


Lightroom and Photoshop include many tools designed to move, remove, or change elements of your photographs.
In this article, I’ll show you how to use Content Aware Fill tools to change or clean up your images. Specifically, I’ll show you how to use the following tools:
- Spot Healing Brush
- Patch tool
- Content-Aware Move tool
- Content-Aware Fill workspace
You can find the first tool, the Spot Healing Brush, in both Lightroom and Photoshop. The Patch, Content-Aware Move, and Content-Aware Fill workspace are only in Photoshop.
Recommended Reading: If you’re interested in improving your post-processing workflow, check out Photzy’s Understanding Masking premium guide. It has sections on Lightroom and Photoshop, as well as Snapseed for mobile users too.
What Is Content-Aware Fill?
Changing or removing an element in your image means that you want to replace some of the pixels. You can’t just remove pixels. If you do that, you’ll have a blank space in the image. You need to replace the pixels with others that make sense.
Ideally, you don’t want your viewer to notice that you’ve changed anything at all!
In the past, you would have to replace each pixel individually. But not anymore. Content-Aware Fill tools use algorithms to choose replacement pixels.
You tell the program what you want to be moved or removed and the algorithm does the rest.
With each version of Lightroom and Photoshop, the algorithms get better and better. The programs still get it wrong at times. I’ll show you what to do if this happens, but more often than not, the programs replace the pixels as if by magic.
Let’s start with the easiest and most useful tool to use: the Spot Healing Brush.
Spot Healing Brush
You can find the Spot Healing Brush both in Lightroom and Photoshop, although the tool icon looks different in the two programs. With this tool, you point to something in your image that you want to remove. The program searches the image to find pixels that might be convincing replacements.
This tool is useful for removing isolated spots or small details. I use this tool for removing dust spots, blemishes in portraits, or small items of trash in landscapes.
Let’s talk about the Lightroom tool first and then move on to the more advanced tool found in Photoshop.
Lightroom Spot Healing Brush
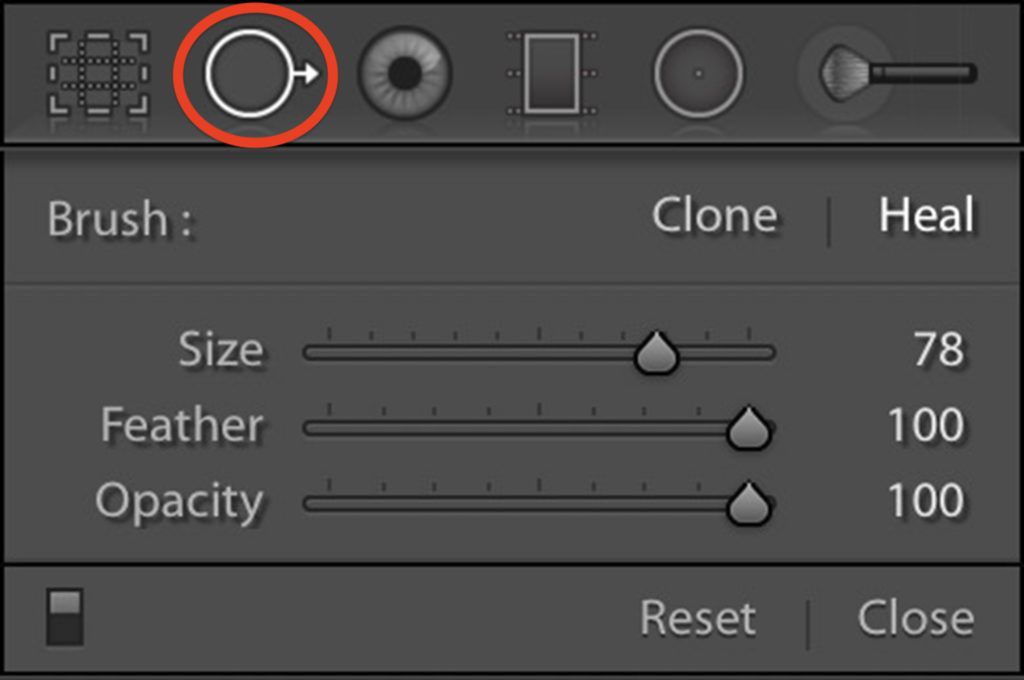
Lightroom screenshot showing the Spot Healing Brush panel. To open the panel, select the Spot Healing Brush icon circled in red. Photograph by Jenn Mishra
In Lightroom, the Spot Healing Brush is located in the Develop Module. Near the top right, select the symbol that looks like a circle with an arrow pointing to the right. This opens the Spot Healing Brush panel.
You have two options: Heal and Clone.
The Clone option copies pixels exactly from another part of the image. The Heal
option blends the new and old pixels for a more seamless fix.
Let me show you how to remove a dust spot using the Spot Healing Brush tool in Lightroom.
In the past, you would have to replace each pixel individually. But not anymore. Content-Aware Fill tools use algorithms to choose replacement pixels.

Photo of the Chicago skyline at sunrise. The red arrow points to a distracting spot created by dust on my camera’s sensor. Photograph by Jenn Mishra
First, select the Spot Healing Brush. You will see a circle with a plus sign in the middle. Size the brush to be a little larger than the spot you are trying to remove. Now, click on the spot. Lightroom selects pixels from another part of the image to replace the spot you clicked.

Lightroom screenshot showing the original spot and where new pixels were selected from. Photograph by Jenn Mishra
Pressing the H key shows you the original spot and where Lightroom selected replacement pixels. Press H again to hide the spot overlay.
Lightroom has chosen replacement pixels for you. If you don’t like the result, you can drag the replacement pixel area to a new spot in your image. Lightroom will sample pixels from the area you’ve chosen.
In the Spot Healing Brush panel, you also have the option to change how much the brush feathers and the opacity. I usually leave these both set to the maximum amount of 100%.
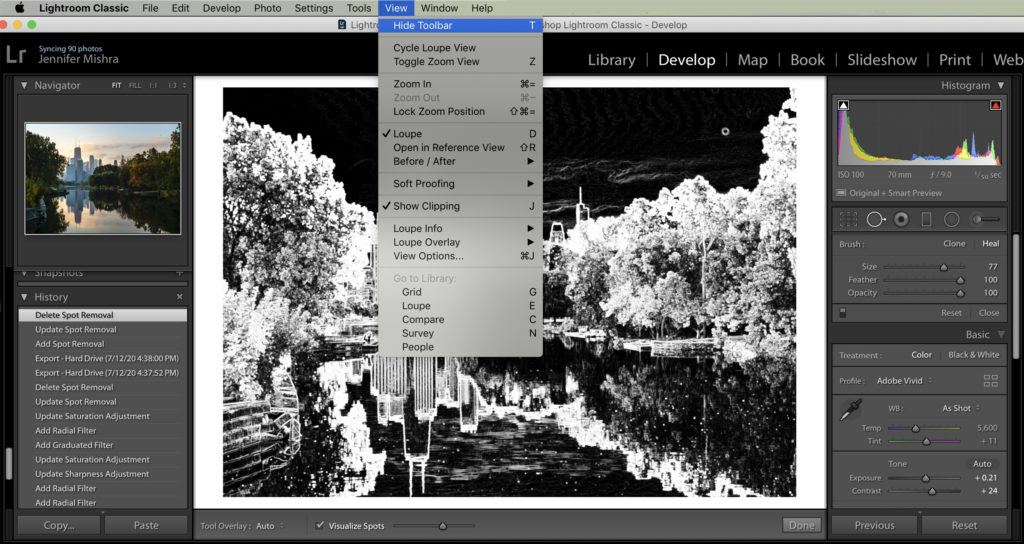
Lightroom screenshot showing how to open the toolbar to better visualize dust spots. Photograph by Jenn Mishra
To help you find spots like these in your image, turn on “Visualize Spots” in the toolbar (image above). Go to View > Show Toolbar (or press T on your keyboard) and click the box. Your screen will switch to inverted black and white, making dust spots easier to see.
Photoshop Spot Healing Brush
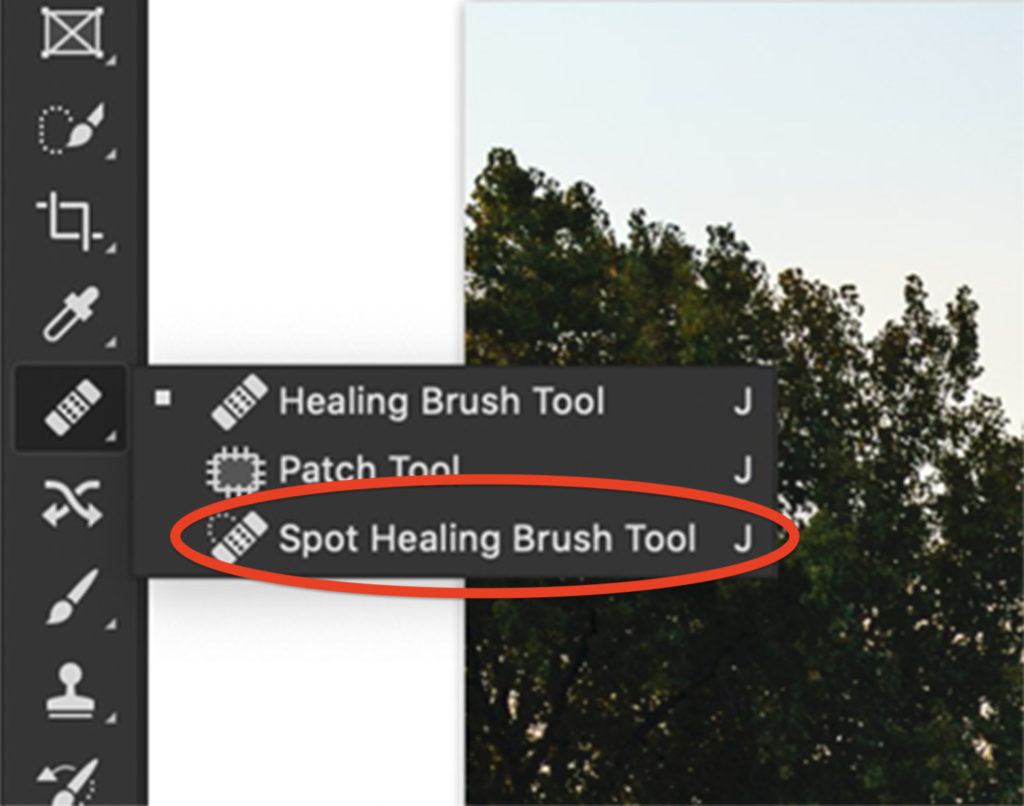
Photoshop screenshot showing the Spot Healing Brush tool. Photograph by Jenn Mishra
The Spot Healing Brush works similarly in Photoshop. This tool looks like a band-aid with a bump.
Select the tool in Photoshop and click on the spot you want to remove. Photoshop selects pixels to replace those you want to be removed. If you don’t like the result, undo the change by selecting Edit > Undo Patch Selection (Ctrl or ⌘Z).
The tool in Photoshop is more advanced than in Lightroom and will handle more complex situations.
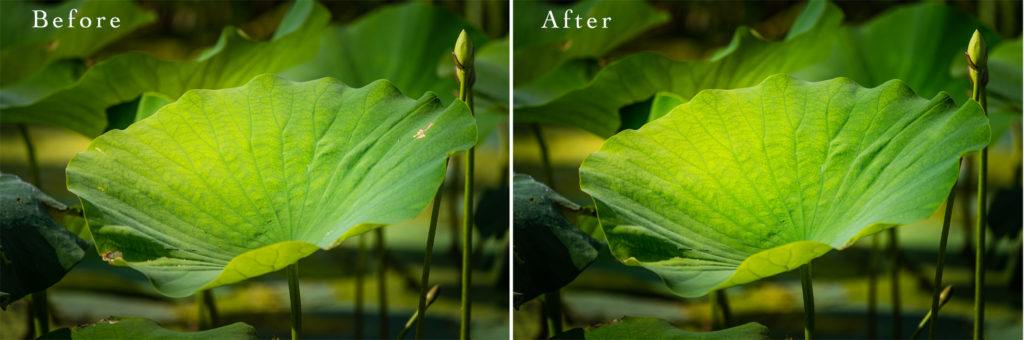
Comparison before (left) and after (right) removing blemishes using the Spot Healing Brush in Photoshop. Photograph by Jenn Mishra
By using the Spot Healing Brush, I was able to remove some of the damaged areas of the waterlily.
If you want to control where Photoshop selects replacement pixels, use the Healing Brush instead of the Spot Healing Brush. This tool looks like a bandaid without the bump. Use the Option key to first select your replacement pixels and then click on the spot you want to be removed.
The Spot Healing Brush is the only Content-Aware Fill tool available in Lightroom. But there are a few more powerful tools in Photoshop.
Patch Tool
The Patch tool in Photoshop allows you to replace larger parts of your image. With this tool, you have some control over the selection of replacement pixels.

Image of Grand Canal in Venice, Italy taken from the Ponte dell’Accademia. The bridge cuts off the bottom-left corner. Photograph by Jenn Mishra
I used the Patch tool to remove a section of the bridge in the lower-left corner of this photo of the Grand Canal in Venice.
Let me show you how to use the Patch tool.
First, select the Patch tool. The Patch tool looks like a rectangle with lines bisecting each edge.
If you want to control where Photoshop selects replacement pixels, use the Healing Brush instead of the Spot Healing Brush.
An Option bar appears on top of your workspace. Make sure “Content-Aware” is selected. You also have “Structure” and “Color” settings. I’ll talk about these in a minute.
Draw around the part of the image you want to remove with the Lasso tool. Marching ants will appear around your selection.
Grab the selection and drag it to an area of your image that contains good replacement pixels. I try to match up to any obvious lines if I can.
Photoshop uses your suggestion to replace pixels in the selected area.
If you don’t like the result, undo the change by selecting Edit > Undo Patch Selection (Ctrl or ⌘Z). Then drag the patch to a different place. Sometimes, it’s best to break more complicated changes down into smaller sections.
You have two more fill settings in the Patch option bar: Structure and Color. The structure tells Photoshop how closely to adhere to the shapes in the new content. 7 means be faithful to the shapes. 1 means loosely interpret the shapes.
Color determines how much color blending you want Photoshop to do. 0 means that you don’t want any color blending. 10 is the maximum.
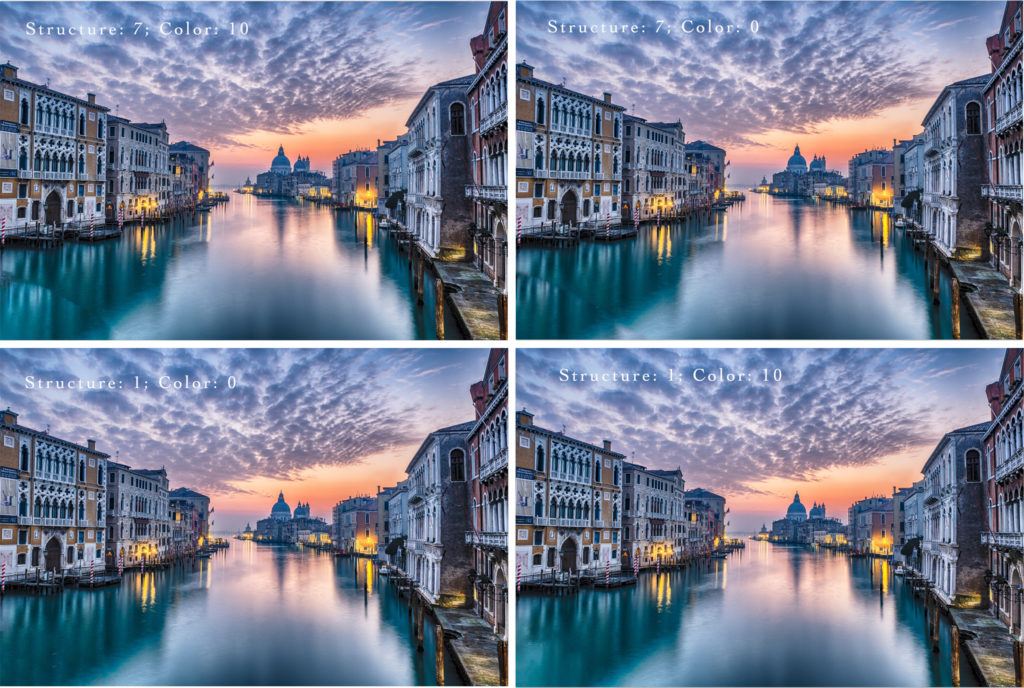
Comparison of Patch tool results using different combinations of Structure and Color. Photograph by Jenn Mishra
In this image, you see the results when I use different combinations of Structure and Color.
For this image, the result was better when I asked Photoshop to loosely interpret shapes.
Recommended Reading: If you’re interested in improving your postprocessing workflow, check out Photzy’s Understanding Masking premium guide. It has sections on Lightroom and Photoshop, as well as Snapseed for mobile users too.
Content-Aware Move Tool
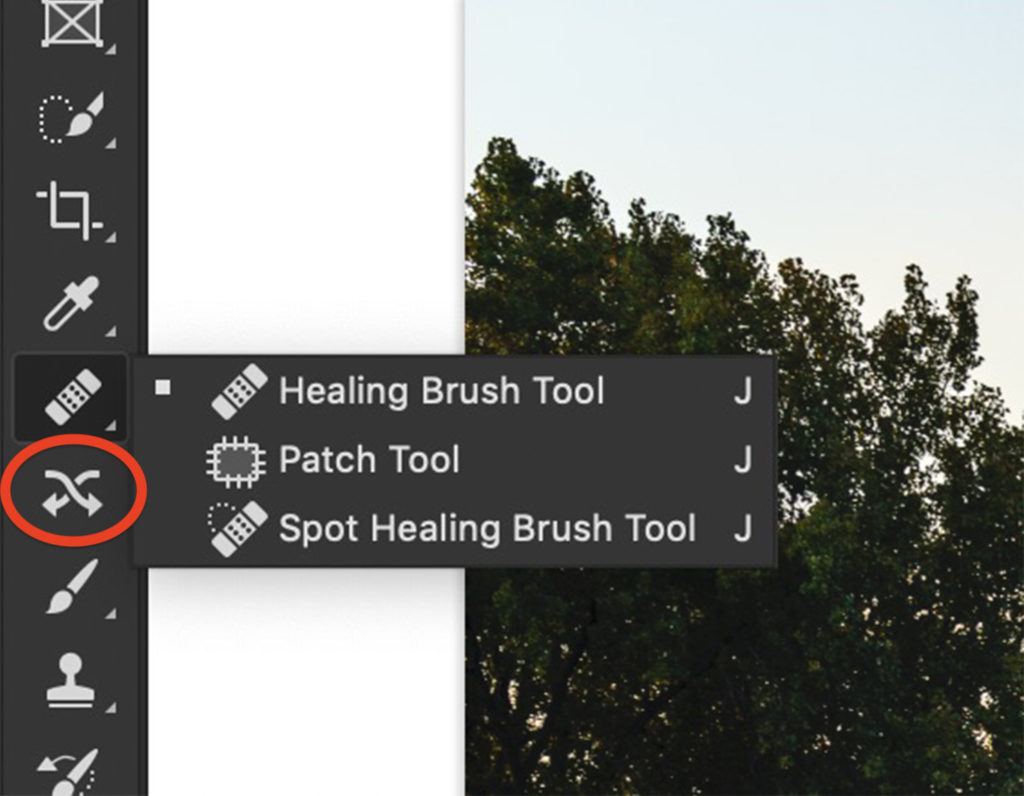
Screenshot of Photoshop showing Content-Aware Move tool icon. Photograph by Jenn Mishra
Photoshop has a tool specifically designed to move something in your image and patch the hole left behind. The Content-Aware Move tool looks like two crossed arrows.

Comparison of before (left) and after (right) images using the Content-Aware Move tool to create more space between people. Photograph by Jenn Mishra
In this image taken in Varanasi, India, I moved a couple of people to add more space.
Let me show you how to use the Content-Aware Move tool.

Photoshop screenshot showing the transform box created by the Content-Aware Move tool. Photograph by Jenn Mishra
Select the tool and draw a loose circle around the person or object you want to move. Then drag your selection to its new position. In my example, I was careful to match up the stripes on the stairs as carefully as I could.
When you let go, a box appears around your selection. This transform box allows you to rotate or size the content to better fit into the new space.
Click Return or the checkmark in the Options bar to accept any changes. Photoshop moves selected pixels and patches the original space.
As with the Patch tool, you have two fill settings: Structure and Color. They work similarly to the Patch tool. A lower number tells Photoshop to be freer in filling in existing shapes and colors. Choosing a higher number tells Photoshop to be more faithful to the surrounding shapes and colors. In my example, setting Structure to 7 and Color to 3 seemed to work.
Content-Aware Fill Tool
The Patch tool is for simple edits where there are obvious replacement pixels in the image. The Content-Aware Fill tool is for more complex edits and gives you more control over the replacement pixels.
There are two versions of the Content-Aware Fill tool: the simpler Content-Aware Fill window and the workspace. I’ll show you both.
Content-Aware Fill Window
The Content-Aware Fill window has been around for a while in Photoshop. If you select an area of your image and press Delete, this window will appear. You can also open this window by selecting Edit > Fill.
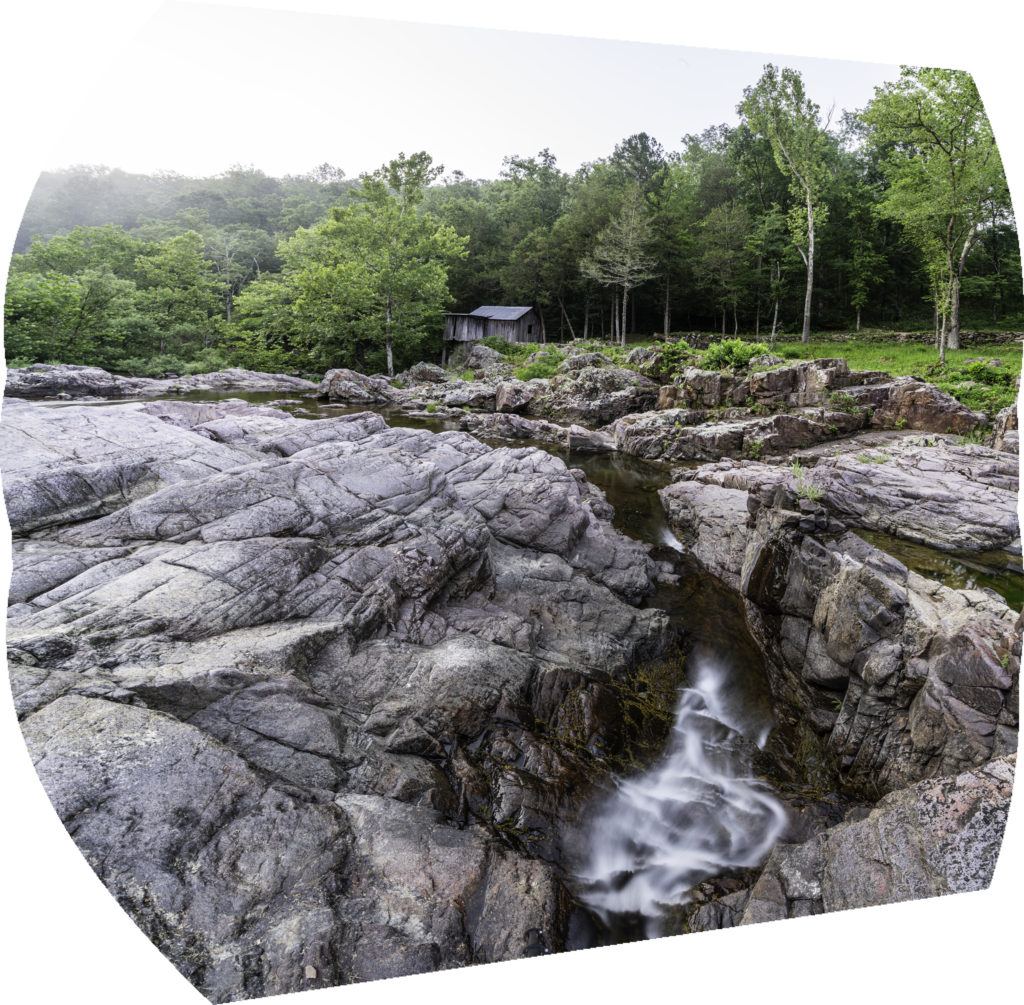
Stitched panorama of a Mill in the Missouri Ozarks. I neglected to check the box for Photoshop to Content-Aware Fill the transparent sections. Photograph by Jenn Mishra
When creating this panorama, I’d neglected to check the box that asked Photoshop to Content-Aware Fill Transparent Areas. The result was large areas of blank space around the panorama. Rather than re-stitching the panorama, I used Content-Aware Fill.
Let me show you how to use this tool.

Screenshot of Photoshop workspace showing how to access the Content-Aware Fill window. Photograph by Jenn Mishra
Select the area you want to change using either the Lasso or the Quick Selection
tool (image above). From the menus select Edit > Fill. In the window that opens, make sure
Content-Aware is selected.
Click OK and Photoshop will replace the selected area with new content.

The result of using Content-Aware Fill in Photoshop to fill in the missing section of the Ozark mill photo. Photograph by Jenn Mishra
In my example, Photoshop did a good job of selecting rock texture that fills in the space. But there is distracting repetition in the pattern. I will need to remove the repetitive pattern using the Spot Healing Brush or Patch tool.

Final version of the Ozark mill image with the blank spaces filled in using the Content-Aware Fill tool. Photograph by Jenn Mishra
This photo above is my final image with the blank spots filled in.
Content-Aware Fill Workspace
In the 2019 upgrade to Photoshop, Adobe added a new Content-Aware Fill workspace. This gives you a lot of control over how to replace pixels in your image.
To open the workspace, go to Edit > Content-Aware Fill. If the selection is grayed out, first select something you want to be removed from your image.

Screenshot of Photoshop showing how to open Content-Aware Fill workspace. Photograph by Jenn Mishra
I’m going to use the Content-Aware workspace to remove the cypress trees in the background of this image. Let me show you the Content-Aware Fill workspace.

Screenshot showing Content-Aware Fill workspace in Photoshop. Photograph by Jenn Mishra
There are three sections to the workspace.
The middle panel is your image. Photoshop has already applied a preview of the Content-Aware Fill. It’s doing a good job of automatically selecting pixels to fill in for the dead trees.
The far-left panel, covered by a green overlay, highlights Photoshop’s sampling area. This is where Photoshop is searching to find replacement pixels.
Refining the sampling area will give you better results. Do this by using the sampling brush tool in the top Options bar. The plus will add to the green overlay; the minus will remove the green overlay. As you change the sampling area, Photoshop updates the preview.
Refining the sampling area may make the fill better or worse. You can always undo the changes and make new selections. You also have a toolbar on the far left that includes a sampling brush tool, a lasso tool, a hand tool, and a zoom tool.
The far-right panel gives you additional options. By default, Photoshop automatically selects the sampling area. But you can control the choice. Select Rectangular if you want Photoshop to choose from the pixels directly around your selection. Select Custom to completely control the sampling area.
In a more complex image, you may want to increase the color adaptation. You have a choice of none, default, high, and very high.
If your selection is on an angle, you can apply a rotation adaptation. You have a choice of none, low, medium, high, and full. You also have the option to scale the image or mirror.
When you’re happy with changes in the Preview panel, click OK. By default, the selected area with the Content-Aware Fill changes is saved on a new layer.
In the 2019 upgrade to Photoshop, Adobe added a new Content-Aware Fill workspace. This gives you a lot of control over how to replace pixels in your image.
After some minor cleanup work with the Spot Healing Brush and the Patch tool, here is my final image:

Final image of Cypress trees with the background trees removed using Content-Aware Fill. Photograph by Jenn Mishra
Recommended Reading: If you’re interested in improving your post-processing workflow, check out Photzy’s Understanding Masking premium guide. It has sections on Lightroom and Photoshop, as well as Snapseed for mobile users too.
Conclusion

Photograph by Jenn Mishra
Between Photoshop and Lightroom, you have many Content-Aware Fill tools to choose from:
- The Spot Healing Brush allows you to delete minor imperfections in your image.
- The Patch tool allows you to select an object and choose pixels to put in its place.
- The Content-Aware Move tool lets you move a selected object. It integrates the object into its new home and patches the space left behind.
- The Content-Aware Fill workspace gives you the most control of the sampling area. This Photoshop fill tool is more subtle and sensitive than the Patch tool.
Content-Aware Fill technology has improved a lot over the years, but it’s not foolproof. You may need to use a combination of these tools to get the effect that you want.
Post-Processing programs have made it easy to move or remove objects from your image. Content-Aware Fill uses AI technology to select and blend the best replacement pixels. As if by magic, you can make objects or people disappear from your image!
Self-Check Quiz:
- What do Content-Aware Fill tools do?
- Which Content-Aware Fill tools are available in Lightroom? Which are available in Photoshop?
- Which is the best tool for removing dust spots in your image?
- What is the difference between the Patch and Move tools?
- What is the difference between the Spot Healing Brush and the Healing Brush?
- In the Patch Tool toolbar, what does the Structure slider do?
- In the Content-Aware Fill workspace, what does the green overlay in the far-left panel designate?
- What tool is identified by the symbol of two crossed arrows?
Editing Assignment:
- Select an image from your catalog that includes an element that you want to remove. Try each of the Content-Aware Fill tools described in this guide and compare the results.
- Make a copy of your image in Lightroom by going to Photo > Create Virtual Copy. Use the Spot Healing Brush to remove the element from your image. You can try both the Heal and Clone options.
- Open your original image in Photoshop. Make a copy or copy the image onto a new layer (Ctrl or ⌘J). Use the Spot Healing Brush to remove the element from your image. Notice the difference between the Lightroom and Photoshop results.
- Make another copy of your original image and use the Patch Tool. Draw a lasso around the element you want to remove. Then drag your selection to different areas of your image. Notice how the fill area changes depending on where you move the patch.
- Make another copy of your original image and use the Content-Aware Fill window. Draw a lasso around the element you want to remove. Select Edit > Fill.
- Finally, draw a lasso around the element you want to remove and select Edit > Content-Aware Fill to open the Content-Aware Fill workspace. Use the plus and minus symbols in the upper left-hand corner to paint on or remove the green overlay in the left panel. Notice how the fill area changes.


