

I confess! I love camera automation. I love autofocus. I love aperture priority. I love auto white balance. I love auto ISO.
I didn’t love automation when it first began to appear in film cameras long ago. Much of the earliest technology wasn’t very good. It was slow and inaccurate and missed as often as it hit, but the thing about technology is that it improves over time.
With automation as good as it now is, even in the simplest cameras, why do we even want to use manual mode? Modern cameras are engineered to be used in any of several auto modes; many, if not most, really aren’t very manual-mode friendly. Some cameras don’t offer any manual control at all.
And why should they? Why not just put the dial on the little full-auto icon and let it make all the decisions, like a smartphone? We know we will get a very high percentage of keepers in full auto, so why in the world would we subject ourselves to the pain and suffering of taking over ourselves?
Because your camera’s automation is dumb, and you are not.
Photographers who have totally relied only on full automation will not have a good grasp of what the automation does and why it does it. It pays to learn how to get your camera into manual and use it that way. Don’t wait until you desperately need it; practice it now so it’s there for you then. The payoff will be better pictures and understanding how to finesse the automation so it does exactly what you want, when you want it. I take over 90% of my pictures using various combinations of auto, but I know exactly what I want and how to make the camera do it. You can, too.
- What do you do if your automation fails? Autofocus, in particular, is easily fooled into sharply focusing on the nearby garbage can instead of the subject 20 feet away.
- What do you do when you know exactly what you want, but the camera refuses to deliver it because it “thinks” it knows better, and you can’t figure out how to override it in any of the many auto modes?
It pays to learn how to get your camera into manual and use it that way. Don’t wait until you desperately need it; practice it now so it’s there for you then.
In this short article, I do not plan to discuss the whys of going manual; only the hows. There are times when the only way to make the camera do what you want it to do is to take partial or even full manual control. Because many modern cameras come with fewer and fewer dials and wheels, to take control you need to know how to do it on your particular camera because they are all different, even within the same brand. Many, if not most cameras today, use MENUS to get you where you want to be.
Here are the main points we’ll hit:
- How do I even get the thing into manual?
- Setting the ISO
- Setting the shutter speed
- Setting the aperture (f/stop)
- Manual focusing
How Do I Even Get the Thing Into Manual?
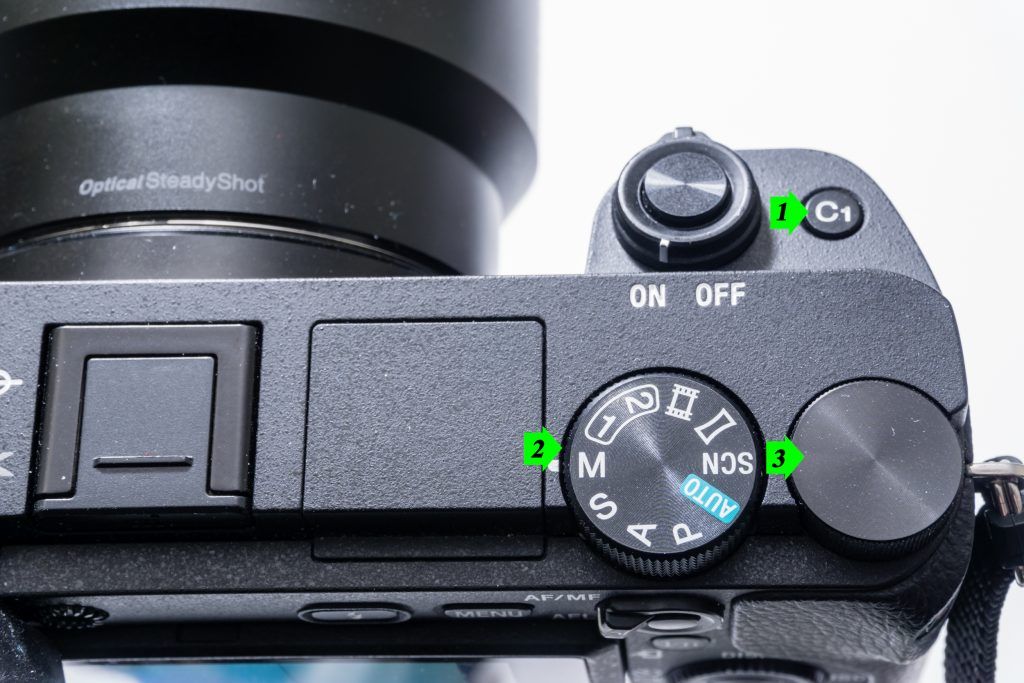
Photo by Charles Haacker
Every camera is different, and I do not know every camera. I use a mirrorless Sony A6300, so I will show you where its controls are and how they are used, so you at least know what to look for on your camera. Never forget the old adage: READ THE MANUAL! (The, um, paper thingy that came in the box, not the same as manual control (silly English).)
The Sony A6x00s have a bit of a reputation for being overengineered to the point of confusion; I cannot disagree. The word I often hear is ‘byzantine.’
My Sony A6300 camera is currently set in Manual Mode (M) on the MODE Dial (number 2). On any camera I know, M stands for Manual. When you dial up M, you are in full control of the exposure. Manual focus may require a separate action.
Number 3 is the command dial, used for changing settings when in manual mode.
Number 1 is a user-customizable, programmable button, not relevant to this discussion.
Key Lesson: Most cameras have a MODE dial or a menu item to select the mode. I’m sure M means Manual on all of them. If there is no M, your camera does not offer manual control.
Recommended Reading: Want a step-bystep guide on photography skills with your DSLR? Grab a copy of our best-selling guide: the DSLR Crash Course.
Setting the ISO
ISO doesn’t have to be set first, but I usually do it because in film days, it was dictated by the film itself. When you loaded a fresh roll, you’d get the ISO (ASA) from the box and set it on the camera. ISO is a number that expresses the “speed” or sensitivity to light of your sensor/film. In film it was fixed; once you made an exposure at a set ISO you had to shoot the whole roll at that number. Digital lets you change it from frame to frame, if you want. That’s one of the many paradigm shifts that digital gave us that is incredibly freeing.
ISO doesn’t have to be set first, but I usually do it because in film days, it was dictated by the film itself.
The higher the ISO number, the greater the sensitivity to light. Every time the number doubles, the sensitivity doubles: 100 is twice as “fast” as 50; 400 is 4X as “fast” as 100. We often express the changes in terms of “stops” or EV (Exposure Values). As a general rule, lower ISOs are sharper and less likely to show “noise” (digital grain), but higher ISOs are useful when taking pictures in low light.
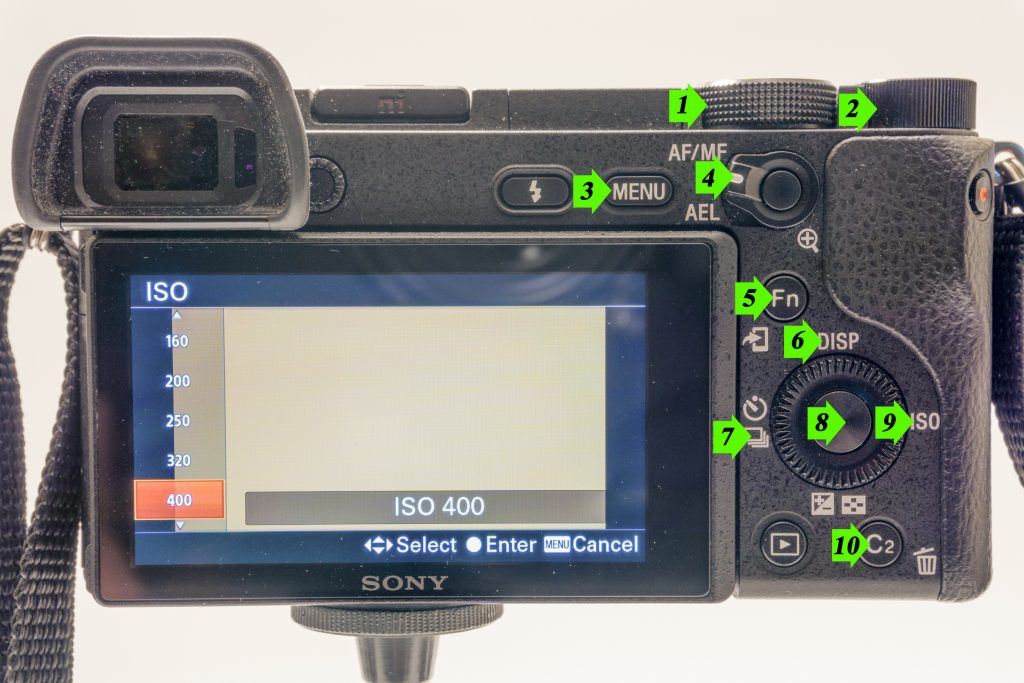
Photo by Charles Haacker
In this image we see the back of my Sony A6300. These cameras are “pro-consumer” and marvelously sophisticated. So is a Boeing 747. I can’t fly a 747, but I can mostly fly my cameras. In any combination of auto modes, they make it beyond easy, but Manual can be challenging. Even something as “simple” as setting an ISO number needs preparation.
- Mode dial, currently set on M-Manual
- Command dial, shares some functions with the MultiFunction Control Wheel (8)
- Menu access button
- User-programmable switch and button
- User-programmable function button, a handy shortcut
5.1. I keep my 10 most-used menu items here for quick access

The Multi-Function Control Wheel (Number 8) is also a rocker switch (6, 7, 8, and 9 refer to that function):
- Control wheel TOP: push down here to change the display
- Control wheel LEFT: push down here to select the frame rate, from single to selectable burst rates
- Control wheel CENTER: push this button to enter/ confirm a command
- Control wheel RIGHT: push down here for the ISO menu
- Another user-programmable button (useful for shortcuts)
I leave my Multi-Function wheel at factory defaults because that works for me, but it is entirely reprogrammable if I choose. I bet that’s true of your camera, too.
Here (image above), I have pushed down on the right side of the wheel/rocker switch at number 9; that brought up the ISO menu on the left side of the screen, where you see some of my choices. Right now, it’s set to ISO 400, which is a good general-purpose speed – not too slow nor too fast, and on my camera not “noisy.” I can scroll by turning the wheel to lower, slower numbers that are generally better quality, but if I need lots of speed for action stopping, I can scroll down to faster and faster ISOs, but there may be a quality trade-off. Once I make my choice, I push the center button (8) to lock it in.
Key Lesson: On this camera, the ISO is set using the Multi-Function Control Wheel to first open the menu, then scroll through the choices, then confirm and lock in an ISO. Auto ISO is one of the options.
Setting the Shutter Speed
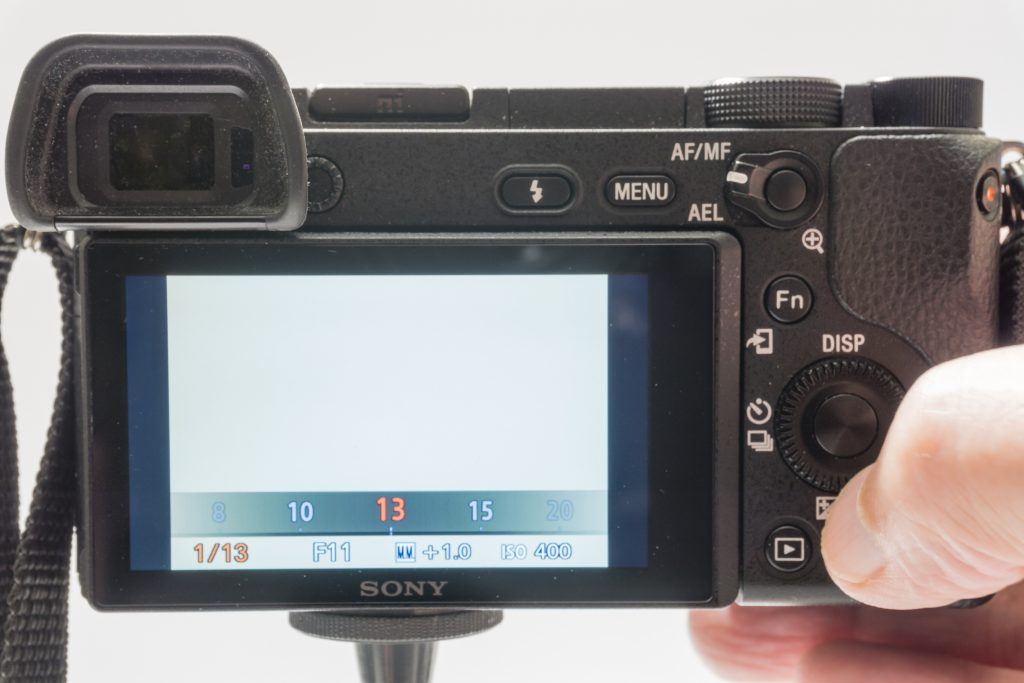
Photo by Charles Haacker
My camera, which is already set to M-Manual (on that top Mode Dial), automatically shows the two bars at the bottom of the display that you see here. If I were to look in my EVF (Electronic Viewfinder) I would see the same thing, magnified and visible even in the brightest sun.
In this picture I am manually adjusting the shutter speed. A quirk of my Sony A6x00s is that, in manual, rotating the control wheel (see my thumb?) changes only the shutter speed. Here it is presently at 1/13 of a second, as you see on the strip and on the left side of the lower band. You can also see that the aperture (f/stop) is currently at f/11. Over on the right you can see the ISO is fixed at 400 because I already set and locked it earlier. Rotating the wheel changes only the shutter speed in this mode; all the other settings are undisturbed.

Photo by Charles Haacker
I am changing the shutter from the previous 1/13 of a second to 1/6 of a second (a longer time) by turning the control wheel with my thumb. Coincidentally, that +2.0 you see on the lower band tells me that the camera’s matrix meter senses currently two stops (EV) of overexposure because it’s pointed at a white background.
Key Lesson: On this specific camera, in manual mode, changing the shutter speed can only be done by rotating the Multi-Function Control Wheel. Another camera is apt to do something completely differently. Read your manual (really).
Recommended Reading: Want a step-by-step guide on photography skills with your DSLR? Grab a copy of our best-selling guide: the DSLR Crash Course.
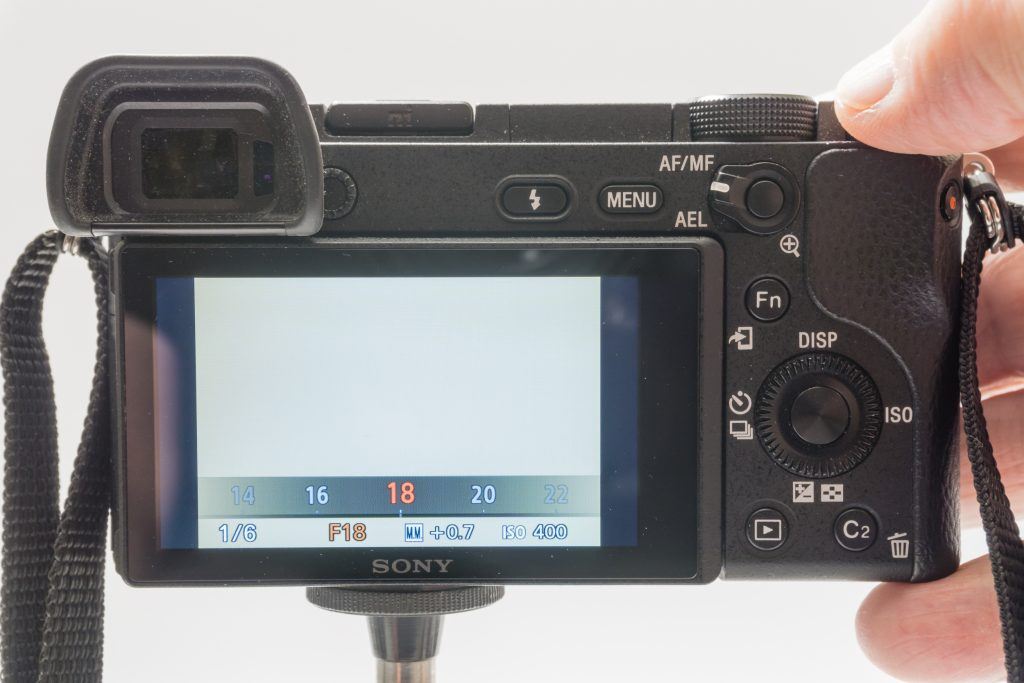
Photo by Charles Haacker
Now I am manually adjusting the aperture, also called the f/stop. On this quirky machine, the control dial on the top deck (where my thumb is) changes the aperture. The orange color shows the aperture is currently set at f/18. I am changing it to a smaller aperture from f/11. Counterintuitively, the higher the number of the f/stop, the smaller the aperture (the hole which lets light into the camera). The smaller the hole, the greater the depth of field.
The bottom band shows 1/6 of a second on the left. You can see that the exposure indicator has dropped to +0.7 EV because I am “stopping down” and letting in less light.
Key Lesson: On this camera, in manual mode, changing the aperture can only be done by rotating the control dial on top. Another camera is apt to do something completely differently. Read your manual.
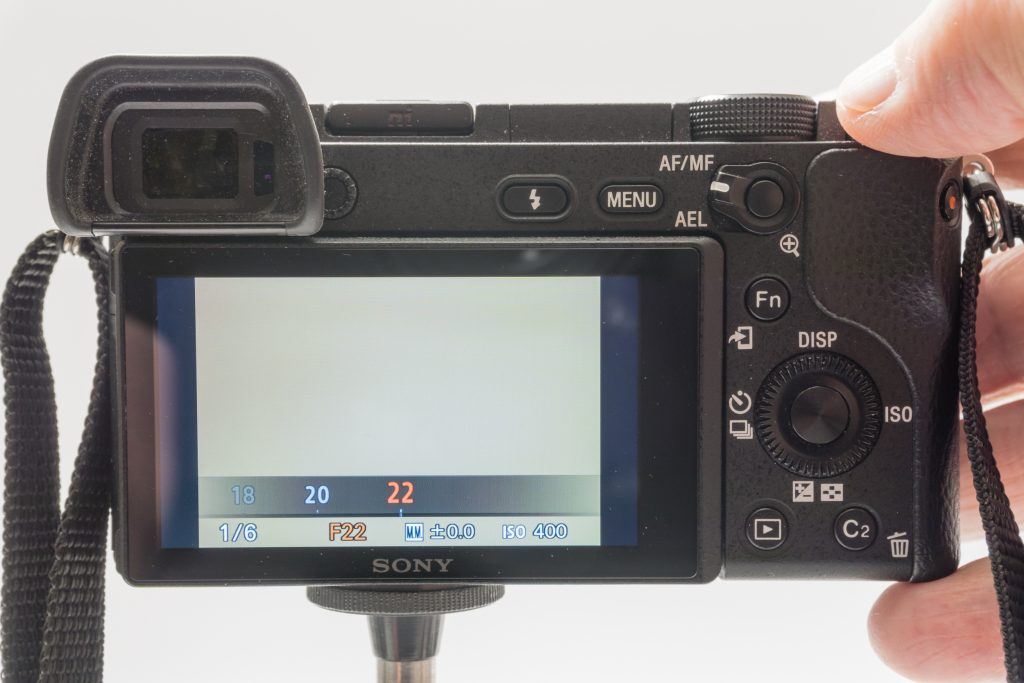
Photo by Charles Haacker
Now I have twiddled the dial to “stop this lens down” to its smallest “hole” (aperture), f/22. It’s still at 1/6 second, ISO 400, and the exposure indicator indicates what it thinks is “correct” exposure: +/- 0.0. (It’s not correct, but that’s a subject for a different guide.)
Now you know how to adjust the fundamental exposure triad: ISO, shutter speed, and aperture. Doing so in manual mode gives you total control of the camera. Its automation is disabled. You lock in the settings the way you want them, and they will not move until you change them.
Key Lesson: Learning to work your camera manually takes the control away from the algorithms and gives it back to you.
Manual Focusing

Modern autofocus is so good that you have to wonder why anyone would ever need manual focus. I considered the earliest autofocus lenses to be slow and clumsy, more apt to miss the focus than not. Today that is so not true! My eyesight is not what it once was, so autofocus is an advantageous blessing to me.
Modern autofocus is so good that you have to wonder why anyone would ever need manual focus.
Nevertheless, here is an example of why you need to know how to manually focus your camera. Typically, wide autofocus defaults to finding the object nearest the camera. Out for a walk in the spring, my eye rested on the tangle of bare branches nearest to me. I was relying on that fact when I brought the camera up, but the autofocus was much more attracted to the scene beyond – the spring green and redbud. I even tried one of the finely honed single-spot focus points, but it still kept slipping off the branches. The not-frustrating real-simple solution was to switch into manual focus.
Key Lesson: I like to say, “Ya’ do what works.” There will be times when the only practical way to get the picture you envision is to put the camera into manual mode. Practice it often so you aren’t stymied having forgotten how.
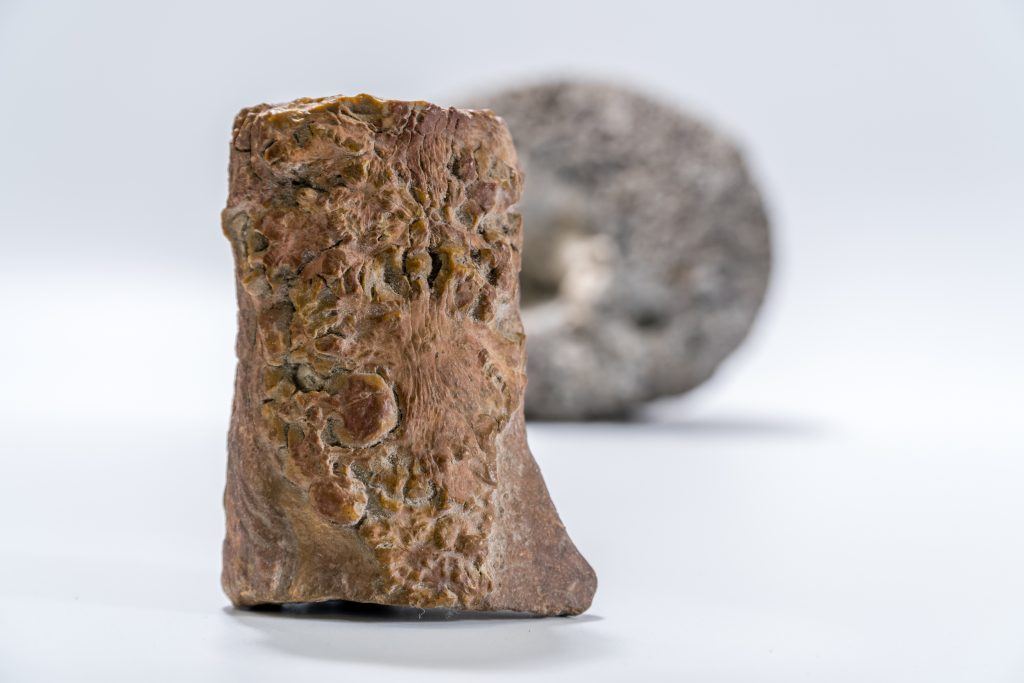
Photo by Charles Haacker
As I said at the beginning, many, if not most, digital cameras really aren’t all that manualfriendly, and that applies to manual focus as well. I have never used any DSLR, but I believe that mirrorless ILCs have some advantages, mainly due to focusing aids that DSLRs lack. Almost all MILCs have focus magnifiers that zoom in the focus so you can see it clearly. Many (including mine) also have a tool called focus peaking.
Getting your camera into manual focus may be as simple as turning a knob or flipping a switch. On my byzantine Sony it is a menu item, but I have it programmed into a shortcut to make it easy to access. (We’re back to “reading the manual” for your camera.)
This picture of a fossilized bone and a brain coral was set up to illustrate the use of the focus magnifier and peaking features on my Sony A6300s. As far as I know, DSLRs do not have those features; you just rotate the focusing ring until the image appears sharp. The film SLRs I used had as many as three concurrent focusing aids: a groundglass, a split-prism, and sometimes a microprism as well. But my understanding is that modern DSLRs have dispensed with all but the simple groundglass because the autofocus is nearly foolproof. Nearly…
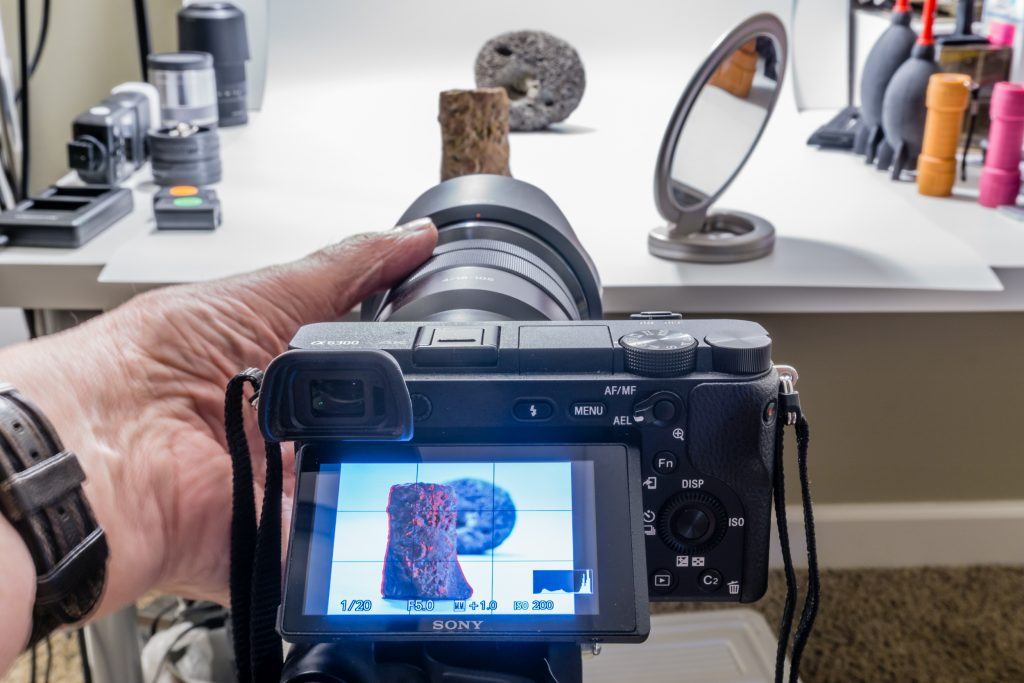
Photo by Charles Haacker
Here’s the setup (the mirror redirects light onto the bone in the foreground). To focus manually, I rotate the focusing ring on the lens barrel. On the LCD display, notice the little red speckles on the bone nearest the lens.

Photo by Charles Haacker
See the red speckles? That is the focus-peaking feature turned on. The red (or white or yellow, your choice) shows texture that is in critically sharp focus. I shot this at f/5.0, a wide aperture with little depth of field so the further object would fall well out of focus. Usually I would stop down.

Photo by Charles Haacker
In addition to focus peaking, I have the manual focus magnifier turned on. It defaults to 6X but can be increased. For this exercise I have both the magnifier and peaking turned on. The peaking is especially useful in this case, since I am focusing using the rear screen rather than in the viewfinder. It’s nice insurance that the camera is truly accurately focused.
Key Lesson: Mirrorless cameras may have a slight advantage in manual focusing owing to onboard focusing aids like magnification and focus peaking.
Recommended Reading: Want a step-by-step guide on photography skills with your DSLR? Grab a copy of our best-selling guide: the DSLR Crash Course.

Photo by Charles Haacker
Now I have shifted the focus to the big brain coral in the rear of the set. At f/5.0 the bone goes to mush, but the coral is satisfyingly sharp.


Photos by Charles Haacker
On the screen the coral looks like a donut with red sprinkles. There is rich texture, so the peaking aid really lights up.
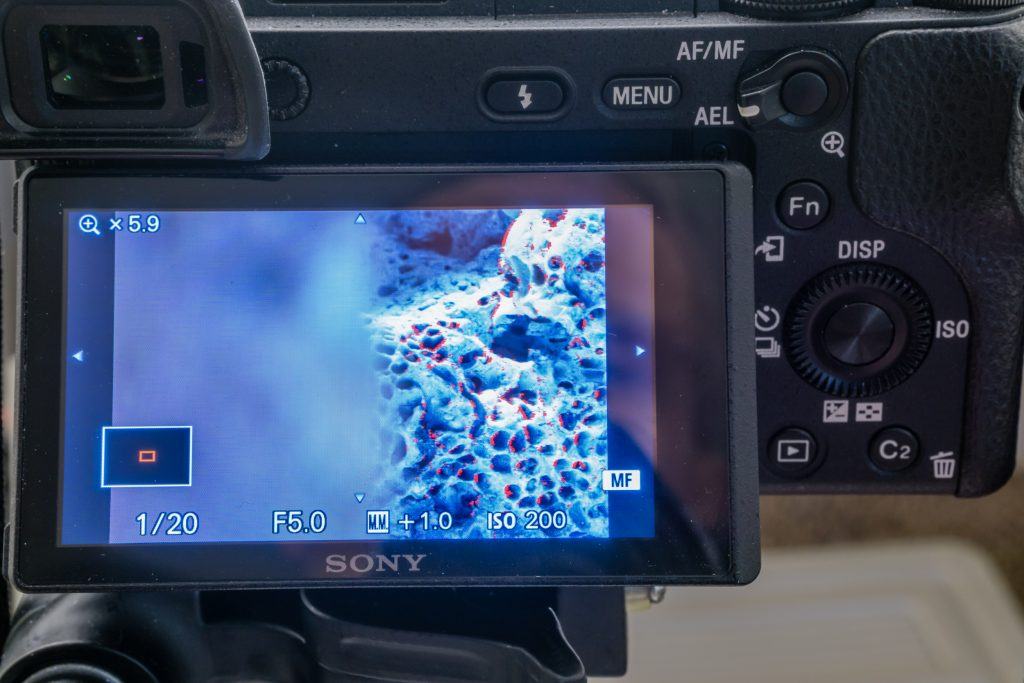
Photo by Charles Haacker
Here’s what it looks like with the focus magnifier on. You can still see red speckles. At a nearly-wide-open f/5.0, the foreground bone is hardly there.

Photo by Charles Haacker
Just for fun I took the two shots and combined them using post-processing software. It was a little mushy at the transition; it would have been better if I’d shot it at f/16-ish.
So finally, why manual? Manual doesn’t “drift.” Once in manual, settings are locked in until you change them. The camera doesn’t surprise you with unexpected changes.
- Manual exposure is fixed no matter what the light does, or the reflectance of your subject.
- Set your ISO manually and it stays where you put it.
- Set your shutter manually and it stays where you put it.
- Set your aperture manually and it stays where you put it.
- Set your focus manually and it stays where you put it.

Photo by Charles Haacker
- All of this is exceptionally useful in a static studio shoot.
- If the light and subject do not change, you will have an easier time editing because everything matches.
I was trained on and worked entirely with 100% manual everything well into the mid-1990s. I could and did work any camera, any format, as easily as breathing. I literally did not need to think about it as, through constant immersion, my cameras had become extensions of my hand, eye, and brain. We were the automation. When any photographer reaches that level of photographic nirvana, actual automation is the absolute nuts, a gift, because we understand how it works, but that’s because we learned in manual. You don’t have to, but I recommend it as it can really pay off in expanding your skillset.
Self-Check Quiz:
- True or False: Modern digital cameras are engineered to be easily worked in manual mode.
- True or False: Knowing how to work a camera manually can save a shoot.
- True or False: A camera in full manual can sometimes “drift” away from your settings.
- True or False: Working a camera manually can help your creativity.
Assignment:
Take your camera out in daylight with a favorite lens on it and very deliberately try to operate it entirely manually. Set a good general-purpose ISO; say, 200 or 400. If your subject is not moving, try a smaller aperture, f/11 or so. Focus manually. Look at the camera’s light meter, displayed on the screen or in the viewfinder. Many, if not most, are “null” meters; you adjust the shutter speed until the meter “nulls” or zeroes out, indicating a correct exposure. Take the picture. Now check it. Is the exposure correct? That’s a big first step! Keep doing it. Don’t delete in the camera; bring it all back, upload, and study it. Learn things!


