

Dealing with mixed lighting is a challenge for any photographer even the professionals. A question some of you may be asking is, “What exactly do you mean by mixed lighting?”
In this case, we’re not talking about the “quality” of the light (soft, hard, wide, spot, etc.); we’re talking about the “color temperature” of the light.
This photograph depicts many different light sources. It is a “mixed light source” photograph. Each light source has a specific color temperature. The setting sun is red, the open shade and shadows are blue, the sodium vapor lighting is orange, the fluorescent lighting is green, and the interior incandescent lights are yellow.
For those of you that are new to photography, let’s cover a few basics about light and color temperature.

Photo by Ed Yourdon
"All light has a temperature and that temperature emits a certain color. That color is going to affect your photographs."
Photo by John Benson
As a photographer, this is a perfect example of something you might be confronted with. This scene (above) has three different light sources. Can you identify them?
- The blue light of post-sunset is coming through the large windows.
- The interior incandescent lighting is very yellow.
- Finally, the light on the video camera is producing light slightly warmer than daylight.
In this example, the photographer chose to go with a daylight color balance and let the other light source colors fall where they may. Could the photographer have done anything to balance the color sources? It would have been difficult in this setting. They could have utilized a flash, which would have over-powered all the other light sources. However, that would have removed the “mood” of the scene.
One concept that you must grasp is that a light source can change in color depending on conditions that affect the light waves.
Here are three examples of photographic situations where color temperature is an important consideration.
- The light from the sun changes in color temperature as the sun progresses across the sky. When it is low to the horizon, such as sunrise or sunset, the atmosphere filters the light, which gives it a warm glow. In the middle of the day the light from the sun becomes much bluer. If you wanted to shoot an outdoor portrait with nice warm skin tones- would you do it at 1 p.m. in the afternoon?
- You are going to create a bridal portrait of a young bride as she sits in front of a mirror combing her hair. There isn’t much light, so you’re going to use your portable flash (which has a 5500K daylight balance). You decide to bounce the light off a nearby wall so that the direction of the light is coming from in front of the bride, not behind her. The wall is covered with lime green wallpaper. Do you think this is a good idea? No, it really isn’t. Light waves are affected by the color of an object they bounce off of. The light approaching the wall is a daylight color temperature. But the green wallpaper is going to absorb most of the other colors of the spectrum and only emit green light waves when they bounce off. This is why green wallpaper appears green to our eyes.
- You’re setting up a still life photograph. You’re working with a flash that is 5500K daylight color balanced. However, you wish to make the background a vibrant blue.You begin with a room that is dark, so there is no light (color temperature) affecting anything in your photograph. You put a deep blue gel (9000K) on the flash that’s going to hit the background: so far so good. Then, you set up another flash in an umbrella that is going to bathe the entire set in soft daylight (5500K) balanced light. Are you going to get your deep blue background? No, you won’t. Have you ever dropped different shades of food coloring into water? They start out as distinctly different colors. But as the water swirls around they begin to mix and become a completely new color. Light works the same way. If you set up three lights with three different colored gels, wherever those lights intersect, the color temperature is going to be affected and a new color temperature will be created. The reason you didn’t get your vibrant blue background is because the umbrella light washed the entire scene with white (5500K) light. The white light diluted the blue light by adding back all the other color temperatures of the spectrum.

Photo by srslyguys
This image was lit with two colored gels: a cyan one on the background and a magenta one on the body.
Only through careful placement are the two colors distinct. If the light coming from these two sources had touched each other, it would have created a third color. If white (5500K) light touched either the body or the background it would have reverted them back to their natural color.
Color temperature is measured in a scale called Kelvin.
The Kelvin temperature scale starts at Absolute Zero and goes up. For the purposes of photography, the light sources that you will be concerned with fall in the range of 1000K to 10,000K. A light source that is closer to 1000K (such as a candle) will be very warm (orange-yellow spectrum).
Conversely, a light source that is closer to 10,000K (such as the midday sun) will be very cold (blue-cyan spectrum).

Photo by Maarten Takens
This post-sunset landscape has “mixed lighting”. The sky (that is still lit by the setting sun) is in the warm spectrum.
The valley (which is no longer illuminated by the sun) is the equivalent of an open shade light source. The camera was set to daylight (5500K) WB. That WB setting let the valley turn blue, as open shade is approximately 7500K.
The sky turned red-orange, as the light emitted by a setting sun is closer to 3000K. The photographer chose to set WB at 5500K and let the valley turn blue for creative purposes. But what if they didn’t want that color shift in the valley? What could they have done? They could have set their camera to a white balance (WB) of “shade”, or “overcast”, or a “manual Kelvin setting”, or a “custom WB”. This would have pulled the blue tone out of the landscape.
Now- not to confuse you, but there is one other aspect of light, color temperature, and photography that you need to be aware of.
The Kelvin rating system was established long ago when artificial light was based on incandescent technology. Many light sources today no longer use that technology.
"If you set up three lights with three different colored gels, wherever those lights intersect, the color temperature is going to be affected and a new color temperature will be created."
A standard fluorescent light bulb has a color temperature of approximately 4500K. This would indicate that the light emitted from this source should be relatively close to 5500K daylight, and thus rendered accurately with a camera- right?
Wrong! Certain types of light sources including fluorescent, sodium vapor, and metal halide use gasses to create light. It’s a different technology that creates a colorcast when recorded by film or a digital sensor.
These types of light sources have what is called a CRI (correlated color temperature) rating. This scale is from 1 – 100. The closer to 100 your light source is, the truer the color temperature will be when recorded by a camera. Therefore, even though a fluorescent light source might have a Kelvin rating of 4500K, it will produce a green colorcast in a photograph.
Unless- the source has a high CRI rating. Many fluorescent bulbs are now coated to give a 5500K-daylight balance.
All of this is to give you some background. You need to understand what you’re dealing with when photographing under mixed light sources.
How do you deal with mixed light sources?
You have five options.
- You can eliminate a light source. (Turn it off or cover it up.)
- You can add a light source. (Overpower an existing light source with a flash unit.)
- You can alter a light source. (Use correction gels to change the color temperature.)
- You can alter how your camera perceives a light source. (Change WB or add a correction gel on the lens.)
- You can do nothing and let the color temperatures shift for creative purposes.
What are the color temperatures of some standard light sources, and what color shift might you see if your camera is set to daylight?
• Sodium Vapor—2,500° K (deep orange)
• Incandescent—3,000° K (orange to yellow)
• LED—3,000° K (yellow to white depending on CRI)
• Tungsten—3,400° K (amber to yellow)
• Fluorescent—4,200° K (green to white depending on CRI)
• Direct Sunlight—5,200° K (approximate)
• Flash—5,400° K (approximate)
• Cloudy—6,000° K (cyan to blue)
• Shade—8,000° K (blue)
Photo by David Woo
Some of you might ask, “Why can’t we just fix the color in post-production?”
The answer is- you might be able to, but it would be difficult.
With mixed light sources you can’t do a global color correction because all of the color would shift.
This means you would have to selectively alter the color balance in various parts of the photograph: not an easy task. In fact, it is often difficult to achieve a pleasing color balance (when an image is shot incorrectly) even when lit from a single light source.
A camera that is set to daylight white balance(color temperature), and used indoors, will often create images in the yellow-orange spectrum.
Attempting to correct an image that is shot with the wrong color balance will almost always look pretty funky; especially if there are people in the photograph.
Photo by Thomas Brasington
1. Eliminate a light source
The photographer had a portable flash (image above), which they bounced off of a nearby wall. The ambient light in the room was most likely incandescent. This was a mixed light situation.
The photographer chose to “eliminate” a light source by not slowing the shutter speed down (or raising the ISO up) far enough for the ambient light to expose the background. If they had, the background would have recorded in the yellow spectrum.
So- is this a better photograph by eliminating the background light source? Not really, as the dark background is distracting. Could the photographer have balanced the two light sources?
Yes, the photographer could have placed a color correction gel over the flash to alter the color temperature to an incandescent setting (approximately 3200K) or tungsten (3400K). They then could have set the appropriate white balance on the camera.
It seems relevant, at this point, to mention the subject of color correction (CC) filters. These filters are used to change the color temperature of light by placing them between the light source and the subject.
By doing this, you can make an incandescent light source emit daylight-balanced color, or, a daylight balanced light source emit incandescent balanced color.
CC filters can change the color temperature of any light source. CC filters can also be placed over a camera lens and thus globally changing all the light sources.
"Color correction filters can also be placed over a camera lens and thus globally changing all the light sources."
They are manufactured in “grades” thus taking the guesswork out of how much you’re altering the color temperature.
This is how you would alter a light source..
Recommended Gear: Rosco is one of the leading manufacturers of lighting gels. They have all the color correction (CC) gels: Rosco Lighting Gels
2. Alter a light source

Photo by Benjamin Linh Vu
The photographer set the color balance on the camera to correct for the overhead fluorescent lighting (image above).
This provided a proper color balance but left the man’s face unlit and without interest.
What if the photographer wanted to add a flash light source to brighten up the man’s face and create some interesting lighting?
How would they have accomplished this?
They would “alter the light source” by putting a correction (CC) gel over the flash head.
How would they be correcting the light?
They would change the daylight (5500K) balanced flash from daylight to fluorescent.
3. Alter the camera’s perception of a light source
This is more applicable to working with film. However, you could find yourself in a situation where it might be necessary for a digital camera as well.
Since most of us are using digital these days, we’ll concentrate on that. You alter a digital cameras perception of a light source by changing the white balance. You can even micro-manage this by setting the Kelvin temperature or setting a custom WB.
But, what if you find yourself in a situation where you can’t fiddle with the color temperature settings? Or, the light you’re trying to correct is so far off normal that there is no white balance setting that works?
This is where you assist the cameras perception of the light source by placing a correction (CC) filter in front of the lens.
Recommended Gear: Tiffen is a leading manufacturer of photographic filters. If there is a color correction (CC) filter being made, they should have it! – Tiffen Lens Filters

Photo by Nattu
This is an excellent example (above) of where a correction filter in front of the lens might come in handy.
When light enters the water, all the warm spectrum becomes filtered out. This amount of filtering varies depending on depth, the angle of the sun, and clarity of the water. Some cameras have an underwater color balance setting, but many do not.
By placing a correction (CC) filter over the lens, you can establish a global daylight color balance setting. What would happen if the photographer used daylight balanced flash to brighten up the colors close to the camera (such as the fish)? The color would be off because the CC filter (on the lens) was a global change to the background light and the flash.
To correct for this, the photographer would put a CC filter over the flash.
Picture this in your mind- the CC filter on the flash turns the 5500K light source to 7500K (thus matching the light on the background). The CC filter on the lens then turns all the 7500K light sources back to 5500K daylight to match the camera’s WB setting. We now have appropriate color on the foreground and the background.
4. Do nothing and let the color shift
Photo by Alcuin Lai
This photograph above has a mixture of daylight and incandescent lighting. The photographer chose to set the camera at a daylight setting and let the incandescent lighting go “warm”.
What would have happened if they set the camera to “incandescent” or “tungsten”? Everything that was lit by the sunlight (5500K) would have recorded with a blue-cyan colorcast.
Do you think that the photographer could have created this photograph (in camera) and with a correct color balance in all areas?
Sure, they could have. Here is how it could be done (in 10 steps)
- Set the shot up with the camera on a tripod.
- Turn the lights off in the room.
- Set the ISO, aperture, and/or make use of a neutral density filter so that you have an exposure shutter speed of approximately 10 seconds for a proper exposure.
- Set the camera white balance to daylight.
- Attach a lockable cable release.
- Set the shutter to bulb.
- Release the shutter and count to 8 seconds.
- Place a 12” x 12” flat black card in front of the lens to stop the exposure. Cover the lens with the lens cap.
- Wait for the sunlight to diminish; reset the white balance to incandescent and turn the lights back on.
- When the sunlight is no longer a factor for exposure, place the flat black card back in front of the lens, remove the lens cap, remove the card, and count out 10 seconds of exposure before releasing the shutter to close it.
A lot of work, huh?
Welcome to the world of film photographers!
An easier version of the above workflow would be to create two exposures: one with the sunlight lighting the interior (and no incandescent lighting) and then a second one (after the sun is no longer a factor) with the incandescent lighting turned on.
Then meld the two exposures in Photoshop.
Sometimes, it’s best just to let the color balance fall where it wants to…
"Sometimes, it’s best just to let the color balance fall where it wants to..."
But what if you can’t?
What if it just won’t work?
Or what if you’ve been hired to take a photograph and the client wants clean color everywhere in the image?
When you’re faced with a mixed lighting situation, the first thing you need to do is evaluate what you’re dealing with.
You need to determine-
- How many different (color temperature) light sources are present.
- What their color temperatures are (approximately).
- What the intensity of light is for each different source.
Let’s troubleshoot some situations and determine how we would get properly balanced color.

Photo by Geoff Peters
This image is lit by two light sources. A candle is providing the “main” light from the front. What does this tell us? The color temperature is extremely low: probably around 3000K.
It also has low intensity. The backlight is being provided by a glowing television. What does this tell us? Sometimes, we may have a situation where we don’t know what color temperature a source is.
Important Tip: Most cameras allow you to set a custom white balance.
Recommended Gear: If you end up doing this a lot, you could also invest in a color meter: Color Meter
If you can’t get exact accurate color with the custom white balance setting, you are most likely dealing with a light source that is outside the range of your camera; it must also be gelled for correction.
Now, back to our photograph of the dessert. If we needed accurate color, how would we tackle that problem?
We would manually set a white balance of 3000K (to correct for the light from the candle) and put a correction (CC) gel over the television.
You’re probably asking, “What gel would I need?”
Recommended Gear: You would need the Rosco 3407 Full CTO gel which converts 5500K to 2900K or an equivalent from another manufacturer: Rosco 3407 Full CTO gel

Photo by NASA Goddard
Photographs that are created in industrial settings are some of the toughest situations to work out.
Look at this photograph above. How many different light sources do you think are involved? We identified three different sources.
The room lighting is sodium vapor, which created the yellow colorcast.
Through the window (in the background) is fluorescent lighting, which created the lime-green colorcast. The photographer used a low intensity camera flash on the foreground. The white balance on the camera was set to daylight (5500K).
We’ve now completed steps one and two in our bullet points above. The final bullet point says that we must determine the intensity of each light source.
In this case it’s clear that the light from the sodium vapor source is providing the bulk of the lighting. The daylight balanced flash is secondary.
The fluorescent source is almost non-existent.
Now that we know what we’re dealing with- how do we resolve the situation? We start by correcting the “primary light source” with a custom WB on the camera;in this case, the sodium vapor lighting. We then place a Rosco 3407 Full CTO correction filter over the flash (this reduces the color temperature of the flash to match the sodium vapor lighting).
"We start by correcting the “primary light source” with a custom WB on the camera;in this case, the sodium vapor lighting."
We could experiment with turning the fluorescent light source off. However, it leaves a “black hole” in the background. So, we cover the fluorescent light source with a Rosco 30CC Magenta gel which converts it to daylight (5500K), AND, a Rosco 3407 Full CTO gel which converts the source down to a color temperature of 2900K thus matching the sodium vapor lights.

Photo by Rosino
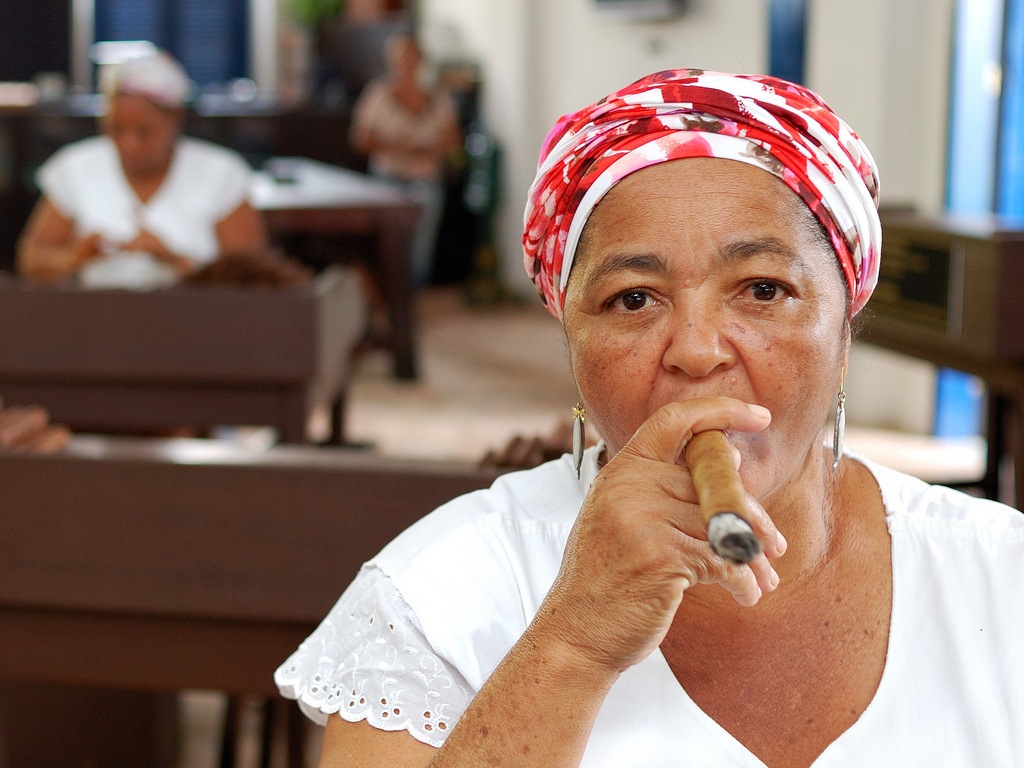
We have identified three light sources here. Can you name them?
- Daylight coming through a window.
- Tungsten lighting on the woman with the cigar.
- Incandescent lights in the room and on the background.
Important Tip: How did we identify these light sources? As a photographer, you often have to be a detective. When we looked at this photograph the first thing we noticed was the “vibrant blue” color of the daylight coming through the window.
This immediately told us that the camera was set to a tungsten setting. We then focused on the woman’s face (the one with the cigar). She has a pleasant, “normal” color balance, which indicates that the photographer lit her up with a tungsten source. We knew the photographer didn’t use a flash because it would have turned the woman blue (just like the window light).
Then we looked at both sides of her face. On one side there is a highlight that is much more yellow in tone (than the rest of the photograph). This tells us that there is a warmer light source somewhere in the background. Through careful examination, we identified three light sources and three color temperatures.
What do you think of the overall color balance of this mixed light situation? It’s pretty good really! The majority of the scene is lit by two sources that are “close” in color temperature.
The only thing that is a little whacky is the window in the background. The bright blue tone is quite distracting. There were two options to completely balance the color in this image.
- The windows could have been covered with a RoscoSun 3411 ¾ CTO filter (which would reduce the daylight coming through the windows to a 3200K tungsten temperature). – OR –
- A much easier solution would have been a slight camera move to the right to remove the window from the background.
Always remember to keep your mind open when working with mixed lighting.
It’s the equivalent to solving a puzzle.
Should a light be removed or added?
Can you alter the temperature of a light? Or, is that impossible?
Can you turn a light off or cover it up?
Can you place a gel between the light and the subject?
"Always remember to keep your mind open when working with mixed lighting."
Can you globally gel for a large light source and then gel your smaller, more maneuverable lights to match?
Can you overpower a light to remove its affect on your image?
Can you change your camera angle to eliminate that problem light source?
The goal is to identify the color temperatures of all the different lights in your image and bring them into a range that is reproducible.
Good luck on your photographic journey!


