
A Super Quick Guide By Kent DuFault
Photzy, recently had a request from one of their readers for information on how to (effectively) photograph holiday lights on a Christmas tree and the exterior of a house.
Today, I’m going to outline the difficulties of photographing these two subjects, and I’m going to provide you with some tips on how to overcome those difficulties.
 Photo by Brett Neilson
Christmas trees with lights, and the exterior of buildings with Christmas lights, have many of the same challenges.
- You’re dealing with a very bright object (the lights themselves).
- You’re dealing with a very dark object- the tree and the building (plus surroundings in both cases).
- You’re dealing with low ambient light.
The main difference between the two scenarios is the location. One is inside, and the other is outside.
But your primary task is the same.
You must balance out the light sources.
Let’s talk about what happens if you don’t balance out the light sources.
 Photo by Michael Gil
The lights are properly exposed, however, the ambient light is underexposed and the surroundings become too dark. The house disappears and the lights look like they’re floating in a sea of black ink.
 Photo by John Stratford
The camera flash, and a faster shutter speed, overpowers all ambient light (as well as the Christmas lights), to create a photograph that lacks any warmth or mood.
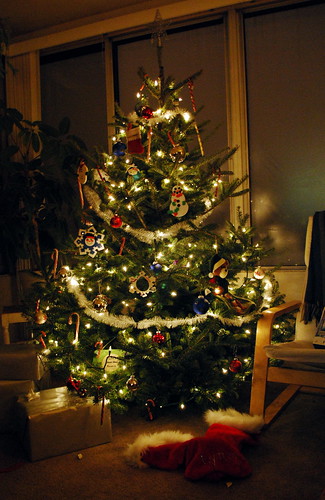
Photo by Laura Bittner
An interior shot of a tree, without sufficient ambient lighting, lacks details in the background creating a flat lifeless image.

Photo by JD Hancock
If you up your ISO sensitivity, or increase your exposure, to allow the ambient light to properly expose the background- the Christmas lights become blown out through overexposure.
Photo by christina rutz
Depending on your camera settings, the specular brightness of the Christmas lights and ornaments can cause underexposure by fooling your meter.
Now, we know what we don’t want, how do we get what we DO want?
Your task is to balance out all the light sources with the surroundings. This is a great time to hone that skill as it will benefit you in all your photographic endeavors.
Here is what you need to get started:
- A camera with manual mode and adjustable shutter speeds including Bulb.
- A sturdy Tripod
It’s also helpful to have:
- A cable release
- An 8×10 inch piece of flat black cardboard
You could also introduce a lot of lighting gear. But, to keep it simple for everyone, we are going to attempt these shots without that.
We need to tackle this problem in slightly different ways- depending on if we are photographing indoors or outdoors.
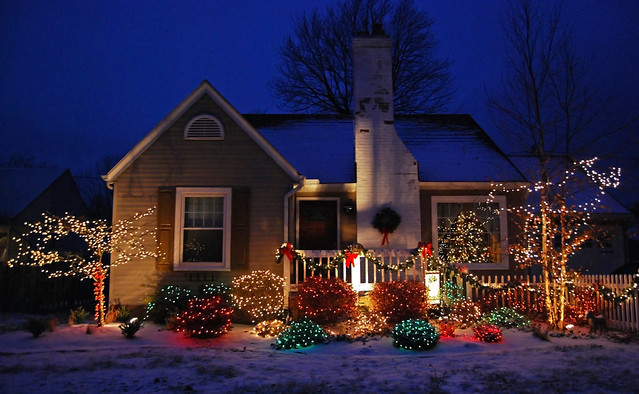
Photo by Rona Proudfoot
Photographing Christmas lights, (outdoors), is solved by being ready at the right time of day.
The best window of opportunity is from sunset until approximately 30 minutes after sunset.
Of course, this window of opportunity can vary based on location. If the home is buried in deep woods- your best time might be an hour to a half-hour before sunset. You must always take into consideration the environment.
This is your goal. You want enough light left in the sky to illuminate the background to an exposure level that is approximately equal with, or slightly under, the exposure value of the lights.
Now again, there are factors to consider. Is the house white? Is it a dark color? Is the house surrounded by other structures? Essentially, you’re making a determination as to when the available light will be within an exposure of 1 stop compared to the lights. If the available light is too bright, your holiday lights will not stand out. If the available light is too dark, your background will go black.
- Put your camera on a tripod and frame your shot.
- Set your meter pattern to center-weight. (If you use the matrix, or evaluative, mode the dark background can throw your exposure off.)
- Set your camera to f/5.6 in aperture priority mode at ISO 400 (resist the temptation to raise up your ISO).
- Attach your cable release. (If you don’t have one use the camera’s built in timer to fire the camera. You don’t want to jiggle the camera when the shutter is fired.)
- Watch the scene as the light changes. Don’t be afraid to fire a lot of frames, especially if you’re new to this type of work. When, I first started, I would set up and fire and fire an exposure every couple of minutes for about 15 to 20 minutes. (The image above is a great example of balanced light between sky and Christmas lights. Eventually, you can train your eyes to “see” this balance of light.)
Some optional thoughts…
- Set your camera to do an exposure bracket. (Shoot in 3 shot bursts every couple of minutes.)
- Use the flat black card to block the camera’s lens (without touching the camera) should a light source (such as a car’s headlights) pass through your shot.
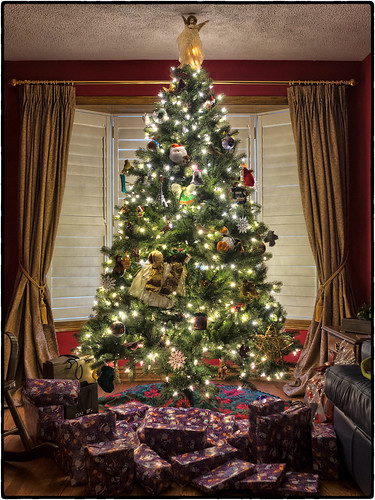
Photo by Joe deSousa
This is a great example of balanced lighting for an indoor shot of a Christmas tree. The lights are bright, but not overexposed. The background is visible and filled with detail.
When, you first think about taking a photograph of your Christmas tree, your inclination is going to be “pop on the flash” and take a picture. In fact, your camera might try and force you to do that if you’re in Auto Mode. This is the worst choice, as it will wipe any ambiance out of your photograph.
The second option (that your camera might attempt- in a Program Mode) is to take a long exposure to brighten up the background. As we saw earlier, this also doesn’t work very well because the holiday lights become overexposed.
Here is what I suggest-
- Put the flash away. (Without a lot of putzing around, you’re not going to get that warm Christmas lighting that you want.
- Gather 3 – 5 lamps from around the house.
- Put your camera on a tripod and frame your shot.
- Set your camera to manual mode.
- Set your metering pattern to center weight.
- Attach your cable release, or use the self-timer to eliminate camera jiggle.
- Manually set your ISO to 400.
- Shoot a test shot at f/5.6 at ¼ second.
- Adjust your exposure until the lights on the tree look perfect. (Too dark- increase your exposure. Too bright- decrease your exposure. Make your changes with the shutter speed, not the f/stop.)
- Study your test shot to make a note of dark areas in the background. (I find it’s generally best to have the room lighting all the way up. But that may vary depending on your situation.)
- Wherever you see dark areas, place one of the household lamps just outside the frame.
- Take another test shot and adjust as necessary.
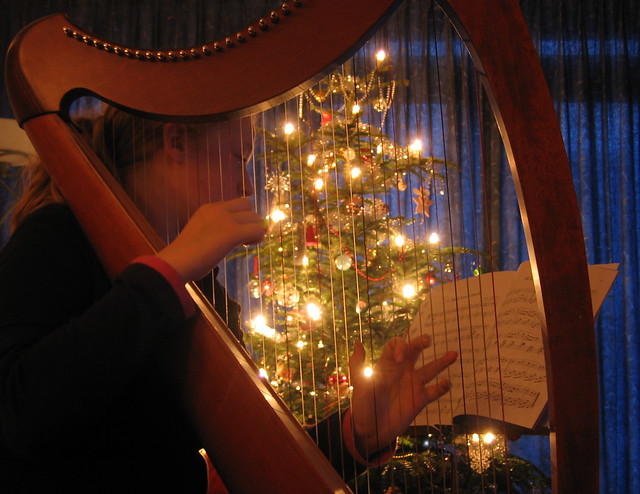
Photo by Hans Splinter
This photograph depicts how a simple lamp can add just the right lighting. A lamp illuminated this scene just to camera left and slightly in front of the musician. Without that extra lighting, the woman and her harp would be a silhouette. Take notice of the drapes in the background. This was shot near sunset. There was enough illumination (in the sky) to provide some background lighting. If the photograph had been created later in the evening- the background would have gone completely black. Evaluate your situation. Perhaps, there are windows in the background that might help illuminate your Christmas tree photograph if you shoot the image at the right time of day?

Photo by Steve Wilson
Don’t be afraid to try some different lighting scenarios. This photographer let the outdoor window light go black. They then placed a bright additional light source behind the tree. The effect is moody, and it works really well for this particular shot. Do you know why it worked pretty well? The area is very small, and has bright walls. So, even though there wasn’t a lot of light- what light there is- is bouncing around nice and evenly illuminating the walls and ceiling. If this had been a large room, or the walls were dark, the photograph would not be effective. In addition, the dark red drapes form a nice colorful frame around the subject. Can you add simple elements to make your photograph better? Presents piled at the bottom of the tree? Children wrapped in a blanket staring up at the ornaments?
Photo by Kevin Dooley
My closing comment is on color balance. Indoor light, Christmas lights, all tend to skew in the direction of warmth (yellows and reds). I enjoy this in my Christmas pictures. Using the Auto White Balance will generally give you a nice pleasing color balance. However, if the image gets a too warm for you, you could manually set your White Balance to indoors (or tungsten) lighting. That will make an adjustment to remove some of the reds and yellows.
Have a Happy Holiday!
