

Photo by Aaron Seefeld
We’ve all come home from a wonderful day (or night) of shooting, eager to review our images and re-live the experiences, only to realize that some of the shots we were most excited about look a little soft or downright blurry. It’s a problem that has frustrated photographers since cameras were first conceived.
Technological advancements keep improving the percentage of shots we take that are focused and sharp, but even the highest quality gear occasionally produces a bad image. More often than not, we’re the ones at fault and not the camera. Fortunately, there are several things we can do to get sharp images consistently.
In this article, we’ll discuss:
- What having a “sharp” photo means
- Why it’s important to perform routine maintenance on your gear
- Techniques to improve your images without buying fancy gadgets
- What to take into consideration when choosing camera settings

Photo by Aaron Seefeld
Sharp images result from a combination of things like the quality of your gear, your shooting technique, and your choice of camera settings. Admittedly, a professional quality lens will produce better results than a kit lens, but even the best equipment will fail to impress if you don’t have the knowledge to leverage its capabilities. With that in mind, we’ll focus on things you can do to get the most out of the equipment you already own.
Disclaimer: Not every setting or technique I mention will be available for your camera or be applicable for every shot you take. This is also not intended to be a comprehensive list. These are just some of the things that have helped me improve over the last few years.
What do you mean when you say a photo is “sharp”?
There’s a lot of discussion about image sharpness in photography circles. Some of it gets very technical, talking about specifications like resolution, acuity, pixel density, and other things that can make your head spin. For this guide, I want to use a broad definition: sharpness means that the parts of a photo you want to be in focus don’t look blurry.
How do we set off to achieve that goal? Like most things, it starts at home.
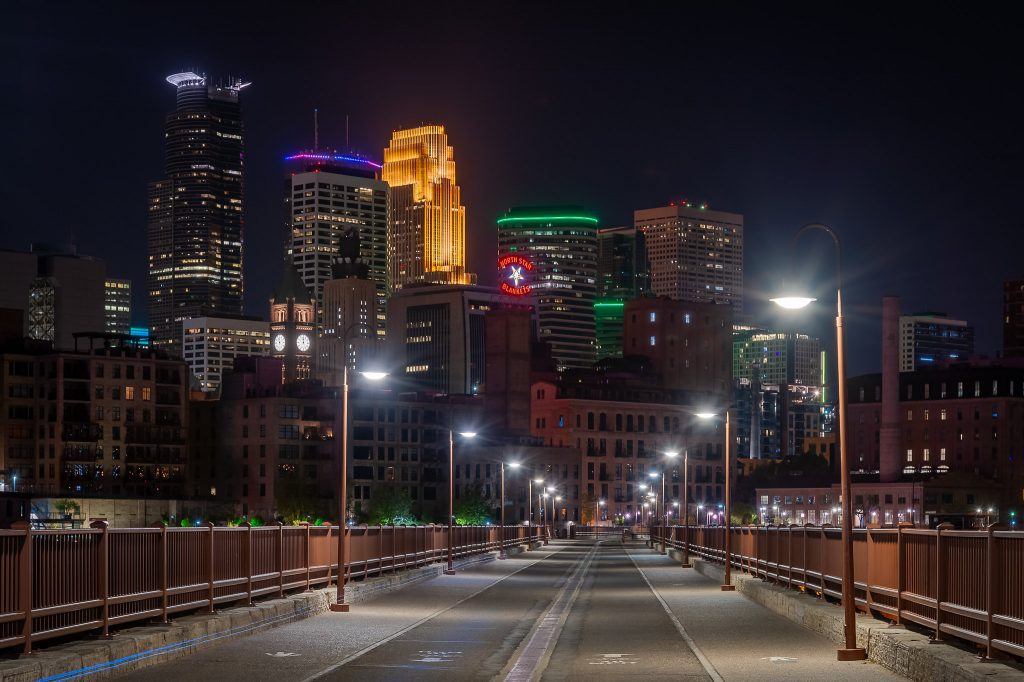
Photo by Aaron Seefeld
Planning
I know it sounds odd, but if you take some time to pre-visualize your shot(s) and think about your locations before you leave the house, you’ll give yourself the opportunity to take the right tools with you. Do you need a tripod or Speedlight? What focal length lens works best for your subject? What else do you need? Is it in your bag?
If you take some time to pre-visualize your shot(s) and think about your locations before you leave the house, you’ll give yourself the opportunity to take the right tools with you.
It’s a bit embarrassing to admit, but I recently learned that it’s impossible to get a sharp photograph with a dead battery and no memory card in the camera. One day, I drove to a scene, pulled my camera out of my bag, and saw a blinking battery and big “E” on the LCD. It was then that I remembered my spare batteries were still on the charger and the memory cards were sitting next to my computer. It was a direct result of failing to plan and just grabbing my bag as I ran out the door. I was extremely disappointed, but still enjoyed a beautiful evening outdoors and didn’t come away with any blurry shots!
Recommended Resource: Want a simple way to learn and master photography on the go? Grab our set of 44 printable Snap Cards for reference when you’re out shooting. They cover camera settings, camera techniques, and so much more. Check it out here.
Clean Your Gear
Lenses can act as a pump and suck dust particles through to your sensor. These particles show up as out-of-focus dots or streaks on your images. Most new cameras have cleaning modes that shake loose particles from the sensor. Stubborn particles may need to be removed by using a blower. Extreme dust buildup may require the camera to be sent in to a certified service center for cleaning.
Lenses are also magnets for fingerprints, dirt, and water drops. Check the front element of your lens for smudges and dust. If the lens is removable, be sure to check the rear element as well. Use a blower, lens brush, or lens cleaning cloth to gently remove debris from the lens. Be careful not to scratch the glass!
Use Appropriate Camera Settings
Set Your Camera to the Lowest ISO it Natively Offers
This is more of a best practice than a rule, but it is a good place to start when trying to balance your exposure. Noise and a lack of contrast can make a perfectly in-focus subject appear to be a little fuzzy. The lowest ISO on your camera is the one that will result in the least amount of noise, best contrast, and best color range in your images.
Of course, everything in photography has tradeoffs. If you need to boost the ISO because the shutter speed is too slow, or the aperture can’t go wider, do it! A little bit of noise is preferable to the unintended blur that can result from long shutter speeds or insufficient depth of field.

Photo by Aaron Seefeld
Find the Sweet Spot
Almost all lenses are a little sharper in the middle of their aperture range and softer towards the ends. They’re also generally sharper in the center of the image circle than at the edges. All lenses have a sweet spot, which is the aperture that gives you the sharpest image across the frame. This value is typically 2-3 stops down from your widest aperture (f/8-f/11 on an f/4 lens). Play with your camera/lens combination and see what gives you the best results.
Don’t fall into the trap of shooting at the same aperture all the time just because it’s the sharpest. You still need to consider how much depth of field your scene requires and use the aperture that gives it to you.
Telephoto lenses also tend to be sharper in the middle of the zoom range than the ends. Like finding the sweet spot for aperture, play around to see what part of the range gives you the best results on your camera and use it when possible.
Watch Your Shutter Speed
Shoot with the fastest shutter speed that’s practical. On my cameras, the fastest possible shutter speeds are 1/4000 and 1/8000. Such short exposures make it almost impossible to get blur from camera shake or subject motion. Unfortunately, they also make it almost impossible to get a proper exposure, even with a fast aperture and high ISO. That’s where the practical part comes into play. Find a shutter speed that is fast enough for your subject!
If your subject is moving and you want it to appear to be standing still, you need to choose a shutter speed that’s fast enough to freeze the action. For a person slowly walking down the street, 1/100 might be fast enough. For a train rumbling down the tracks, you might need 1/1000. Birds in flight may require up to 1/2000! It will take some trial and error to find the exact speeds needed, but over time you’ll learn what works for you and be prepared when you arrive at the scene.

Photo by Aaroon Seefeld
The train in the image above was moving at 60mph and shot at 1/1250, and the details in the nose are perfectly clear.

Photo by Aaron Seefeld
Compare that with this image, which was shot at 1/500 and the train rolling by at 79mph. It is cropped to emphasize the motion blur. The shutter speed was too slow, and the entire train is fuzzy, especially at the front.
If your subject is inanimate, you can keep the shutter open for as long as you need, if you can keep the camera stable.
Stabilize Your Camera
Camera shake is one of the biggest contributors to soft or fuzzy photos. Fortunately, there are a few things you can do to stabilize your camera and reduce the effects of camera shake.
Use a Tripod
Yep, here we go again. You’re probably well aware that using a tripod is one of the best things you can do to improve the quality of your images. However, as great as tripods are, they aren’t infallible. Wind, unstable ground, loose screws, and other things can all wreak havoc on our beloved camera supports. Here are some things you can do to improve the performance of your three-legged friend:
- Perform routine maintenance. Make sure all the screws are tight, but not overtight. Loose screws can cause the tripod to wobble or the legs to collapse while locked. Overtightening the screws can break the leg lock mechanisms and render the tripod useless. Also make sure the joints pivot smoothly. If it feels gritty, try to clean out the dirt. If you hear creaking, or it feels overly stiff, loosen the screws ever so slightly.
- Only extend the leg sections you need, starting with the widest ones. The tripod is only as stable as the weakest leg, so use the strongest sections first and add the weaker ones as needed.
- Don’t extend the center column unless it’s absolutely necessary. Raising the center of gravity will make the tripod less stable.
- Widen the leg base. Some entry-level tripods won’t allow you to do this, but most mid- to pro-level tripods allow you to open the legs at different angles to add stability to the base. This is particularly useful on windy days, or when you want to get the camera lower to the ground.
- Remove the strap from your camera. It can act like a sail on windy days and cause the camera to shake during the exposure. If you don’t want to remove the strap, hold it or tie it up so it can’t flap around as much.
- Hang weight from the center column. More advanced tripods will have a hook for this, but you could rig something over the legs. Your camera bag can work well as a weight, or you could use sand bags or rocks.

Photo by Aaron Seefeld
- Balance the load. Get the camera’s center of gravity as close to the pivot point of the tripod head as possible. The more unbalanced your camera is, the more it will shake.
- Use the mirror lock-up function. It may not be noticeable through the viewfinder, but the camera will shake when the mirror slaps up prior to releasing the shutter. Using this feature gives the vibrations a chance to subside before the exposure begins.
- Turn off Vibration Reduction (VR) or Image Stabilization (IS)! Like the mirror slapping up, the vibrations from VR/IS will cause the camera to shake on the tripod and make your images less sharp.
- Use a cable release. Pressing the shutter button also induces camera shake. If you don’t have a cable release, use the self-timer to give the vibrations a chance to settle down.
Perfect Your Hand-Holding Technique
When using a tripod or other stabilization method isn’t practical (or even allowed), you’ll have to hold the camera as steady as possible. Stand with your feet shoulder-width apart, your left foot slightly in front of your right, and bend your knees a little bit. This will provide a stable base from which to work. Hold the lens with the palm of your left hand underneath it instead of having your thumb support the weight, and hold the camera with your right hand. For smaller cameras, you may want to cradle the base of the camera itself instead of the lens. Tuck your elbows in and rest them on your torso. If necessary, lean against a sturdy tree or wall, or lie on the ground and prop yourself up on your elbows.
Take even, relaxed, steady breaths. Release the shutter as you exhale. If you hold your breath, don’t hold it for too long.
When you press the shutter button, don’t jab at it or jerk the whole camera down. This will cause your composition to change. Instead, slide your index finger across the button with just enough force to activate it.
Take even, relaxed, steady breaths. Release the shutter as you exhale. If you hold your breath, don’t hold it for too long.
Choose your shutter speed wisely. To eliminate camera shake when using lenses without Vibration Reduction, the rule is to shoot faster than 1 over the 35mm equivalent focal length of the lens. For a 50mm prime lens on a full frame body, shoot at 1/60 or faster. On a Nikon DX body, multiply by the 1.5x crop factor to get your minimum speed – in this case 1/75 (I know that’s not an actual option, so bump up to 1/80). Canon crop sensor DLSRs would multiply by 1.6 and shoot at 1/100. I can’t speak for other brands/formats, so look up the information for your specific camera model.
If you’re using a zoom lens, use the longest focal length when calculating your shutter speed (i.e. use 1/250 for a 70-200mm lens on a full frame body, or 1/320 for the same lens on a crop sensor camera).
If your lens offers Vibration Reduction, using it can allow you to avoid camera shake while shooting at slower speeds.
Of course, this rule is not absolute. With good hand-holding techniques and practice, you may be able to avoid camera shake at slower speeds. Play around with your camera and lens combinations to see how far you can push the settings and still get acceptable results.
Here’s the “gotcha”: This rule applies to eliminating camera shake; it does not account for motion blur caused by moving elements in the scene. As we discussed earlier, you may need to shoot at even faster shutter speeds if your subject is moving.
Recommended Resource: Want a simple way to learn and master photography on the go? Grab our set of 44 printable Snap Cards for reference when you’re out shooting. They cover camera settings, camera techniques, and so much more. Check it out here.
Acquire Critical Focus

Photo by Aaron Seefeld
Along with camera shake, improper focus is a major player in causing images to look soft. If you’re shooting portraits, focus on the eye closest to the camera. I thought I had focused on the closest eye of the butterfly in the image above, but ended up focusing on the wing. I didn’t catch the mistake until I got home. As a result, the image isn’t as strong as it could be.
If you’re shooting landscapes, focus at the hyperfocal distance. If you’re not familiar with that concept, start by focusing about 1/3 of the way into the scene.
Let’s look at a few ways to get your subject in perfect focus.
Use Auto Focus, But Take Control Of It

Photo by Aaron Seefeld
When you let the camera choose the focus points for you, the closest object in the scene will usually be what’s in focus. That isn’t always desirable, but it doesn’t mean the method is without merit. I usually give my camera the first chance when shooting cityscapes at night. The distant buildings are what I want to focus on and they typically have enough contrast for my camera’s auto focus system to work. The foreground is too dark for the camera to focus on, so I usually get what I want.
When the camera can’t detect the proper focal point on its own, or can’t quite latch on to your subject, you need to help it out. Switch to a single focus point and put it on your subject. I had to do this for the image above as the camera wanted to focus on the grey umbrella shape at the bottom center of the image instead of the towboat.
If the focus point you choose doesn’t work, try using the center focus point and then recompose the scene after acquiring focus. The center point is usually one of the most sensitive ones on a camera, so it should work better in low light or low contrast situations.
If you’re having trouble focusing in the dark, shine a flashlight on your subject to help your camera find focus.
If you still can’t get your subject in focus, try live view. It uses a different detection method than the focus points, so you may have better luck.
Use The Right Auto Focus Servo Mode
In addition to making sure you are focused on the right spot, you also want to make sure your camera knows how to deal with objects moving in the frame. There are two basic types of auto focus drive, or servo, modes: one-time and continuous.
Use one-time focusing for stationary subjects such as buildings. The camera will lock in the focus and not change it until you release the focus button and press it again.
Use continuous focus for moving objects like birds in flight, moving vehicles, and anything else that won’t stay still. Continuous focus modes constantly evaluate and adjust the focus as long as you’re holding down the focus button.
Your camera may have different variations on each type of auto focus drive mode. Refer to your documentation to learn more about how your camera’s auto focus system works and try the different options to see what works for you.
Use Back-Button Auto Focus
Auto focus is typically engaged by pressing the shutter button halfway down. This is convenient because our trigger finger ends up on that button to take the picture anyways, so it’s a natural part of our shooting process. It’s a nice feature, but it can lead to some focusing issues when releasing the shutter.
I often run into trouble when I use the focus and recompose method. If I’m not careful, the camera will try to refocus when I subsequently press the shutter button and will hunt until either I let go of the button or the battery dies.
Some cameras also allow you to use a button on the back of the camera to activate the auto focus system instead of the shutter release button. Separating the auto focus and shutter release functions makes the situation I described above a non-issue. Once the focus it set, you don’t have to worry about it drifting when you’re ready to take the shot. This is a huge benefit when doing time-lapses, bracketing exposures for HDR, or taking multiple shots for panoramas.
Some cameras also allow you to use a button on the back of the camera to activate the auto focus system instead of the shutter release button.

Photo by Aaron Seefeld
The image above was taken with back button focus to keep the bridge and lightning in focus when the shutter was released. Also note the flare next to the light post in the bottom center of the frame. That’s due to a water drop finding its way on to the lens, which illustrates why you want to keep your equipment clean!
If your camera doesn’t have back-button focus, you can set your focus and then switch to manual focus before taking the shot, being extremely careful not to bump the focus ring. The biggest challenge of this method is remembering to switch back to auto focus when you’re ready to hone in on a new subject.
Recommended Resource: Want a simple way to learn and master photography on the go? Grab our set of 44 printable Snap Cards for reference when you’re out shooting. They cover camera settings, camera techniques, and so much more. Check it out here.
Manual Focus

Photo by Aaron Seefeld
Auto focus is great, but there are times when it just won’t work. In these cases, you’ll have to resort to using manual focus. With practice, you’ll be able to recognize when a scene is in focus by looking through the viewfinder. Most cameras also have some sort of focus confirmation indicator that will tell you if it thinks the scene is in focus or not. Be sure to review your image to make sure you nailed the focal point.
If you’re struggling to get the focus exactly where you want it, try using live view. The rear LCD is much bigger than the viewfinder and you can zoom in, so you’ll have an easier time seeing when your subject is in focus.
Try It Out!

Photo by Aaron Seefeld
Now that you have a few tricks up your sleeve, go create the sharpest images you can!
- Gather all the gear you need to get the shot. Don’t forget spare batteries
and memory cards! - Make sure your glass is clean and your sensor is free of dust spots.
- Choose camera settings that are appropriate for your scene and shooting technique.
- Stabilize your camera.
- Acquire critical focus
- Take the shot.
- Keep and show off more of the shots you take!
Self-Check Quiz:
- True or false: Every pixel must be in focus for an image to be considered sharp.
- What are two major causes of soft photos?
- How does planning your shoot help you get sharp photos?
- Why is it important to keep your gear clean
- How fast should your shutter speed be if you’re hand-holding a camera?
- List three things you can do to improve the stability of a tripod.
- If your camera auto focuses in the wrong place, what could you do to fix the problem?
- True or false: Live view offers no benefits when it comes to focusing on your subject.


