My journey into high key photography started with a dandelion, which led to experimenting with still life and flower photography, and then I veered off into fine art self-portraiture.
All of these images were shot in my studio (spare bedroom) with white walls and natural window light. No flash, no fancy lighting setup, and no new expensive gear had to be purchased to create these high key images.

High key photography is used a lot for weddings, especially bride portraits. It’s also used for photographing newborns, portraits in general, boudoir work, food, and studio still life photography.
Professionals are likely to use big fancy lighting setups, but you can still get a really nice effect with some good natural light through a window, or a white wall, and then use some creative post-processing.
Here is what you will learn in this article:
- What a high key photograph is
- The setup and gear needed to create a simple high key shot
- The process of shooting a high key photograph
- How to use post-processing for the high key effect
What is a High Key Photograph?
High key photography is defined as an image that contains very little in the way of shadows or dark tones. A high key photo contains mostly very white or light-toned colors. It is bright, and it may possibly contain purposefully overexposed areas in the frame.
Normally, when we shoot our images, the aim is to expose them correctly for the lighting situation that you have at hand.
Many people “shoot a little to the right,” which means that they deliberately set the camera to overexpose the shot.
This creates a histogram that is balanced a little more to the right.
The left edge of the histogram indicates the blacks and shadow tones within the photograph.
The right edge of the histogram indicates the highlights, whites, and lighter tones.
The middle of the histogram indicates those middle tones that aren’t dark or light – they are in the middle.
When you expose more to the right, it brings in more lighter tones to the photograph.
But, be careful. Don’t go so far that you blow out the highlights (when the whites have no detail and simply appear as big flat blobs of white).
When you expose more to the right, it brings in more lighter tones to the photograph.
Sometimes, especially in high key photography, we may want to push the exposure all the way into the light bright areas of the histogram.
It is a viable creative choice, especially in high key photography, but it can be a little daunting when you first give it a go.
When you shoot, and expose, for the far right side of the histogram (into the right or the bright white tones), this style of photograph is called “high key.” A “low key” photograph is the opposite; it has a preponderance of shadows and darker tones. Photograph by Stacey Hill
The amount of high key application can vary greatly to where the background is very white and the subject is still fairly correctly exposed, all the way through to images that have hardly any shadows, middle tones, or detail at all! These are very stylistic high key photos.
Photograph by Stacey Hill
Opinions will of course vary as to whether a photograph is artistic or just simply overexposed.
My approach is to go with what feels right for the particular image. So don’t be afraid to push the boundaries beyond what typically makes you feel comfortable.
Let’s look at a normally exposed image (based on the camera meter) and its histogram:

Photograph by Stacey Hill
This is back lit with window light, and to the eye looks a little dull and dark. The histogram is visible in the top right and is fairly evenly distributed across the mid-range.
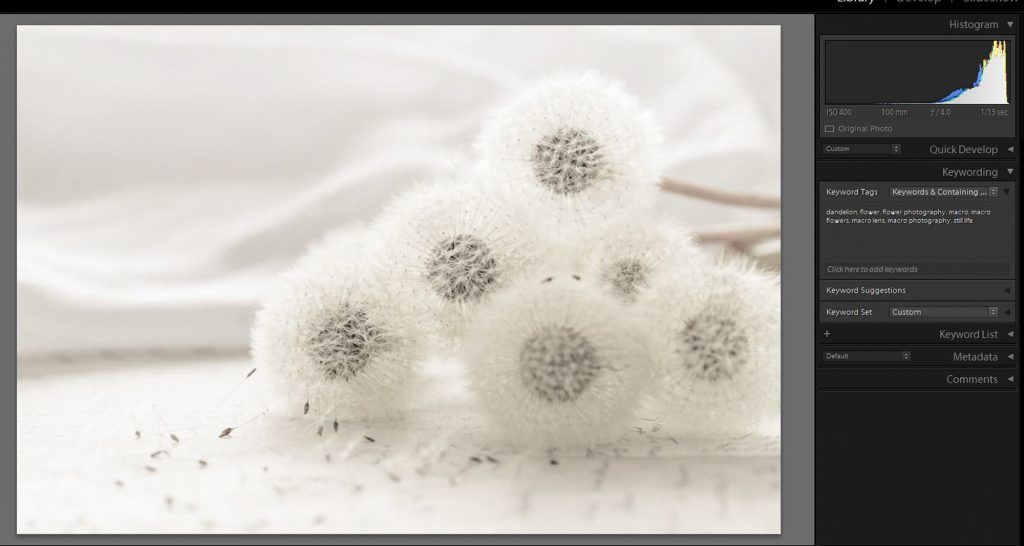
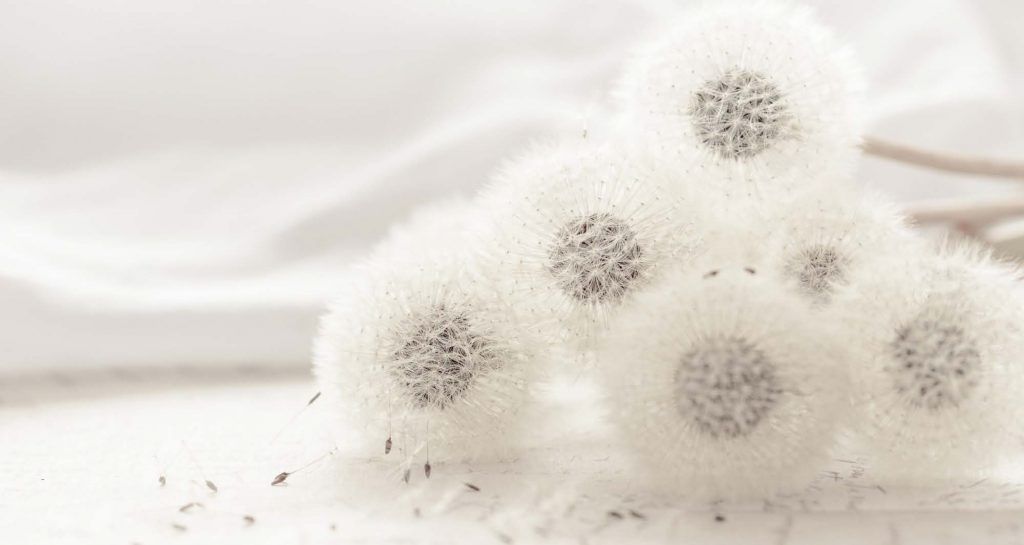
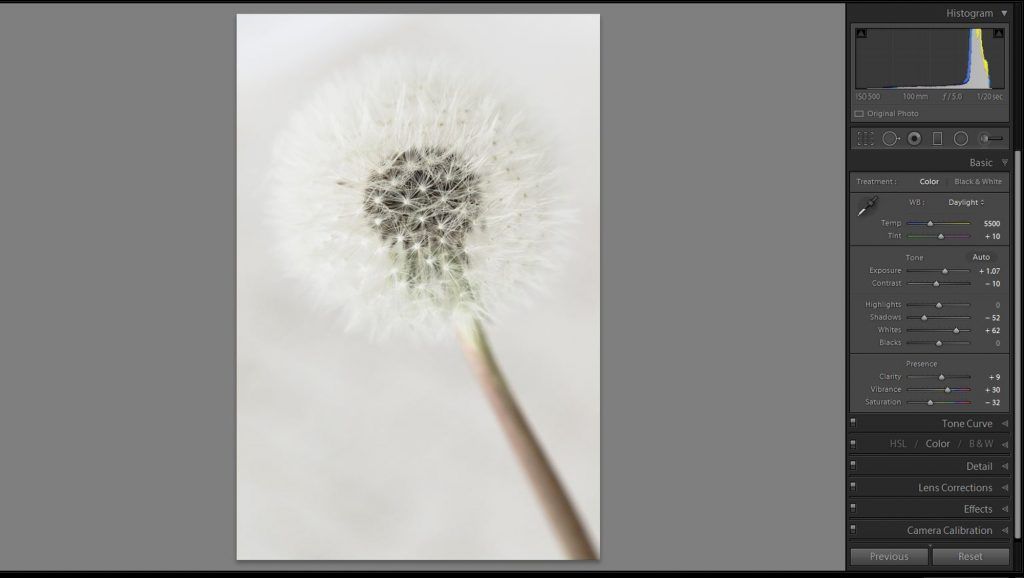
Here is a different image shot from the same shoot. This has been processed for a high key effect. Photograph by Stacey Hill
This image (above) is much whiter and brighter. While the shadows are still present (as they were in the image on the previous page), they are much lighter in tone as a result of my post-processing.
The histogram reflects this by being pushed to the far right.
Yet, the image still has “textural detail.” We can see the soft fluff of the dandelions as well as the folds and shadows in the white fabric of the background. We can also see the texture underneath the dandelions.
When I shot these images, there was no particular plan to edit them this way.
It evolved as I experimented within Lightroom.
Had I planned for a high key outcome, I probably would have exposed the image further to the right and thus captured more information in light to the white end of the histogram.
Because the image was shot in the camera RAW format, the file contained sufficient information so that it could be edited this way in Lightroom.
I recommend that you always shoot in camera RAW, but especially when attempting high or low key imagery. The RAW file format contains so much more data than a .JPEG image file, and it allows for more scope in creative editing and pushing the boundaries of tone.
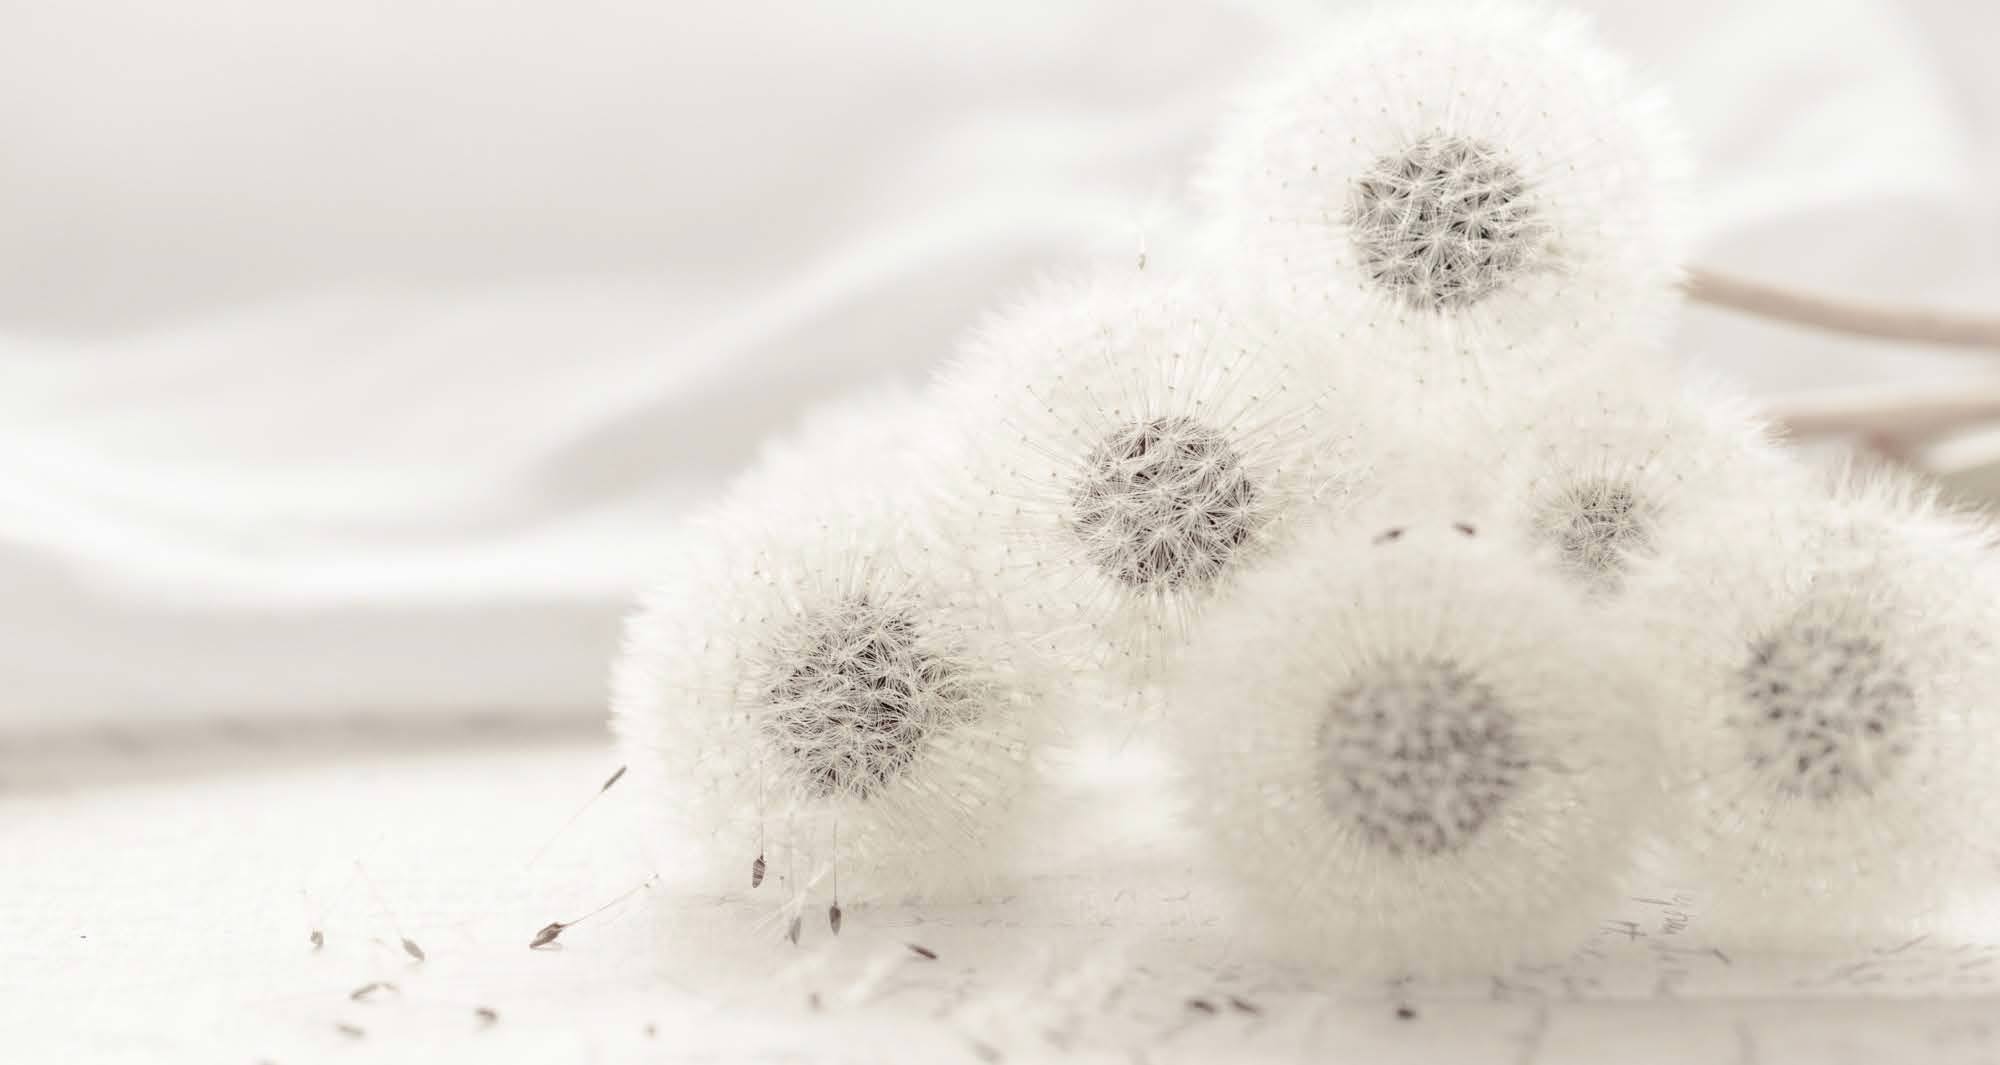
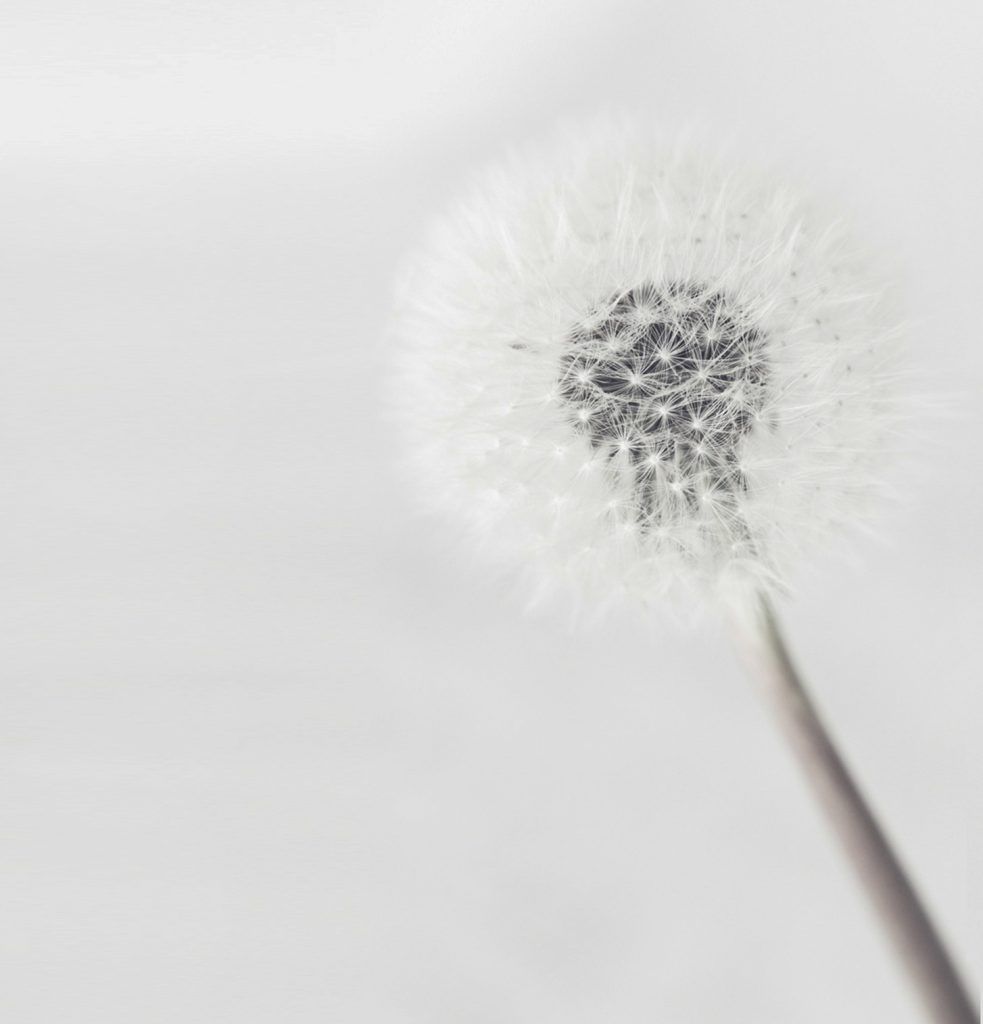
Key Lesson: Editing for high key requires a lot of file data to be available. Shoot in camera RAW to optimize your final image outcome. Also, when pushing the boundaries of tone, do not push so far that you lose important detail. Review the two dandelion images above. In the processed image (2nd dandelion image), the tones have been pushed to the right, but not so far that the highlights have been clipped.
Recommended Reading: If you want to learn how to enhance your photos and create better images, grab a copy of Photzy’s premium guide, Ultimate Guide to Fundamental Editing.
Setup and Gear
You may choose to use studio lights, or an electronic flash, to illuminate your background and your subject.
My process does not cater to that setup, as I do not have studio lights or multiple flash units.
Plus, I prefer to work with natural light as it gives softer, more natural shadows. I also have the added benefit that it shines right inside my studio window for free!
My gear is as follows:
- Canon 7d MK II
- Canon 50mm F1.8mm lens
- Canon 100mm F2.8 IS L macro lens
- Canon 17-55 F2.8 IS lens
- Manfrotto tripod legs and an Acratech tripod head
- RRS L plate
- Wireless remote camera release
Lenses that are considered “fast” mean that when they are “wide open,” you are looking at an aperture in the F1-F2 range. I recommend fast lenses as these will bring in as much light as possible.
If you have slower lenses, with the fastest aperture being in the range of f/4 to f/5.6, and the available light is low, then you might want to consider bringing some extra lights. Bringing in more light will help you keep your ISO settings lower.
I recommend fast lenses as these will bring in as much light as possible.
As for positioning the subject in high key photography, I use two options.
- The rear of the subject to the right wall (behind the cat).
This positioning gives a nice neutral background and side lighting, which I find useful as it provides natural shadows. This gives the image a more three-dimensional appearance when processed with a high key effect
- The rear of the subject is in front of the window, so that the lighting comes behind the subject.
This lighting setup can make for tricky exposures, especially if the light from the window is bright. However, in some circumstances, it gives a really nice effect, especially when using fabric as the backlighting adds more interest and softness.

This is my studio – white walls and a large window at the end. I usually drape that with some thin white fabric to further soften and diffuse the light coming through the window. This helps tone down the highlights and makes the edges of the shadows softer. (The cat is an optional extra.) Photograph by Stacey Hill
Key Lesson: Studio lights may be an ideal but unachievable solution – good window light and a white background/wall/fabric is an easy and affordable option. With window light, it typically works better if there is no direct sunlight passing through it. Pick a window on the shadow side of your shooting space. If there is no other option than a window with direct sunlight, hang a sheer white cloth in front of the window to help soften and diffuse the light.
Shooting a High Key Image
As previously mentioned, to have the most control over your lighting and exposure for high key photography, studio lights are handy.
The typical setup is to have a pair of lights evenly lighting the background, one from each side, and another pair lighting the subject.
That’s a total of four lights!
Not everyone has the space, or the money, to afford this kind of setup.
You can manage with some good natural light, a neutral white wall, shoot in camera RAW, and then a lot of scope in post-processing is available to you.
From the photo of my studio, you can see that I have a nice sized window and a lot of neutral walls.
I usually shoot against the right wall, because the angle of the sun as it moves across the room (I’m in the southern hemisphere) throws the light from the left.
If I set up my shooting space with the right wall as the background, I will then get the light coming over my left shoulder directly onto the subject.
This helps me expose properly, and it also helps to minimize shadows.
You’ll need to evaluate your own situation, and then pick the best space to set up your high key photography.

Photograph by Stacey Hill
This dandelion image was shot with the window as the background (you can see the fabric of the translucent curtains). The dandelion is dark, because I have exposed for the background so that it’s not too blown out. I did not “shoot to the right,” and that was a purposeful decision. Shooting to the right would have rendered the background without any detail. In this case, it makes sense to create the high key effect primarily in post-processing, as I can then control where all of the tones will fall onto the histogram.
Photograph by Stacey Hill
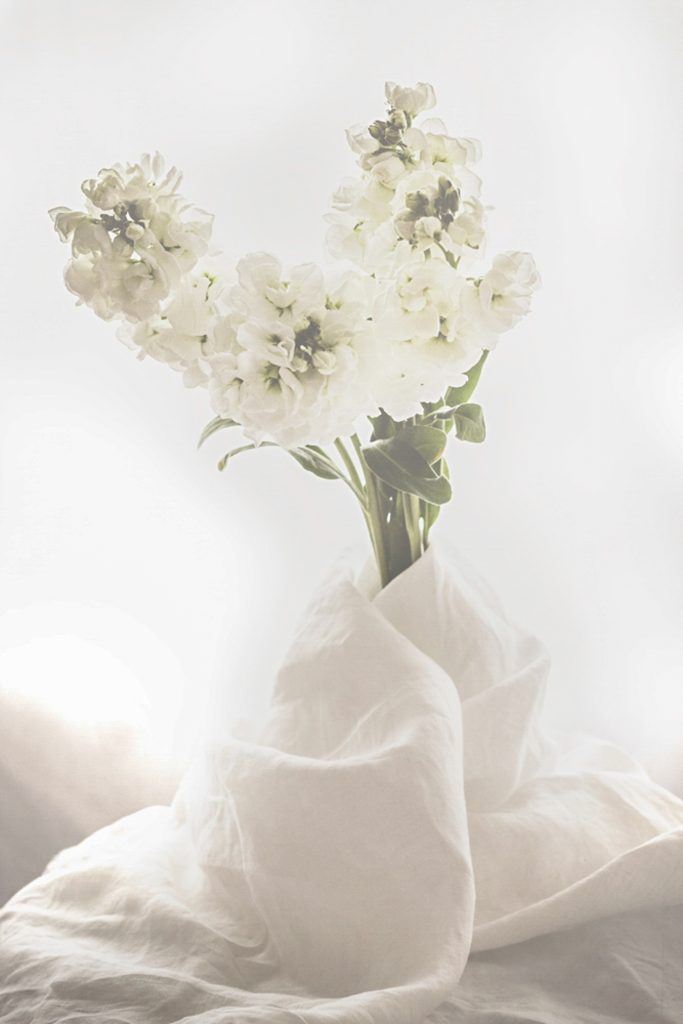
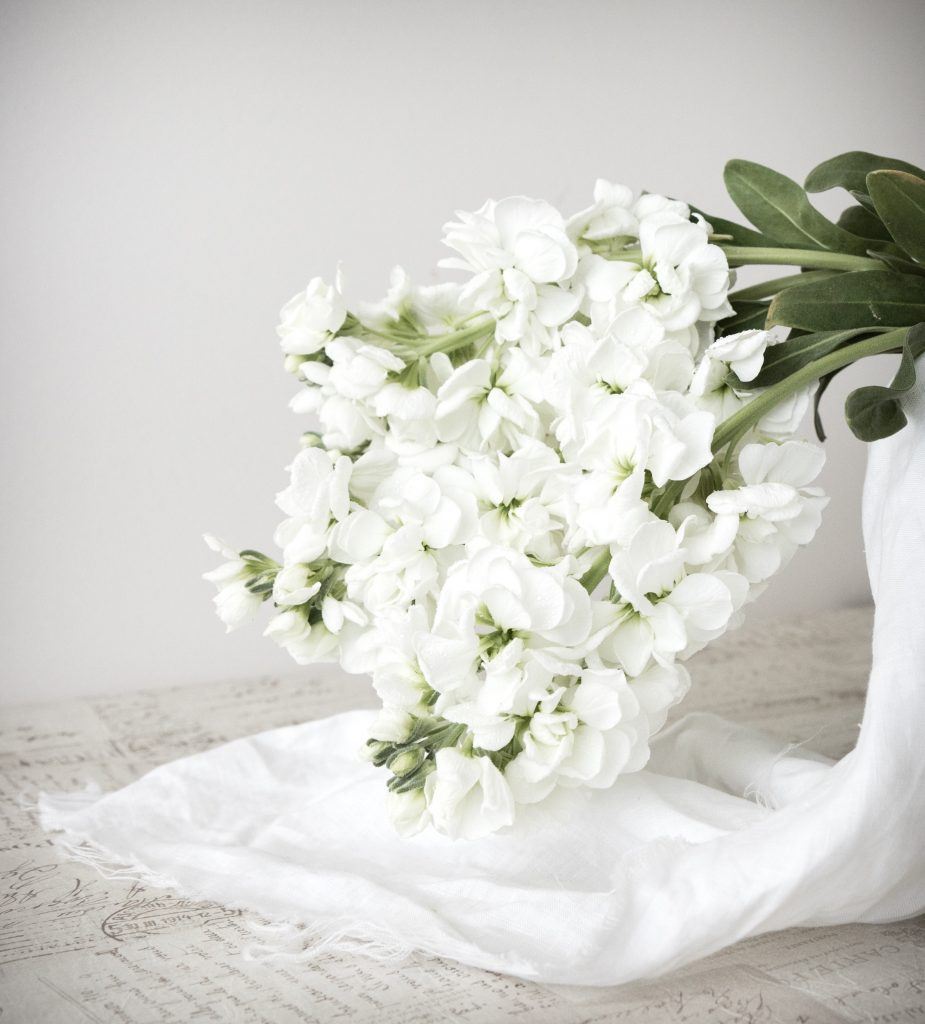
This image of the white flowers is also shot with the window as a background – it’s been further draped with a more opaque fabric so less texture is visible. As a result of the more opaque fabric background, some of the foreground is in shadow, as is the corner of the wall visible off to the left. With high key photography, especially when the lighting is backlit, you walk a fine line between a properly presented high key image and one that is simply grossly overexposed. The upper background areas of this photo were grossly overexposed on purpose to help separate the flowers from the background and to give the image an ethereal quality. I took some creative liberty with this high key shot. However, if you want to be a purist, you should have some portion of the frame at, or near, absolute black. This brings a full contrast range back to the shot. The bright dandelion image earlier is a good example of that. Most of the image is white. However, there are some small areas that are near, or at, absolute black.

Photograph by Stacey Hill
This is a flat laying setup in the lounge area of my home, where I have a glass ranchslider door taking up most of a wall. This was shot in late morning, on a slightly overcast day, so the sunlight is nicely filtered. This image did not need a lot of post-processing to take it into high key territory.
Key Lesson: There are three important elements to creating a high key photograph: the lighting, the post-processing, and, as illustrated in the image on the left, the choice of subject and props. If I had chosen a background that was darker in tone, this would not be a high key image, and nothing in post-processing could have turned it into a high key image without the end result looking pretty awful. Choose your subject and props carefully. A good rule of thumb in high key imaging is that a good 85% of the frame should be in the highlight-to-white end of the histogram. This image is approximately 85%. The percentage can be higher. The post-processed photo of the dandelions earlier, is approximately 95% on the white end of the histogram, and the photo of the white flowers (previous image) is 100% to the right on the histogram.

Photograph by Stacey Hill
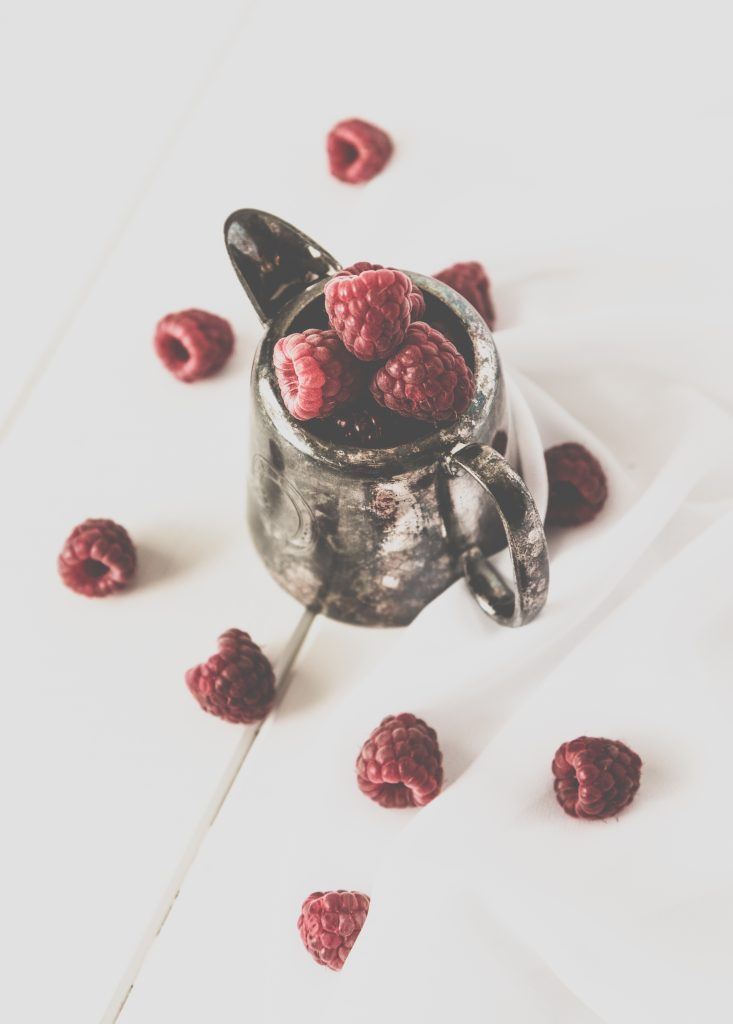
If you want to shoot high key images, an important step is to set up the shot to work in your favor. For the raspberry shot on the left, the background consists of white painted boards and a bright white fabric. Remember the Key Lesson. I’m choosing my props and background material on the white/light tonal range. This sets up my high key image and also helps to make my subject “pop” from the background.
Key Lesson: The white background is necessary to give the nice high key effect. Secondly, it helps you expose the image properly for the outcome you are after.
Photograph by Stacey Hill
This was one of my final images taken using the raspberry setup – the white has been pushed into the high key range and the shadows are very soft and faint. I added a matte preset in Lightroom to further add to the “soft mood” of the image. The red on the berries has been tweaked to give them more color and pop, as they were the hero of this shot.
Photograph by Stacey Hill
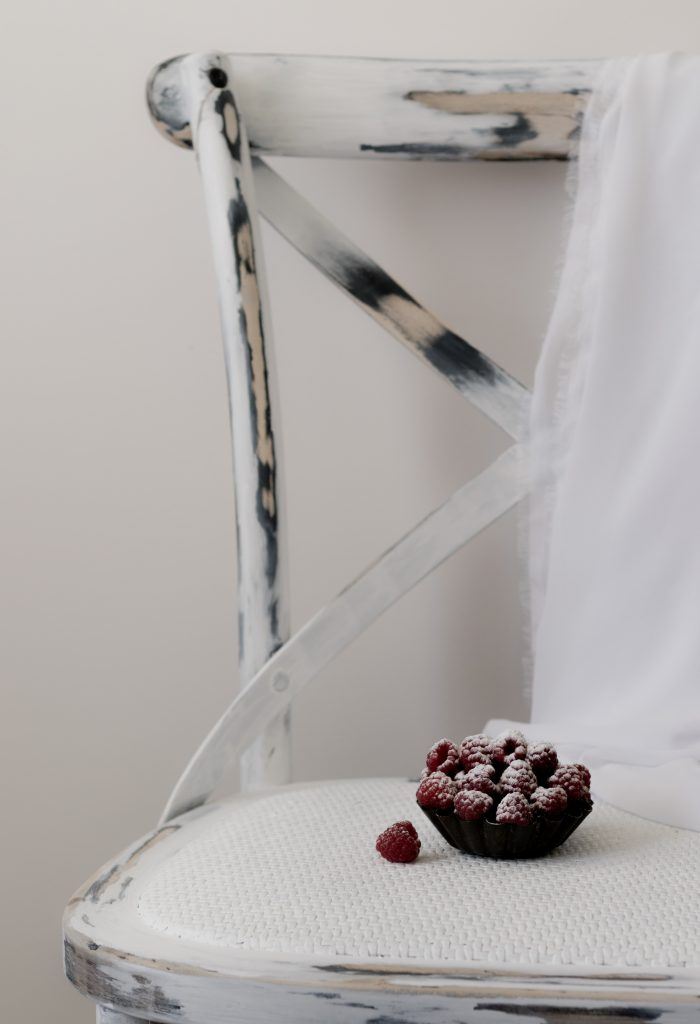
This photo, of the flower arrangement, has been used with window light directly on it, and my white wall is in the background. One trick that I have learned is to position the subject further away from the wall. Doing this helps to minimize contact shadows that will become visible against the wall surface if the subject is too close to the wall. You can see an example of this “problem” in the following image. The chair was very close to the wall and there were a lot of shadows visible as a result.
Photograph by Stacey Hill
My shooting setup consists of the camera on my tripod. I shoot with a wireless camera release, as my exposures often use slow shutter speeds.
I like to use Live View. This helps me focus accurately, as I can zoom in. I also like to be able to “sit back” and look over the frame. This allows me to expose “visually” based upon the lighting that I am seeing in the frame.
Key Lesson: Live View is very helpful in still life photography where the process is somewhat slow and methodical anyway. When using natural light, the lighting can change quickly and in subtle ways that we don’t see if we aren’t paying attention. Live View helps us to see these subtle changes.
When doing my fine art self-portraits, the wireless remote is much easier, as it allows me to shoot several different changes in pose without having to move from my spot.
Key Lesson: Taking time to set up the shoot with the right elements and the right lighting will assist in getting the best high key effect. Minimizing shadows can be helpful.
Post-Processing High Key Photos
This is the image that got me started down the path to high key photography. It was originally a fairly dark image, so I was mucking around with my presets – I have some specialty ones from hacking photography, and there are some low and high key options in there. Photograph by Stacey Hill
If I am honest, this is the most fun part.
I like playing with the settings in Lightroom and then pushing the limits of exposure. It’s so much fun to see the results.
My usual process when trying presets is to click my way down the list until I find something that I like (yeah, really scientific, I know!) and I hit a high key option.
My brain started to tingle, so I set about trying to figure out what my thoughts were saying to me. I then set about tweaking the sliders after using the preset.
The image above was the final result, and I love it.
You can still see the dandelion against the background (if your monitor is calibrated well).
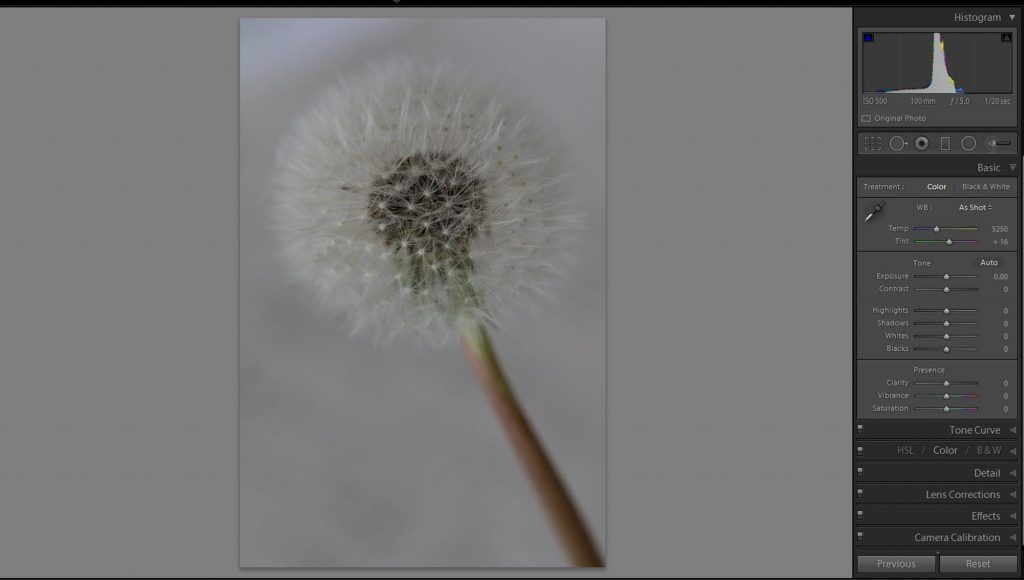
Here are a couple of screenshots, from within Lightroom, that show the before and after during editing. I always edit my images to the best “base level” that I think they should be at first. Only then do I start applying presets and other creative edits. Many times, I will save two or three different variations of my creative edits before I finally decide on which one that I want to keep as my final product. Photograph by Stacey Hill
It’s a very calm, simple, and elegant image that tells the story of a soft dandelion’s beautiful puff.
It’s important to me that my images have a mood or a feel, and using high (or low) key processing helps me to achieve that.
High and low key is not an uncommon style.
However, it isn’t frequently seen. So this adds a level of interest, or uniqueness, to images that would otherwise lack some punch.
The trick with this kind of editing (high key) is that every image will be different, and there is no fixed recipe or outcome.
My editing process is very organic, and it involves me identifying a good composition, cropping to suit my taste, doing the base edits, and then experimenting with different styles.
The trick with this kind of editing (high key) is that every image will be different, and there is no fixed recipe or outcome.
When I first started doing high key photography, it was accidental. However, once I established that I could edit to a professional high key outcome, it then made sense to start from the beginning and set up the shots and shoot with high key photography in mind.
This makes the editing portion of the process a bit easier, because all the right factors are present in the original image file, and if you have exposed it well for high key, the final image will embody all of those elements and bring it all together
Key tips for editing a high key image:
- Shoot in camera RAW.
- Set up the shot with lots of white props, and include a white or light colored background.
- Direct the light angle to minimize shadows.
- Expose appropriately. Sometimes you have to expose for the background so that you don’t blow it out too much in post-production.
- Edit in your camera RAW editor of choice. I use Lightroom, but I am sure that the other options will also allow you to achieve this kind of image edit.
- Be brave and go way outside your comfort zone!
Note: Something I discovered: Editing human skin in high key has an amazing softening effect, it evens out the flesh tones, and it helps to reduce blemishes. The high key process has lots of potential for portraits.
Key Lesson: Edit to a well exposed balanced image and then go nuts experimenting with pushing the post-production sliders way past your comfort zone.
Recommended Reading: If you want to learn how to enhance your photos and create better images, grab a copy of Photzy’s premium guide, Ultimate Guide to Fundamental Editing.
Photograph by Stacey Hill
Conclusion
High key photography is a stylistic choice for shooting and editing your images.
It may not be appropriate in all situations. In fact, like all creative options, it should be used with care and precision, and only when the image or situation demands it.
When doing it on a grand scale (like weddings/ bridal shoots), a studio setup with lighting gear is an option, and probably required (in that circumstance).
However, for the hobbyist on a smaller scale, a lot can be done with some good filtered natural light, white walls, or white or light toned backgrounds, and of course a steady hand in post-processing.
High key imaging effects can be used in portraits, still life, macro, bridal, new born, children, landscapes, and many other genres of photography.
The best results will happen when you can set the whole shoot up, right from the beginning, with a high key outcome planned for the final shot.
However, under some circumstances, you can edit a normally exposed image into a high key result when shot in camera RAW.
Most of all, you need to be prepared to go far outside the boundaries of how you would normally shoot or edit your images, pushing the settings and exposure much higher and further out from your comfort zone. Shoot to the right on that histogram.
Self-Check Quiz:
- Can high key photography be done without studio lights?
- Is high key always completely lacking in any shadow detail?
- Is it necessary to shoot in camera RAW?
- What lenses are recommended?
- Which way will the histogram skew when an image is processed as high key?
Answers:
- Yes, provided you have good natural light.
- No, high key imaging generally minimizes shadows but does not necessarily completely remove them.
- Yes, for best results shoot in camera RAW.
- A fast lens with a wide open aperture in the range of f/2 is recommended.
- A high key image histogram will be pushed far to the right.