


Unwanted blur is annoying. It’s something that we all want to avoid. Many of us want our photos to be acceptably sharp, if not tact sharp. Unwanted blur, however, is something that every photographer encounters.
If you’ve been shooting for a number of years now, and you’re still getting blur problems, that’s ok. Even professionals get them. I’m pretty sure, though, that the percentage of shots with unwanted blur for pros and experienced hobbyists is far less compared to someone just learning how to get off auto mode. So it’s really normal to still have it even after years of shooting. However, we want to be able to create more photos without unwanted blur over time. This is why learning how to get rid of blur is something that we want to address within our first year of photography.
In this quick guide, I will be focusing mainly on what causes blur and ways to prevent it. Do take note that this is not a tutorial on how to use editing software to help you salvage your photos from blur.
Although there are sharpening tools you can use during post-processing to deal with minor soft blur (and even that doesn’t look as crisp compared to when it’s already sharp off the camera), there’s still no technology that can turn overly-blurred shots into sharp photographs. It would still be easier to learn how to prevent blur than spending too much useless time on post-processing. If you’re interested in doing that, then keep reading.

Understanding Blur
Blur is defined as anything that is not clear or where details are obscured. If you’re supposed to wear subscription glasses, you know that not wearing them will cause your vision to become unclear. This is a type of blur in vision. Another type of blur is when you have fingerprints smudged all over your glasses.
Blur isn’t just limited to vision. There’s a big difference in the sound produced when you’re talking while your hand is covering your mouth compared to when you don’t have it covered.
Go ahead – try to cover your mouth while talking so you can observe how it sounds. What did you notice?
If you listen to someone else doing it, you may find some words difficult to understand. It’s just not well defined. The voice isn’t sharp. This is one form of blur in audio.
Another form of blur in audio is when your ear drums are affected by a very strong sound source. War movies sometimes depict battle scenes where an explosion causes the protagonist to have temporary deafness. His hearing gradually returns after some time and the unclear sound slowly clears up until it goes back to normal.
Key Lesson: There are different types of blur in photography and we will be discussing each of these types later. I would just like to stress that the dictionary definition of blur doesn’t fully apply in photography. For example, if you don’t see the details of a photograph because it’s too dim, we don’t call this blur. In photography, we call this underexposure.
When a photograph is unclear because it’s affected by fog, morning mists, smoke, or haze, it’s not a blurry shot – it’s called a hazy photograph.
You will notice later in our discussion that what we consider as blur in photography is caused either by the camera or the lens. For now, let us work on how to recognize blur in photography.
Recognizing Blur
Each type of blur has certain characteristics. Being able to recognize and identify the kind of blur based on what it looks like in a photo is the frst step in learning how to prevent blur.
Can you see the difference in blur between these three photographs?


Let’s describe the blur in each of the images. In the first image, the elements in the photo are unclear. It’s too soft that you won’t notice any edges. This type of blur is similar to when you take off your prescription glasses. We call this an out-of-focus blur.
The second photograph shows only a portion of the photo as blurry. In fact, it’s only the bus that’s blurry. Everything else seems to be sharp. With this type of blur, it creates a feeling that the bus is moving. This is because it was taken when the bus was in motion, as you can see from the blur streaks and light trails within the blur. We call this motion blur.
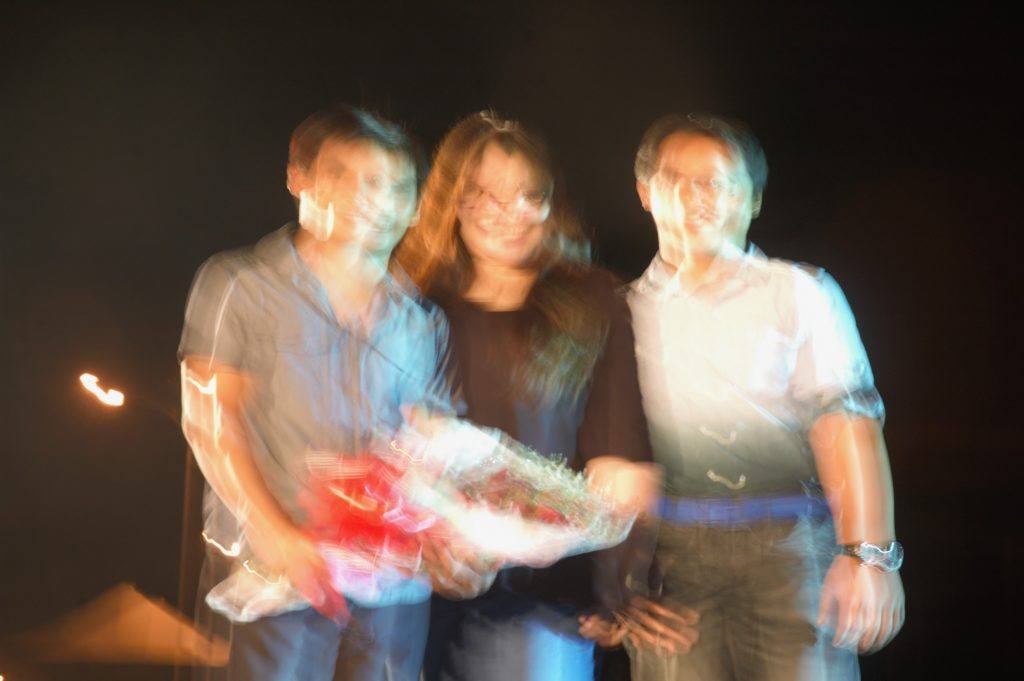
Our last photo contains the third type of blur. The three individuals posing seem to produce motion, but the blur is really caused by the camera moving instead. This type of blur is usually easily recognizable when you’re taking photos of subjects that aren’t moving. As it is caused by the camera movement, it will affect the whole image. We call this camera shake, since the blur is made by the camera shaking.
Note: When we use the word ‘blur’ in photography, we normally refer to ‘out-of-focus blur.’ When the blur is caused by shake, we use the term ‘camera shake.’ When it’s motion blur, we use the term ‘motion blur.’
Let’s take a look at some photos. See if you can determine if they have an out-of-focus blur, motion blur, or camera shake. Zoom in to take a better look.


Answers:
- Motion blur
- Camera shake
- Out-of-focus blur
- Out-of-focus blur and also camera shake
- Looks like it has all three
Key Lesson: Did you do well in recognizing the types of blur? If not, that’s ok. Some photos can be tricky, especially if there is only a small amount of blur. For example, minimal camera shake may be hard to spot since it may look a bit like minor out-of-focus blur.
Different Types of Photography Blur
Let us now look into these three blur types in detail. Here we will recognize the type of blur, how it’s created, a comparison of intentional/wanted and unintentional/unwanted blur for each type, as well as some possible solutions and learning points to avoid creating unwanted blur.
1. Out-of-Focus Blur
When you capture a photograph, the lens optics cause some parts to be rendered as blurry and others as sharp. That sharp area is called depth of field. To make it technically correct, depth of field is the area of acceptable sharpness. The rest is called out-of-focus blur. When an object falls within the depth of field, you will see it as sharp. If it doesn’t, it will be blurry.

Intentional vs. Unwanted Out-of-Focus Blur
Out-of-focus blur isn’t a bad thing; it’s simply just blur. It is the blur naturally created by your lens’ optics. Many great photographs have out-of-focus blur. Have a look at this example image. The subject is sharp and the background has out-of-focus blur.
When, then, do we encounter unwanted out-of-focus blur? This usually occurs when there is a problem with focusing. It is when we want our intended element to be sharp – usually our predetermined subject – but it does not fall within the area of acceptable sharpness. In short, it’s when we (when we use manual focusing) or the camera (when we use its autofocus system) focus on the wrong spot. We then call this an out-of-focus shot. The photo of a dog below is an example.

Intentional and unintentional out-of-focus blur will look the same. The photographer determines which elements should have out-of-focus blur and which should be sharp. Photo by Homini:)
Causes of Unwanted Out-of-Focus Blur
Incorrect focusing is the key reason for unwanted out-of-focus blur. It’s when you want a specific object to be sharp so you focus on it so that it falls within the depth of field, except it ends up in the out-of-focus area.
Incorrect focusing, more often than not, is due to user error. Focusing can either be done manually or by using the camera’s autofocus system. Whether you use autofocus or manual focusing, it is ultimately your decision to say yes to what is being focused on by pressing the shutter and creating the shot.
If you’re using manual focusing and still get it wrong, it can be because you didn’t set the focus ring correctly to render a sharp focus. In other words, your eyes thought it was sharp, but it really wasn’t.
If you’re using manual focusing and still get it wrong, it can be because you didn’t set the focus ring correctly to render a sharp focus.
If you’re using autofocus, it means you’re relying on the camera’s autofocus system to make sure that your chosen focus point renders the required sharpness.
Note: Focusing systems aren’t always perfect and can have calibration issues. This can cause the camera to produce out-of-focus blur in an area where it’s supposed to create depth of field. Although we will not be discussing it here, there are tests that you can do to see whether your camera and/or lens has focusing issues. I do not recommend, though, that you assume that is the case when you’re having blur problems. A lot of times, this isn’t very noticeable, except to the well-trained eye.
Also, take note that lens quality can affect how sharp the sharpest areas really are. Sometimes after doing tests, you’ll discover that the depth of field is still quite soft. This can be due to the quality of your lens’s optics.
How to Avoid It
Avoiding out-of-focus blur means you need to address the incorrect focusing issue.
If you’re not familiar with your camera’s focusing and autofocus system and how to use it properly, then it may result in out-of-focus blur. Study and practice using your camera’s autofocus system. Experiment on different autofocus modes and study how your camera behaves according to different focus points available. It is also important to gain understanding and experience in dealing with depth of field.
If you’re used to manual focusing and you’re always getting out-of-focus blur, try shooting using the autofocus system to see if the problem still exists. If you’re used to autofocus, try using manual.
Learning how to test your camera for autofocus problems may not be necessary, but if you do fnd your gear has calibration issues and the blur becomes too obvious, then make sure to have it checked and fixed by a technician.
Important Note: I also suggest looking at forums or reviews about specific lenses as there are lenses with soft focus issues. Expensive lenses usually mean better glass. The cheaper ones at certain focal lengths can produce images that aren’t very sharp. It’s not necessarily blurry; it’s just not that sharp. And it’s not because the lens is broken; it’s just because of the lens quality.
Also, you may have already heard that prime lenses produce sharper images than zoom lenses. This tells us that sharpness levels can vary when using zoom lenses. Many have noticed that super zoom lenses (those that stretch from wide angles to very long telephoto ranges) tend to become softer at longer focal lengths. For example, if you’re using an 18- 300mm lens, it’ll be noticeably soft at 200- 300mm compared to when you’re only at 50mm.
2. Motion Blur
Blur created by the movement of an object using a slow shutter speed is called motion blur. Any movement made by an element or object within your frame while the shutter is open will result in this type of blur, unless the shutter speed is fast enough to avoid creating it.
The amount of blur you can create is dependent on two things: (1) how long the shutter speed is set to be open, and (2) the speed of the moving object.
Intentional vs. Unwanted Motion Blur
Intentional motion blur is when a photographer decides to show an object’s motion by slowing down the shutter speed to capture the movement. The camera renders this movement as blur that looks like a trail.
This technique is quite common, but it can produce exceptional results when combined with excellent composition.
Unwanted motion blur, on the other hand, will yield the same result, but it is usually when you simply don’t want motion blur or you want less motion blur, but your camera’s exposure limitations cause you to use a shutter speed that is longer than what you desire to use.

Like intentional and unintentional out-of-focus blur, intentional and unintentional motion blur will look the same. The only question is: ‘Does the photographer want the blur or not?’
Causes of Unwanted Motion Blur
The main cause of unwanted motion blur is low light and your camera’s exposure limitations. When you’re shooting under the bright hot sun, the light is so strong that you have to use fast shutter speeds. In low light, however, you usually end up with slower shutter speeds because faster settings can result in underexposure or an undesirable image noise level. Since shutter speed directly affects motion blur, you need to be able to increase your shutter speed to an acceptable speed that will prevent motion blur.


A faster shutter speed was used for the shot on the top. Although it’s still slow enough to create motion blur, the blur is comparatively less than the shot on the bottom.
How to Avoid It
Motion blur is dependent on a slow shutter speed setting. To avoid it, you just need to use a fast shutter speed setting.
There are a number of ways you can do this. All you need to think about is, how can I make my shutter speed go faster without compromising exposure?
If you remember the fundamental lessons of exposure, you know that shutter speed is affected mainly by three other things: aperture size, sensor sensitivity (ISO), and luminance (light intensity). Adjusting any or all of these three will give you the ability to change your shutter speed. If you increase the aperture size (small f number), increase your ISO (more sensitive sensor), or increase luminance (brighter light), this will allow you to use a faster shutter speed setting to avoid overexposure.
Of course, if you’ve been shooting for quite some time now, you know that you can only go so far when it comes to changing settings because of camera limitations. This is why many resort to upgrading to better lenses that have larger apertures or camera bodies with a higher ISO threshold. It isn’t always easy to increase light intensity either, unless you’re using studio lights or if you’re considering using flash.
Once you use a flash unit, it immediately extends your camera’s ability to use shutter speed settings that can avoid motion blur. Take note, though, that since you’re adding another light source into the scene, this will affect how the camera renders the image, so you need to ask yourself if you like the way your flash affects your shot.
Recommended Gear: Using an external electronic flash or flash gun is a better option than using your camera’s onboard flash. This is because onboard flashes – although readily available for many cameras – are limited in terms of lighting direction as it uses straight-up front lighting, and in terms of power or light intensity as you may only use it to illuminate your subject that’s a few feet away.
Electronic flashes can give you versatility in both lighting direction and power, resulting in a better and more aesthetically pleasing image.
Recommended Reading: For best results when using your flash, practice using it in different lighting conditions and scenarios. This Photzy premium guide may help you use your flash effectively: Electronic Flash – Parts and Practices
The other solution may be easier or harder depending on how much control you have over your subject. The solution is to stop your subject from moving. Obviously, it’ll be impossible for you to stop the waves from moving when you’re shooting the ocean, or a bird from moving its wings while flying. Telling your friend to hold a pose for a second or two may be easier.

There’s a theory that part of the reason why subjects during the early days of portrait photography didn’t smile was because holding a pose long enough was necessary to keep the images sharp. A single shot required a very long exposure and it’s difficult to wear a smile that long.
Camera Movements
In motion blur, an object moving in the frame is what causes the blur. This tells us that movement can cause blur when using slower shutter speeds.
There’s another form of blur caused by movement. Any movement made by the camera during the shot can also cause blur. When the camera moves, obviously the placement of an object within the frame moves as well.
The longer the shutter speed duration, the more blur it creates. Intentional vs. Unwanted Blur There are a couple techniques you can use to create intentional camera movement blurs.

Panning is one of these techniques. It’s executed by horizontally rotating the camera while following the movement of an object. This creates a kind of trailing blur in the background, similar to motion blur.
Another technique is zoom burst or zoom blur. This is done by zooming your lens in or out while the shutter is open. Here’s what it can look like.
Any movement made by the camera during the shot can also cause blur.
Unintentional movements of the camera are usually caused by very small movements while trying to achieve a steady shot. The term used for this kind of unwanted blur is camera shake.

An example photo using zoom blur. You’ll see how the direction of the blur streaks created seem to go outward.
Causes of Camera Shake
Camera shake is obviously created when whatever is holding the camera is moving. When you’re holding your camera with your hand, at a certain point, your body movement will cause the camera to shake.
Also, using a longer focal length given the same shutter speed setting increases the chance of blur.
When you’re using a tripod to avoid camera shake while shooting at longer exposures, pressing your shutter can still initiate camera shake. The other cause is internal vibration. The DSLR’s mirror vibrating when you trip the shutter can create some blur.

Photo by Katherine Johnson
How Do We Avoid It
Your camera can tolerate some movement when you’re using faster shutter speeds. The key to address this is to avoid using a shutter speed setting that is too long for hand holding. Your focal length should be considered. The tolerance level when you’re shooting at 35mm is different compared to when you’re using a 105mm lens. To avoid shake, you need a faster shutter speed for the 105mm lens.
One classic guideline formula is to use a shutter speed setting that is 1/focal length. So if you’re using a 60mm lens, the fastest you can go is 1/60th of a second.
If you’re using a 105mm lens, the minimum shutter speed should be 1/105th of a second. But since cameras don’t have this setting, you need to choose the closest fastest setting. In this case, it’s 1/125th of a second.
Of course, this guideline isn’t absolute as some hands are shakier than others.

There’s both motion blur and camera shake in this photo. The photographer used a shutter speed of .4 seconds and seems to have hand-held the camera. Although this turned out to be somewhat artistic, you’ll notice that the surrounding elements are affected by camera shake. The buildings, ground, and brick wall seem blurry but it doesn’t look like it’s out of focus blur. Photo by Antoine K
Also, the size of the sensor also matters. It is also important that we learn how to hand-hold our cameras for better stability.
You may also get lenses that can reduce the shakiness of the camera. These lenses help in stabilizing your shot to avoid camera shake.
Different camera manufacturers have different terms for this feature. Canon calls it Image Stabilization (IS) while Nikon calls it Vibration Reduction (VR).
If you will be using a longer exposure setting, having a steady base is necessary to ensure stability. Using sturdy tripods are your best choice. It’s more expensive, but it does its job in ensuring that it isn’t affected by internal vibrations from a DLSR’s mirror movement or external factors like mild wind.
Since tripping the shutter button with your finger can also cause movement, using a shutter release cable or a wireless remote to trigger the shutter may help in these instances.
Of course, there are external movements that are too strong where it’s still difficult to avoid shake, such as when there’s ground vibrations because of a train passing by or when the wind is too strong.
Recommended Reading: Get yourself a sturdy tripod and a wireless remote cable. If you’re into landscapes, it’s a must-have for steady scenery shots. Photzy’s best-selling premium guide, The Complete Landscape Photography guide, covers topics about gear, including what to look for in a tripod.

It looks like there are sharp elements in this shot, but you will actually see camera shake if you look very closely.
Review Exercise: Now that we’re done discussing the major causes of blur and how to avoid them, let’s have a review exercise. If you can’t answer it now, I suggest trying out the settings in similar conditions so that you’d be able to answer it later.
The photo below has a mix of motion blur and camera shake. It was hand held using a 50mm f/1.8 prime lens with settings at f/1.8 and ISO 500. Exposure time was 1/15th of a second. It was taken at night with lantern festival lights as the only light source.
What technical solutions can you offer to (1) remove the camera shake but not the motion blur, and (2) remove the camera shake and reduce/remove the motion blur?
Just explore possibilities for now; don’t concern yourself with limitations outside of technical settings. Write as many as you can.

Photo by Karlo de Leon
How did it go? Here are some solutions. See if they match yours.
- To remove camera shake and keep motion blur, the shutter speed doesn’t have to change. I just need to keep the camera steady. My best solution is to use a tripod. If using a tripod is not an option and I need to hand-hold the camera, I can improve my handholding techniques to get a steadier shot, and/ or increase camera shake tolerance by reducing the focal length. Based on the lens that was already used, I need to replace it with a lens with a wider angle with the same or better maximum aperture like a 24mm 1.8 lens. It’s not the best setting you can use since it’s not the recommended setting (1/30 for a 24mm lens), but it’s better than using a 50mm lens. Of course, composition will change, or if I want to keep a similar composition, I just need to move in closer to the subjects. If my lens has a stabilization feature, I can turn that on too.
- To remove camera shake and reduce motion blur, I need to increase the shutter speed. To do this, I have to increase the ISO, use a lens with a larger aperture (f/1.4 or better), or use a flash unit. I can also use a combination of these settings. Improving the camera shake tolerance can also help reduce camera shake. The solution is the same as number 1.
Other Causes of Blur
Aside from the three main types of blur in photography, there are other things that can cause blur in your shots. Here are a few things you should consider:

Those dark blurry things are sensor dust. Photo by Jeff Keyzer
Dirty gear can cause blur. Dust, grime, fngerprints, and mold can affect sharpness. The location of dust in your gear matters since it determines whether or not it will affect your shot.
Some places where it won’t affect your shot are the following:
- Viewfnder
- Mirror (for DSLRs)
Some places where it will affect your shot are the following:
- Lens
- Camera sensor
Dirty gear can cause blur.
This can be addressed by simply cleaning the affected parts of your camera. In some cases, where dust is located in unreachable places, especially the lens, an air blower can be used to remove them.
If fungus is present in the inside of the lens, you should have it cleaned by a camera technician. Keeping it there for a long time can permanently affect your lens.

If there are fingerprint smudges on your lens, this is how it’s going to look like. Photo by Theresa
Noise and Pixelation
A noisy and/or pixelated image isn’t exactly blur. In fact, it’s not blur, but it may look like blur because the pixels begin to overlap with each other causing a look that may pass as blur. This usually happens when you’re using an ultra-high ISO value beyond the acceptable ISO levels of your camera or when you use a very low resolution image that you try to magnify in post.
To remedy this situation, you need to shoot at a lower light sensitivity. You may do this by setting a lower ISO value. It’s also a good habit to check whether you’re shooting at the highest resolution. Better yet, use raw fles.
Photo by Quinn Dombrowski
Key Lesson: It is always best to shoot at the lowest ISO to maintain a crisp shot. But in most cases, this is not ideal since you need to push for a higher ISO in lower light situations to be able to get a shot with perfect exposure. Usually, what you would have to do is determine the optimum ISO that your camera can use given the light intensity so that it would produce images that are within an acceptable standard of noise. The optimum ISO depends on each camera model, but I suggest experimenting with your camera to determine which is best for you.
Viewfinder Diopter
If you fnd that your viewfnder has constant out-of-focus blur, it can be because your viewfnder diopter is not set correctly. A diopter is a switch in your viewfnder that you can use to adjust the viewfnder optics. This feature is available in some cameras.
This is especially helpful to those who use glasses for better vision. Instead of shooting with your glasses on, just adjust your diopter to be able to adjust your vision. It’s like having your glasses built into your camera. Pretty cool, eh?
So if you’re getting a blurry frame when looking through the viewfnder but your shots seem to be normal, your diopter must be readjusted. Perhaps you’ve accidentally moved the setting. You’ll know that it’s an issue with the diopter when you peek through the viewfnder and everything, including the numbers and grids, are blurry. If the problem is something else other than the viewfnder, you will still see a blurry photograph, but the numbers and grids that you see in the viewfnder will still be sharp and clear.

The dial beside the viewfinder eyepiece is where you adjust the diopter on a DSLR. Photo by halfrain
Final Thoughts
Learn to avoid blur, then don’t worry about it too much.
This statement may be an odd way to end a topic, but let me tell you that personally, I’m not a pixel peeper. I really don’t mind having a bit of camera shake, soft focus, or slight unwanted motion blurs in some of my shots. I know that this goes against what many other photographers prefer, but as long as I achieve the look, effect, and story I want, then that’s good enough for me. Of course, there are times when I have to assure sharpness in my shots, especially when I’m shooting for clients.
It’s really all about being able to manage the blur.
Photo by Karlo de Leon


