


Introduction
Maybe you have used Lightroom’s adjustment brush before to touch up facial portraits (after all, it has two skin-softening selections as well as one for teeth whitening). Why then spend extra effort (and/or money) on another tool to touch up faces?
Well, firstly your intuition should tell you that a package that was built to cater for photography, in general, is not going to include a full facial enhancement package – or seen from the opposite side: that a package that was built specifically for facial ‘enhancements’ will focus much more on tools to adjust facial features and ‘flaws’ than a general image editing package. I use the word ‘flaws’ with caution because PortraitPro allows you to adjust facial features which cannot be described as ‘flaws.’ It also has non-facial adjustments like the strength and angle of light.
Note: PortraitPro released PortraitPro Body a few years ago, allowing you to make adjustments to the full human body. We’ll only focus on the standard facial edition in this guide, though.
Recommended Reading: If you want to learn how to enhance your photos and create better images, grab a copy of Photzy’s premium guide, Ultimate Guide to Fundamental Editing.
What will you learn in this guide?
In this guide, we’re going to look at how to use PortraitPro, not only together with Lightroom but from inside Lightroom. But why would you want to do that?
- All of your images from a shoot (with or without PortraitPro adjustments) are in one library. Remember how Photoshop creates a separate image inside Lightroom when you open it in Photoshop from inside Lightroom (see my previous guide called A Match Made in Heaven: Lightroom and Photoshop)? PortraitPro does exactly the same.
- You can seamlessly edit a Lightroom image before opening it in PortraitPro and/or after making changes in PortraitPro.
The Integration
How do you go about making PortraitPro available in the Edit In… submenu list? There may be more than one method, but this one is probably the most common:
- Select Edit from the top menu
- Select Preferences
- Click on Choose in the Additional External Editor section
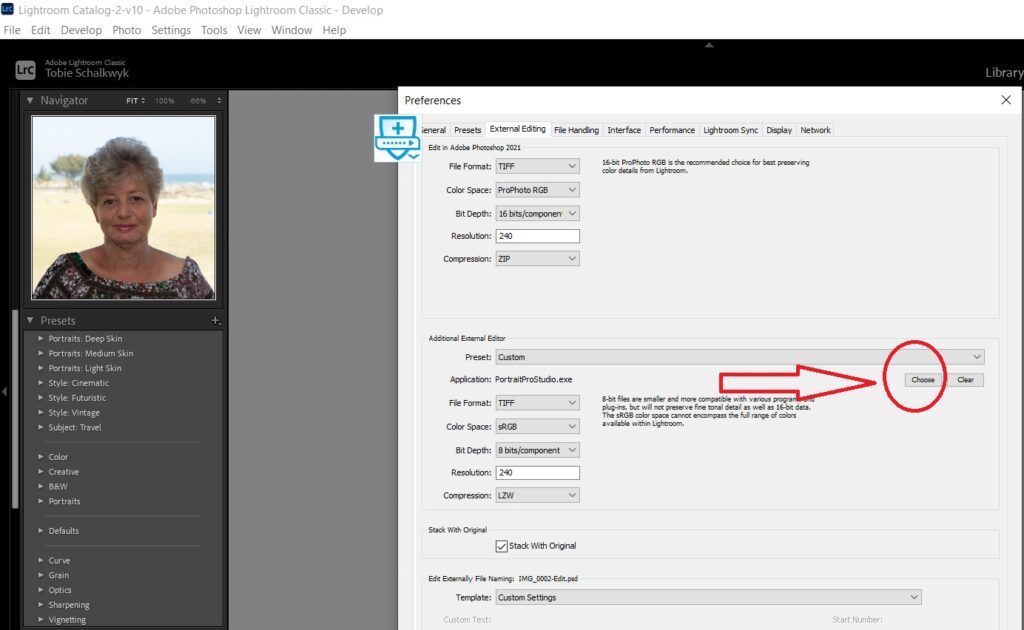
Screenshot by Tobie Schalkwyk
- Navigate to the directory of PortraitPro’s .exe file. I have PortraitPro Studio 18 installed, so the directory is called C:\Program Files\PortraitPro Studio 18.
- Click on the PortraitPro .exe (in my case exe)
- Click on the Choose button
From now on, you should see PortraitPro listed in the Edit In… sub-menu.
Screenshot by Tobie Schalkwyk
Preparation
I like to do basic corrections in Lightroom before passing an image to PortraitPro (that’s the advantage of integrating them). In this case, I’ve done the following:
- Raised the shadows to +54, as the face is a little unexposed
- Removed two white miniature white spots (fluff) in the model’s fringe

Photograph by Tobie Schalkwyk
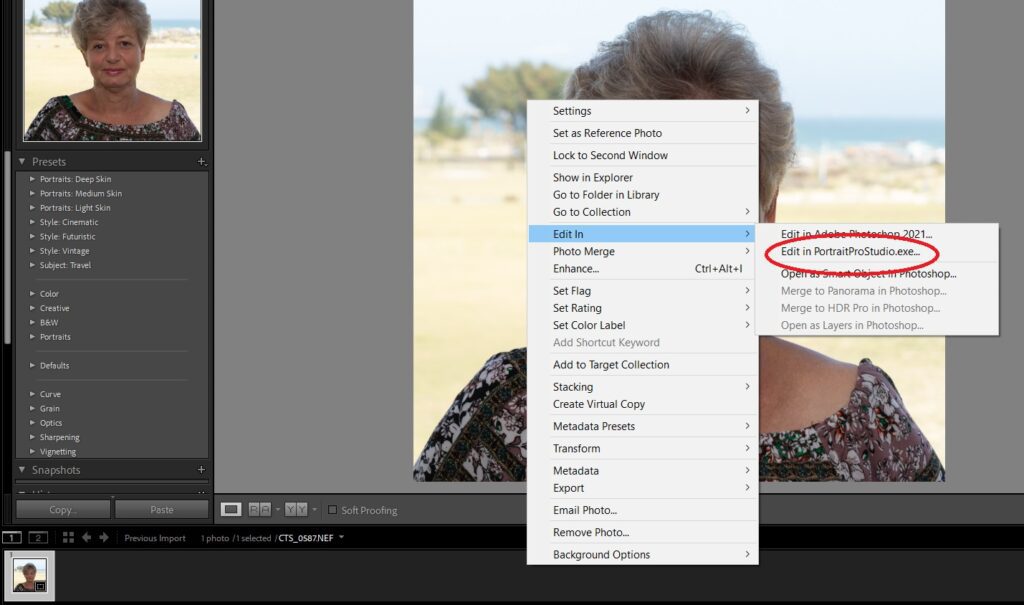
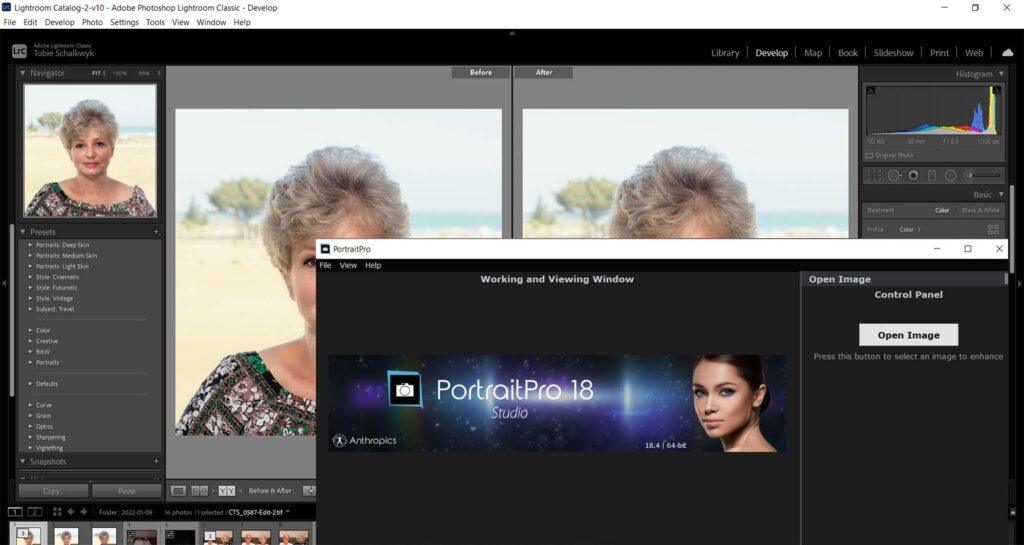
So, we open the following image in PortraitPro:
Right-click on the relevant image and select Edit In in the resultant dropdown menu. Then click on the PortraitPro entry in the next dropdown menu. Click on the Edit button to confirm that you’d like to pass on the image with Lightroom adjustments.

Screenshot by Tobie Schalkwyk
You will immediately see the creation of a (blank) duplicate thumbnail in Lightroom Classic’s filmstrip image bar. It will have the same name as the original, with an Edit suffix and .tif extension. The thumbnail will obtain an image as soon as you save the adjusted image in PortraitPro.
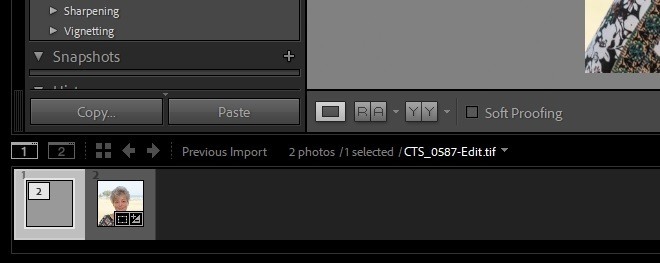
Screenshot by Tobie Schalkwyk
Inside Portraitpro
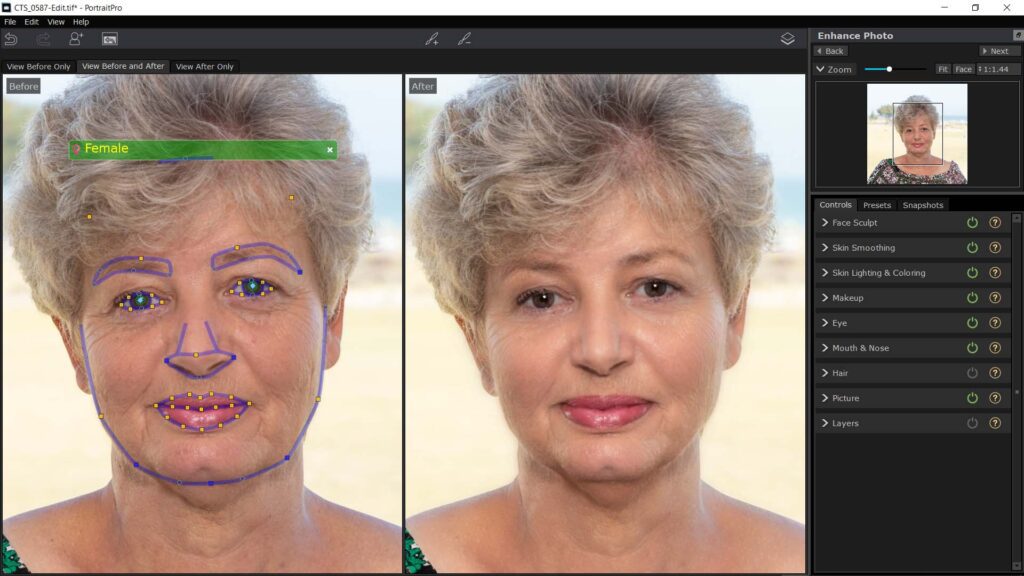
The first thing that PortraitPro will ask you is to specify your model’s gender. In this case, we select Female.
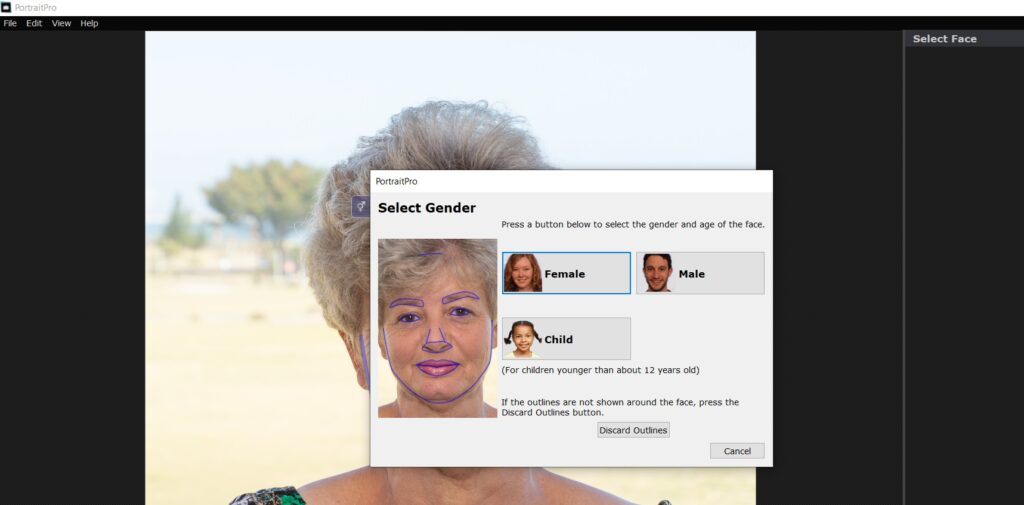
Screenshot by Tobie Schalkwyk

Screenshot by Tobie Schalkwyk
In this particular case, PortraitPro seems to have auto-established the face’s borders quite well. I just made a few minor adjustments around the nose, cheeks, and chin. I also dragged down the bottom point of the model’s left eyebrow to cover her eyebrow in full.
Screenshot by Tobie Schalkwyk
Now let’s take a breather for a moment. Let’s compare the pre and post-faces. Just imagine for a moment how much work it would need to make these changes in Lightroom. This time we did it with one click (well, almost)!
Note: I must admit, usually I am not fond of PortraitPro’s initial auto-adjustments. More often than not it goes way too far, and the auto-adjusted face makes the model look like a stranger, or ‘obviously modified,’ for a lack of words. In this particular case, however, PortraitPro seems to have done a decent job. It not only softened the skin on the face, chest, and shoulders, but it also removed dark areas under the eyes, softened the glare on the model’s lips, and whitened the whites of her eyes. Had the model’s teeth been visible, it would also have whitened them too.
The ‘problem’ with PortraitPro is that it does not only make skin adjustments. It also makes ‘Face Sculpt’ adjustments which change the profile of your model’s face to look ‘younger.’ Of course, in general, that is exactly what females want, but is that a true reflection of your model? Especially if the image will not be used for modeling purposes but your subject is a family member or friend. This is where manual adjustments enter the picture (pun intended).
Key Lesson: PortraitPro has a built-in auto-adjustment, but usually it goes way too far with ‘Face Sculpt’ and skin adjustment settings. You may want to drag the relevant Master slider(s) way back (even to zero) and use the sub-sliders to re-introduce only relevant adjustments in a controlled fashion.
Recommended Reading: If you want to learn how to enhance your photos and create better images, grab a copy of Photzy’s premium guide, Ultimate Guide to Fundamental Editing.
Portraitpro - Manual Adjustments
I do not doubt that the model above would be quite happy with her auto-adjusted image version, but I’m going to pretend that this is one of the 90% of cases where I am not happy with it – not that I would necessarily end the editing right here, even if I am happy with it. There are additional changes that might enhance a ‘perfect’ image even more. You will realize what I’m talking about as we work through the image.
Face Sculpt

Screenshot by Tobie Schalkwyk
This is the PortraitPro adjustment I’m most cautious with as it can easily change your model into a totally new person. I usually start off by dragging the Master Fade slider way down to the left, and most of the time I leave it there. If you use it, I suggest doing the same and then starting by dragging the sub-sliders (Face Shape, Eyes, Eye Widening, etc.) to the right one by one. Keep a close eye on each slider’s effect on your model’s face as you do so.
Skin Smoothing

Screenshot by Tobie Schalkwyk
This is another setting that can easily be overdone, especially by amateur photographers. It provides you the ability to smoothen your model’s face beautifully, but if overdone, it can easily change your model into a wax doll.
In this case, I’d adjust the Master Fade control to more or less where I like it best (usually below 40) and then play with the sub-sliders. As you can see, PortraitPro gives you great control as to which area you’d like to touch, what type of adjustment you’d like to make, and by how much.
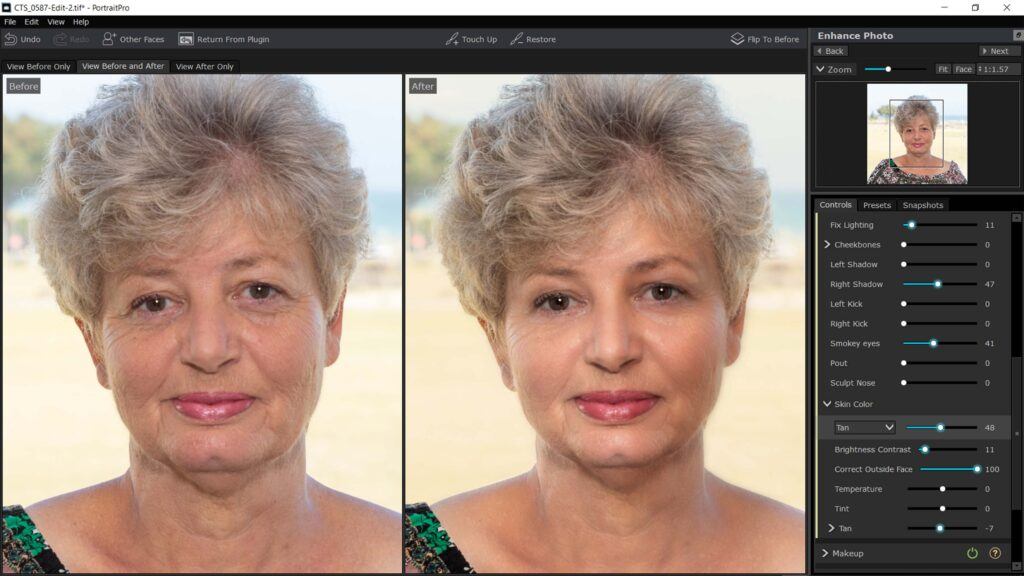
Skin Lighting and Coloring

Screenshot by Tobie Schalkwyk
This is one of my favorite adjustment tools in PortraitPro. Yet again, it is a setting that can only be made with great difficulty in Lightroom (especially the gradual increase/decrease in light and/or shadows across the face) and one of the major reasons why I love to integrate it with PortraitPro.
You can position your virtual ‘modeling lamp’ anywhere by dragging the highlighted circle with your mouse, or by dragging the side and bottom sliders closest to the face. Then, to emphasize the effect of your virtual modeling lamp, you can darken the shadows on the opposite side of the lamp.
You can position your virtual ‘modeling lamp’ anywhere by dragging the highlighted circle with your mouse, or by dragging the side and bottom sliders closest to the face.
In the image on the left, I have positioned the ‘modeling lamp’ to our left and dragged the Right Shadow setting to ‘47,’ perhaps a little too much, but I’d like to demonstrate its effect here. So, be honest – isn’t that great?
Take note of the Cheekbones slider which allows you to emphasize your model’s cheekbones using lighting adjustments. The Smokey Eyes slider allows you to add a shadow effect to the upper eyelids. You can increase/decrease the mouth’s pout effect and highlight the nose using light and shadows, should you wish to do so.
Screenshot by Tobie Schalkwyk
The Skin Color dropdown offers you a large selection of pre-sets and after selecting it, you can adjust the amount of your selected skin color by dragging the slider right next to the dropdown. You can even adjust the area outside of the face to match your skin color selection. See how I’ve darkened the background slightly in the image on the left.
Makeup
PortraitPro offers a handy selection of makeup adjustments. In this case, I chose to add a bit of mascara by dragging the Mascara slider to 73 and by choosing ‘Thick Application.’

Screenshot by Tobie Schalkwyk
You may want to add a bit of Upper Eyeshadow by using its Texture, Shape, color, shine, and opacity. You can do the same with the Lower Eyeshadow settings.
Eye

Screenshot by Tobie Schalkwyk
This is a suite of settings that can usually be left on its auto-adjusted levels as it clears up the white in the eyes, darkens the pupils a touch, and much more. Check out its sub-settings and keep a close eye on the changes as you make adjustments. You can even change your model’s eye color, but who in the world would want to do that?
One of the most used settings is probably Sharpen Eyes.
Mouth and Nose
PortraitPro offers a few adjustment sliders such as lip saturation and moistening. In this case, I chose to slightly reduce lip saturation and moisten the lips a little bit.

Screenshot by Tobie Schalkwyk
Hair
This is not a setting I use in general, but I guess it may be handy in cases where your model’s hair color seems to be a bit off its ‘real’ color for some reason.
Picture
This setting allows you to make a few overall adjustments in terms of temperature, exposure, etc. I’d rather do these adjustments inside Lightroom because of unpredictable results if you do them here, and then later also adjust them in Lightroom.
One of the most used settings is probably Sharpen Eyes.
Layers
Yet again, I believe in horses for courses and if I want to play around with layers, I’ll use Photoshop which specializes in layers, or perhaps other photo editing tools, depending on what the layers are needed for.
Key Lesson: The biggest mistake that editors make (especially amateurs) is to go too far with facial adjustments. This creates strangers or wax dolls which does not represent the real person. Know where to stop and rather do a bit too little than a bit too much, especially if your subject is a family member or friend.
Back to Lightroom
Once you have completed your changes, click on PortraitPro’s Next button in the top-right corner. It will then give you a dropdown to choose whether you’d like to edit another face or return to Lightroom (Return from Plugin).

Screenshot by Tobie Schalkwyk
If you select Return from Plugin, PortraitPro will save the image and close itself. A .tiff version of the image (with the ‘-Edit’ suffix in the name) will be available in Lightroom.
If you select Enhance Another Face In This Photo, then PortraitPro will allow you to go through all of the changes above for another face. And another. Until you’re done.
Note: It’s all about personal preference, but I hardly ever touch a man’s face. I believe that a man should look like a … well… man, LOL! If I do touch it, it would usually be to remove a pimple, sunspot, or other imperfection, but Lightroom is good enough to do so. No need for PortraitPro.
Recommended Reading: If you want to learn how to enhance your photos and create better images, grab a copy of Photzy’s premium guide, Ultimate Guide to Fundamental Editing.
Final Touches, if Needed
Once back in Lightroom, it is time to do your final check to see if you have not overlooked anything. In this case, I overlooked some blue objects in the background, so I removed them using Lightroom’s Spot Removal brush. I also removed a couple of other brownish dots on her other side while at it.

Screenshot by Tobie Schalkwyk
Well, that is it!
It may feel like a lot of steps and effort to edit one image, but keep in mind that after using PortraitPro a few times, you will quickly fall into an editing pattern. You will quickly learn which adjustments are your favorites or most valuable and only look up the others when needed.
Conclusion
PortraitPro is without any doubt one of the best (if not the best) facial image editors on the market. Having it integrated into Lightroom makes it just an extension of Lightroom, and a handy and valuable one at that! It adds a lot of editing features impossible to do in Lightroom, or only achievable with a lot of time and effort, mixed with a lot of imperfections and frustration.
I have tried various plugins with Lightroom, but PortraitPro is the only one that lasted through the years. I sincerely believe that no photo studio owner should be without it, and if they are, they do not have the optimal facial image editing software package at their disposal.
I have tried various plugins with Lightroom, but PortraitPro is the only one that lasted through the years
The biggest problem with PortraitPro is the use of self-constraint. It is easy to change your model into a different person. It would be a little silly to make your model look like her daughter’s older (or younger, heaven forbid) sister. Keep it real!

Photograph by Tobie Schalkwyk
I have done a lot of adjustments above for demonstration purposes, but had it been a real-life situation, I most probably would have stopped after Step 3 (Skin Lighting and Coloring), keeping all of the auto-adjusted settings for the steps thereafter. At that stage, my subject still looks like herself. My other manual adjustments thereafter made her move too far away from her natural appearance.
Screenshot by Tobie Schalkwyk
Self-Check Quiz:
- What is the most common mistake when using PortraitPro?
- Under what title will PortraitPro create its own version of the adjusted image in Lightroom?
- What is the main difference between Lightroom and PortraitPro (and why do you need it)?
- Name one adjustment that PortraitPro offers in addition to facial adjustments.
- How many faces can you touch up in one image in PortraitPro?


