


I’d like you to have a quick look at a bunch of images on Facebook before you read any further. Focus on landscapes and seascapes, or family shots with horizons in the background. What is the most obvious indication that those images have been taken by ‘amateurs’ (and I use that term with respect)?
Horizons! Have you noticed it? No? Then go back, have a look, and see what common trait a lot of them share. Look specifically at the horizons. Do you see it? They are hardly ever level!
The interesting thing is that the average human brain sometimes accepts tilted horizons (or other tilted objects, for that matter) as ‘acceptable’ and other times not. This can be quite confusing to (especially) beginner, or amateur, photographers. A question that regularly pops up on photography forums is, when is a tilted horizon acceptable and when is it not?
The interesting thing is that the average human brain sometimes accepts tilted horizons (or other tilted objects, for that matter) as ‘acceptable’ and other times not.
In this article, we’re going to have a look at when it’s fine to have horizons (or other objects) level and when it does not really matter that much. Then we’re going to look at mechanisms to manipulate horizons and other objects, or to tilt them to desired levels.
Recommended Reading: If you’d like to learn more and improve your landscape photography, grab a copy of Photzy’s bestselling premium guide: The Complete Landscape Photography Guide.
A Few Practical Rules About Leveling Horizons/Objects
I base my image leveling on three basic rules, based on gut-feel and perception. So, if you disagree with them, then it’s fine but keep them in the back of your mind when you’re entering your landscape (or other) images for a competition (wink, wink)!
Rule 1: Keep Things ‘Real’

Photograph by Tobie Schalkwyk
This rule could also have read ‘Use Your Common Sense.’ Let’s look at the image above.
What is most indicative of accidental tilt? The buildings and tower! In real life, no one would build a tilted tower or a building that it not horizontally level. So, no matter what else you level in this image, as long as those buildings and/or the tower is tilted, your brain will tell you that something is wrong!

Photograph by Tobie Schalkwyk
Doesn’t this look much better? Of course, because it matches real life! The fact that the hills are sloping towards the right does not matter because the buildings are level.
You’re probably thinking, “Horizons are easy, but what if there’s no horizon?” Well, then you’d still ‘stay real’ in leveling your image. Let’s look at the following image:

Photograph by Tobie Schalkwyk
In this image the bird seems quite at ease, but something seems ‘off.’ Does anyone build pine fences at a slope? No!

Photograph by Tobie Schalkwyk
After leveling the fence, the image looks more natural, strengthened by the fact that the bird’s beak is now also horizontally level.
Something else to notice in this image is that the log seems to make a kind of ‘bulge’ in the middle, but, due to the fact that the sides are level relative to each other, the perception is that the log is totally level. That is something to keep in mind if you do not have a 100% smooth horizon.
Rule 2: Fix Obvious Accidental Tilts

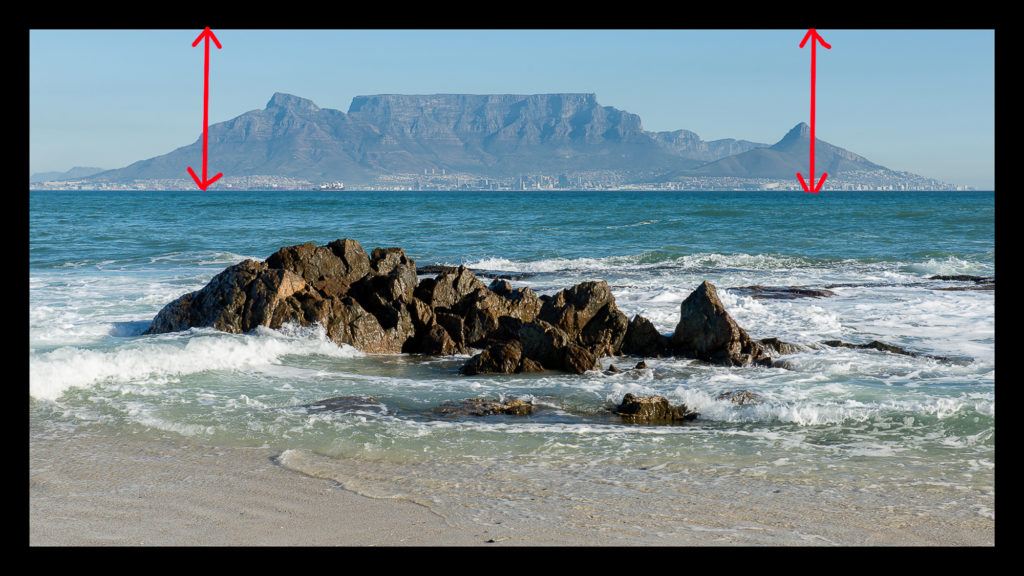
This is the most common problem, especially with family (and other ‘casual’) photos. The image above was actually downloaded from a paid stock image website and, sorry to say, makes one think ‘What the heck?’
Ironically, the photographer did well by placing the horizon perfectly on the top horizontal thirds line, but that was not enough to save a totally spoiled shot.
Everything inside of me screams, ‘This is wrong!’ It makes me want to hold onto one of the trees!

Doesn’t this look better? It makes me want to relax and enjoy the view!
Rule 3: Level for Aesthetic Reasons, Using a Top-Down Approach
Photograph by Tobie Schalkwyk
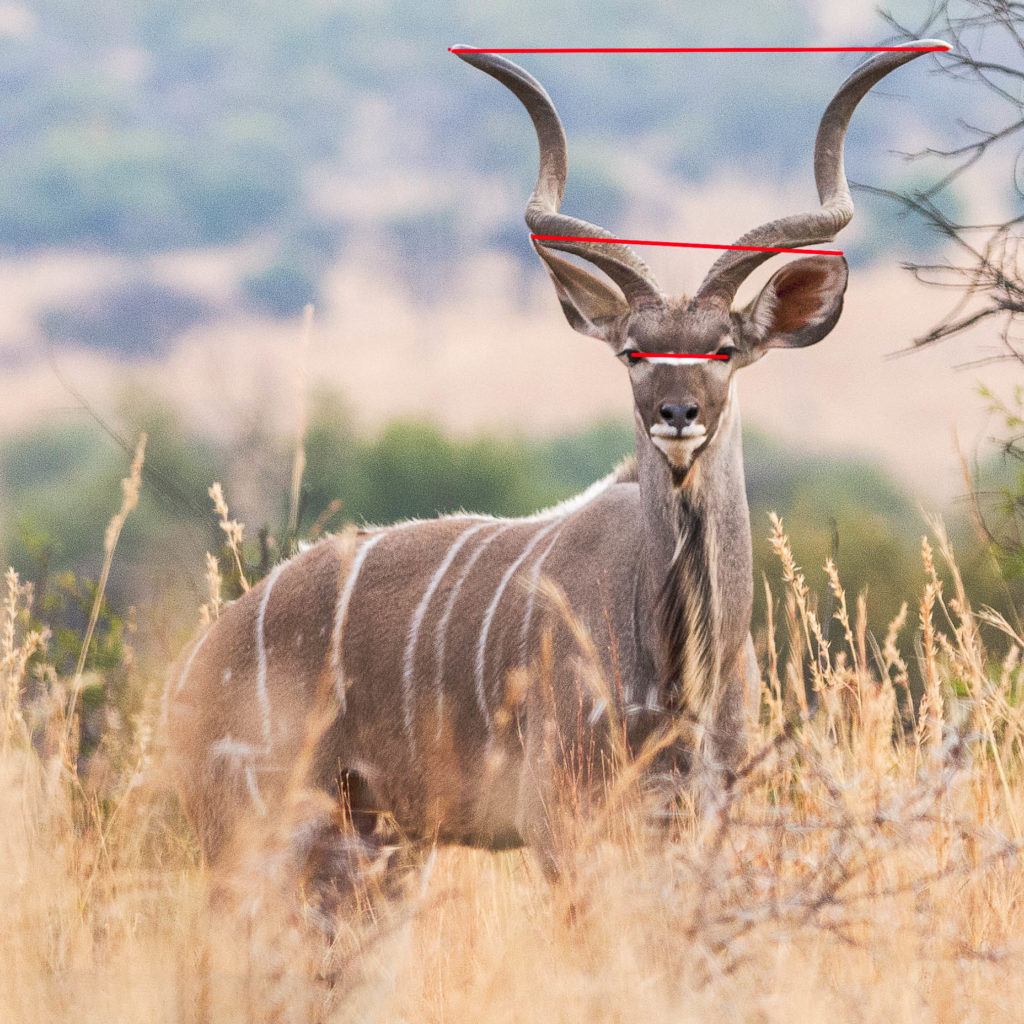
Sometimes I level things simply because it’s more appealing to the eye. It just raises my image’s overall look and feel that extra little bit. I find this to be particularly true with wildlife. I usually level one of three things: horns, ears, and eyes, in that order of importance because the higher the body part (or the closer to the top frame), the more obvious it is.

Photograph by Tobie Schalkwyk
In this particular instance the Kudu bull was looking straight at me, so it just felt ‘right’ to level the image by using the tips of its horns as guide.

Photograph by Tobie Schalkwyk
Had this been a cow (without horns), or the horn tips were at obvious different levels, and the ears were turned towards me at the exact same angle, I would have leveled the tips of the ears. Had the ear tips (and horn tips) been at obvious different levels as above, I would have leveled the eyes.
The same rule applied.
Which looks best?
Key Lesson: When deciding whether the angle of an image should be adjusted, start by getting a feel for the overall look and feel of the image. If your gut-feel tells you that something is off, then your viewers will most probably feel the same.
Then ask yourself: does it have a horizon and if so, is it level? Does it match ‘real’ circumstances? Will an angle adjustment relative to your top frame border enhance the overall look and feel?
Reasons for Using Tilted Images
Reason 1: For Artistic Effect

As with anything else in life, there are exceptions to the rules as far as the levelling of horizons is concerned. Sometimes images are tilted (in-camera or during post-processing) on purpose, mainly for the following reasons:
Sometimes the total absence of leveled objects can create a feeling of awe or create emotion, such as with huge buildings. In the image above, the photographer manages to invoke that same ‘weird’ feeling in my stomach as when I’m standing next to these buildings in real life and I look up.
He manages to enhance beauty by letting the buildings enter the image in the bottom two corners, tilted at more or less the same angles. Any attempt to level anything here would spoil the image!
This extreme kind of tilt should be done in-camera (when taking the shot) in order to prevent heavy cropping in postprocessing.
Reason 2: To Emphasize Motion

In the image above, the yacht was leaning over to one side. The photographer took the shot in an ‘upright’ position relative to the yacht but not relative to the ocean (maybe the camera was mounted on the yacht?). The result is a tilted horizon and a perceived ‘upright’ yacht. It creates the feeling that you are actually on board the tilted yacht.
There is no doubt that this was done on purpose and in-camera due to the large angle of the tilt.
Reason 3: For a More Interesting Composition

This mobile phone looks much more interesting (for example to be used in an advertisement) than a straight-up cell phone. Yet again, there is no doubt that this tilt was introduced on purpose.
Key Lesson: I have only just touched the tip of the iceberg here. There are many reasons for tilting an image, either in-camera or later during post-processing. Whatever your reason, the secret for it to ‘work’ is to do it in such a way that there will be no doubt from your viewer that you have done it on purpose.
Only then will he or she be able to see the image through your eyes and appreciate the tilt for what it was intended (consciously or not).
Recommended Reading: If you’d like to learn more and improve your landscape photography, grab a copy of Photzy’s bestselling premium guide: The Complete Landscape Photography Guide.
Ways to Level Horizons
Photograph by Tobie Schalkwyk
There are many ways to level horizons, some while you’re taking your shot, others thereafter.
Through the Viewfinder
This is simply your ‘manual’ method, and although it will not always be perfect, it can be close to that. The worst case scenario is that you’ll need a small adjustment afterwards, using some of the other methods as mentioned below. Use the upper border of the frame as seen in your viewfinder as a guide.
The secret is to be conscious of it, otherwise you will have much more work to do in post-processing.
There are many ways to level horizons, some while you’re taking your shot, others thereafter.
Your Camera's Viewfinder Grid Display
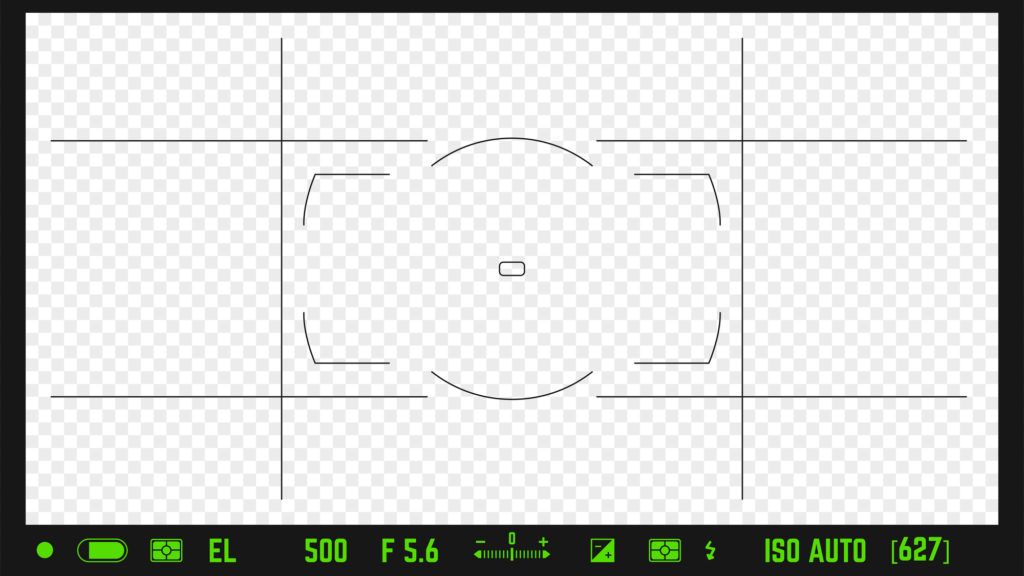
This method has an added advantage: you can use the grid to compose your image in-camera in terms of the rule of thirds. The grid overlaps whatever you see through your viewfinder, so the top horizontal thirds line can just as well assist you in leveling the horizon.
Not all cameras have this feature and it may look a little different in those that have it. It may not be activated by default, so check your camera’s user guide to see if it’s available and if so, how to activate it. You may like it so much that you leave it activated at all times! If you’re a landscape/seascape photographer, then why not?
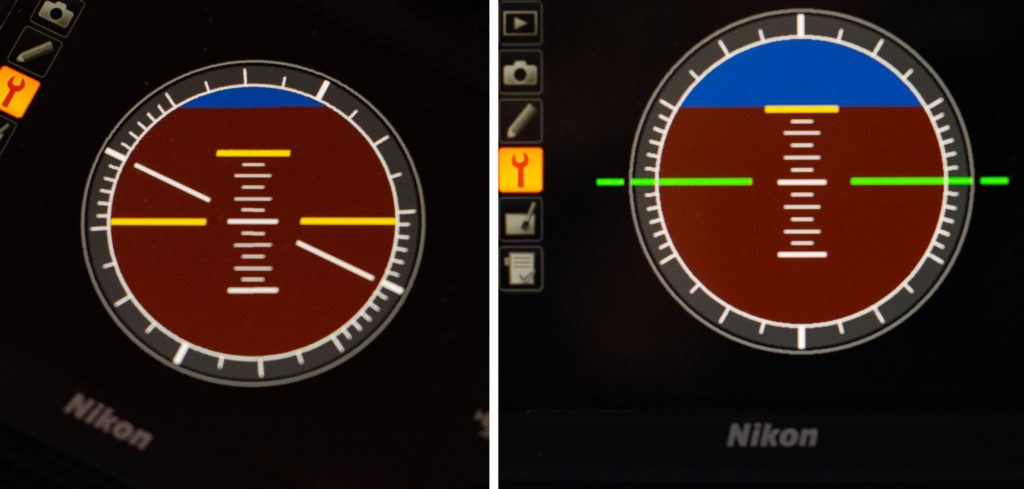
Using Your Camera's Virtual Horizon
Photograph by Tobie Schalkwyk
Most cameras have some kind of Vertical Horizon setting. This example is from my Nikon D600’s LCD screen and is found by selecting Menu/Setup Menu (‘spanner’ icon).
The image above shows the camera in a horizontally tilted position. As you correct the tilt, the white line moves closer to the yellow (level) line. When the camera is 100% level, a green line replaces the yellow and white lines.
Use Your Tripod's Bubble Level
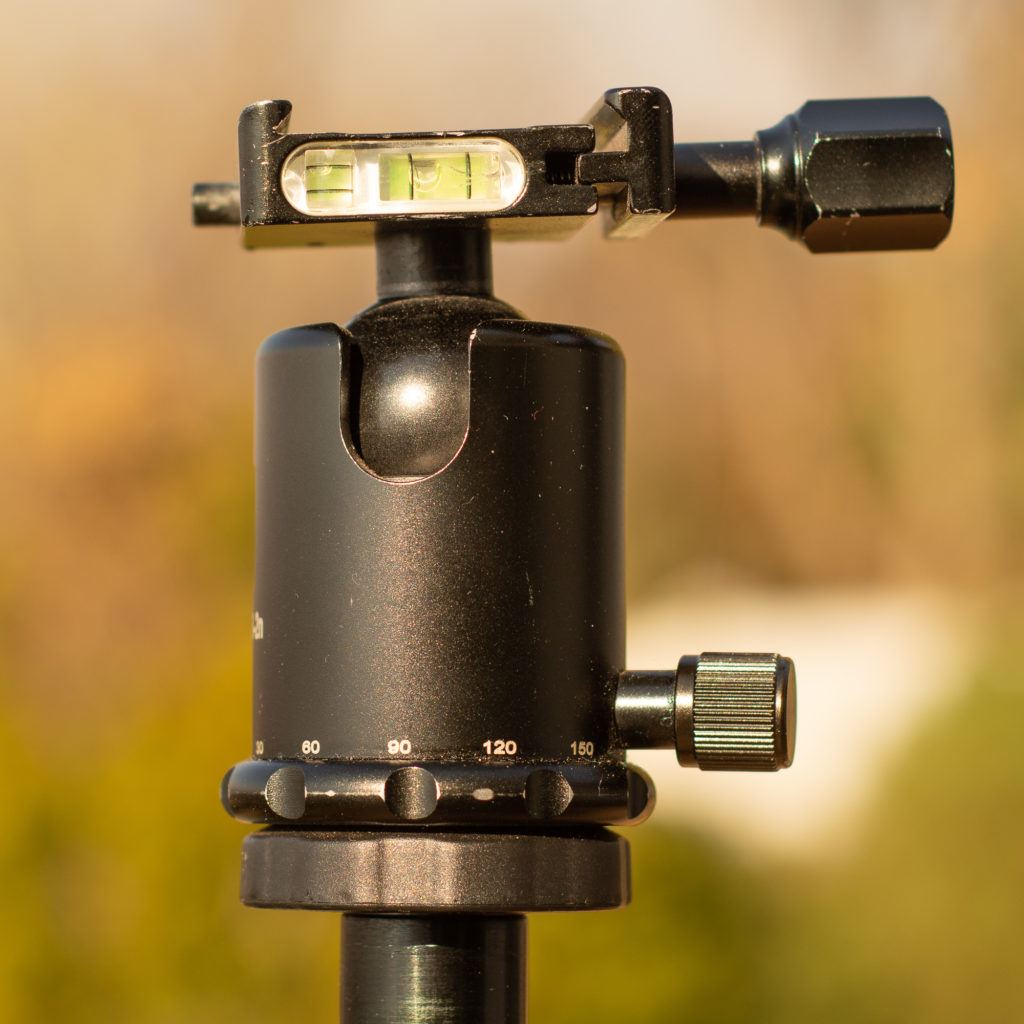
Photograph by Tobie Schalkwyk
Some tripods have bubble levels built into their mount plates. This is handy to check whether your camera is level when mounted on a tripod. It has the added advantage of compensating for an uneven surface on which your tripod is situated.
This is something to keep in mind if you do not have a tripod yet or you’re planning on replacing your tripod head sometime soon.
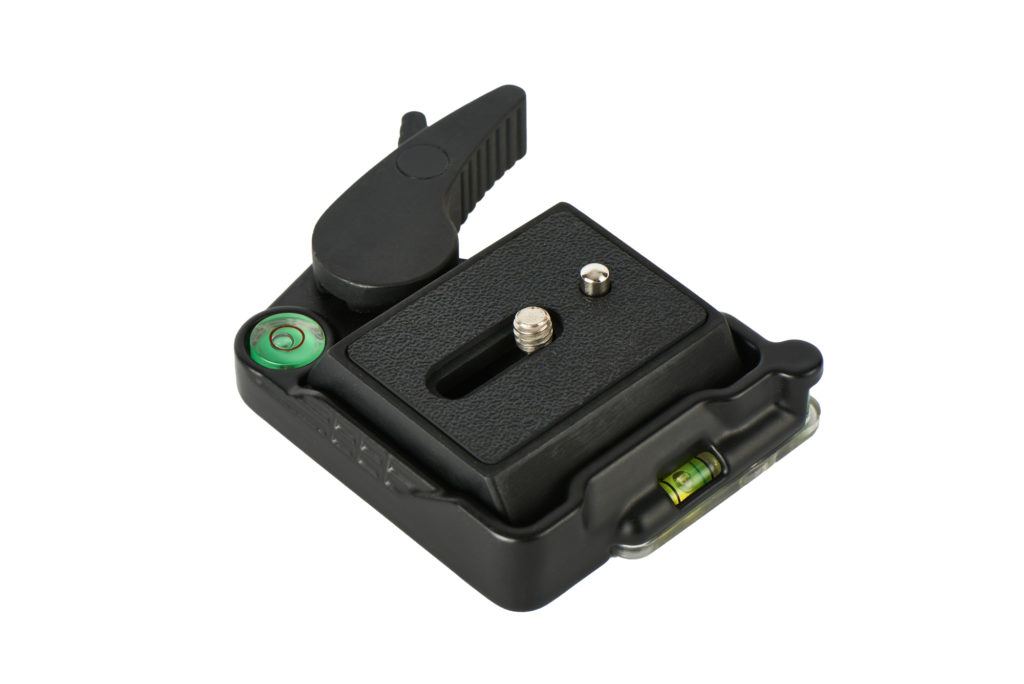
Photograph by Tobie Schalkwyk
You can actually purchase a quick release plate with a built-in bubble level that fits onto your tripod’s standard mount plate. That is a good option if your tripod does not have a bubble level or yours was broken by a bump or fall.
Use a Hot Shoe Bubble Level

Photograph by Tobie Schalkwyk
If your favorite tripod does not have a bubble level and you’re not planning on parting ways with it soon, there’s a low-cost solution. A wide variety of bubble levels are available that fit on your camera’s hot shoe.
The downside of course is that you won’t be able to use it when you have a speedlite or wireless flash trigger mounted on your camera, but hey, that is usually not the case when photographing landscapes, when you need it most. The upside is that you can use it when taking a hand-held landscape shot.
Post-Processing Tools
This horizon leveling option may be mentioned last, but it’s my go-to option for leveling horizons and other objects (in Lightroom specifically). I have taught myself the habit of leveling the horizon as much as possible in-camera (through the viewfinder), so usually very little horizon leveling is needed for my landscapes.
Every post-processing tool will have some way of changing the angle of your images (if it does not have one, then it’s perhaps time to look for another tool!). I will just discuss Lightroom and Photoshop in this guide, as I believe they are used by most photographers (if you’re not one of them, their CC package which includes both Lightroom and Photoshop is available for $9.99 per month – great value for money!).
I have taught myself the habit of leveling the horizon as much as possible in-camera
If you’re using different post-processing software, then I’m sure you will find instructions on changing image angles in its user guide/tutorials/online searches.
1) Lightroom
a) Use the Cropping Tool’s Grid Lines
These lines become visible as soon as you click the Crop Overlay icon.
- Hover your mouse just outside of your image. Your mouse icon will change to a bent line with an arrow on each end and your image will be filled with horizontal and vertical lines.
- Hold your mouse down while dragging it up or down. Your image’s tilt will follow your mouse movements.
- Release the mouse when your horizon is level with one of the grid’s horizontal lines.

Screenshot by Tobie Schalkwyk
Note: This method can also be used to tilt your horizon on purpose.
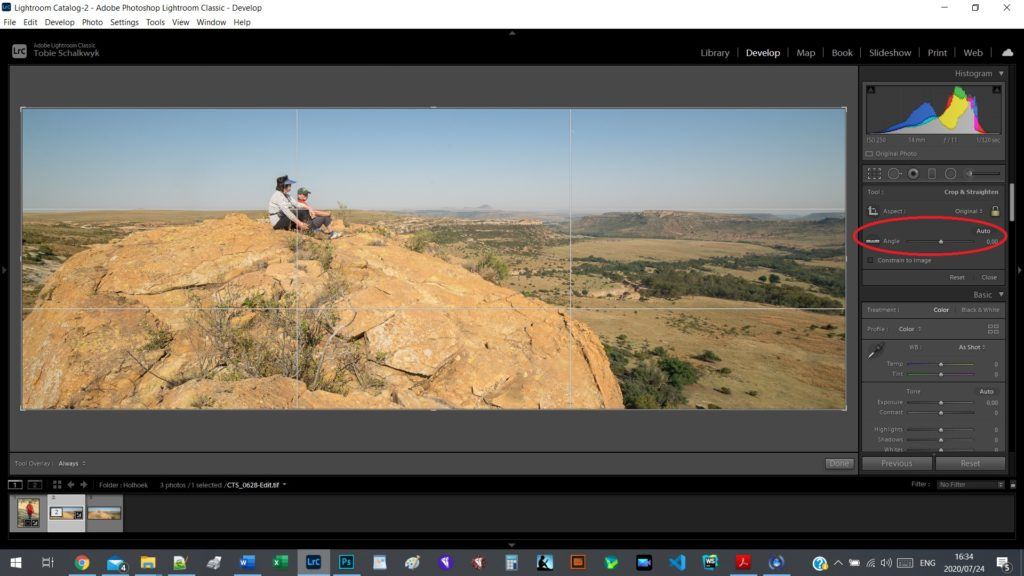
b) Use the Angle Straightening Tool
- Click on the level symbol next to ‘Angle.’ Your mouse cursor will change into a movable level with a plus sign above its top-left corner.
- Click on one side of your horizon and drag the mouse cursor to the other end of your horizon. Release the mouse.
- You will see the horizon shift into the level position.

Screenshot by Tobie Schalkwyk
c) Use the Auto Straightening Tool
- Click on Auto to the right of ‘Angle.’
- You should see the horizon shift into a level position.
Screenshot by Tobie Schalkwyk
Note: This method does not always produce perfect results. If you’re not happy with the results, use one of the other two straightening tools instead.
2) Photoshop
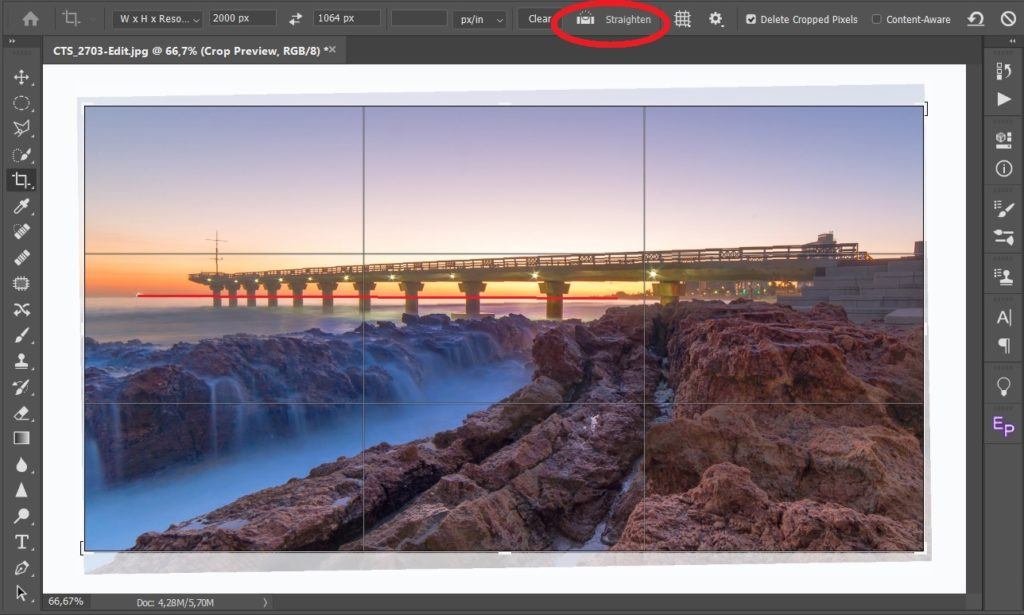
Screenshot by Tobie Schalkwyk
- Click on the Cropping symbol in Photoshop’s left menu. A level symbol appears in the middle of your top menu with the word ‘Straighten’ next to it (see the red oval in the above image). Your mouse cursor will change into a movable level with a plus sign above its top-left corner.
- Click on one side of your horizon and drag the mouse cursor to its other end. Release the mouse (see the red horizontal line above).
- You will see the horizon shift into the level position.
Key Lesson: We are only touching the tip of the iceberg where changing the angle of your image is concerned. Find your favorite method in the postprocessing tool of your choice.
If you are a serious photographer, then it makes sense to invest in one of the popular post-processing tools such as Adobe CC. If you’re really running on a tight budget, then Gimp seems to be a popular free tool. But there are many others.
Recommended Reading: If you’d like to learn more and improve your landscape photography, grab a copy of Photzy’s bestselling premium guide: The Complete Landscape Photography Guide.

Photograph by Tobie Schalkwyk
Conclusion
Sometimes the leveling of a horizon/object/subject is a personal decision. Other times you are not really left with a choice. Most important is to not let it look like an accident. Trust your gut-feel in all other cases. If your brain somehow does not like it, then most of your viewers will probably feel the same.
Make sure that you know how to change the angle of your image. It is not a matter of if you’ll need to do it at some stage, but rather when. Do it as one of your first steps during post-processing, as the pieces that you crop out in the process will influence your overall tones needing adjustment.
Teach yourself to do the necessary leveling in-camera. That will allow you to spend your time on other things during post-processing and prevent the cropping out of parts that you would have liked to keep.
Happy snapping!

Photograph by Tobie Schalkwyk


