


Learning how to use your camera’s electronic flash, whether it’s the pop-up one on top of the camera or an accessory mounted version on the hot shoe, has always been hard for many amateur (and even some professional) photographers. I remember when I was learning photography at college (in the UK, too many years ago) the thought of being asked to ‘use flash’ struck fear into my sub consciousness. I clung to the misguided notion (or was that an ‘excuse’) of only using available light “…because it was more creative…” for years – because I didn’t really understand the use of an electronic flash. As a result, every time I tried it the results were abysmal. Overexposed faces, rabid red-eye, desperately blurred shots and mysteriously dark backgrounds.
What you’ll learn in this post:
- What high speed flash mode is
- Why all cameras have a limit to their flash synchronization speed
- How high speed flash works
- Who might use high speed flash
- Troubleshooting issues
Why Using Flash is Tricky
I think the biggest problem is that the event – the actual flash of light – is done and dusted in an impossibly short time. Typically, this might be 1/1000 of a second or even quicker.
As you know, camera flash doesn’t have a modeling light (as you’d have with a continuous light source like a floodlight), so it’s very hard to see if the light is falling in the right position, direction, or intensity on your subject.
Your assessment of the lighting can only come by previewing the end result! However, even this falls short of being a truly useful modeling lamp. We assume that it’s all going to work nicely, and when it doesn’t it’s particularly hard to work out why.
Note: Some top-tiered Speedlight’s do have a continuous illumination simulation feature. This feature is created by firing hundreds of flash bursts in a continuous stream, giving the appearance of continuous light.
Key Lesson: The most fundamental flash rule is quite simple: the camera’s shutter speed controls the brightness of the ambient light in your picture, while the aperture (that’s the f-stop) controls the brightness of the flash lighting on the subject (providing the subject is within range of the flash).
When you use flash in the camera’s auto metering mode, it restricts the maximum shutter speed to 1/250s – and though all cameras can synchronize at slower shutter speeds, 1/250s is determined to be the flash synchronization speed.
The reason that cameras have such a relatively fast default shutter sync speed is because that design is best (overall) for producing sharp, shake-free picture results.
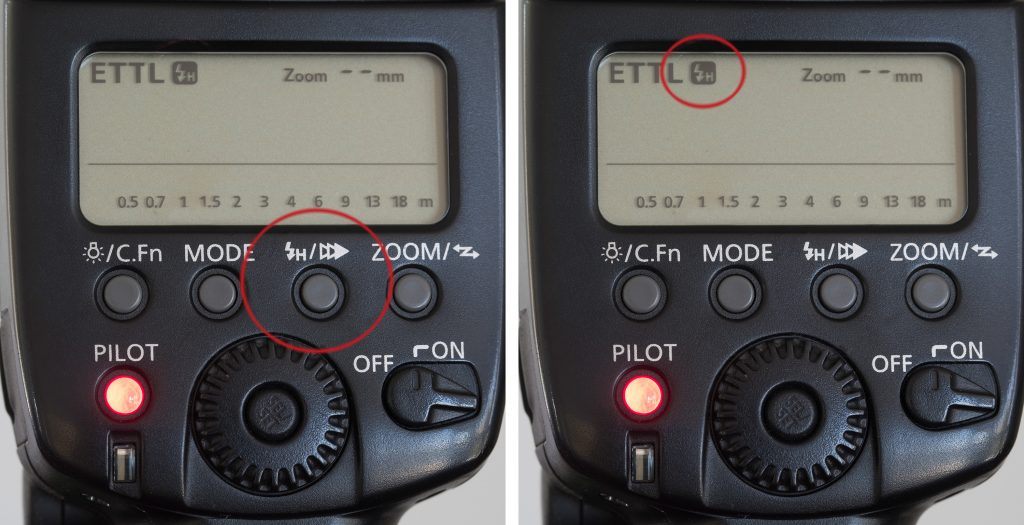
Finding the high speed flash mode is sometimes harder than actually putting it to good use. This is the LCD from a Canon flash. Pressing the ‘H’ (circled in red) button puts the unit into its high speed sync mode (right-hand frame) and you can then dial in shutter speeds in excess of the 1/250s regular sync speed. Photograph by Robin Nichols
Key Lesson: When set to “auto” the camera and electronic flash will default to the fastest shutter speed that it can sync with. Slower shutter speeds can still sync; however, they require you to manually set the slower shutter speeds.
In fact, every camera has a top sync speed, but as you may know, that maximum sync speed is generally too fast a shutter speed to get good, bright results in most of the places where we use the flash – indoors, at sunrise, sunset, deep shade, and in other low light locations.
This is why photographs created with an electronic flash often have dark backgrounds.

This was made using a Canon Speedlight set to its high speed sync mode. The shutter speed was 1/2000 of a second. The other camera settings were f/7.1 and ISO 1250. Shooting models (like my willing stunt cat) reveals details that you could not see with the naked eye. I’d suggest wearing gardening gloves to avoid damage to the trainer! As you can see, high speed flash is incredibly effective at freezing a moment in time. Photograph by Robin Nichols
Recommended Reading: If you’d like to learn how to use your flash unit for better photography, grab a copy of Photzy’s Electronic Flash – Parts and Practices premium guide.
Camera Settings
Although the auto-priority (aperture and shutter) and Program shooting modes can be massaged into producing acceptable flash results, the mode that provides us with the most control is the Manual Mode, and although you might be nervous about using Manual Mode that requires you to set both the aperture and the shutter speed, think of this: when we use an electronic flash, we do so mostly in scenarios where the light doesn’t change much, so you only need to set the exposure parameters once and you are good to go.
The first thing to do is to slow the shutter speed down to one that is more appropriate to the scene brightness.
Although the auto-priority and Program shooting modes can be massaged into producing acceptable flash results, the mode that provides us with the most control is the Manual Mode..
Don’t go too slow or you will get camera shake. Instead of 1/250 of a second (the default shutter speed in the auto setting), perhaps 1/100 of a second could produce a sharp, shake-free picture result, while at the same time the slower shutter speed will increase the ambient light by one stop (one exposure step brighter). The result is a photo with more detail in the background (the areas not illuminated by the flash).
Going further, choosing a shutter speed of 1/50 of a second brings two additional exposure steps of brightness to the background.
Opening the aperture up one f/stop (for example, from f5.6 to f4) will increase the subject brightness one step (both flash and background).
The reverse is also true – closing the aperture one f/ stop (i.e. from f5.6 to f8) will darken the flash’s impact on the subject, but it will also make an impression on the brightness in the background.
Key Lesson: The effective range for a camera’s built-in flash is ideally between two and three meters. Any further than this and the flash power will begin to struggle.
To fine-tune this simple flash recipe, you can modify the power output of the pop-up flash using the camera’s Flash Exposure Compensation function (FEC).

Even a stunt cat has to have time off. The left frame was just a quick snap in Aperture Priority Mode while the right-hand image was shot with auto fill-flash in the high speed mode, which did a good job of adding overall brightness to the face and revealing a lot more detail to the left-hand side of the cat’s body. (Both photographs were taken at 1/400 of a second (high speed flash sync), f/2.8, and at an ISO setting of 800.) Photograph by Robin Nichols
This setting affects the power output of the flash only; don’t get this confused with the regular Exposure Compensation feature, which overrides the metering in Program, Shutter Priority, and Aperture Priority modes.
FEC can be dialed-in to increase, or decrease, the power output
of the electronic flash. This is typically done in one third-of-a-stop increments.
Key Lesson: I usually leave my pop-up flash FEC set to minus one exposure step of power as a default. This does a great job of reducing flash output, making the flashed results for “fill-in flash” appear more subtle and natural looking. (Note: FEC doesn’t reset when you turn the camera off.)
If you find that even by slowing down the shutter speed, and opening up the aperture, it still does not produce a well-exposed flash shot, you can then increase the ISO sensitivity appropriately.
We mostly use electronic flash in dark lighting conditions, so it makes sense to set the ISO to at least 800 as a starting point. You can then move it up a notch to ISO 1000, or even ISO 1600 if the location is really dark.
However, what if you need to shoot outdoors, in bright light, with a fast wide-open maximum aperture like f2.8 to soften the background?
Remember, almost all DSLRs (and mirrorless cameras) have a top flash synchronization speed of only 1/250 of a second.
While this is too quick for a bright exposure in dark locations, it’s certainly not fast enough for a good result in bright lighting conditions either.
Remember, almost all DSLRs (and mirrorless cameras) have a top flash synchronization speed of only 1/250 of a second.. It’s certainly not fast enough for a good result in bright lighting conditions either.
The reason that a camera cannot employ a faster flash synchronization speed is linked to the way the shutter curtain is physically designed.
To achieve the fastest shutter speeds (i.e. 1/8000 of a second in some camera models), the standard focal plane shutter ‘curtain’ has to be reduced to a thin slit. This is because it’s impossible to open and close the full width of the shutter door fast enough in that short of a time period.
If you try to use your electronic flash with a fast shutter speed (faster than the sync speed), it simply doesn’t work without switching over to the high speed flash sync mode.
Recommended Reading: If you’d like to learn how to use your flash unit for better photography, grab a copy of Photzy’s Electronic Flash – Parts and Practices premium guide.

Here’s another good example of where high speed flash really benefits the photographer. This is a macro shot taken in my garden on a very hot day and in bright sunshine. Not ideal conditions for the best results, but adding some fill flash in high speed flash mode really helped lighten the deepest shadows without overexposing the lighter parts of the image. (Both images were shot at 1/3200 of a second at f4 using ISO 200. The right side image employed the use of the high speed flash.) Photograph by Robin Nichols
Introducing High Speed Flash Mode
Fifteen years ago technology wasn’t as advanced as it is today, so there was no automatic restriction on the flash sync shutter speed. If you used your electronic flash on a shutter speed setting faster than the sync speed, the resulting image was weird. The frame of the photo was only partly illuminated by the flash. You’d get a thin, perfectly exposed sliver across the frame, while the rest of the shot showed disastrous underexposure – even total black.
The only way to synchronize flash with the fastest of shutter speeds is to use the feature called High Speed Flash – thankfully most Speedlights have this feature as a standard. On the Canon Speedlite line of electronic flash units (note the spelling) it’s called High Speed Flash. On the Nikon Speedlight line of electronic flash units (different brand, different spelling) it’s called FP (focal plane) mode.
Check the specifications of your flash unit for the exact description.
How does this special high speed flash mode work?
When you press the shutter button, the first shutter curtain opens, closely followed by the second curtain, forming the slit that travels across the entire frame in a very short period of time. By firing off multiple flashes in almost instant succession – starting from the time the first curtain moves to the time when the second curtain closes – the entire frame is exposed to flash. Hundreds of individual flashes are strung together to look like one longer flash burst. Clever technology. And, don’t be concerned when you see, and hear, the multiple flashes – that’s normal.
Key Lesson: The advantage of high speed flash mode is simple. You can shoot with the electronic flash at any shutter speed and with any aperture. The main disadvantages, if you can call it that, is that because the Speedlight fires off a burst of multiple flashes it reduces the power output of each burst of light coming from the flash unit, and it will exhaust the batteries quicker than in single flash applications. To solve the first issue, you will generally want to use a wide aperture (for example f/2.8) or stay close to your subject (don’t put too much distance between the subject and the flash). I think this is a small price to pay for the creative freedom that high speed flash brings to the photographer.

In this mock-up, you can see that the shutter opening is a different size at different shutter speeds. This is because it is impossible to move the entire full frame shape (seen at 1/200s) across the entire height of the opening any faster than 1/250s. The solution is ingenious: reducing the height of the frame solved the speed problem but created the high speed flash sync problem. The solution was to fire multiple bursts of flash, starting when the first curtain moves and finishing when the second curtain closes. Photograph by Robin Nichols
When Would You Use High Speed Flash Mode?
HSF mode is perfect when you need to freeze motion in a subject and also provide additional illumination to a scene. This makes it perfect for press photography, sports photography, wedding photography, or basically in any situation where you cannot risk underexposure by not using fill flash.
Have a look the next time you see a political announcement on the TV – the politician will be blasted with flash light from all the journalists present, regardless of whether it’s perfect lighting or not. Same goes for sports personalities – no picture editor is going to pick a press shot of Rafael Nadal with his face in the shade unless it’s a truly extraordinary image.
Fashion photographers who have a preference for shooting at f2.8 in bright daylight also use high speed flash photography extensively. The technique is popular with some nature photographers as well. High speed flash mode is really useful if you are shooting backlit animals, flowers, and even people for that matter.
Troubleshooting

Photograph by Robin Nichols
High speed flash (or FP flash mode) actually has few drawbacks other than the use of more power. Because it has to fire a burst of flashes to achieve enough illumination for a single frame, you will see the battery reserve running out much faster than regular, non-high speed flash use. One way to help preserve battery power would be to increase the ISO sensitivity. This effectively makes the sensor more sensitive to light and therefore you need less power from the electronic flash to get the same brightness level result at a lower ISO. How much would you increase the ISO?
You can only answer this question by testing your camera to see how it handles increased ISO and its associated noise. Generally, I’d keep the ISO to 800 or maybe ISO 1600 – image quality at higher ISO settings depends a lot on the size of the sensor and the design of the camera.
High speed flash mode works wirelessly as well, as it does with an external electronic flash accessory that is placed on the hot shoe.
However, it’s worth mentioning that it might not work if you use third-party flash triggers, or if you try to mix different electronic brands or models for more complex multi-flash work. The simple solution for complex electronic flash work is to use the same brand, and preferably the same model for every unit in the setup, so everything works together seamlessly.


