


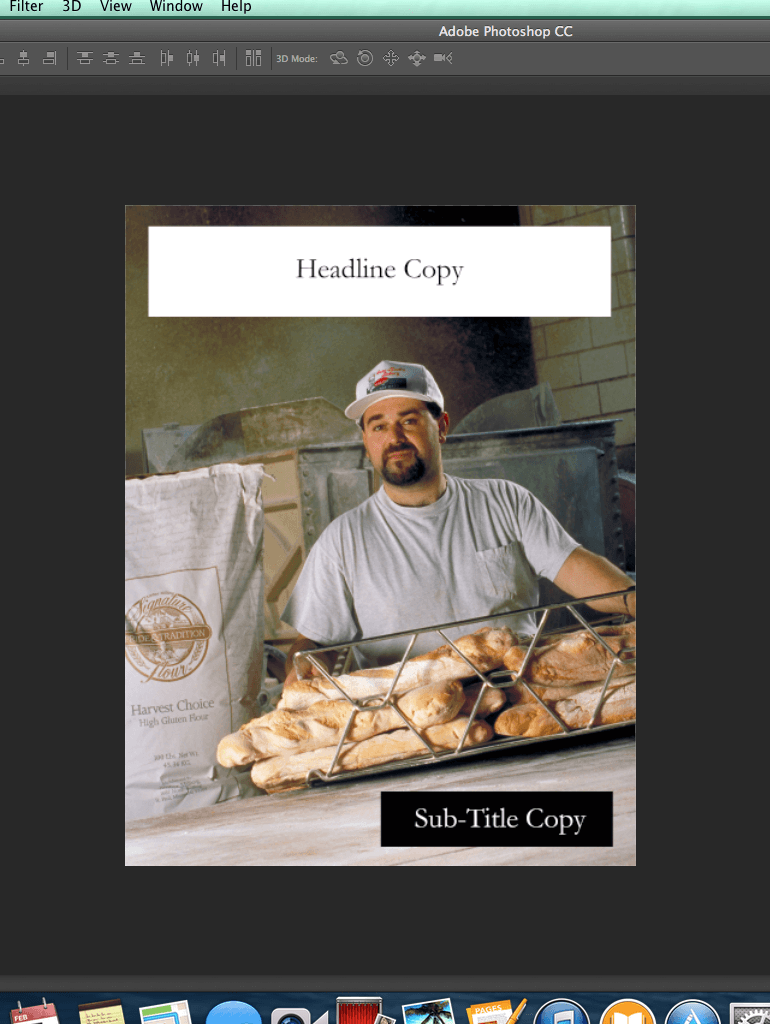
As a commercial photographer, you are often asked to wear many hats. One day, you might be photographing products in the studio, and the next, you’re creating an environmental portrait. There’s always a lot of variety, which makes it fun, but also challenging. Today, we’re going to analyze this environmental portrait that was created for a client named, Harvest States Cooperatives. HSC was one of the largest privately held agricultural cooperatives in the United States. The company produced various grains and milled them into usable products. This portrait was to be used in a brochure for HSC’s flour product: the marketing pitch being- “a customer testimonial”. The customer (in this case- Casa Nostra Bakery) is a large commercial bakery that provides Italian style hard breads nationwide. They use a lot of flour.
As is often the case in the life of a commercial photographer, we had no idea what to expect until we arrived at the location. This particular image was created on film.
Here is the equipment list that was used:
- Nikon F5 Camera
- Nikkor 105mm f/2.8 lens w/ lens hood
- Minolta Spotmeter F 1
- Gitzo Traveler Carbon Fiber Tripod
- 2- Paul C. Buff, White Lightening 1600 Mono-light flash units
- 2- Quantum Radio Slaves
- 36” x 72” Photoflex Reflector Panel with Bright White fabric
- 36” x 72” Photoflex Scrim Panel with Translucent (1 stop light loss) fabric
- Photoflex 36” x 45” Softbox
- Roscolux ¼ CTO Warming Filter
- Photoflex 42” Umbrella with Silver lining
- 4- 10 foot Arri Light stands
- 3- 15 lb. sandbags
- 2- 100 ft. extension cords
(The final image was drum scanned for post-production work in Photoshop).
After meeting with the client, and discussing the goals for the photo shoot, a date was scheduled.
This project occurred in Chicago, Illinois- a day of travel from the studio.
We were going into this site unseen. All we knew was that the business was a large successful bakery.
When shooting on-location, a commercial photographer will often pack far more than will actually be used.
This is done for two reasons-
- To make sure they will have anything that might be required to successfully complete the project.
- To have back-up gear should anything break or fail to function properly.
"When shooting on location, a commercial photographer will often pack far more than will actually be used."
Upon arrival, we discovered there were not a lot of “pretty” photogenic areas to work with.
The bakery had a small retail store in the front that was pretty cool, but, it was packed with customers. There was no way we could shoot there without shutting down their business.
So, we went to the production area in the rear of the building. This was the core of the business. It was a huge 22,000 sq. ft. industrial space filled with large machinery and covered with flour dust. It was a noisy, hot, and extremely busy environment.
Our subject was the owner of the bakery, Mike Florio. He was super cool.
But three things became quickly apparent:
- His expectation was that this was going to take only a few minutes of his time.
- He did not want his business disrupted.
- Communication was going to be an issue as he spoke Italian and very little English.
You can check out Mike’s business, Casa Nostra Bakery, here.

Now we knew what we were up against, we had to choose a location.
There were a couple of things that had to be taken into consideration when choosing the location:
- There were 3 elements that had to be highlighted: the customer, HSC’s
product, and the customer’s final product. Since the location was not visually pleasing, we decided to highlight just those three components and minimize anything else. - The other consideration was that the photograph had to be composed with “room” for blocks of copy.
Space had to be provided for placement of a headline and sub-titles.
We chose a corner in the back of the complex that wasn’t being used. The location presented a number of challenges.
- The overhead lighting was fluorescent and created a green color balance.
- There were no 120-volt AC outlets near our chosen spot.
- There was a lot of flour dust in the air which affected equipment and lighting.
Here’s how we solved those problems:
- There was a large window in our chosen location. The light from that window, plus the strobe lighting, generally overpowered the fluorescent lighting. The final image still picked up a slight greenish yellow color-cast, but this was fixed in post-production.
- We had brought over 500 feet of electrical extension cords. We needed two 100-foot cords to get to the nearest outlets.
- There was an archway separating our chosen spot from the rest of the production floor. We hung plastic over it to help stop the flow of flour dust into our shooting area.
A large softbox was used for the key light on the subject, bag of flour, and bread. We covered the softbox with a ¼ CTO warming gel to add warmth to the bread and the man’s skin tone.
Our exposure was set at 1/30th of a second, at ISO 50, with an f/stop of f/8.0, and using a 105mm lens.
We chose the ISO 50 film for its low grain.
We used 1/30th of a second because it was slow enough to let some of the window light expose the background, but fast enough to ensure we had no camera shake.
Our aperture was f/8.0 because this gave enough depth-of-field to keep the subject, flour bag, and bread in focus while letting the background drop-off in sharpness.
We chose the 105mm lens based on how much room we had to work with and the fact that it is a pleasing portrait lens.
Our primary exposure was determined using a reflective spotmeter reading from the man’s face. Once the softbox was set in place and the meter reading determined, we could see that the flour bag was slightly overexposed and losing detail. We set-up a 1 stop scrim and slid it in front of the softbox just far enough to affect the flour bag.
(During the lighting process, we used a stand-in for Mike Florio. This allowed him to keep working until we were ready for him. The stand-in stripped down to their t-shirt and placed a bakery baseball cap on their head to match Mike as close as possible.)
The softbox provided nice light, but the shadows were too deep; so we set-up a reflector (with a white fabric) opposite of the softbox. This opened up the shadows nicely without removing them completely.
Everything looked good, but the background was still a little dark. The 1/30th of a second shutter speed allowed some of that window light to illuminate our background. But, if we slowed the shutter any further, the green fluorescent lighting really started to take over. Instead, we decided to set-up a second flash unit that was bounced into a silver reflective umbrella. This unit was placed behind the subject and to camera left. The light was feathered to hit the machinery behind the subject, the subject’s shoulder, and the top of the bag of flour.
When everything was ready, we put Mike in, and the session took less than 5 minutes of his time.
Here is the image as it came out of the camera:

We now had to start post-production.
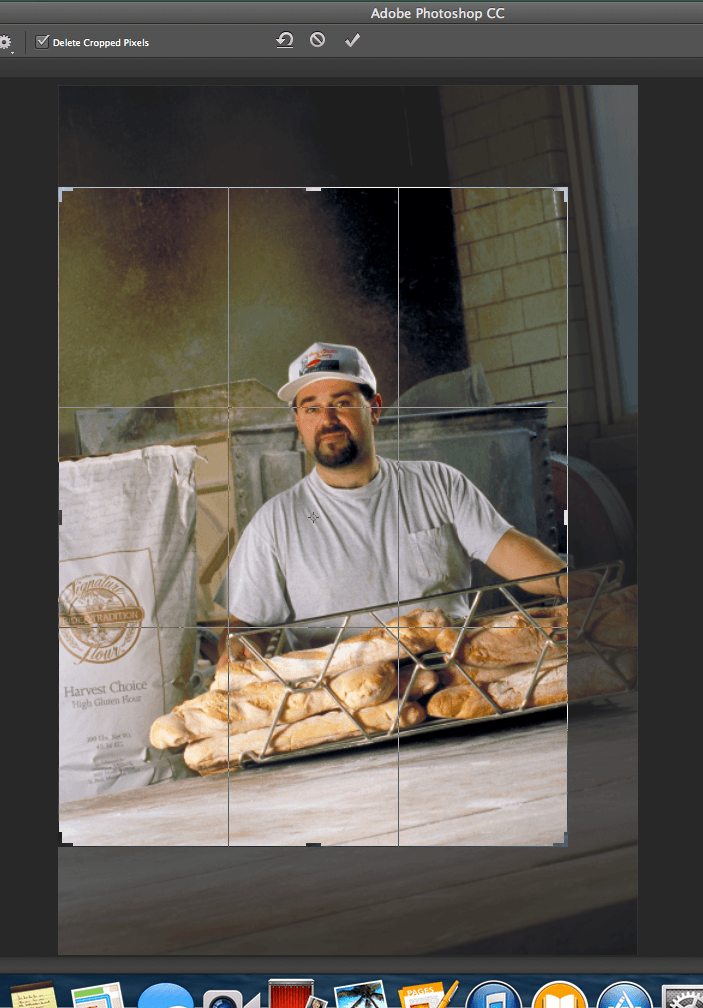
The first objective was to crop the image to the final size. The photograph was going to be used full-bleed in a publication that measured 8 ½ inches by 11 inches.
Despite our efforts, the image still picked up a green-yellow colorcast from the industrial lighting. We needed to correct that.
We do our color correction by creating an adjustment “Levels” Layer. Once the layer is created, we measure the white point, mid-tone, and black point.

"We do our color correction by creating an adjustment “Levels” Layer. Once the layer is created, we measure the white point, mid-tone, and black point."
Measure the whitest area.

Measure a mid-tone (preferably gray).

Measure the blackest area.

Here is the before and after with the color correction. This “after” example also depicts some additional work that was done. We’ll discuss that now.

Here we’ve highlighted some problem areas. We felt that the shadow on the wall and surface texture of the wall was too domineering. We also had a little problem with Mike’s face. It was very hot in this location, and he was sweating. While the client didn’t require the bag of flour to look perfect (like it would have to in a product shot), there were some areas that needed touching up. Finally, the tips of the bread (closest to the softbox) were slightly overexposed.
Here’s how we fixed everything (all work was done in Photoshop).
- The shadow on the wall was removed using the Patch Tool.
- The highlight on the wall (from the window) was removed with the Clone Tool.
- The entire wall area was selected and softened with a minor Gaussian Blur.
- The flour bag imperfections were removed with the Clone Tool.
- The bread (closest to the Key Light) was darkened with the Burn Tool.
Mike Florio’s face was the most complicated fix. Not only did we want to remove the sweat, but we also wanted to slightly soften the skin texture.
We started by cloning out sweaty highlights. Then, using the Magic Wand we selected the facial hair and feathered it 5 pixels.

We then converted that selection to a Quick Mask and cleaned it up with the Paint Brush.

We then created a New Layer.

The selected skin was pasted onto the New Layer.

A 1.2 Gaussian Blur was applied to the Skin Layer. That layer was then reduced in opacity to 40%. This technique softens skin without creating that “Plastic Look” (which is especially important for men).

Photo by Kent DuFault
Before flattening the image, we cleaned up the Skin Layer around the eyes and mouth using the Eraser Tool. You want to soften the skin without affecting the underlying facial features.

Our last step was to select the Sharpening Tool and do a “light” sharpening of the facial features. We rarely do a global sharpening with an image. If we do, it’s very light. We prefer to “Spot Sharpen” with the sharpening tool: especially with portraits.

Here is the Final Image as presented to the Client!


