Back button focus is a mystery to some photographers and an essential technique for others. Back button focus is an alternate way of setting up the buttons on your camera to achieve focus.
Back button focus is often thought of as an advanced technique, but it isn’t just for professional photographers. Once you understand the concept and have your camera set up, you might just wonder where back button focus has been all your life.
In this guide, we will start with what back button focus is, and what it isn’t. We will talk about the reasons to use back button focus. Finally, we will help you set up your camera for back button continuous autofocus to get the most out of back button focus.
What we will cover:
- Defining back button focus
- Reasons to use back button focus
- Setting up your camera for back button continuous autofocus
Back button focus takes a bit of practice to get used to. But once your fingers get used to the new system, you will be able to achieve faster and more accurate focus.
Recommended Reading: If you’d like to master camera settings to create gorgeous, creamy, blurry backgrounds, grab a copy of Photzy’s premium guide: Beautiful Background Blur.
What Is Back Button Focus?
All modern digital cameras have an autofocus system. By default, your camera activates this system when you push your shutter button halfway down. The camera takes a reading of the scene and decides on focus and exposure. When you are happy with the focus and exposure, you push the shutter button down fully and the camera takes the photo.
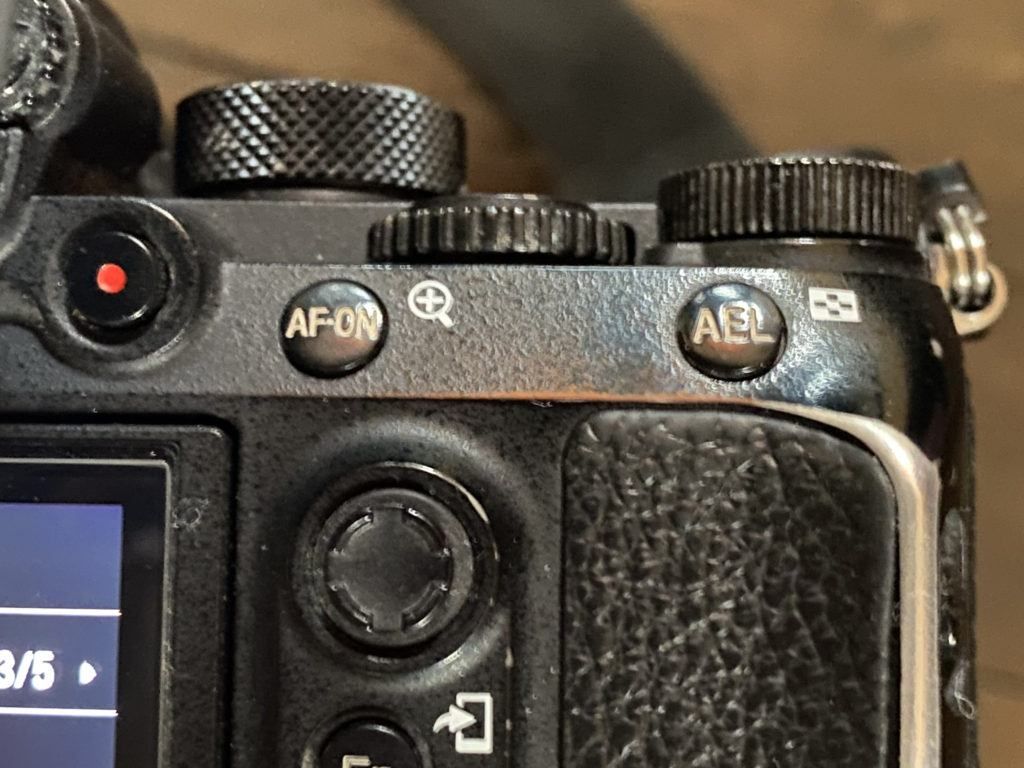
Using back button focus, I push the AF-ON button on the back of my camera to find focus. Photograph by Jenn Mishra
Finding focus is linked with opening the shutter. One follows the other like clockwork. You may not even realize that you have a choice in the matter. You can unlink autofocus and shutter release.
Back button focus means that your camera is set up to use a button other than the shutter button to acquire focus. Pressing the shutter button only releases the shutter. This system is called “back button” focus because, usually, the button dedicated to focusing is on the back of the camera. In this system, you will use your thumb to focus and your index finger to push the shutter button.
But why might photographers want to separate autofocus and shutter release? Using two buttons – one for focus and one for shutter release – sounds more complicated than just using one button for both.
Why Use Back Button Autofocus?
Using the shutter button to both find focus and take the photo is simpler, but there are a couple of limitations.
When you press your shutter button halfway down, your camera focuses using whatever focusing mode you have chosen. If you are shooting static subjects, you may be using AF-S (Single Shot). If your subject is moving, you may have selected AF-C (Continuous). This is called AI Servo on Canon cameras. Your camera may also have an AF-A (Automatic) mode where your camera tries to figure out what the subject is doing and choose the best autofocus mode.
Some cameras can be set to beep when they find focus. Mirrorless cameras have a focus peaking setting that highlights everything in focus.
Your camera is doing a lot when it is focusing. It needs time to assess the scene and select focus points. You may not notice the time if you are shooting static subjects, but when you start photographing wildlife or sports, your camera just seems too slow! You push the shutter button halfway down, wait until your camera finds focus, then release the shutter. A fast-moving subject may be out of frame by the time your camera is ready to take the photo.
Then, when you release the shutter, the camera resets focus. It has to do the same focusing process again for the next image. But actually, it only seems like the focus resets because you have to press the shutter button again if you want to take another photo.
Your camera is doing a lot when it is focusing. It needs time to assess the scene and select focus points.
The shutter triggers the focusing process. You only lose focus because you have to press the shutter to take another photo.
The back button focus separates the autofocus process from the shutter button. You can focus once with a different button on your camera and the shutter button only takes the photo. Back button focus is a way of locking in your focus.
To better understand why you might want to use back button focus, let’s work through a situation where back button focus can really help.

Using back button focus to help capture a dragonfly. My settings were 1/2000th of a second at f/11, ISO 3200. Photograph by Jenn Mishra
Dragonflies are small and quick-moving. They dart in and out of the frame and the scene may have other objects, like twigs or reeds, that distract your camera’s autofocus. Once you get a dragonfly in focus, the last thing you want to do is to lift your finger off of the shutter button and lose focus.

Capturing dragonflies in flight using back button continuous autofocus. My settings were 1/2000th of a second @ f/8.0, ISO2000. Photograph by Jenn Mishra
Dragonflies often perch for a couple of seconds, giving you time to get them in focus. But then they suddenly fly away. If you are waiting to catch a dragonfly in flight, you will have to hold your shutter button pressed halfway down for a long time.
Back button focus allows you to lock focus on the dragonfly when it is not moving and then quickly switch to AF-C when it starts to move. Later in the guide, we will show you how to set up your camera to do this.
Back Button for Faster Focus
One of the main reasons to use back button focus is to speed up your image-making. Photographers often use back button focus when photographing quick-moving subjects. Wildlife and sports photographers especially like back button focus.
Photographers who have just switched over to using back button focus may find the process slow at first. It takes a little time to relearn physical habits. But with a bit of practice, the back button focus is faster than the traditional shutter button focus.
Locking Focus
The biggest advantage of back button focus is the ability to quickly move from continuous autofocus (AF-C) to single point autofocus (AF-S). As long as you are holding down your focus button, your camera will continuously track a moving subject. When you lift your finger off the back button, focus locks. You can press the shutter as many times as you want with the same focus point.

Using back button focus, it is easy to switch from static subjects to moving subjects. Wild horses spend a lot of time standing in a field not moving a lot, but when they get frisky, I want to be ready! My settings were 1/2000th of a second @ f/8.0, ISO4000. Photograph by Jenn Mishra
When you use the shutter button to focus, your camera searches for a focus point every time you take a photo. The camera may make a different decision each time especially if the subject is moving.
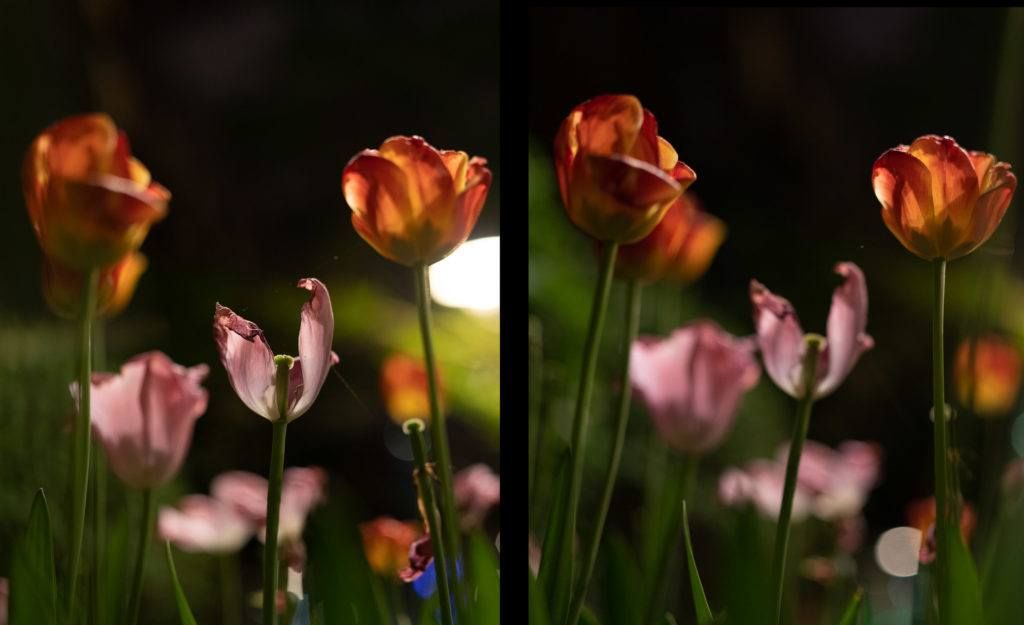
Photos are taken within seconds of each other. The autofocus chose the center tulip the first time and the foreground tulips when I pressed the shutter a second time. My camera settings were 1/50th of a second at f1.4, ISO 2000. Photograph by Jenn Mishra
With back button focus, you only need to focus once. If you lock your focus on the eye of an animal, you don’t have to worry about your camera decided to focus on the background or a distracting branch.
Back button focus allows you to better control where the camera is focusing.
Recommended Reading: If you’d like to master camera settings to create gorgeous, creamy, blurry backgrounds, grab a copy of Photzy’s premium guide: Beautiful Background Blur.
Setting up Back Button Autofocus
Now that you understand what back button focus is and why it might be useful, you need to make a few changes to your camera settings to make it work. In this section, we will take you through the general process of setting up a back button focus on Sony, Canon, and Nikon. You may need to refer to the owner’s manual for your specific camera model to find specific menu items.
What you won’t find in your owner’s manual is a button marked “back button focus.” Camera manufacturers use different terms and locate the necessary settings in various places. This can vary not only between the camera makes but from model to model too.
What you won’t find in your owner’s manual is a button marked “back button focus.”
There are three steps to set up back button focus. The third step is optional, but it allows you to take full advantage of the benefits of back button focus.
- Isolate focusing from the shutter button
- Choose focusing button
- Select focusing mode AF-C (optional)
None of these steps are difficult. Let’s walk through them one by one.
Isolate Focusing Shutter Button
The first step in setting up back button focus is to tell your camera not to focus when you press the shutter button. Your shutter button will still be reading the scene for exposure and releasing the shutter to take a photo. But you don’t want the shutter button to trigger the autofocus system.
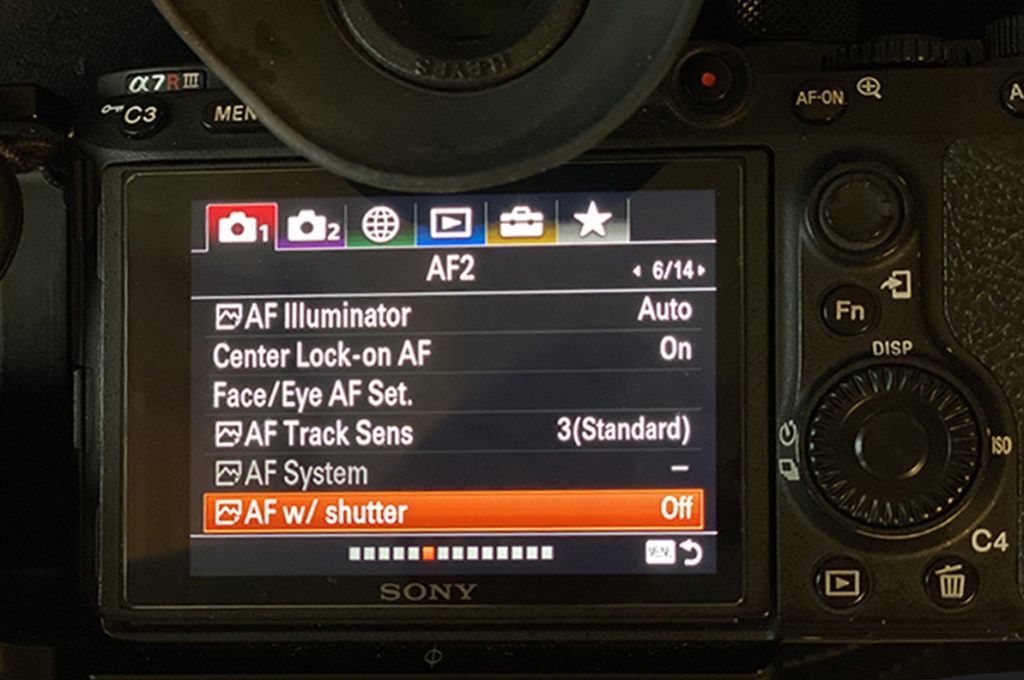
Menu showing AF w/ Shutter feature on Sony A7R3. Photograph by Jenn Mishra
Most mid-to-high-end cameras allow for buttons, including the shutter button, to be customized.
On Sony cameras like the A7R3, scroll through the menu until you find the “AF w/ Shutter” and turn it off. This tells the camera not to autofocus with the shutter button.
For Canon cameras, you will find this option under Custom Function controls. Select the shutter button and keep “metering start” on and turn off “AF start”.
For most Nikon cameras, there is a custom setting for autofocus. Scroll to “AF activation” and select “AF-ON only.” Nikon users won’t have to do the next step. This menu toggles back and forth between shutter button focus and back button focus.
If your camera is different, look in your user manual to see what options you have for controlling the shutter button.
Now that you have removed the autofocus function from your shutter button, you need to assign this function to a different button.
Choosing a Focusing Button
Many mid-to-high-end digital cameras have a button on the back of the camera labeled “AF-On,” or something to that effect. This is the button the camera manufacturers assume you will use for back button focus.
In your menu system, you will need to find the controls for the customizable buttons.
For Sony, find the custom buttons and assign the AF-On feature to the AF-On button. In the menu system for my Sony A7R3, I selected the Custom Key menu item and scrolled over until I found the AF-ON Button. I assigned this button to AF-On.
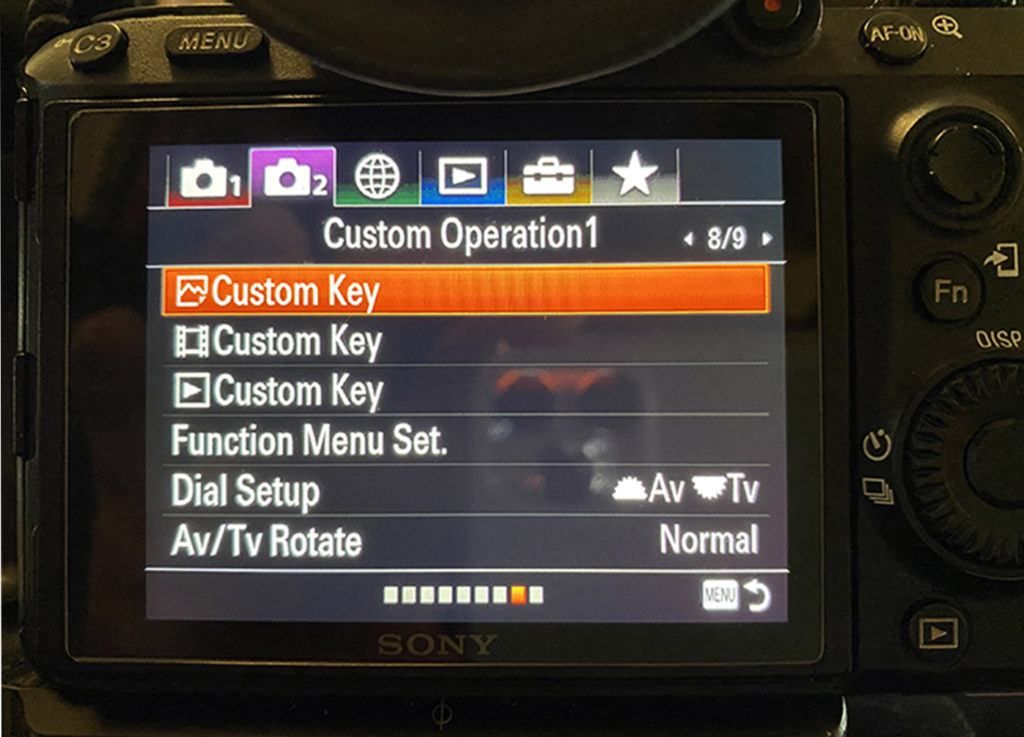
Menu showing Custom Key feature on Sony A7R3. Photograph by Jenn Mishra
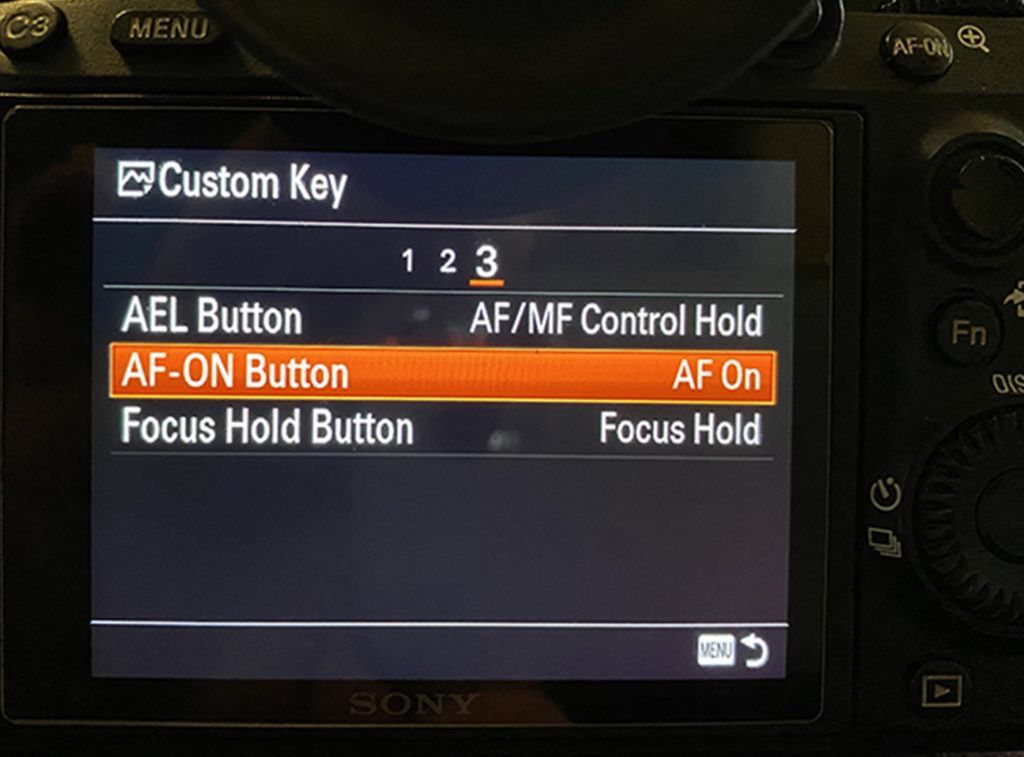
Menu showing AF-On Button setting on Sony A7R3. Photograph by Jenn Mishra
For Canon cameras, you will find this option under Custom Function controls. Set the AF-On button to “metering and AF start.”
Nikon users won’t have to do this step. If you have toggled to the “AF-On only” option in AF activation, you are all set.
Don’t worry if your camera doesn’t have an “AF-On” button, you can use any customizable button you want to control autofocus. There may be a button labeled AEL or one with a star (*). You can choose which customizable button you want to use to control autofocus.
Don’t worry if your camera doesn’t have an “AF-On” button, you can use any customizable button you want to control autofocus.
When you are first setting up your camera, you may want to try different buttons to control autofocus. To make full use of back button focus, you will want to feel comfortable pressing the autofocus button at the same time you are pressing the shutter button.
In Step 1, you told your camera not to autofocus with the shutter button. In Step 2, you assigned autofocus to one of the customizable buttons on your camera. That’s it. Your camera is set for back-button autofocus.
AF-C Option
Back button focus will work with any focusing mode. But the biggest advantage of back button focus is the ability to quickly move from continuous autofocus (AF-C) to single point autofocus (AF-S).
- On a Sony camera, scroll through the menu until you find “Focus Mode.” Set this to “Continuous AF.”
- For Canon cameras, find the “AF operation” or “AF Mode” menu and select “AI Servo.”
- For Nikon cameras, go to the Custom Settings Menu and select Autofocus. Then select “AF-C.”
When you press the back button to focus, your camera will continuously search for focus. This is what you want to do if your subject is moving in the frame. Focus will move, too.
Your camera may have other autofocus features that you may want to explore. These features allow you to fine-tune tracking and autofocus.
Setting up continuous autofocus along with back button focus allows you to essentially lock focus by lifting your finger off of the autofocus button. The focus will only change when you press the back button.
Recommended Reading: If you’d like to master camera settings to create gorgeous, creamy, blurry backgrounds, grab a copy of Photzy’s premium guide: Beautiful Background Blur.
Practicing Back Button Focus
Back button focus takes a little time to get used to. Your muscles are in the habit of pressing the shutter halfway down, waiting a moment, and then fully pressing the shutter button down. You have to relearn some physical habits before back button focus feels natural.

Practice using back button focus at a local pond with ducks or seagulls. My settings were 1/1200th of a second @ f/8.0, ISO1600. Photograph by Jenn Mishra
At first, you may forget to press the back button to find autofocus. Finding focus is a two-step process. Your thumb and your index finger will learn to work together.
Your practice may seem slow at first. But if you stick with it, back button focus can end up making your photographing faster and more accurate.
Summary

Photograph by Jenn Mishra
The back button focus separates autofocus from the shutter and assigns it to a different button on your camera. This allows you to better track moving subjects and quickly lock focus.
There are three steps to set up the back button focus on your camera. First, removing autofocus control from the shutter button. Second, assigning autofocus to a different button on your camera. Third, setting your camera to AF-C mode to take full advantage of the back button focus.
Self-Check Quiz:
- Define back button focus.
- What genres of photography often use back button focus?
- What button does your camera use by default to autofocus?
- What are the benefits of using back button focus?
- How does setting your camera to continuous autofocus make the most of the back button focus?
- What is the first step in setting up a back button focus on your camera?
- What is AF-C?
- What is AF-C called on a Canon camera?
- Once you set up back button focus, which of your fingers controls autofocus?
Assignment:
- Set up your camera for back button focus.
- Practice photographing a moving subject. Go to a local park to photograph ducks, or photograph your children playing in the back garden.
- When the subject is moving, track focus by keeping the back button pressed while taking a series of images.
- When the subject is stable, lock focus by lifting your thumb off the back button.
The final images are not the important part. It is about practicing the feel and timing of using another button to control focus.


