


Introduction
Imagine a world without wireless flash triggers. In a studio, it might work if you’re able to connect a kind of advanced ‘hub’ to your camera’s hot shoe, from where you have a cable running to each of your strobes or speedlites.
But what about a wedding? Let’s say you’re doing a wedding shoot where the bride and groom have invited 150 guests to a hall measuring 50m x 50m (150’ x 150’) in floor size. Now your ‘hub’ will have to be situated somewhere in the center of the hall and hooked to your camera using a long cable (you have to move around, after all) while sending out a spider web of trigger cables to your other light sources.
Crazy, hey? Actually, it’s impractical to such a degree that it’s simply not feasible. That is why wedding images from the ‘old’ days scream for more light. The main objective was to cast enough light directly onto the subjects. Anything else was a bonus. Is that where vignettes originated from (unintentionally)?
Enter Wireless Flash Triggers
Now imagine again the scene of a wedding reception in a large hall where you have one or two strobes in combination with three or more speedlites. The photographer adjusts the amount of light transmitted by each external light source independently and on-camera using a flash controller.
No cables, no fuss. Can it be? Absolutely, yes!
Here is what you will learn in this article:
- Why you need a wireless electronic flash trigger
- The three types of wireless flash triggers
- The pros and cons of each type of flash trigger
- An opinion on which method works best based upon experience
- Why you may want to invest in an external flash trigger even if your camera has that option built-in
- A discussion of cost versus features
- The difference between transmitters, receivers, and transceivers
- Some troubleshooting tips from experience
- A discussion on practical applications
Recommended Reading: If you’d like to learn how to use your flash unit for better photography, grab a copy of Photzy’s Electronic Flash – Parts and Practices premium guide.
Three Main Flash Triggering Mechanisms
The world of flash triggers is controlled by mainly three mechanisms.
Optical Flash Trigger System
This is your most affordable flash trigger mechanism, built into a lot of (especially older) speedlites and strobes. It is also your most simplistic system and works as follows:
- Your camera sends out a flash. This can be:
- the camera’s built-in flash,
- an external flash mounted on your camera’s hot shoe, or
- a light-transmitting trigger mounted on your camera’s hot shoe.
- Your speedlites and strobes’ built-in optical slave features pick up the flash from your camera and send out a flash at the same time. Well, probably not at the same time, but so fast after your camera’s flash that it appears to be simultaneous.
Pros:
- Very affordable (no additional expenses on a flash trigger kit)
- Very simple to operate (no technical knowledge/settings required)
Cons:
- The slave (light-receiving) flashes have to be in the line of sight (almost in front) of your camera’s flash beam to see it
- Affected by or turned useless by strong light/sunlight
- Other cameras’ flashes may trigger your slave flashes which may be a nuisance and drain your flashes’ batteries
Infra-Red (IR) Trigger Mechanism
This mechanism is also built into the most recent speedlites and strobes.
Pros:
- Conveys TTL and Manual control information to your slave flashes
Cons:
- The slave (light-receiving) flashes have to be in the line of sight (almost in front) of your camera’s IR beam to see it
- Limited range
- Affected by or turned useless by strong light/sunlight
Radio Flash (RF) Trigger Mechanism
Photograph by Tobie Schalkwyk
This mechanism usually comprises a controller unit (also called a ‘commander’ or ‘transmitter’) that is mounted on your camera’s hot shoe or (nowadays) built into your speedlite/strobe. Obviously, the flashes with built-in RF capabilities are more expensive than others, but it’s one device less to worry about for each flash. It also saves you a separate set of batteries for each external receiver, and you’d be surprised how often receivers get lost due to their small size!
Pros:
- RF triggers convey TTL and Manual control information to your slave flashes over hundreds/thousands of feet distances
- Your flashes do not have to be in your line of sight
- The radio signals are not affected by strong, direct light sources
- RF triggers provide for easy and super-fast adjustment of settings
Cons:
- More expensive than optical/infra-red systems
Note: Some triggers have both transmitter and receiver capabilities and consequently are known as ‘transceivers.’ Transceivers have a bottom hot shoe for mounting on your camera, as well as a top hot shoe for mounting a speedlite. This makes it possible to mount a transceiver/flash combination on your camera.
Transceivers are usually not as rich in features as controllers.
Key Lesson: There are three main flash trigger mechanisms (optical, infrared, and radio flash). The affordability of non-brand units, however, makes it unnecessary to settle for anything but radio flash technology. The other two options are simply too unreliable in the presence of strong light, and the fact that the slave units must be in the line of sight makes them totally impractical to use.
So, which trigger mechanism is the ‘best’?
The ‘best’ system is undoubtedly among the Radio Flash triggers. Infrared and optical systems are simply too unreliable and limiting. That is not an option, for example, in wedding shoots where you have only one chance to take a particular photograph, and you will certainly not always be in the line of sight of your slave flashes.
So, built-in triggers or external?
My personal choice is a combination of both. I prefer an external controller due to the ease of adjusting settings (channels and flash strength) and its richness in features. I prefer built-in slave functionality in my speedlites, however, because external triggers are relatively small and sometimes they simply get ‘lost.’ They also require their own set of batteries, so it’s another thing that may go wrong at a critical moment (such as when the groom places the ring on the bride’s finger!).
The ‘best’ system is undoubtedly among the Radio Flash triggers. Infrared and optical systems are simply too unreliable and limiting.

Photograph by Tobie Schalkwyk
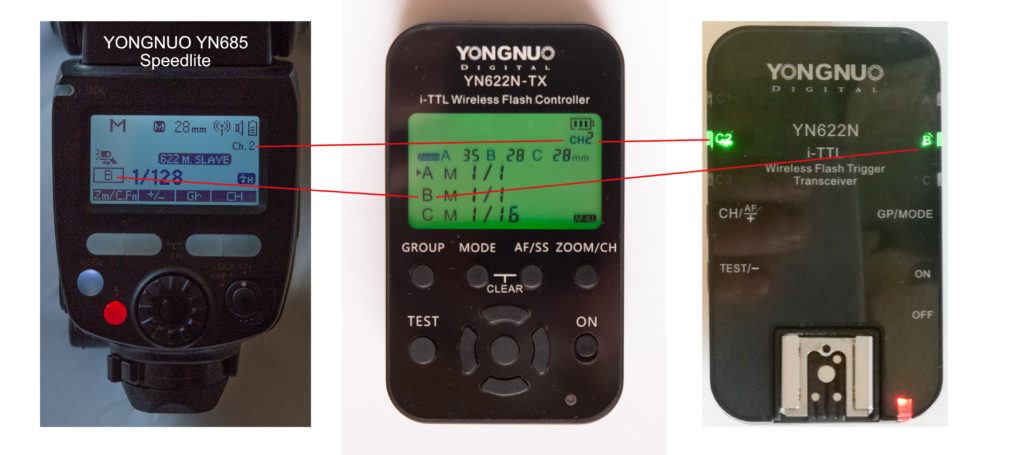
When using a speedlite with built-in receiver functionality, you simply select its slave mode and select the applicable group/channel combo to communicate with your controller. Thereafter, you don’t have to touch it. Everything else is adjusted from the controller.
Why do I prefer to use an external flash controller instead of a flash with built-in controller functionality? Because on a flash, all of the controller settings are done on the same LCD screen as the flash’s own settings. I just know that I’m going to accidentally mess things up at a critical moment – it’s only a matter of time. In addition to that, the external controllers make it super easy to change channels/ beam strengths with the touch of a button or wheel dial. The buttons are always in your sight and within reach. This also makes it easy to quickly check if everything is still set as it’s supposed to be, without touching anything at all.
Key Lesson: The ‘best’ flash trigger kit is the one that complements your current equipment the best. Therefore, it is extremely important to choose your equipment with caution right from the start. At least make sure that the components are all compatible with a specific controller (RF range) so that they work together to make your life easier and give you superior results.
Keep in mind that built-in features can be an advantage, but they can also clog up your LCD screen, and their settings may not be as ‘in reach’ as external units where everything is adjusted using buttons and wheel dials.
External Radio Flash (Budget) Options
Note: I am only going to look at Godox and Yongnuo options. Brand name units are also available, but, as usual, are quite expensive compared to these brands. Be prepared to pay up to 3-4 times the price of non-brand names. Are they more reliable? Perhaps some time ago, but not today when unreliable products simply do not survive.
There are other non-brand options like the (by-now famous but expensive) Pocket Wizard.
If you are loyal to your brand (and/or you already own brand name flashes and you need a compatible trigger), then have a look at units such as Canon’s STE2 Speedlite Transmitter and Nikon’s SU-800.
All External Flash units share a specific set of features, so your choice would probably be influenced by which of those features are most important to you, as well as your available budget. You can never go wrong by investing in your camera’s brand triggers, BUT it’s actually quite nice to have the cheaper generic options available as offered by Yongnuo and Godox.
Let’s look at a few external radio flash triggers (commanders/transmitters/master controllers). I have added prices as available on Amazon. Keep in mind that controller/slave kits are sometimes available at a much lower cost than when buying the same units separately.
Note: These units were all brand new (on Camerastuff’s display shelf), so I did not want to remove their LCDs’ plastic protection film. I thus apologize in advance for a bit of photo quality loss as a result.
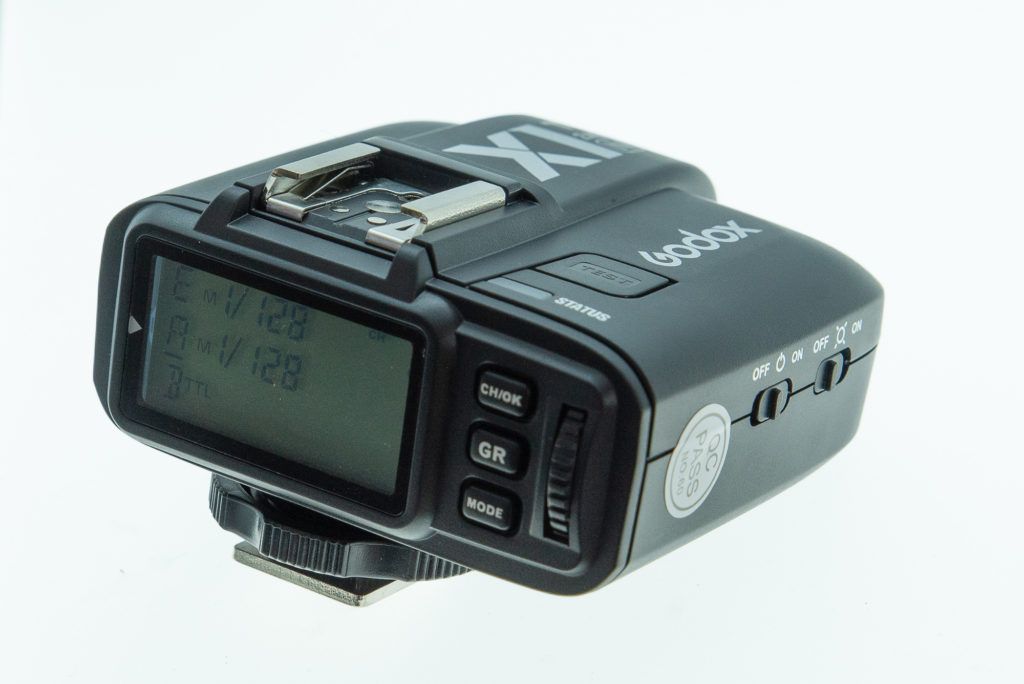
Godox X1T Transmitter

Photograph by Tobie Schalkwyk
- Compatible with many Godox strobes/flashes, such as the AD600, AD200, V850-II, and V860-II
- Four groups, 32 channels
- TTL firing mode
- Available for Sony, Nikon, Canon, and Olympus/Panasonic (not sure about others)
Added Advantage: It has a hot shoe for mounting a speedlite on-camera.
Price: $40–$46
Godox X2T Transmitter
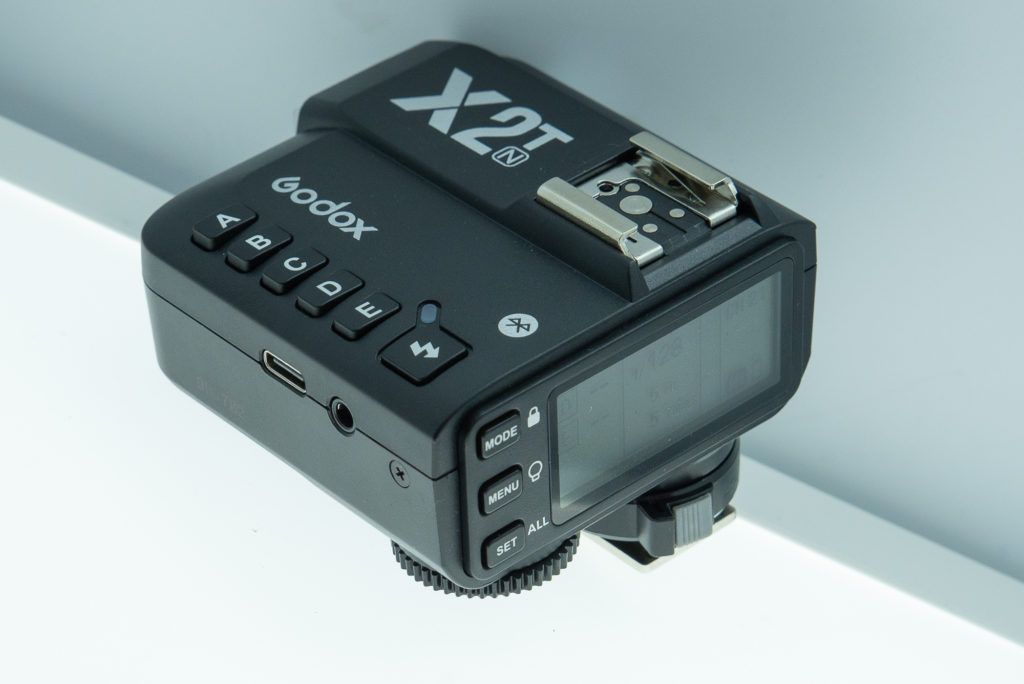
Photograph by Tobie Schalkwyk
- An upgrade of the Godox X1-series with a much larger LCD screen
- Available for Fuji, Sony, Olympus/ Panasonic, Nikon, and Canon
- Clear button layout
- Five groups, 32 channels, and 99 wireless ID settings to limit interference from other systems nearby
- Adjustable wheel dial
- Bluetooth connectivity to control a lot of functions from an app on your Apple/Android device
- Compatible with the Godox 2,4Ghz X system
- TTL, Manual and HSS flash firing modes
Added Advantage: It has a hot shoe for mounting a speedlite on-camera.
Price: $59
Godox XPro Flash Trigger
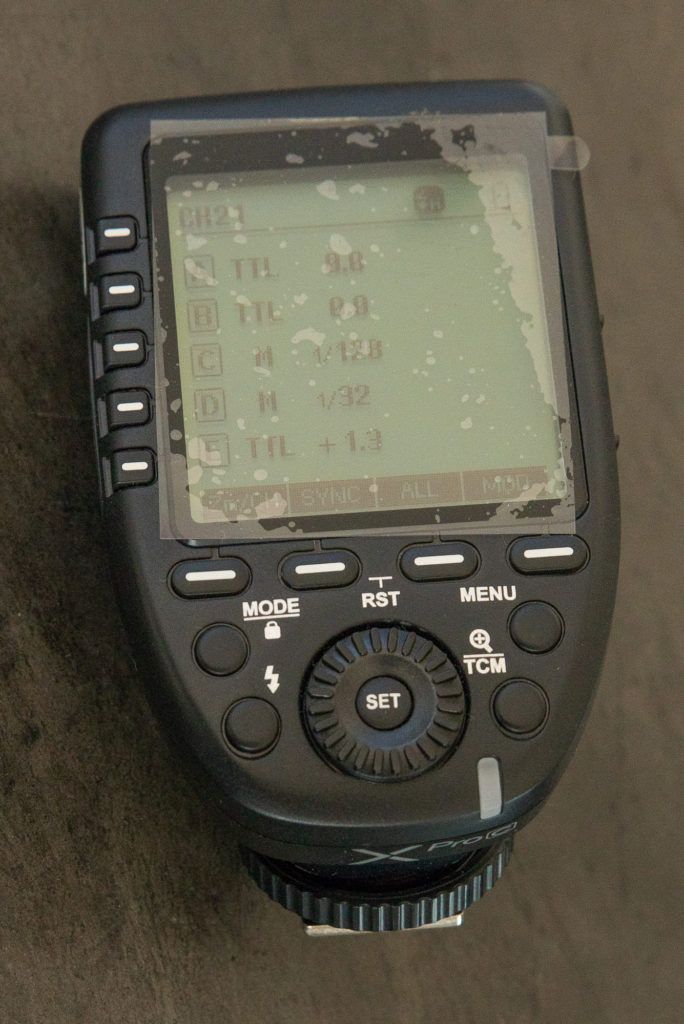
Photograph by Tobie Schalkwyk
- Un upgrade of the Godox X1-series
- Available for Canon, Nikon, Sony, and Fujifilm
- Compatible with a variety of Godox strobes, such as the Ving-series flashes, AD200, and AD600
- Controls all flashes with the built-in Godox wireless X system and brand name flashes mounted on the X1R receiver
- 16 groups, 32 channels, and 99 wireless ID settings to limit interference from other systems nearby.
- TTL, Manual and HSS flash firing modes
Price: $69
Recommended Reading: If you’d like to learn how to use your flash unit for better photography, grab a copy of Photzy’s Electronic Flash – Parts and Practices premium guide.
Yongnuo YN560TX Pro Flash Trigger
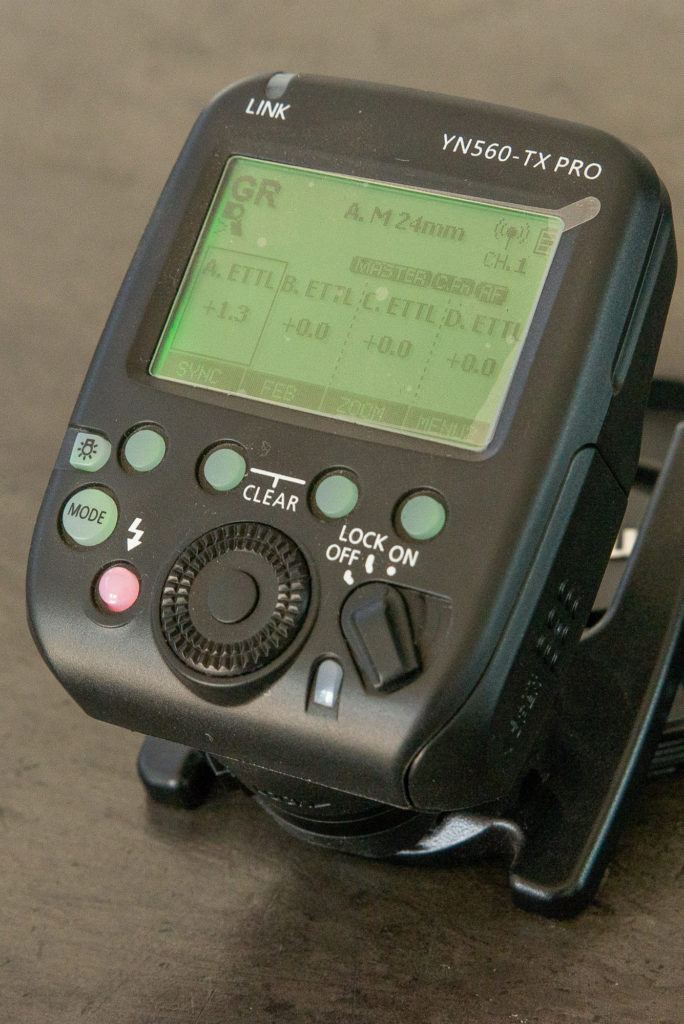
Photograph by Tobie Schalkwyk
- Integrated YN560-TX, RF603, and YN622 flash communication
- Flash Triggering Modes: Manual, TTL*, HSS*, and Rear Curtain Sync* (*where supported)
- Modeling flash
- Operating distance: 100m
- Built-in AF-Assist beams
- High-resolution dot-matrix LCD
- Five groups, 16 channels, and 99 wireless ID settings to limit interference from other systems nearby
- TTL, Manual and HSS flash firing modes
- Remote zoom features
- Available for Canon, Nikon, and Sony
Price: $72
Yongnuo YN560TX-II Flash Controller
(No image available, but I’d like to list it here due to its high cross-compatibility).
- Integrated YN560-TX YN660 flash communication
- Compatible with certain flashes, such as the Yongnuo YN560-III, YN560-IV, YN660, and YN685 models
- Can still trigger other flashes when mounted on a Yongnuo receiver (such as the RF-602, RF-603, RF-605, etc.), but you won’t be able to control the flash’s power or zoom
- Six groups
- Only Manual flash firing mode
Price: $45
Yongnuo YN622-TX Flash Controller
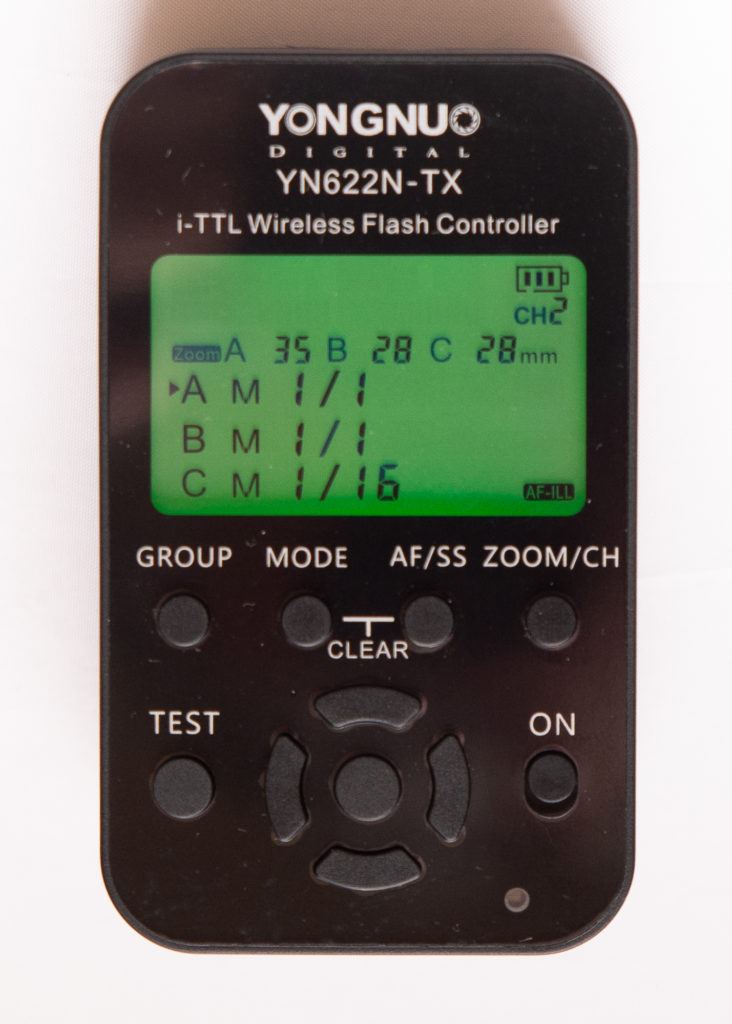
Photograph by Tobie Schalkwyk
- Compatible with the YN622 RF system, which is also built into the YN685 speedlite.
- Available for Canon (YN622C-TX) and Nikon (YN622N-TX)
- Individual zoom features per group
- TTL, HSS, FEC (flash exposure compensation), FEB (flash exposure bracketing), Manual (with power control), Multi, and Super Sync
- Flash wake-up (for flashes that entered sleep mode)
Price: $45
Note: Not compatible with Canon 2000D, 4000D, and 250D.
Key Lesson: The flash controllers above are just a drop in the bucket. If you need one, then the first question to ask is how important an on-camera flash is to you. Your answer will probably divide your number of options in half.
Thereafter, you simply have to see that the unit you choose complies with your minimum requirements as far as features are concerned. Remember to keep an extra set of batteries even though they last just about forever on these units.
About Transmitters, Receivers, and Transceivers
In the ‘old days,’ triggers were comprised of separate transmitters and receivers (also known as ‘master and slave triggers’). The transmitter (master) was mounted on your camera’s hot shoe and communicated with receivers (slaves). Each of your external flashes was mounted on a receiver via its hot shoe.
Eventually, transmitters and receivers were combined in units called ‘transceivers.’ As the name indicates, each transceiver can be used as a transmitter or a receiver. ‘Transmitters’ (masters/commanders/ controllers) then became something totally different, with many advanced features not found in transceivers.
The advantage of transceivers is that they have a hot shoe so you can mount one of your external flashes on-camera. If you already have a set of Yongnuo flashes using the RF-602/RF-603 radiofrequency platform, you may want to have a look at the Yongnuo RF-605 transceiver as your ‘controller.’ It comes with a small controller-like LCD screen.
The advantage of transceivers is that they have a hot shoe so you can mount one of your external flashes on-camera.
Most of the Godox controllers listed above do have hot shoes. This is something important to keep in mind before starting to build up your wireless trigger arsenal as all controllers only talk to a specific RF range of flashes/transceivers. Once you have a set of flashes with built-in receiver functionality, you are tied into the type of controller/ transceiver you’ll be able to trigger them with.
Photograph by Cherise Brady
When do you need a transceiver?
- To act as a controller (unless you use one of the controllers listed above)
- For each of your external flashes that do not have built-in slave features to communicate directly to the controller/transceiver mounted on your camera’s hot shoe
Why would you buy a controller instead of a transceiver?
- For ease of use. In general, the layout of buttons on controllers are much better than on transceivers, supported by wheel dials and LCD screens.
- For ease of control. In general, one look at your controller will tell you exactly what the status is of each of your external flashes (power selection, zoom, etc.) without touching anything.
- Wider functionality, providing for high-speed sync, flash exposure compensation, TTL, more channels and wireless ID settings, and Bluetooth and wireless connectivity to manage controller functions from a downloadable app on your iPad/ tablet.
- Some controllers offer off-camera wireless shutter release functionality.
Photograph by Tobie Schalkwyk
Key Lesson: Controllers are in general more expensive than transceivers, but they offer much more functionality. They are also much easier and more intuitive to operate. Therefore, it may be worthwhile to use an external controller rather than the built-in master trigger features of one of your flashes or transceivers.
Built-in Radio Flash (Budget) Options
I am not going to discuss this in detail as the functionality, compatibility, and features of built-in flashes are endless. Let me just say the following:
- Most external flashes do not have built-in wireless flash features
- Some external flashes have only slave trigger functionality built-in
- Some external flashes have a master as well as slave functionality built-in
What Does This Mean?
- It’s certainly worth your while to sit down and plan well before buying your first speedlite or strobe. It will set the path ahead for adding compatible flashes and triggers.
- Ensure that all of your units are compatible with the same RF range (622, 560, etc.) so that you can control them from one trigger device.
- If you can afford it, try to stay with speedlites with at least built-in slave trigger features. That will save you the extra cost of buying external slave triggers and the other disadvantages linked to them.
How Do They Work?
Photograph by Tobie Schalkwyk
To fire a flash through an external trigger kit, the rules are simple:
- If you’re using a flash with built-in slave features, select the setting that specifies that the flash will act as a slave to a controller (check your specific flash’s user guide for instructions).
- Select a group/channel combo on your slave flash/transceiver.
- Make sure that your controller (built-in or not) is set to cover that specific group/channel combo.
- Set the flash’s required power level and any other less-used adjustments (zoom, HSS, etc.) on the controller.
- Fire!
Key Lesson: Whether you use a flash’s builtin wireless flash features or external flash triggers, the concept is the same: you pair the master and slave(s) by sharing the same group/ channel combo and thereafter you adjust the slave’s power (and other) settings from the master.
Make sure you can do this blindfolded because it will become exponentially more difficult if you need to do it under pressure. Actually, not if, but when. It’s only a matter of time.
Troubleshooting
There is not really much that can go wrong with the proven versions of external flash triggers. Everything revolves around the correct selection of groups and channels. The same rules apply to built-in and external triggers.
If the flash is not firing, check that:
- your flash or transceiver’s selected group and the channel is also selected on your commander (sometimes you accidentally touch one of the group/channel buttons that changes the selection);
- your flash’s group/channel combo is not switched off/disabled on the commander;
- your flash’s shooting mode (e.g. Manual) is selected for your relevant group/channel on the commander;
- you have selected the relevant ‘master’/’slave’ setting on your flash if you use its built-in trigger functionality;
- everything is switched on (your batteries might have died);
- your speedlite/commander is connected firmly and is pushed in fully on its relevant hot shoe (if external); and
- if you’re using High-Speed Sync (shutter speeds of higher than 1/250s), then ensure that you have selected HSS in your camera settings as well as in your controller/slave flash settings, as and where needed.
The procedure for shooting HSS should be documented in your camera’s User Guide. If not, then someone else would have used your camera/trigger combo successfully before, so check Google for assistance.
One thing you need to be aware of is the triggering of your flashes without you doing it.
That means that someone else might be using the same RF triggers as you (for example, a guest or a photographer at a wedding in a venue next door, or even your second photographer). When this happens at a reception, it’s more of a nuisance than anything else (although, it might quickly drain your batteries).
One thing you need to be aware of is the triggering of your flashes without you doing it.
But if it happens during a wedding ceremony inside a church, then it could be a real problem.
In such an event, see if you (or your assistant) can find the culprit and agree on non-overlapping group/ channel combinations for each of you. If you cannot find the culprit, then you may want to change some of these combinations on your own and hope for the best. Some photographers tend to use the triggers’ factory settings (i.e. Group A, Channel 1), so it might be a good idea to stay away from that, or anything on Group A for that matter.
Make sure you know how to change these settings without fiddling around (that’s why I prefer using external master and slave triggers, as you can quickly change group/channel combinations without working your way through a menu system, by simply pressing a button or two).
Recommended Reading: If you’d like to learn how to use your flash unit for better photography, grab a copy of Photzy’s Electronic Flash – Parts and Practices premium guide.
Practical Applications
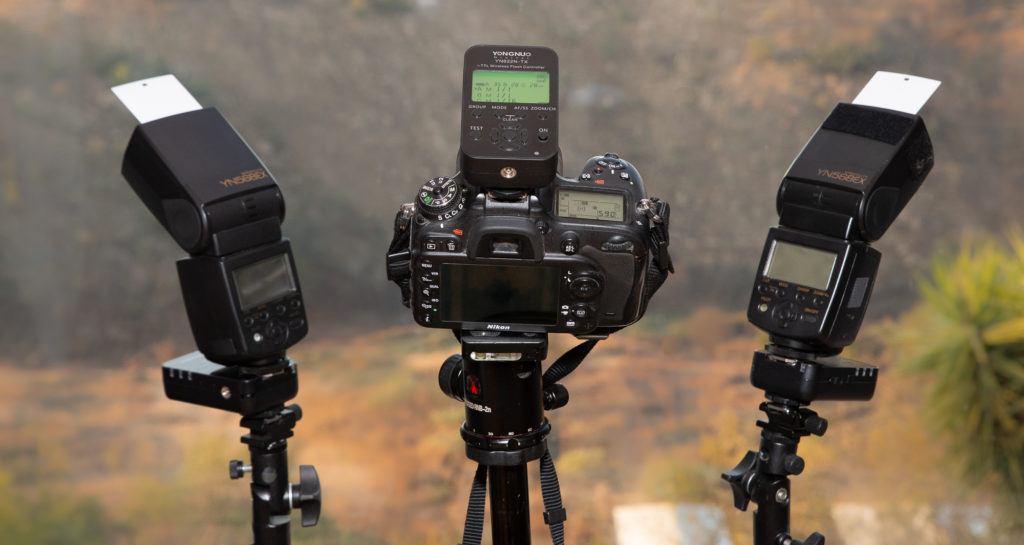
I considered copying relevant images from my previous guide (Getting Started with External Flash), but I’d rather you read that material together with this guide for more context. All of the images used for demonstration in the previous guides were taken with:
- a Yongnuo YN622N-TX controller on-camera; and
- one or more YN622N transceivers on YN685EX/YN568EX speedlites.

Nikon D600 + Tamron 24-70mm @ 52mm | f/5.6 | 1/200s | 400 ISO | +1 step exposure | Handheld | Yongnuo YN622N-TX controller on-camera + YN622N transceiver + YN568EX flash. Photograph by Tobie Schalkwyk

Nikon D600 + Tamron 24-70mm | EXIF details not available | Yongnuo YN622NTX controller on-camera + YN622N transceiver + YN568EX flash. Photograph by Tobie Schalkwyk
Having said that, I’d like to include these two images (above) which would not have been possible without the use of an external flash kit. A blue filter on the speedlite added a color effect.
My assistant stayed behind the groom and bride as they opened the dance floor, speedlite in hand. I was able to take a few shots and select the best ones.
Conclusion
Photograph by Tobie Schalkwyk
The world of external flashes is an exciting and interesting one. The features built into these units are amazing, if not mind-boggling.
Add to that the fact that the non-brand names are very affordable, and that places them within reach of not only the pros but any serious photographer. The advantages they offer are endless. If your kit does not have built-in trigger filters, get a trigger kit for at least one of your flashes and use it to the fullest. It enriches your life and the results gained from it are beyond rewarding. Just do it!
Self-Check Quiz:
- True or False: The wired remote firing of electronic flash units becomes cumbersome when the units are placed at great distances apart.
- Name the three main types of wireless electronic flash triggers.
- Name a con for the optical-type trigger.
- Name a pro for the infra-red-type of a trigger.
- With a radio flash trigger, does the unit have to be in the line of sight with the camera?
- Why does the author recommend an external wireless trigger versus a built-in unit?
- Name a recommended budget wireless flash transmitter.
- True or False: With a flash controller, the photographer can control numerous flash settings on numerous electronic flash units from one position.
- What is a transceiver?
- Name one recommended troubleshooting step that you should try if the wireless flash trigger is not causing the flash to fire.
Attributions: My sincere thanks to Camera Land (Randburg, South Africa) for allowing me to photograph the list of controllers shown in the ‘External Radio Flash (Budget) Options’ section.


