

Photography is all about one thing. If you get that right, you have made it. If you get that wrong, you have failed, even if you’re using the best camera and lens in the world. Ask wedding photographers who wish that they could only go back and redo ‘that one’ image or ‘that one’ scene.
That one most important thing is light. If you are considering going into wedding photography and you are not 100% sure that you have sufficient light, then don’t do it! You’re going to regret it and even worse, your bride and groom are going to regret hiring you. You only have one chance of getting it right!
Recommended Reading: If you’d like to learn how to use your flash unit for better photography, grab a copy of Photzy’s premium guide: Electronic Flash – Parts and Practices.
External Flash
In this article, ‘external flash’ refers to any light source which is not built into your camera but which is controlled by your camera – wirelessly or not – utilizing flash triggers. So even a flash mounted on your camera via its hot shoe is an ‘external flash.’
We are not going to look at permanently lit light sources, as they are not ‘flash’ lights, are they? A flash is something that works on the same principle as lightning!
We’re going to look at the features which make these light sources so popular and see why you pay such a stiff amount of money for some of them.
We are also going to look at a few practical applications. If I do not make you realize that you actually can’t do without at least one of these great toys, then I have failed in my mission!
Note: I may mention the use of flash triggers and/or diffusers from time to time, but I’m not going to spend much time on them. We’ll keep that for my guides following this one. So, if you find this guide helpful, make sure you read the others to see how you can get the most value out of your external flashes in combination with wireless flash triggers and diffusers.
The Most Common Types of External Flashes
In general, ‘external flashes’ can be divided into two main classes:
Speedlites
These are often referred to as ‘speedlights,’ ‘flashguns,’ and ‘hot shoe flashes,’ but ‘speedlites’ seems to be the most common term, so we will stick to that for this article.
The most common traits of a speedlite are as follows:
- It has a hot shoe mounting foot which enables you to mount it on your camera’s hot shoe or wireless receivers.
- The speedlite’s flash head can swivel 360° (or close to it) horizontally and 180° vertically (isn’t that magical?).
- An on-camera speedlite will actually zoom its light physically to the back and front based on your current focal length (24mm, 70mm, etc.). It thereby limits the ‘wastage’ of light. You can actually hear it ‘zooming’ in and out as you manually adjust your focal length.
- Some of the more expensive speedlites have built-in wireless flash features, allowing you to control other speedlites (with the same built-in features) without the need for a special wireless flash trigger kit.
Photograph by Tobie Schalkwyk
- Speedlites usually have a white pull-out reflector to reflect more light onto your subject.
- Most speedlites have a pull-out diffuser in case you want to soften the light projected on your subject.
- Some speedlites have built-in optical trigger features, but I recommend only using these as a last resort. They need your camera to be in view (and turned with its front-facing them) to work. That is not ideal when running around with moving subjects, such as at a wedding.
- Speedlites in general produce somewhere between 60 and 100 watts of power.
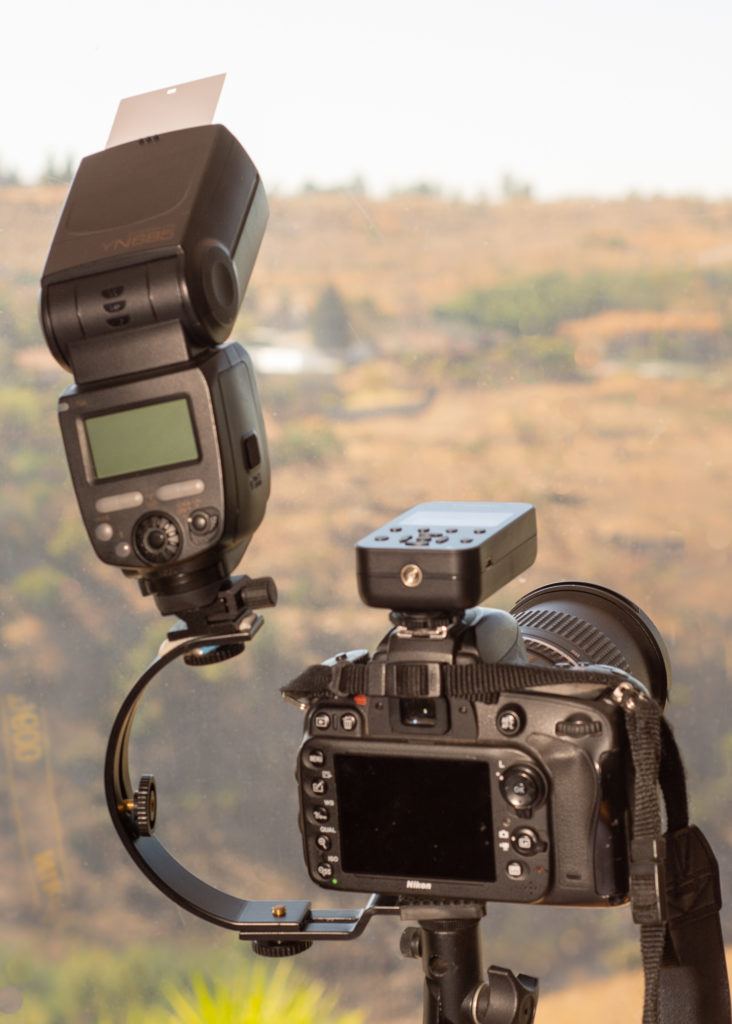
Most wireless trigger commanders do not have a hot shoe, for good reasons. In this case, the top of the commander is occupied by buttons and an LCD screen. This creates a problem if you need an on-camera speedlite in combination with off-camera speedlites. A C-clamp is a good solution. Just make sure everything is tightened well so that it’s not flimsy, or you may drop your expensive speedlite.
Important notes about speedlites:
- Most speedlites automatically set the range to 24mm when you deploy (pull out) the built-in diffuser, so you may be losing more light than you’re bargaining on. Have a quick look into your LCD screen/your on-camera’s histogram after taking your first shot to ensure that your image is not totally underexposed.
- When buying speedlites, make sure they are compatible with your camera brand (even nonbrand speedlites like Yongnuo).
- Most speedlites are powered by a set of four AA batteries. These batteries usually heat up very quickly and should have the following properties:
- Tolerate intense heat. Always have an extra set of batteries available so that when your batteries are getting so warm that they start slowing down your shoot, you can quickly swap them for another set while the first set is cooling down again. You should always have a backup set of available batteries for each device anyway.
- Recycle very quickly after each shot to be ready for the next one.
Shop around to find the best batteries suitable for this job. Get opinions based on personal use on online forums because better batteries come onto the market from time to time (and current ‘best’ ones are phased out).
My personal choice are Energizer Ultimate Lithium batteries. They last long, endure high temperatures, and recycle very quickly after each shot. And they do not leak!
If you’d like to save a few bucks in the long run, buy rechargeable batteries suitable for this job (the standard bunch from the shelves are not!). I have not used rechargeable batteries before, but I have heard good things about Powerex NiMH’s and Eneloop NiMHs.
If you buy rechargeable batteries, go for the highest mAh rated ones possible. The higher its mAh spec, the longer it will take to run flat during a shoot. Try to find batteries with a spec of 2600Ah and above.
Key Lesson: Speedlites are probably the most versatile light source available to photographers today. Therefore, they are the most popular, too. A proper flash trigger on the one end and a diffuser on the other end go a long way to get the most out of it. If you start cheap, get a diffuser first and invest in a flash trigger kit at a later stage.

Photograph by Tobie Schalkwyk
Speedlites produce harsh shadows and are at their best in combination with a diffuser. Your choice of diffusers is endless. This MagMod MagBounce/MagGrip combo is my favorite for on-camera lighting. The diffuser is attached to the grip using magnets, providing for quick removal if and when needed. The MagGrip rubber mount is part of the MagMod 2 Basic kit.
Commercial Strobes
Strobes are bulkier than speedlites and are mostly used in photo studios. They are, however, not too bulky to be hand-held (some of them come with a special removable grip for this purpose) or to be carried around on stands by assistants. Usually, they are used in combination with large diffusers such as beauty dishes and octaboxes.
Strobes are bulkier than speedlites and are mostly used in photo studios.
Some of the most common strobe features are as follows:
- Built-in zooming features like speedlites.
- Some have hot shoe mounts, not for mounting it on your camera (it’s way too bulky) but rather to be mounted on a (wireless or not) flash trigger. It is more common for them to have a sync port for connecting your flash trigger. Some of them actually have built-in wireless flash-receiving features.
- Strobes in general produce somewhere between 300 and 1,250 watts of power. Even the smallest ones are thus much more powerful than your most powerful speedlites.
- Strobes come with their own battery packs. These batteries last quite long (depending on what power you’ve set the strobe on, of course), but it will do no harm to get a backup set just in case, especially if you’re a wedding photographer.
Key Lesson: Strobes may be bulky, but photographers do not pay assistants to carry them around during photo shoots without reason. I mostly love them for one reason: to create ambient light in rooms, churches, and halls when combined with an octabox.
It removes all dark, unwanted shadows and creates a great platform for all of my images, with or without the help of speedlites. Yet again, I’m getting the most use out of it when used in combo with a wireless flash trigger kit, so I am not limited in my movement during the shoot.
A Closer Look
Let’s have a closer look at these two great types of light sources. It will serve as a handy overview of what functionality they come with. I am not going to explore the web for more samples. There are just too many variations and brands, so we may get lost in the detail. I’m only going to use my favorite speedlite and my studio strobe as an example.
I am not thereby implicating that these two products of mine are the ‘best’ or ‘the one and only.’ Other units out there have similar features. Just make sure that you buy units compatible with your camera brand, with some of the mentioned features that are important to you.
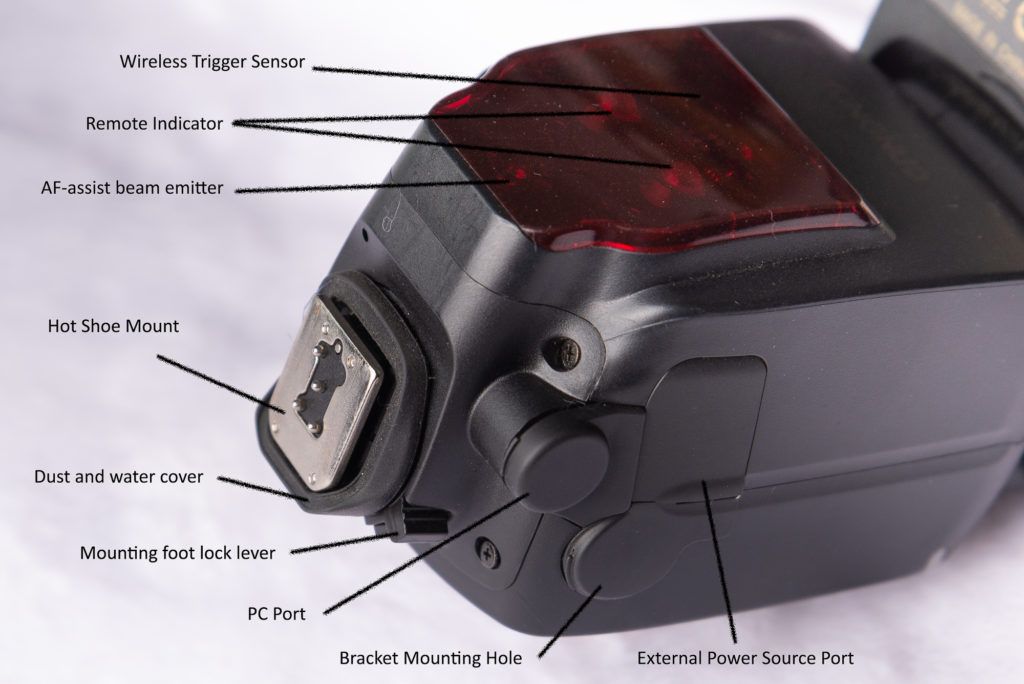
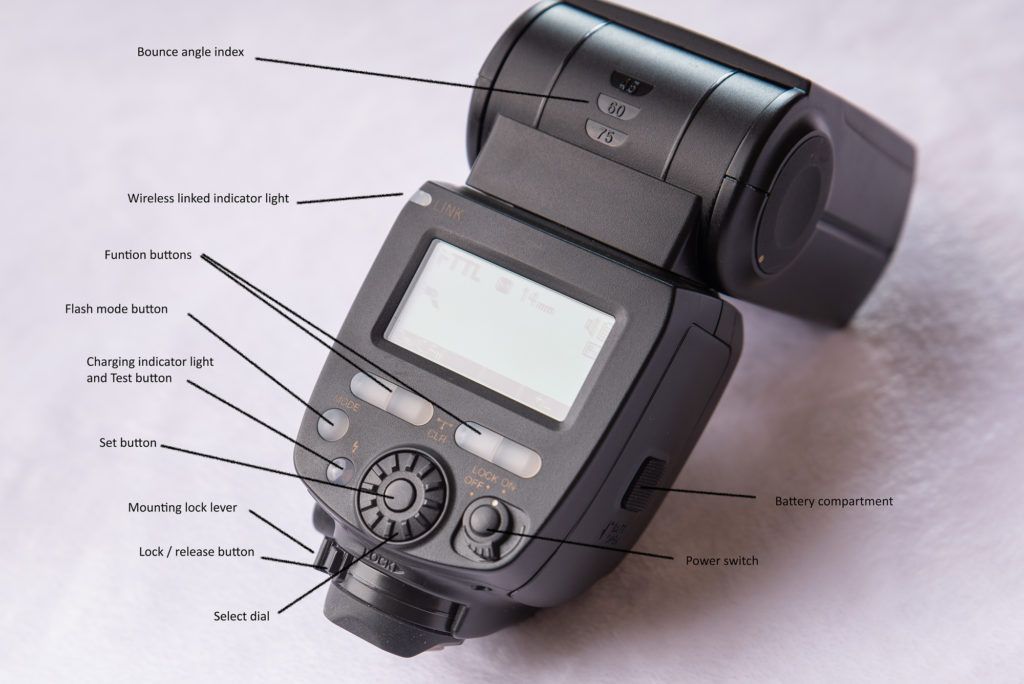
The Yongnuo YN685 Speedlite

Photograph by Tobie Schalkwyk
I absolutely love this speedlite because it has a built-in wireless receiver (compatible with the Yongnuo YN622N-XT wireless trigger), a dust and water-resistant hot-shoe adapter, and a quick-release mounting foot lock lever.
Photograph by Tobie Schalkwyk
It actually has built-in commander (transmitter) trigger functionality too. The advantage of this is that you could use it as an on-camera speedlite as well as control other speedlites. If those speedlites have built-in wireless receiver capabilities, it means that you could use all of your speedlites without the need for a separate wireless trigger kit.
Personally, I prefer using the Yongnuo YN622N-XT wireless trigger commander (mounted on the camera’s hot shoe) to control all of my speedlites and/or strobe. I’ll cover the reasons for my preference in my next article on wireless triggers. Let me just mention that it has the disadvantage of not being able to directly mount an on-camera speedlite as the camera’s hot shoe is occupied by the trigger.
Photograph by Tobie Schalkwyk
Key Lesson: A lot of invaluable features have been built into speedlites. Make a list of which of these are not negotiable before you shop around, and don’t settle for less. Having a capable speedlite at your disposal during a shoot helps you focus on the task at hand as you do not have to worry about the features and durability of your light source.
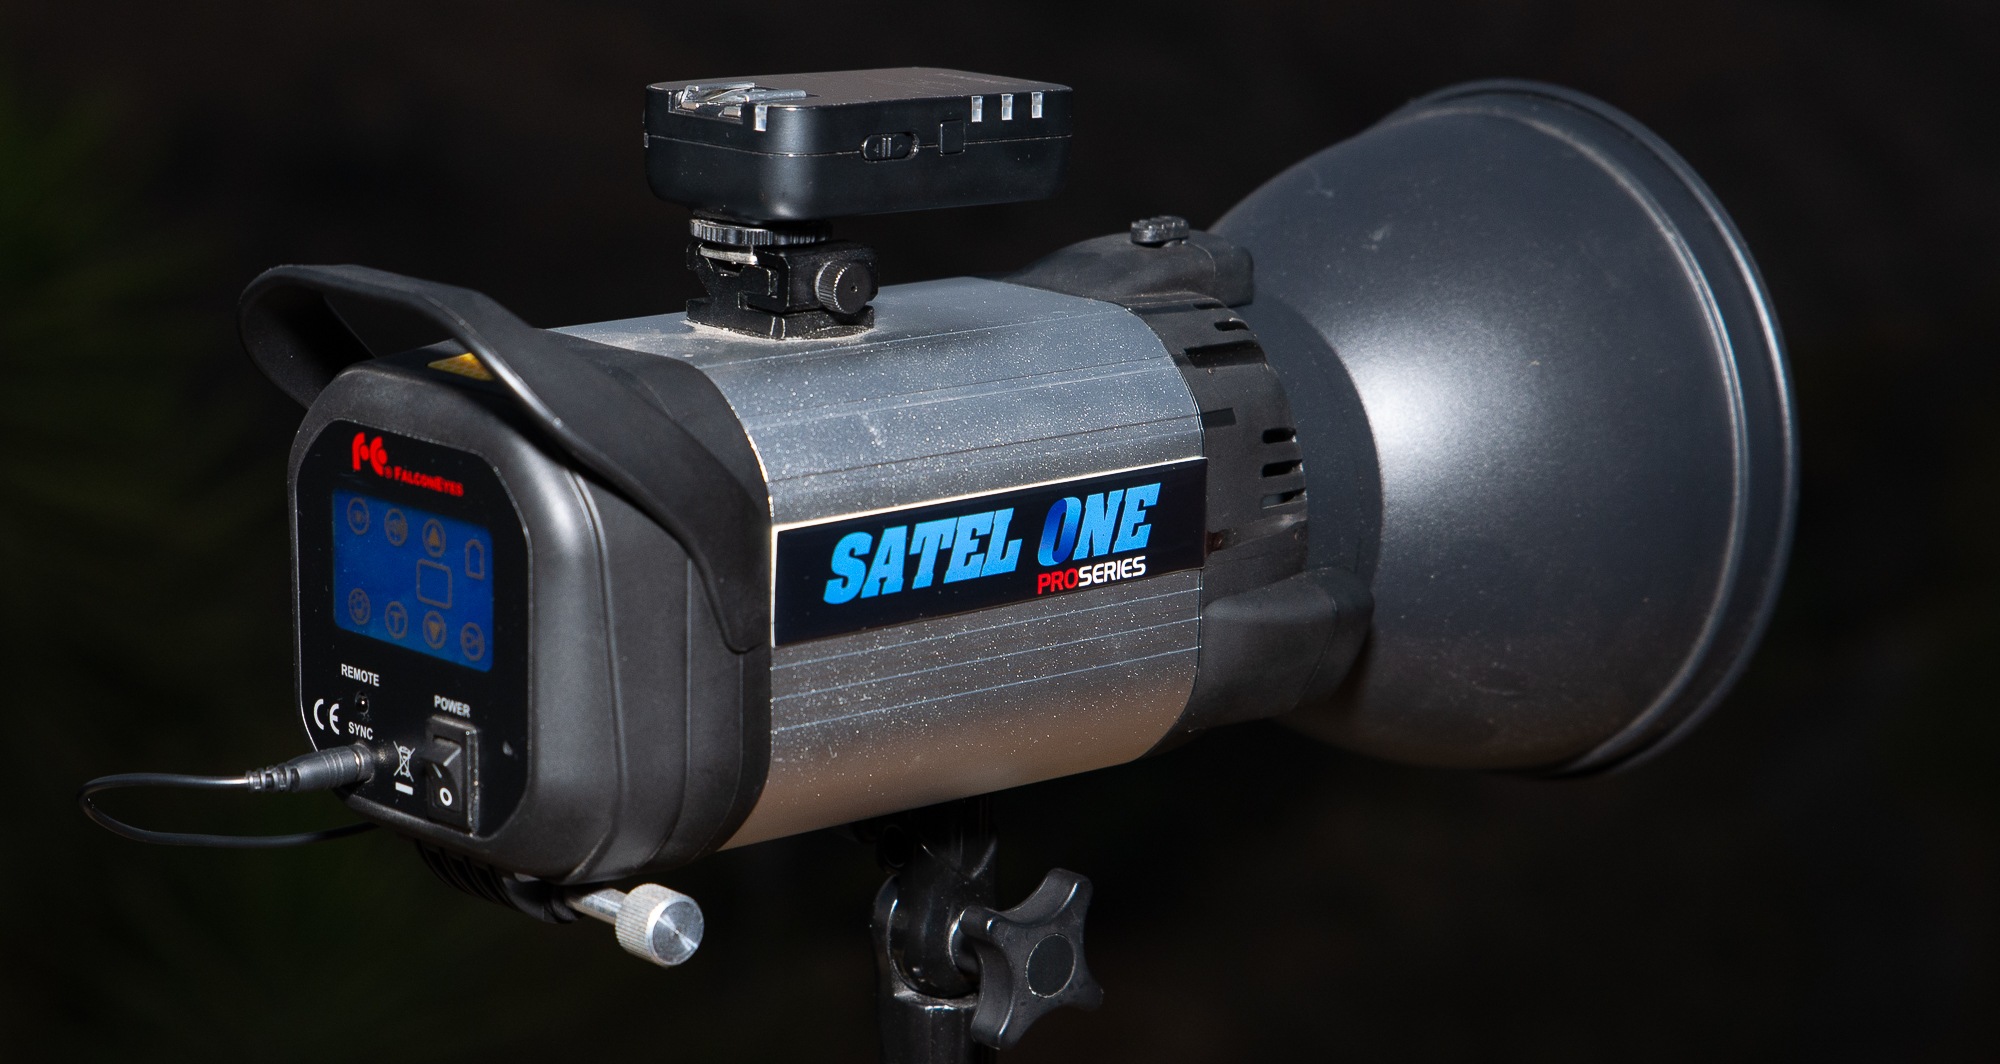
The Falconeyes Satel One Pro Series Commercial Strobe

Photograph by Tobie Schalkwyk
The chances are quite good that you won’t find this strobe on a shelf near you. There is a much wider range of strobes available than speedlites, simply due to their popularity for studio use.
One of the most important reasons why I love this strobe is its value for the money. It also comes in a compact foam protected casing, making it easy to carry around to weddings or other outdoor shoots. It utilizes a rechargeable battery pack and a removable handle, should you wish to hand-hold it during a shoot.
The only drawback of this strobe is that it does not have a place to position a wireless flash trigger out of harm’s way. I thus glued a hot shoe bracket on top of the body (using silicone glue), and I cut a hole in its accompanying foam packaging to cater for my add-on invention.

Photograph by Tobie Schalkwyk
The battery pack gives me about 600 flashes at full strength.
Recommended Reading: If you’d like to learn how to use your flash unit for better photography, grab a copy of Photzy’s premium guide: Electronic Flash – Parts and Practices.
The Contols
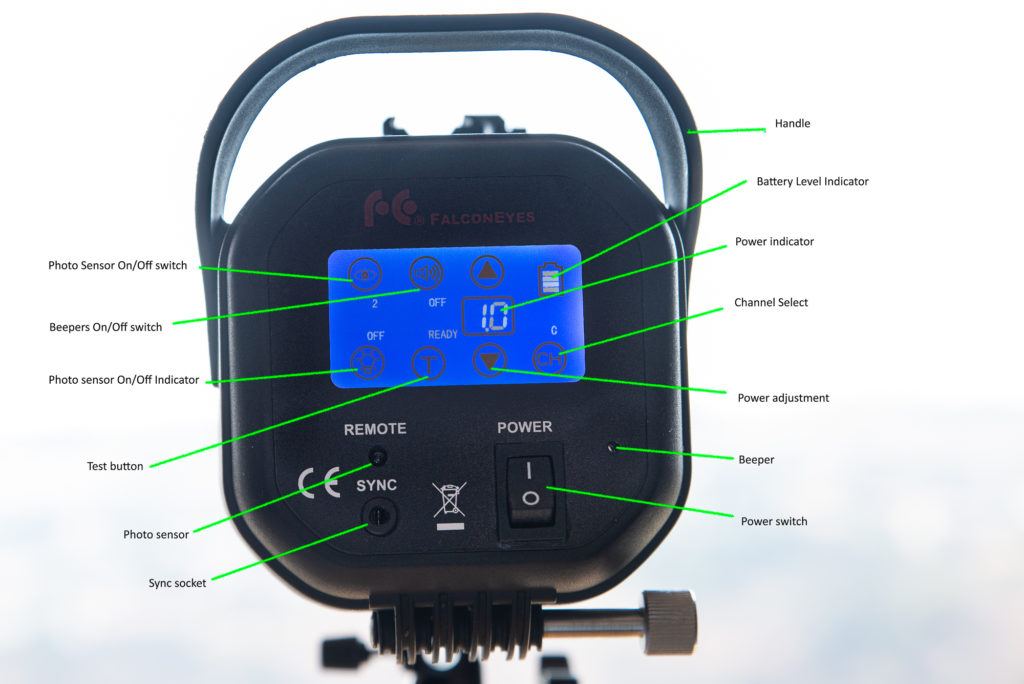
Photograph by Tobie Schalkwyk
A bit of info about some of these controls:
- Battery level indicator and power adjustments: from 1-4 in 0.1 increments. Level 4 generates 600W of power.
- Sync socket: for plugging in your flash trigger cable.
- Photosensor: for triggering the strobe optically from your camera’s flash. It flashes the moment when it picks up a flash from anywhere else (so be aware!).
Key Lesson: Strobes are invaluable tools to create ambient light but also to create stronger light on one side of your subject. They are bulky, but in the hands of an assistant, their value can’t be expressed in monetary terms.
Strobes are expensive, so make sure that you know exactly what you’re looking for when shopping for one. Mount them only on the best, sturdiest stands and support them using sandbags in areas where people move past them regularly.
When placing them in churches and halls, be mindful of guests as the strobes produce very strong light that could lead to irritation.
Five Practical Examples
Let’s look at a few practical applications where I have used these units before, to illustrate their versatility.

Paradise Flycatcher (mail) feeding its newborn chick. | Nikon D600 + Tamron 150 600mm G2 @ 600mm | f/6.3 | 1/800s | 800 ISO | tripod. Photograph by Tobie Schalkwyk
In this particular case (image above) I had the problem of very dark light created by thick leaves above the nest. I positioned the strobe on a stand 3m (10’) high, aimed straight at the nest. I could not get closer to the nest with my camera as it would have frightened the parents. They were not bothered by the strobe’s flashlight at all.

Nikon D600 + Tamron 24-70mm @ 46mm | f/8 | 1/100s | 320 ISO. Photograph by Tobie Schalkwyk
In this instance, we were in a dark venue, so I created ample ambient light by placing a speedlite on the counter (behind a solid wall, out of my sight) and tilting it upwards to reflect light from the white ceiling.
A second speedlite with a diffuser was placed on the floor (also behind the wall, out of my sight) and directed towards my subjects to create beautiful soft light from the right.
I used a Yongnuo YN622 wireless trigger kit to trigger the speedlites.
A small aperture was selected to capture the image in the mirror, which looks like the groom-to-be is kissing the bride-to-be on the forehead.

Nikon D600 + Tamron 24-70mm @ 24mm | f/9 | 1/200s | 1000 ISO | Exposure +1 | Handheld. Photograph by Tobie Schalkwyk
The size of this group was always going to be a problem since we had no help from a set of steps to expose all the faces. I thus created my own ambient light by placing a 600W strobe with 120cm (48”) octabox about 7m (22’) behind me (twice that distance from the group). I positioned two speedlites at the sides to evenly light up everyone. I then got onto a stepladder to capture all of the faces.
Everything was triggered by a Yongnuo YN622 wireless trigger kit.

Nikon D600 + Nikkor 85mm f1.8 | f/1.8 | 1/200s | 800 ISO | Handheld. Photograph by Tobie Schalkwyk
Setup:
- On our right: A 600W strobe at full strength, serving as the main light (also known as the key light). It was behind a 100cm (48”) beauty dish to soften the light.
- On our left front: A speedlite set at full strength, serving as a secondary light. It was hooked up to a 100cm (40”) octabox to soften the light.
- On our left, behind her: A speedlite at full strength to provide rim light. The built-in diffuser was deployed to soften the light just a little.

Nikon D600 + Tamron 240-70mm @ 24mm | f/5.6 | 1/20s | 1600 ISO | Handheld. Photograph by Tobie Schalkwyk
Flash lights have the ability to freeze any moment in time. Ever wondered how someone freezes a hummingbird’s wings that beat up to 50 times per second? With flash lights!
In this case (above), I used an on-camera speedlite and swirled the camera in a circle (quickly!) while pressing the shutter. The dancing couple was frozen by the speedlite while the light streaks were captured by the shutter which stayed open much longer than the flash’s light period. As shown in the EXIF details, a slow shutter speed is needed to create this effect. A high ISO is needed to capture as much as possible of the dark dance floor.
The couple did not get captured at all by the slow shutter period outside of the flash time because the dance floor was quite dark. You’ll have to disable autofocus if your camera is set to only release the shutter while focused on a subject; otherwise, it will refuse to take the ‘shot in the dark.’
Flash lights have the ability to freeze any moment in time.
Key Lesson: Speedlites and strobes can be deployed in an unlimited number of combinations (or alone) to create any effect you desire. We have not even touched on the subject of adding color filters (a topic for another day). Go sit down for a moment before using these tools.
Paint a picture in your head of what you’d like to capture and then ‘build your set.’ Play around with different light settings until you get exactly what you’ve planned.
Recommended Reading: If you’d like to learn how to use your flash unit for better photography, grab a copy of Photzy’s premium guide: Electronic Flash – Parts and Practices.
Summary

Photograph by Tobie Schalkwyk
Life without speedlites and strobes is boring. It’s limited. It’s frustrating. You’ll never reach your full potential (not to mention satisfaction!) without them. If you do not have at least a speedlite yet, go out and buy one.
I promise you, you will thank me!


