


A few years ago, I decided that I wanted to take a photo of the Milky Way. At the time, I had no background in astrophotography. In fact, I took very few images at night. So, I set to work learning this new photography skill.
I discovered that astrophotography is as complex as it is gratifying. During my night shoots, I had experiences and saw a side of nature that most people don’t experience. I looked up and had a greater appreciation for the beauty of the night sky.
I found that astrophotography takes a lot of planning and a working knowledge of both astronomy and meteorology. I purchased specialty camera gear and downloaded apps to help me on my quest to photograph the Milky Way.
The camera settings I learned helped me understand my camera on a deeper level. I also discovered compositional techniques and conventions that make effective night sky photographs.
In this article, I’ll introduce you to the camera gear you’ll need. I’ll help you plan a shoot and set your camera.
I’ve focused on photographing the Milky Way, but I’ll also talk a little about star trails and capturing the moon.
Here’s what we’ll cover:
- Astrophotography gear
- Planning a shoot
- Camera settings for astrophotography
Recommended Reading: If you’d like a more comprehensive training on capturing beautiful landscape photographs, grab a copy of Photzy’s best-selling premium guide: Complete Landscape Photography.
The Milky Way at the Garden of the Gods in southern Illinois. Photograph by Jenn Mishra
Astrophotography Gear
You can get started in astrophotography with nearly any camera and lens, but there are some gear recommendations that make photographing the night skies easier.
A tripod is a must for astrophotography. To collect light from dark skies, you will be leaving your shutter open and taking a long exposure. A tripod stabilizes the camera and allows for long exposures.
A remote trigger may also be necessary depending on what you’re shooting. If you’re shooting the moon or the Milky Way, you won’t need the remote trigger. Your exposure times will be under the 30-second shutter speed limit of most cameras. But if you’re shooting star trails, you’ll need your shutter open for longer than 30 seconds.
Most astrophotographers use a fast lens and a camera with good ISO performance. A fast lens is one with a wide aperture, between f1.4 and f2.8. The larger the aperture (smaller number), the more light that will hit the sensor.
A tripod is a must for astrophotography. To collect light from dark skies, you will be leaving your shutter open and taking a long exposure. A tripod stabilizes the camera and allows for long exposures.
The focal length of your lens varies depending on your subject. If you’re shooting the Milky Way or star trails, you’ll want an ultra-wide-angle lens with a maximum focal length of 16mm. If you’re photographing details of the moon, then a telephoto lens would be better. Some astrophotographers mount their cameras to telescopes to capture images of deep space.
You will also need a headlamp to help you navigate at night. Get one that has a red light option. Using red light instead of white preserves your night vision.
Key Lesson: Recommended gear for astrophotography includes a wide, fast lens with an aperture of at least f2.8; a camera with good ISO performance; and a tripod. A headlamp with a red light and a remote trigger is also recommended.
If you don’t have all this gear, don’t let that stop you from shooting the night skies. I encourage you to get out there with whatever gear you have right now and try astrophotography. If you fall in love with astrophotography, then think about investing in gear.
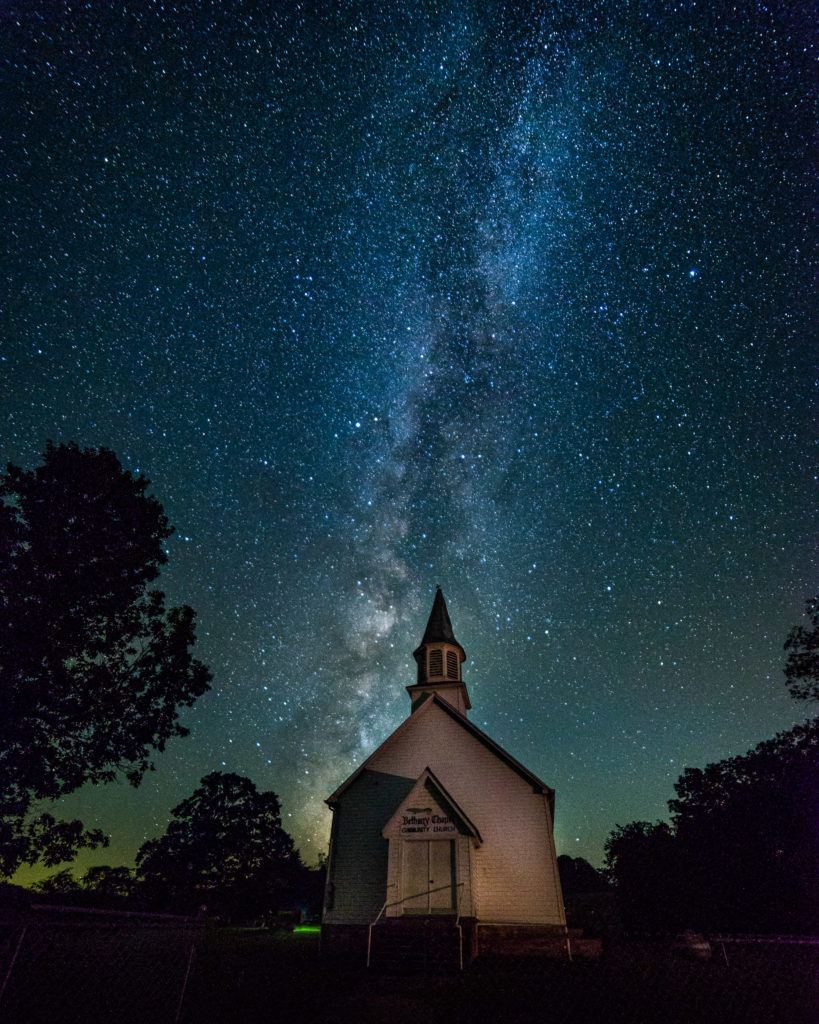
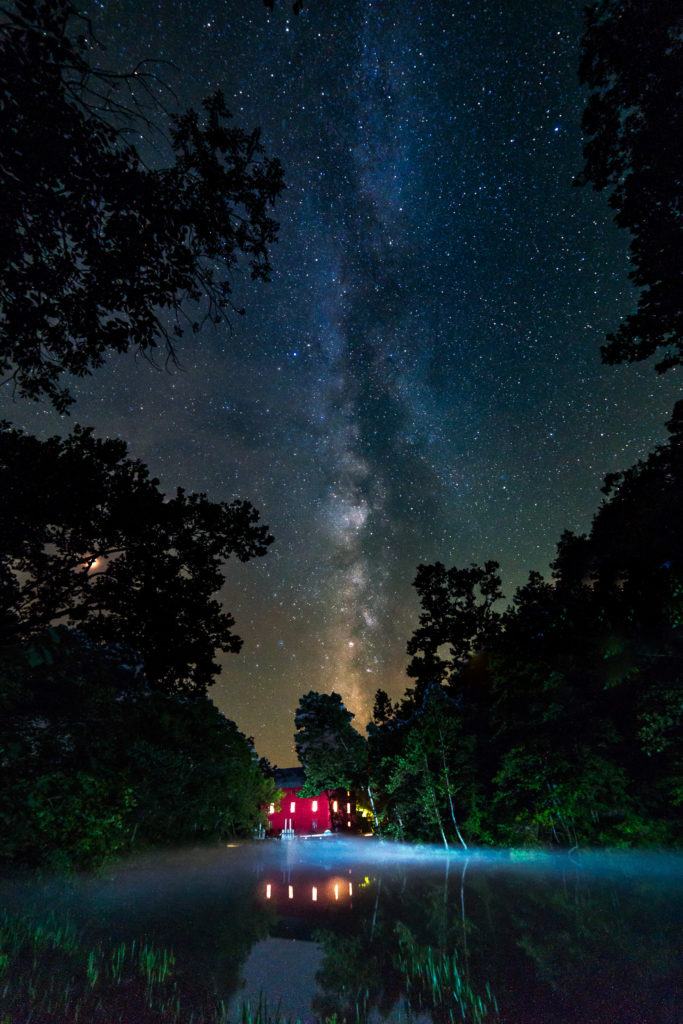
A church under the Milky Way in southern Missouri. Photograph by Jenn Mishra
Planning a Shoot
A lot of planning goes into an astrophotography shoot. You need to plan for three things for astrophotography: dark skies, clear skies, and a subject to photograph.
Thankfully, there are many apps and websites available to help you.
Finding Dark Skies
Light pollution surrounds cities and obscures the night sky. You may be able to photograph the moon in a city, but dark skies are essential for most astrophotography.
One tool I use to find dark skies is Dark Site Finder. This website tracks light pollution and helps me find dark skies nearby.

A screenshot showing a map of the light pollution in the United States. The black and blue colors show dark skies. Screenshot by Jenn Mishra
The map of the United States from the Dark Site Finder website shows that dark skies are generally found in the western states, but zoom in close to take a look at your location. You may be able to find relatively dark skies in your area.

A screenshot of the light pollution map of southern Missouri on Dark Site Finder. Screenshot by Jenn Mishra
I live near St. Louis. The reds, oranges, and yellows around the city show that there is a lot of light pollution, but there are spots of blue, gray, and even black not too far away. There’s a spot in the Missouri Ozarks that is a favorite for local astrophotographers.
When shooting star trails or the Milky Way, it’s also important to avoid the brightest light in the night sky: the moon.
Astrophotography is best on nights around the new moon. But some photographers like a bit of moonlight to illuminate a foreground element.
Finding Clear Skies
Finding a dark sky isn’t enough for good astrophotography. You must be able to see the night sky. Clouds that make daytime skies interesting obscure subjects in the night sky.
Astrophotographers use a variety of weather apps to anticipate cloud coverage. Apps like Dark Sky Weather and Astrospheric help astrophotographers plan for the weather.
• Dark Sky – https://darksky.net/
• Astrospheric – https://www. astrospheric.com/

Light pollution shows on the horizon and obscures the night sky. Photograph by Jenn Mishra
When looking for weather apps, choose ones that show the percentage of cloud cover. Because I have to travel to get to night skies, I’m not likely to go out for anything more than a 10% cloud cover.
Key Lesson: Most astrophotography benefits from dark, clear skies. Apps that track cloud cover and light pollution help astrophotographers plan the best time and location for their shoot.

Cloud cover obscures the night sky. Photograph by Jenn Mishra
Finding Astrophotography Subjects
Astrophotography subjects move through the night sky and are often seasonal. This means that it’s beneficial to know the rising and setting times as well as where your subject will be in the night sky at any given time.
Apps like PhotoPills and The Photographer’s Ephemeris (TPE) help photographers plan night shoots.
• PhotoPills – https://www.photopills.com/
• The Photographer’s Ephemeris – https:// www.photoephemeris.com/
Moon
If your goal is to photograph the moon, then you’ll need to track the phases of the moon and when it will rise and set. Many photographers like to photograph the geographic features of the moon. More features are visible when the moon is full.
You’ll want to photograph when the moon is near the horizon. This allows you to place the moon behind a foreground subject like a tree or building. The moon also tends to appear larger near the horizon.
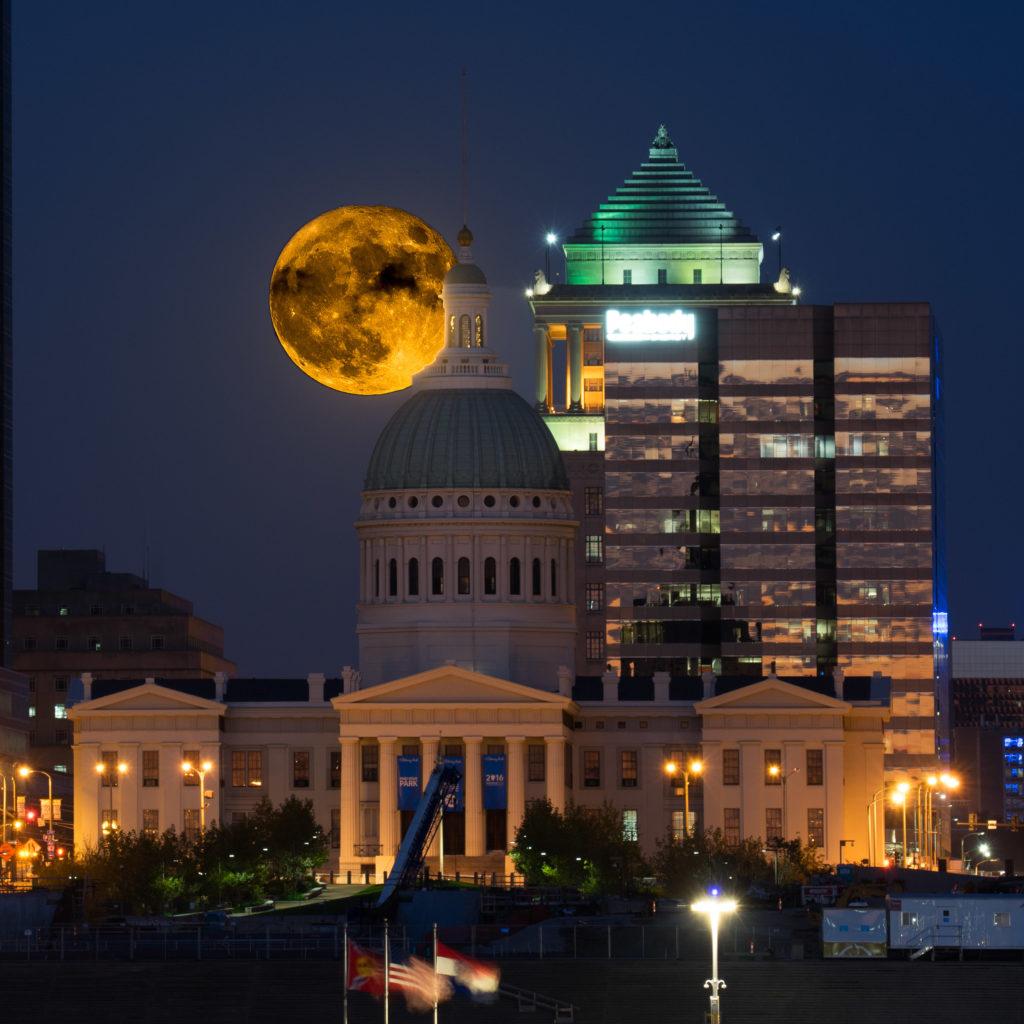
Supermoon over St. Louis in November 2016. Photograph by Jenn Mishra
Milky Way
If you’re in the northern hemisphere, the Milky Way is visible from February through November. It rises in the southern skies. The Milky Way will be more horizontal earlier in the year and shift vertically in later months. The Milky Way rises earlier later in the year.
I use PhotoPills to help me figure out the phases of the moon and when the galactic core rises above the horizon.
Photographers wait for the galactic core to rise above the horizon. This is the center of the Milky Way and the brightest, most interesting part. There is a lot of color and detail in the galactic core. I can bring this out in post-processing using clarity, contrast, and saturation.
Key Lesson: It’s essential to know when celestial objects rise and set. The location of these objects will change in the night sky depending on the time of year. It’s often important to know if multiple subjects are visible. A full moon obscures the Milky Way.
Recommended Reading: If you’d like a comprehensive guide on using ND filters and producing gorgeous long exposures, grab a copy of Photzy’s guide: The Complete Guide to Long Exposure Photography.
Comparing two dates in April 2020. On April 7th, the moon is full and is in the sky when the galactic center rises at 1:23am. This is a good night to photograph the moon, but not a good night to photograph the Milky Way. On April 19th, the moon is waning and will not rise until 5:06am. The galactic center will rise at 12:36am. This is a good night to photograph the Milky Way if it’s a clear sky. Screenshot by Jenn Mishra
Foreground Element
The best astrophotography images have a foreground element to add scale and visual interest to the image. A foreground element might be a rock formation, a tree, or a barn. Astrophotographers scout the location and select a foreground element during the day.
Not only do astrophotographers know where the Milky Way or moon will be in the sky, but they know where it will be in relation to a foreground element.
Using tools like Google Earth and TPE 3D, photographers can select foreground elements in advance.
PhotoPills and The Photographer’s Ephemeris have helpful Virtual Reality (VR) tools. Point a phone at the scene and the apps will tell you where in the sky the moon or Milky Way will be in relation to the foreground element.

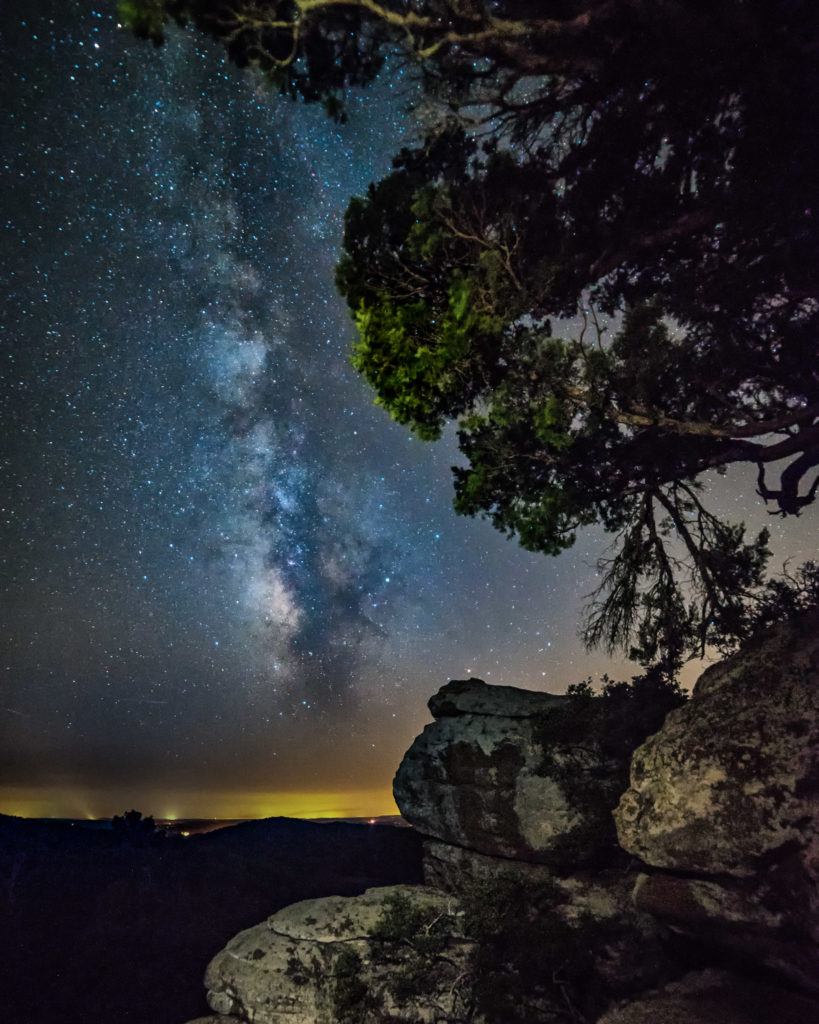
Castle Rock in the Kansas badlands makes for a great foreground element in this Milky Way photograph. Photograph by Jenn Mishra
Camera Settings for Astrophotography
Shutter Speed
Astrophotography requires long shutter speeds, but maybe not as long as you might think.
If you’re photographing the moon, you won’t need a long exposure at all. The moon, especially if it is full, is often quite bright. Shutter speed for a moon photograph will range between 1/60th and 1/125th of a second. Longer than that and the moon will become a featureless white orb in the sky.
When I’m shooting a full moon, I often create a composite image: one image for the foreground with a long night exposure, and one exposure for the moon with a much shorter shutter speed.
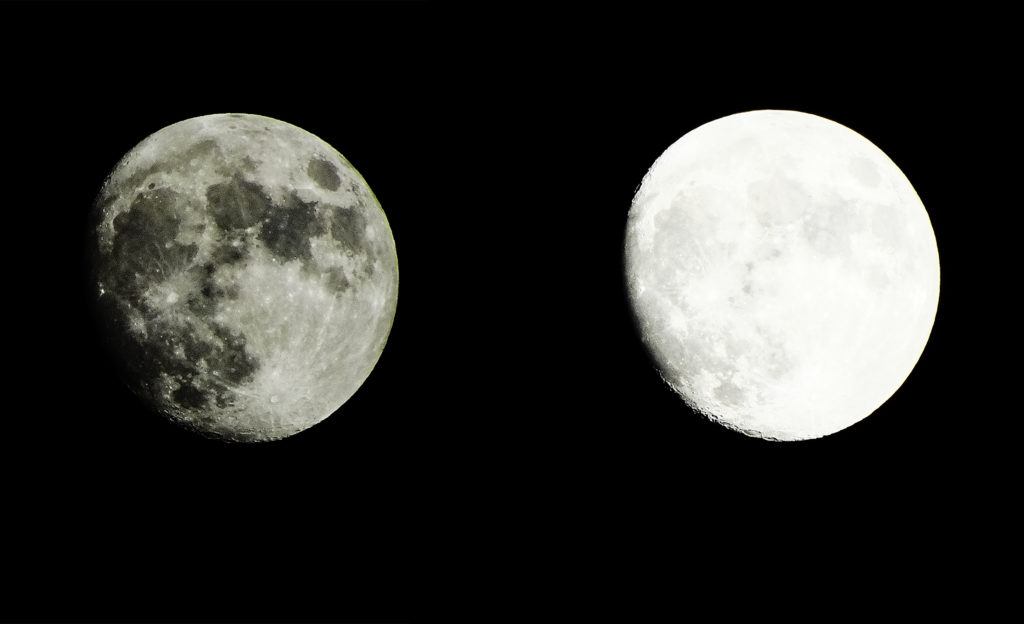
Compare these two photos of the moon. These were photographed within one minute and the only setting that changed was the shutter speed. The photo on the left was taken at 1/250th of a second. The photo on the right was taken at 1/80th of a second. Photograph by Jenn Mishra
If you’re photographing the Milky Way, there is a balance when choosing the shutter speed. You’ll need to open your shutter long enough to capture enough light, but not so long that the stars begin to trail.
Stars trail because the earth is moving, and your camera picks up this movement. We want to capture this motion when we take photos of star trails. But if you want a sharp image of the Milky Way, the shutter speed needs to be fast enough to freeze star movement.
If you’re photographing the Milky Way, there is a balance when choosing the shutter speed. You’ll need to open your shutter long enough to capture enough light, but not so long that the stars begin to trail.
There is a formula to help you figure out how long you can leave your shutter open before the stars start to trail. It is called the 500 Rule.
Divide 500 by the focal length of your lens. This will give you the maximum amount of time you can leave your shutter.
For my 14mm lens, I divide 500 by 14.
500 / 14 = 35.71 seconds.
This means that I can theoretically leave my shutter open for 35 seconds before the stars begin to blur. I say theoretically because in actual fact, the stars already start to trail at 35 seconds.
The 500 Rule is the standard. But with advances in ISO performance, most astrophotographers prefer faster shutter speeds. A faster shutter speed ensures more clarity in the stars.
A 300 Rule is probably closer to what many astrophotographers use.
300 / 14 = 21.42 seconds.
When I’m photographing the Milky Way, I usually leave the shutter open on my 14mm lens for 20 seconds.
ISO
If you have your aperture wide open and your shutter speed is restricted by the motion of the earth, then the only way to get more light in your camera is by increasing ISO.
Most modern cameras can easily handle 3600 or even 5000 ISO with no problem. I set my camera at 3600 ISO. I fix any resulting grain and increase the exposure of the image in postprocessing.
There are a couple of ways to reduce the noise created by high ISOs beyond using the Noise Reduction slider in Lightroom.
Key Lesson: For astrophotography, shoot in Manual mode with your aperture wide open. Set your ISO at a minimum of 3600 and compute your maximum shutter speed using the 300 Rule.
Photograph of the Milky Way taken at ISO 3600. Photograph by Jenn Mishra
Noise Reduction
Noise reduction is a feature often included in highend DLSR or mirrorless cameras. If this setting is on, the camera takes two photos: one of the night sky and a black photo. The camera superimposes these images to get a cleaner image.
It’s a good idea, but I don’t usually use this setting. Turning on noise reduction means I will be locked out of my camera for double my shutter speed. If I’m taking a 20-second photo, my camera will take two 20-second photos. I have to wait for the camera to finish both shots. This is especially important if you’re taking photos of star trails and leave your shutter open for minutes at a time. You will be locked out of your camera for an equal number of minutes for the
noise reduction to process.
Instead, I take many photos of the night sky in quick succession. I overlay them in post-processing using a program called Starry Landscape Stacker.
But with upgrades to my camera’s ISO performance, I’m using this program less and less frequently.
Focusing at Night
While we’re talking about camera settings, let’s talk about focusing your camera at night.
Focusing in darkness can be tricky and there are few ways to do this. Thankfully, once your camera is focused on infinity, you probably won’t have to change it. Autofocus isn’t your friend in astrophotography.
Many lenses have a tick mark or an infinity symbol at the point where the lens should focus on infinity, but this is a general designation. Each lens is slightly different. It’s best not to rely on this mark.
One way to focus at night is to find the brightest star in the sky. Use live view on your camera to magnify the star. Adjust the focus manually until the star is as small as you can make it. This method works because blur creates a halo around the star, making it seem larger. When the star becomes a pinpoint of light, it is in focus.
One way to focus at night is to find the brightest star in the sky. Use live view on your camera to magnify the star. Adjust the focus manually until the star is as small as you can make it.
You can also use a light source to illuminate a tree or rock. This might give you enough light to autofocus or to focus manually. Make sure the object is far enough away that you are focusing to infinity. If you’re focused on infinity, then both the distant object and the night sky should be in focus.
If you arrive at your location before the sun sets, focus your camera normally on a distant object. This is the easiest, but it means you’ll have to leave your camera turned on so you don’t lose focus.
I have a dedicated lens for astrophotography. I’ve manually focused to infinity during the day and I’ve placed a piece of gaffer tape on the focus ring, so it won’t move. Since I never use this lens for anything except astrophotography, I don’t have to change the focus.
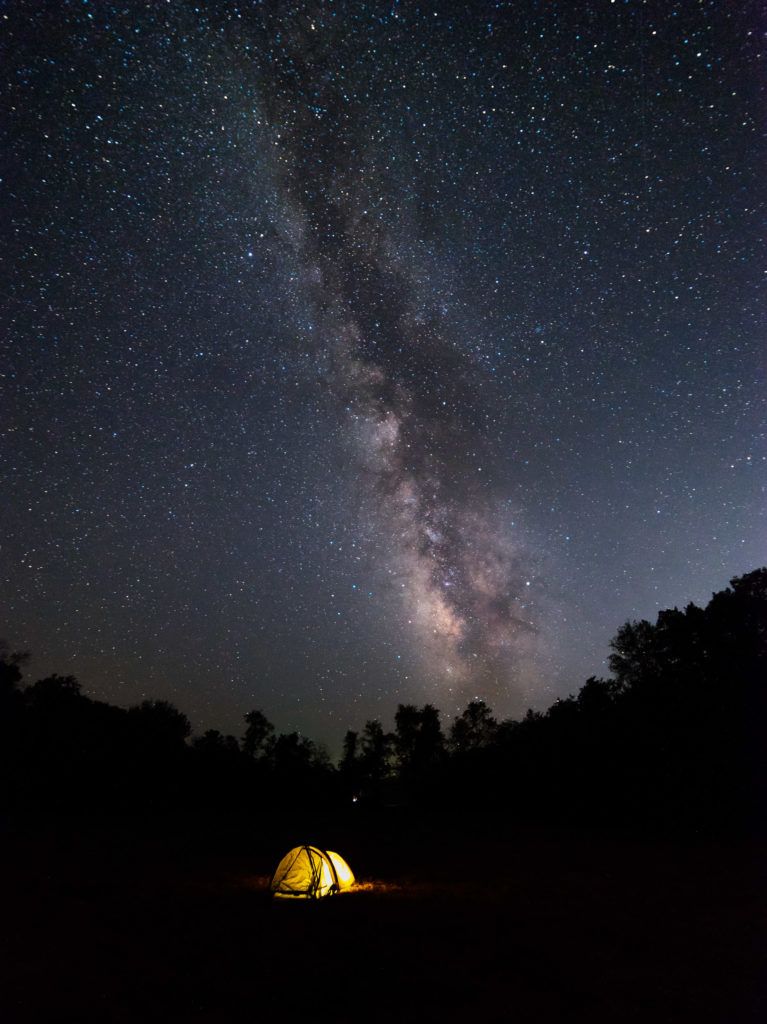
Milky Way image taken in the Missouri Ozarks. A lit tent provides a foreground element. Photograph by Jenn Mishra
Summary
Astrophotography requires foresight and planning. You’ll need to find dark, cloudless skies. You also need to know a bit about meteorology and astronomy. You’ll need to know when celestial objects will be visible.
There is very little gear that you need to shoot astrophotography, but there is some equipment that will make it easier to capture a clear night sky photograph. This gear includes a fast, wide-angle lens and a camera with good ISO performance.
Camera settings for astrophotography are fairly specific and do not change very much from night to night. Photograph in Manual mode with a wide-open aperture (f2.8, f1.8, or f1.4) and set your ISO to at
least 3600. Your shutter speed depends on the focal length of your lens. Use the 300 Rule (a variation of the 500 Rule) to compute your maximum shutter speed.

Photograph by Jenn Mishra
Self-Check Quiz:
- Describe the characteristics of a good lens for shooting the Milky Way.
- Why do astrophotographers use a headlamp with a red light?
- What are the three things you need to plan for when setting up an astrophotography shoot?
- At what time of year is the Milky Way seen in the northern hemisphere?
- What apps will help plan an astrophotography shoot?
- How slow should your shutter speed be when photographing the moon?
- What does the 500 Rule tell you?
- How does your camera’s noise reduction setting work?
- Describe three ways of focusing your camera at night.
- What causes stars to leave a trail of light in an image?
Shooting Exercise:
Plan a local Milky Way shoot. Depending on the light pollution in your area, you may not be able to actually photograph the Milky Way. But if possible, execute your plan.
- Find a date on which the Milky Way will be visible in the night sky. Choose a night with a new moon.
- Find out what time the Milky Way will rise and set that night.
- Find a weather app that reports cloud cover. Look to see what the forecast is for the night you’ve chosen. If cloud cover is expected to be heavy, select a back-up date.
- If possible, find an area of dark skies near your home.
- Scout your area and find a foreground element within the dark sky area that will sit in front of the Milky Way. Check the relationship with PhotoPills or The Photographer’s Ephemeris.
- Grab a friend and go to the location you scouted on the night you’ve chosen to check your planning.


