


One of the first composition rules that photographers learn about is the Rule of Thirds. This simple composition tip can make a huge difference to images, helping to keep them balanced and pleasing to the eye. But it’s not the only useful composition tip out there and using it all the time can lead to slightly repetitive images.
Enter the Fibonacci Spiral, which is another way to produce beautifully balanced images that are pleasing to a viewer’s eye. In this guide, I’ll explain what the Fibonacci Spiral is and show you how to use it effectively in your photography.
Here’s what we’ll cover:
- What is the Fibonacci Spiral in photography?
- What is the Phi Grid?
- Why is the Fibonacci Spiral the next step in composition from the Rule of Thirds?
- How to use the Fibonacci Spiral in your photography
- A step-by-step guide to shooting with the Fibonacci Spiral in mind
- Post-production tips
Recommended Reading: If you’d like to improve your composition skills for better images, grab a copy of Photzy’s best-selling premium guide: Advanced Composition.
What Is the Fibonacci Spiral in Photography?
The Fibonacci Spiral is a mathematical law that was discovered by Leonardo Fibonacci around 1200 A.D. He noticed that there was an absolute ratio that often appears throughout nature and is a design that appeals to the human eye. The spiral that is created is the result of some complex math: a/b=(a+b)/a = 1.61803398875 (usually rounded to 1.618 in case you’re interested or mathematically inclined).
Key Lesson: You may also hear the Fibonacci Spiral referred to as the golden ratio, golden spiral, golden mean, divine proportion, or Phi Grid. It existed long before the invention of photography and indeed long before Fibonacci analyzed the mathematical formula. The Pyramids were built using the golden ratio, and famous artworks such as the Mona Lisa also followed its rules, and in modern designs, it’s used in both the Apple and Twitter logos.
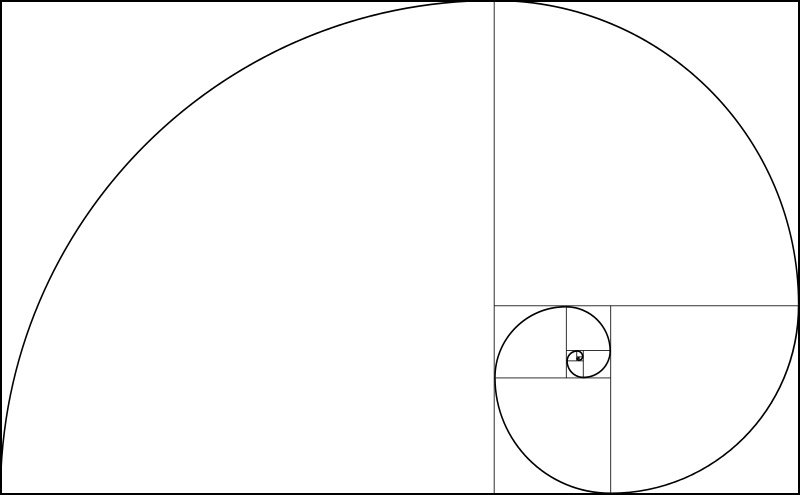
The Fibonacci Spiral
In the image above, you can see the Fibonacci Spiral. It’s built from a series of squares based on the Fibonacci numbers, with the length of every square being one of these numbers. Imagine these squares placed in a frame and arcs drawn from opposite corners of each square. You’ll end up with a curve resembling the shape of a spiral.
What Is the Phi Grid?

The Phi Grid
The Phi Grid is another way of representing the Fibonacci Spiral, but this time in a grid format. Many people find this far easier to visualize, and it’s certainly more effective for some genres of photography. In the diagram on the left, the Phi Grid has been laid over a Rule of Thirds grid for comparison. Although the two look similar, the Phi Grid is 1:0.618:1 whereas the Rule of Thirds grid is 1:1:1. The grid is formed by taking the sweet spot of the Fibonacci Spiral and recreating it four times.

The famous Golden Gate Bridge makes an excellent study for practicing with the Phi Grid. Photograph by Maarten van den Heuvel
Why Is the Fibonacci Spiral the Next Step in Composition From the Rule of Thirds?
The Fibonacci Spiral is the next logical step in composition from the Rule of Thirds. It allows the photographer to tweak images and place subjects within the frame to their best advantage. Using the Fibonacci Spiral can allow you as a photographer to create images that really ‘pop’ and are extremely attractive to a viewer. It all boils down to the sweeping curve that’s created by the spiral. The curve allows you to use it to direct your viewer’s eye around the picture, while the tight coil of the spiral gives you a perfect spot to place your subject/point of interest. This is a powerful composition tool that’s worth getting to grips with.

Portraits can also work well with the Fibonacci Spiral, and using this technique can produce unusual and eye-catching images. Photograph by Ali Choubin
How to Use the Fibonacci Spiral in Your Photography
You’ll find that the traditional spiral and the grid work well for different genres of photography. Many photographers use the Phi Grid for landscapes and the Fibonacci Spiral works well with portraits. Using the Phi Grid means that your subject will be located a little more centrally.

The Fibonacci Spiral works well with natural curves, but these don’t have to be confined to the land. Here the clouds form curves that help with drawing the viewer’s eye to the lighthouse. Photograph by Gaston Roulstone
Key Lesson: When using the traditional Fibonacci Spiral, you’ll want to place your point of interest (or the area with the most details) in the smallest part of the spiral. You’ll then want to position the rest of your subject within the curve of the spiral. This allows a viewer’s eye to flow through the rest of the image. You can rotate the spiral vertically or horizontally, but the key is to try and maintain the shape and distance between the loops of the spiral.
You might be wondering how to actually visualize the Fibonacci Spiral when shooting. We’ll come onto that next.
When using the traditional Fibonacci Spiral, you’ll want to place your point of interest (or the area with the most details) in the smallest part of the spiral.
Step-By-Step Guide to Shooting With the Fibonacci Spiral in Mind
Let’s look at how to actually go about shooting a scene using the Fibonacci Spiral.
- Survey the scene – Before you start shooting, you need to look at the scene and ask yourself some questions. What is the subject of your image and where do you want to lead your viewer’s gaze? Consider what else is in the scene. Is this going to distract from your subject or enhance it? Use your feet to move around or zoom in and out (if you’re using a zoom lens) to include what you want to feature in your final shot.
- Leading lines or natural curves? – Do you have either of these in your shot? Leading lines can work very well with the Phi Grid, but natural curves are far more suited to the spiral.
- Imagine the Fibonacci Spiral or Phi Grid – This particular point can be hard to visualize at first, but practice does make perfect. You can help yourself along to begin with if your camera has a built-in Rule of Thirds overlay for your LCD screen (many will do). If you’re using the Phi Grid, place your subject closer to the center of the image compared to the Rule of Thirds intersection. For the Fibonacci Spiral, place your subject further out than the Rule of Thirds intersection.
- Take your shot – Don’t just stand still and take a photograph of what’s in front of you. Remember that you can exaggerate leading lines or angles by adjusting your position. Kneel down, climb up, move closer or farther away, or just step from side to side! Remember that you want elements of the scene to ‘spiral’ out from your subject or, if you’re using the grid, you’ll want to place your elements on one of the unused lines in the Phi Grid. Take lots of shots and change your composition a little as you go along so that you have a choice of shots and can see which best fits the Fibonacci Spiral rule. The more you practice this, the easier it will become to visualize the spiral.
Post-production Tips
It can be hard to visualize the Fibonacci Spiral when you’re out shooting, particularly if you’ve just started using the technique. If you want to get it completely right, or just want to experiment with placing the spiral or grid over existing images, then you can access overlays in Photoshop and Lightroom.
If you’re using Lightroom, you can access the spiral by pressing ‘R’ to open your cropping function. You can then cycle through the available overlays by pressing ‘O’ until you reach the spiral. There are eight variations to choose from and you can change the direction of the spiral by using ‘Shift + O.’
Photoshop has options for both the Fibonacci Spiral (labeled as the Golden Spiral) and the Phi Grid (labeled as the Golden Ratio). Open your image in Photoshop and select the Crop tool. Now draw a crop box over your image. You can now click on the overlay options and select the composition tool you want. There are six options in total in the overlay options. Once you’ve selected either the spiral or grid, you can adjust the crop box to fit your composition and move the image into the right place. You can also change the direction of the spiral in the overlay options box by clicking on the cycle orientation option. Alternatively, you can shortcut this by pressing ‘Shift + O’ as you would in Lightroom.
Photoshop has options for both the Fibonacci Spiral (labeled as the Golden Spiral) and the Phi Grid (labeled as the Golden Ratio).
Recommended Reading: If you’d like to improve your composition skills for better images, grab a copy of Photzy’s best-selling premium guide: Advanced Composition.
Conclusion

Because the Fibonacci Spiral is a pattern and ratio naturally found in nature, it can add a real boost to your images and help them to look naturalistic and well-balanced. It’s also a great way to add interest to your shot, and understanding the technique will help improve your composition techniques.
Self-Check Quiz:
- Who discovered the Fibonacci Spiral and when was it discovered?
- What other names is the Fibonacci Spiral known by?
- Where should you place your point of interest on the spiral?
- How do you access the Fibonacci Spiral overlay in Lightroom?
- How do you change the direction of the Fibonacci Spiral overlay in Photoshop?


