Awareness of what’s going on in the foreground, middle ground, and background of your composition helps you take better photos. Many beginner photographers only concentrate on their subject and forget how important other layers of a photo are.
Composition is a key to any great photo. Being aware of the three levels of depth in a photo helps you to make better use of the elements in your frame. You see in three dimensions, but photographs are only two dimensional. The better you can translate the depth you perceive into a flat image, the more interesting your photos can be.
The background of a photo is usually at the top of the frame. Sometimes it’s also at the sides. The middle ground makes up the midsection of an image and it’s usually where the main subject of a photo is. The foreground can be in any part of the frame, as illustrated in the image below.
In this guide, I’ll offer you some perspective on how you give due to the three layers of composition. Using foreground, middle ground, and background well in your photos will help make them more creative.
Recommended Reading: If you’d like to learn how to create amazing portraits, grab a copy of Photzy’s premium guide: The Art of Portrait Photography.
Don’t Only Look at Your Subject
When you’ve found a wonderful subject to photograph, it’s super easy to concentrate solely on it. You can forget about the background. You won’t notice the foreground unless it is your subject, and all kinds of things can go badly.
Messy backgrounds destroy otherwise perfectly good photographs. Making a portrait of your partner when they’re looking particularly attractive is fun. What’s not fun is to later see that there’s a tree, lamp post, or other distraction appearing like it’s stuck in their head.

Photograph by Kevin Landwer-Johan
Anytime there are moving elements behind your main subject, you need to pay careful attention to them. When concentrating only on your subject, you might not notice a passing vehicle or person sneaking into your frame. Any element like this appearing in the background of your photo, especially when it’s in focus, will weaken your picture.
Anytime there are moving elements behind your main subject, you need to pay careful attention to them.
The key composition rule I teach people is to ‘fill the frame.’ This means everything in your composition is relevant to the photo you are taking. To achieve this, you need to consider elements that are in the foreground, middle ground, and background.

Photograph by Kevin Landwer-Johan
Key Lesson: To do this well, it’s usually just a matter of slowing down. Take your time to view everything you’re including in your frame. Foreground elements are typically more obvious because they are closer to you and appear larger than things further away. The background is where unsightly distractions are most often neglected.
How Different Focal Lengths Affect Foreground, Middle Ground, and Background

Photograph by Kevin Landwer-Johan
Using a standard lens means your composition appears relatively close to how you see it when you’re not looking through your camera. A 50mm lens on a full-frame camera is considered a standard focal length. This provides a similar field of view to what we see naturally and produces no depth compression.
Longer focal lengths create the effect of compression of distance in a photo. Everything within the frame looks nearer to you and closer together than it is. The longer the focal length, the greater the compression.

Photograph by Kevin Landwer-Johan
With wide-angle lenses, the opposite happens. Distance is exaggerated in photos taken with lenses with a wider field of view than a standard lens. The wider the focal length, the more spread out things appear.
These characteristics affect how you frame the foreground, middle ground, and background. Understand how distance is captured and appears in a two-dimensional image. This will help you make more effective use of the lenses you have.
If you want your subject in the middle ground to appear closer to elements in the foreground and background, then use a longer focal length. When you want things to appear more separated, use a wider focal length.
Key Lesson: Using a wide lens can allow you to make the most of a foreground. Framing foreground elements well with a wide focal length can draw a viewer’s eye into your image. If you want to bring an element in the background to more prominence, you can use a longer focal length.
Managing Depth of Field Well
How you manage the depth of field affects the relationship between the foreground, middle ground, and background.
With a very shallow depth of field where not much of the composition is sharp, what’s in the foreground and background may not be recognizable. A deep depth of field can render the whole image in sharp focus. What is in the foreground will be just as sharp as what’s in the middle ground and background.
Managing the depth of field well allows you to control how much of an image is in clear focus.
Managing the depth of field well allows you to control how much of an image is in clear focus. Maybe you want the foreground soft and the middle ground and background sharp. With the careful choice of lens and aperture setting, you manipulate how prominent each layer of the composition is.

Photograph by Kevin Landwer-Johan
In this photo of the market vendor preparing some snacks for a customer, I wanted the focus to be on her and what she was doing. I positioned myself so her face, her hands, and the plastic bag were the same distance from my camera. I wanted them all in sharp focus.
With an 85mm lens on my Nikon D800 full-frame camera, I knew the aperture setting of f/2 would give me a shallow depth of field. Standing between one and two meters from my subject gave me enough depth of field to capture her and what she was doing in sharp focus. The background is blurred enough not to be distracting, yet still shows the environment of the stall at the market.

Photograph by Kevin Landwer-Johan
Key Lesson: By managing depth of field well, you can control the relationship between the foreground, middle ground, and background. But this is not the only photography tool available to help you do this.
Recommended Reading: If you’d like to learn how to create amazing portraits, grab a copy of Photzy’s premium guide: The Art of Portrait Photography.
Composition Techniques to Enhance Depth in an Image
You can also use many composition techniques to enhance the sense of depth in your photos. By combining any of these with a well-managed depth of field, you can add greater perspective and depth dynamic to your pictures.
Leading Lines
Strong leading lines will draw a viewer’s attention to a subject. You can guide their eye from the foreground through the middle ground and into the background.

Photograph by Kevin Landwer-Johan
The curved edges of the pond in this photo lead your eye from the foreground to the bridge in the middle ground, and then onto the chedi in the background. This creates a good sense of depth in the image.
Framing
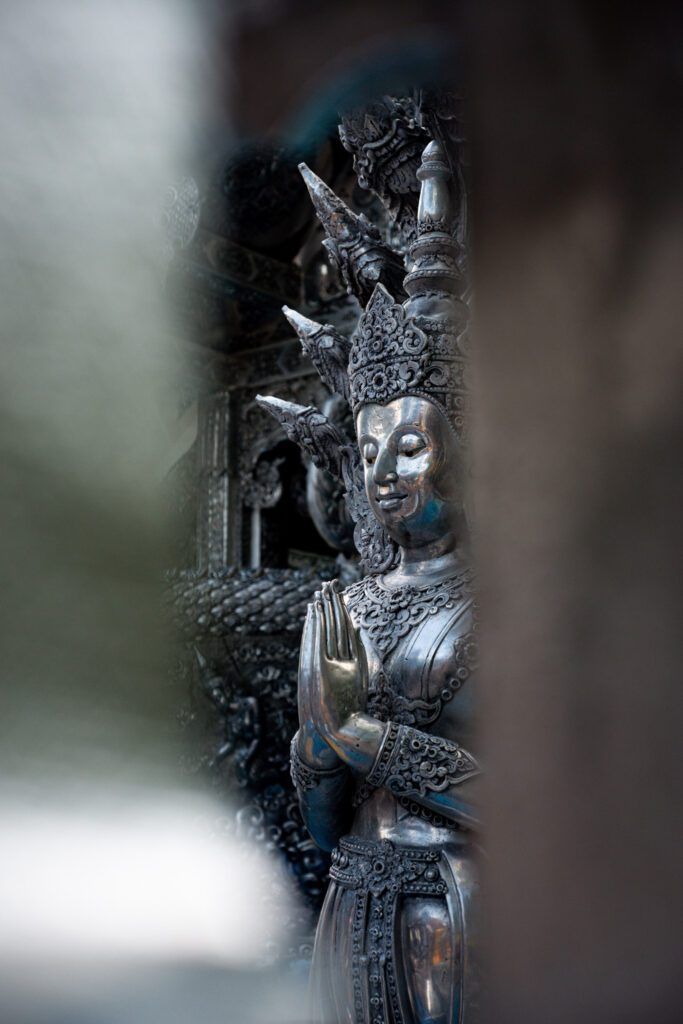
Adding a frame within your frame helps to make good use of the foreground to add depth. By including some element in the foreground that frames or partly frames your subject, it pushes it towards the background.
Photograph by Kevin Landwer-Johan
In this image of a statue at Wat Sri Suphan in Chiang Mai, Thailand, I used elements in the foreground to frame and crop the statue. Also using a shallow depth of field means the foreground elements are very blurred. This gives the impression they are much closer to the camera than the statue is.
Foreground Interest
Composing your image with something in the foreground can have a similar effect to using leading lines. A well-positioned foreground element can help draw a viewer’s gaze into an image. It might be something at the bottom or to one side or the other of your composition. It might even be an element at the top of your frame.

Photograph by Kevin Landwer-Johan
In the image above at the fresh market, I was concentrating on the shadows. There was too much space on the road that was not being filled. So, I took a step to my right and lined up the mangos to provide my foreground interest and some lovely color. They smelled great too, but I do not have a camera that can capture that!
By lining up my composition in such a manner, I was then able to wait and photograph passersby until I was satisfied I’d captured an interesting shadow.

Photograph by Kevin Landwer-Johan
Conclusion
Paying attention to what’s in your viewfinder and how it’s filling your frame leads to stronger compositions. Think about the depth of what you see and how this will translate into a two-dimensional photo. This prompts you to make better use of the foreground, middle ground, and background.

Photograph by Kevin Landwer-Johan
You don’t always need to balance all three layers, but being aware of them will help you make better composition choices. Sometimes you may only want a very flat-looking image with your main subject in focus and where nothing else is sharp. At other times you might want to exaggerate the sense of depth using a wide lens and leading lines.

Photograph by Kevin Landwer-Johan
If these concepts are new to you, let me encourage you and challenge you to practice them. Next time you pick up your camera, think about how you can make the best use of the foreground, middle ground, and background. Try to incorporate some other composition techniques and be mindful of the depth of field. Experiment with different subjects in a variety of locations.
How many different, strong images can you make where you use the three layers to add more depth to your compositions?
Recommended Reading: If you’d like to learn how to create amazing portraits, grab a copy of Photzy’s premium guide: The Art of Portrait Photography.
Self-Check Quiz:
- What are the three main layers of depth that can be included in a photo?
- Where does the background typically appear in a picture?
- What can destroy otherwise perfectly good photographs?
- What effect do long focal length lenses have on the perception of depth in a photo?
- What effect do wide-angle focal lengths have on the perception of depth in a photo?
- How does the depth of field affect foreground, middle ground, and background?
- Name some composition techniques you can use to help create a sense of depth in photos.


