


During this early morning parade, the light was flat, and I was mainly looking up at my subjects toward the sky, which was behind them. Using rear curtain sync and a fill flash with a shutter speed of 1/15th provided a pleasing result. Photograph by Kevin Landwer-Johan
Fill flash and rear curtain sync might sound to you like a couple of fancy bits of photographic jargon. You’re right, they are. But what’s cool is that you can combine them to create an easy special effect that can help transform your photos, especially when the lighting is poor.
Fill flash is the technique where you add in a little extra light to balance with the ambient light or even out harsh shadows. Rear-curtain sync manages when the flash fires with the camera’s shutter opening and closing. This combination of techniques is great to use when the ambient light is of poor quality. It might be flat and low, or hard and harsh. Popping in a little flash to compliment it can add some visual magic to an otherwise dull or challenging photo session.
What Is Fill Flash?
Fill flash is a technique used to reduce shadows cast by the main light on a subject. It’s often used by photographers taking portraits outdoors on a sunny day. The bright sun causes harsh shadows on a subject. Adding some light from your flash can help reduce the intensity of these shadows.
The output power of the flash needs to be controlled so as not to overpower the main light source. This is achieved by setting your camera controls so your subject will be well exposed. Then set your flash to produce one or two stops less light when it fires. You can do this manually or by using exposure compensation on the flash when it’s in auto mode.
The light from the flash being slightly less than the main light will soften the shadows nicely. Adding too much flash will overpower the main light. This can cause more shadows and an overexposed subject.

These photos are from the Poi Sang Long festival in northern Thailand. It celebrates the day boys enter the temple to become novice monks. Photograph by Kevin Landwer-Johan
In situations where your subject is backlit, more output from the flash is necessary to balance the light on your subject and the background. You need to take a light reading from your subject and the background. Then set your exposure and flash settings so you strike a pleasing balance between the light on your subject and the light in the background.
There’s no set formula for this. How you set your shutter speed will affect the ambient backlighting. How you manage the balance between the backlight and the light from your flash depends on your aperture, ISO, and flash settings. In some situations, you may want to overpower the backlight. By doing this, the background can appear darker. Other times you may want a bright background and a subject that’s dark but not in silhouette.

The boys dress in colorful costumes and wear makeup and are paraded through town on the shoulders of male family members. Photograph by Kevin Landwer-Johan
Key Lesson: Experimentation is the key. Finding the balance between ambient light and flash is tricky at first. Every situation is different, so you must practice a lot and study your results.
Recommended Reading: If you’d like to learn how to use your flash unit for better photography, grab a copy of Photzy’s Electronic Flash – Parts and Practices premium guide.
What Is Rear Curtain Sync?
Rear-curtain sync is when the flash fires just before the second curtain of the shutter close. Confused? Let me explain.
Your camera’s shutter is made of two curtains (or blinds). When you press the shutter release button, the first curtain opens, and the sensor begins to be exposed to light. According to the set duration, the rear or second curtain closes and the sensor is no longer exposed to light. With fast shutter speeds, the rear curtain will start to close before the front curtain is fully opened. This restricts the use of flash at faster shutter speeds.
Having the flash fire immediately before the second curtain closing influences the look of any movement that occurred during the exposure.

When they eventually reach the temple, their heads will be shaved, including their eyebrows, and they will put on the traditional orange monk’s robe. Photograph by Kevin Landwer-Johan
Key Lesson: To effectively combine fill flash and rear curtain sync, you need to set a slow shutter speed. How slow depends on the ambient light and how strong you want the effect to be. I’ll get to this shortly, but first I’ll explain the effect.
During a long exposure of a moving subject, before the flash fires, the camera records blurring of the subject. When the flash fires at the end of the exposure, the subject is ‘frozen’ by the light from the flash. When you balance the flash output and ambient light with the shutter speed and movement, you can get some wonderfully creative results.
What Kind of Results Can You Expect?
Juggling all the aspects of rear curtain fill flash means the results are often unpredictable. With experience, you’ll better be able to predict how an image will look. The more variance in ambient light and movement, the more difficult it is to know how your photos will turn out.
Juggling all the aspects of rear curtain fill flash means the results are often unpredictable. With experience, you'll better be able to predict how an image will look.
The longer your exposure time, the more blur from the movement you’ll capture. The speed at which your subject is moving influences the amount of blur. The color and tone of your subject also impact how the blur appears in your photos. So does the ambient light. Combining these variables is never the same twice unless you’re working in an extremely controlled environment.
Embracing the potential of random outcomes when using rear curtain sync makes it all the more fun. If you’re the kind of photographer who likes to be in complete control of how their photos will turn out, then this technique may not be for you.

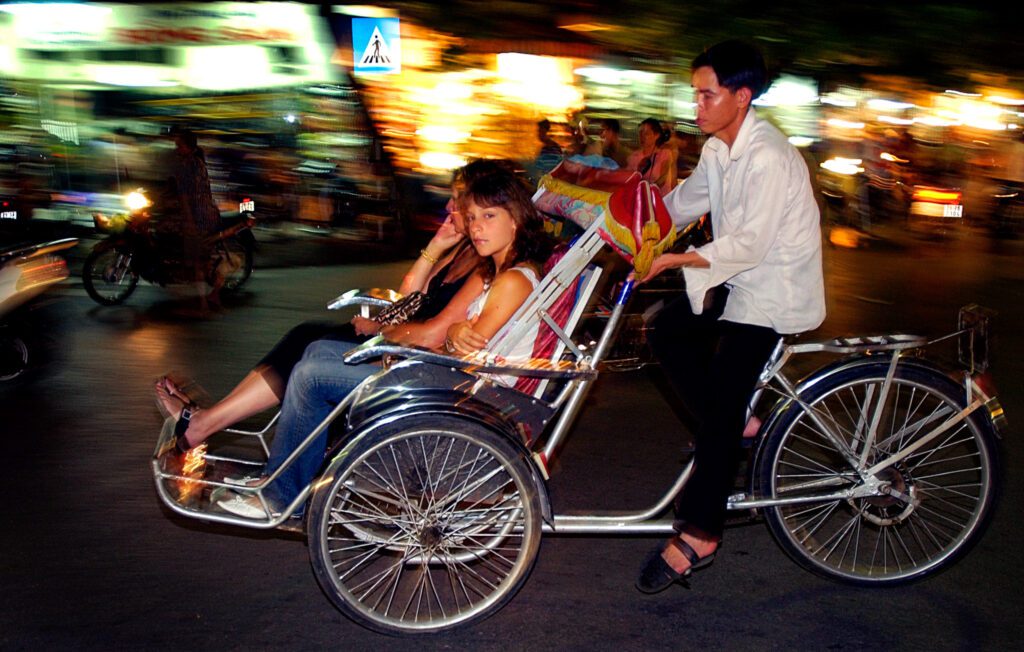
You can use this technique with any moving subject. Photograph by Kevin Landwer-Johan
In situations where you need a predictable result, set a faster shutter speed. Capture a more conventional, predictable image and then experiment. If you’re working for a client who expects a certain result, it’s always good to get a few ‘safe’ pictures before beginning to experiment.
Key Lesson: Once you have captured your more standard photos, experiment as much as you like and have time for. There is so much room to make adjustments to camera settings, subject movement, and ambient light. You can take dozens of photos of the same subject and no two will be identical.
How Can You Manage the Variables?
Changing your shutter speed is usually the easiest variable to experiment with. The longer your shutter remains open, the more blur you’ll get. With longer exposure times you are also letting more light enter the camera. To compensate, you need to use a narrower aperture setting or lower your ISO.
Balancing the flash output and ambient light exposure is critical. Too much or too little light from either the flash or ambient sources will adversely affect your exposures. There’s no formula for this because it’s different in every situation. You need to experiment. Try different exposure triangle combinations. Try your flash on different settings.

Photograph by Kevin Landwer-Johan
By managing your exposure well, you can control how the background is exposed. Sometimes you may want it dark to help isolate your subject. Other times you may want to see what’s in the background. This can help provide context to your blurred subject.
The speed your subject is moving at and how long you choose to leave your shutter open control the amount of subject blur. Sometimes you may want a long trail leading up to the flash burst, which freezes your subject. Other times you may want more of a ghosting effect with minimal blur. The faster your subject is moving, the shorter the shutter needs to be open for blur to occur.
Flash control determines how well exposed your subject will be in its frozen state. Too much or too little flash and the impact of this technique will be diminished.

Photograph by Kevin Landwer-Johan
Key Lesson: Search for the ‘sweet spot’ between shutter speed, subject speed, and flash output. When you get it right, your photos will be extra special.
How Much Flash Do You Need?
The amount of flash required to expose your subject well varies. The distance your subject is from the flash and the amount of ambient light plays a part in the calculation.
You can set your flash to TTL as a starting point. Take a few test images and review them. If your subject is underexposed, dial in one or two stops exposure compensation on your flash. If your subject is overexposed, dial the exposure compensation down a stop or two.

Photograph by Kevin Landwer-Johan
In tricky lighting situations where you have many light sources making up the ambient light, it’s better to set your flash manually. This way you can control the amount of light each time the flash fires. This is good when you are using fill flash and using rear curtain sync at a party, nightclub, or other such venues.
The more you experiment, the more of a feel you will develop for how much flash output different subjects need. The balance between the ambient light and your shutter speed also influences how much light you need to add with your flash.
Key Lesson: Wireless off-camera flash gives you the most flexibility of the direction of light from your flash. Being able to position the flash away from the camera allows you to create more natural-looking lighting and add more depth to your photos.
Do You Need to Use a Tripod With Rear Curtain Sync Flash?
Photograph by Kevin Landwer-Johan
The more you experiment, the more of a feel you will develop for how much flash output different subjects need.
Locking your camera down on a tripod means you are more restricted in your movements. For some subjects, this will not be a problem, but for others, it’s good to have the freedom to move about with your camera.
If you’re not using a tripod, think about how you are moving your camera as you are taking photos. Add some panning motion. Move the camera in the same direction as your subject is moving. Or move it in the opposite direction. All this adds more variables and leads to more unpredictable results.
Recommended Reading: If you’d like to learn how to use your flash unit for better photography, grab a copy of Photzy’s Electronic Flash – Parts and Practices premium guide.
Conclusion

Photograph by Kevin Landwer-Johan
Combining fill flash with rear curtain sync is a lot of fun. The results are often unpredictable. This means the more time you put into developing this technique, the greater variety of images you’ll produce.
When you combine flash, rear sync, and subject movement with a slow shutter speed, the variables are endless. This is partly why the results can be so random. Experimentation is the key. As you practice, tweak your settings. Change one at a time so you can see the difference that change makes. If it’s not giving you the look you want, adjust one of the other settings. If you alter the flash output, shutter speed, and aperture settings all at once, it may not be clear which setting change makes the most interesting difference in the next series of photos you take.
Certainly, the best way to learn to use fill flash along with rear curtain sync is by taking a lot of photos. Use this technique during the day, in the evening, and later when there’s no light in the sky. The varying ambient light provides more scope for different photos of the same subjects.
Self-Check Quiz:
- What is fill flash?
- What is rear curtain sync?
- What are the main variables you need to manage?
- Does the speed your subject is moving at the influence the results?
- How important is ambient light with this technique?
- Do you need to always use a tripod?
- Does this technique work with off-camera flash?
- Do you need to use TTL or can you set your flash output manually?


