
I love automation in cameras. I love all of it: the autofocus that almost always nails it (except when it doesn’t); the auto-ISO that never fails (well, hardly ever); ditto the auto white balance, the auto ISO, the auto exposure, and I don’t know about you, but my cameras brew up a decent cuppa joe on occasion. (That’s actually, um, not true…yet.) Modern photo automation used intelligently, has made photography not only easier but on the whole better, and absolutely more fun.
When I was in school in the Lower Paleophotographic (made that up too), our instructors would joke that what all photographers really wanted was to be able to load film between our ears and blink. I did not know at the time that one of the giants of 20th-century photography had said almost precisely that:
[…] “There is, I think, an electronic impulse between my eye and my finger. But even this is not enough. I dream that someday the step between my mind and my finger will no longer be needed. And that simply by blinking my eyes, I shall make pictures. Then, I think, I shall really have become a photographer.” —Alfred Eisenstaedt, 1966 (Emphasis added cgh)
Modern photo automation used intelligently, has made photography not only easier but on the whole better, and absolutely more fun.
In those thrilling days of yesteryear, everything was manual, from cameras to cars. We learned manually and did fine. It was what we knew. It remains valuable to learn to operate any camera a manual, but it isn’t nor should it be mandatory. With the introduction of more and more computerization in our film cameras beginning about the mid-1980s, the shift began to mainly autofocus. Much of the earliest automation was very hit-and-miss yet everyone persisted. With the dawn of digital, the paradigm shifted still more. Today, I consider that the digital revolution has very nearly achieved Eisenstadt’s vision, but manual mode remains crucial: when automation fails, and it does, the manual is the workaround. For some types of photography, a manual is preferred.
A significant number of photographers work only in manual. Many folks on the blogs and forums will insist that you must shoot a manual. Must! It’s “pure.” It’s “creative.” They will bend your arm to force you to “use only manual or you are not artistic,” otherwise you are just handing off your responsibility as a photographer to an algorithm! (p-tooie!)
Some of that same crowd will also assert that you must “get it right in the camera”; they will eschew shooting RAW and post-processing as “impure,” having somehow missed the plain fact that they have relegated their creativity to an algorithm (p-tooie) in their camera that has already post-processed their allegedly “pure” shot.
Key Lesson: Once, all cameras were manual, and we worked with them. Automation has been a tremendous boon, but serious photographers know when to use it and when not to use it.
Recommended Reading: Want a step-by-step guide on photography skills with your DSLR? Grab a copy of our best-selling guide, the DSLR Crash Course.
In this brief guide, I will assume that you already understand the celebrated exposure triangle and that you know why you might want to adjust any of the three variables.
What Are the Automatic/Semi-Automatic and Manual Settings on Most Modern Digital Cameras?
Typically, you will have a wheel or dial or a menu item or some means of selecting P, A, S, or M.
P - Stands for Programmed Auto
- Allows you to adjust shutter and aperture simultaneously, reciprocally, with one dial.
- You must choose and lock in an ISO number (no auto-ISO in this mode).
- Occasionally misidentified as “Professional” setting.
A - Stands for Aperture Priority Auto
- Allows you to choose a specific aperture (f/stop); the camera automatically selects the appropriate shutter speed.
- ISO may be automated.
- Best for control of DOF (depth of field) which varies with the f/stop, among other things.
S - Stands for Shutter Priority Auto
- Allows you to choose a specific shutter speed; the camera automatically selects the appropriate aperture.
- ISO may be automated.
- Best for freezing fast action, or for slowing the shutter for panning.
M - Stands for Manual
- Best for any situation where automation fails or is fooled by conditions. Manual always works but may not be as quick as auto unless you practice, which is recommended.
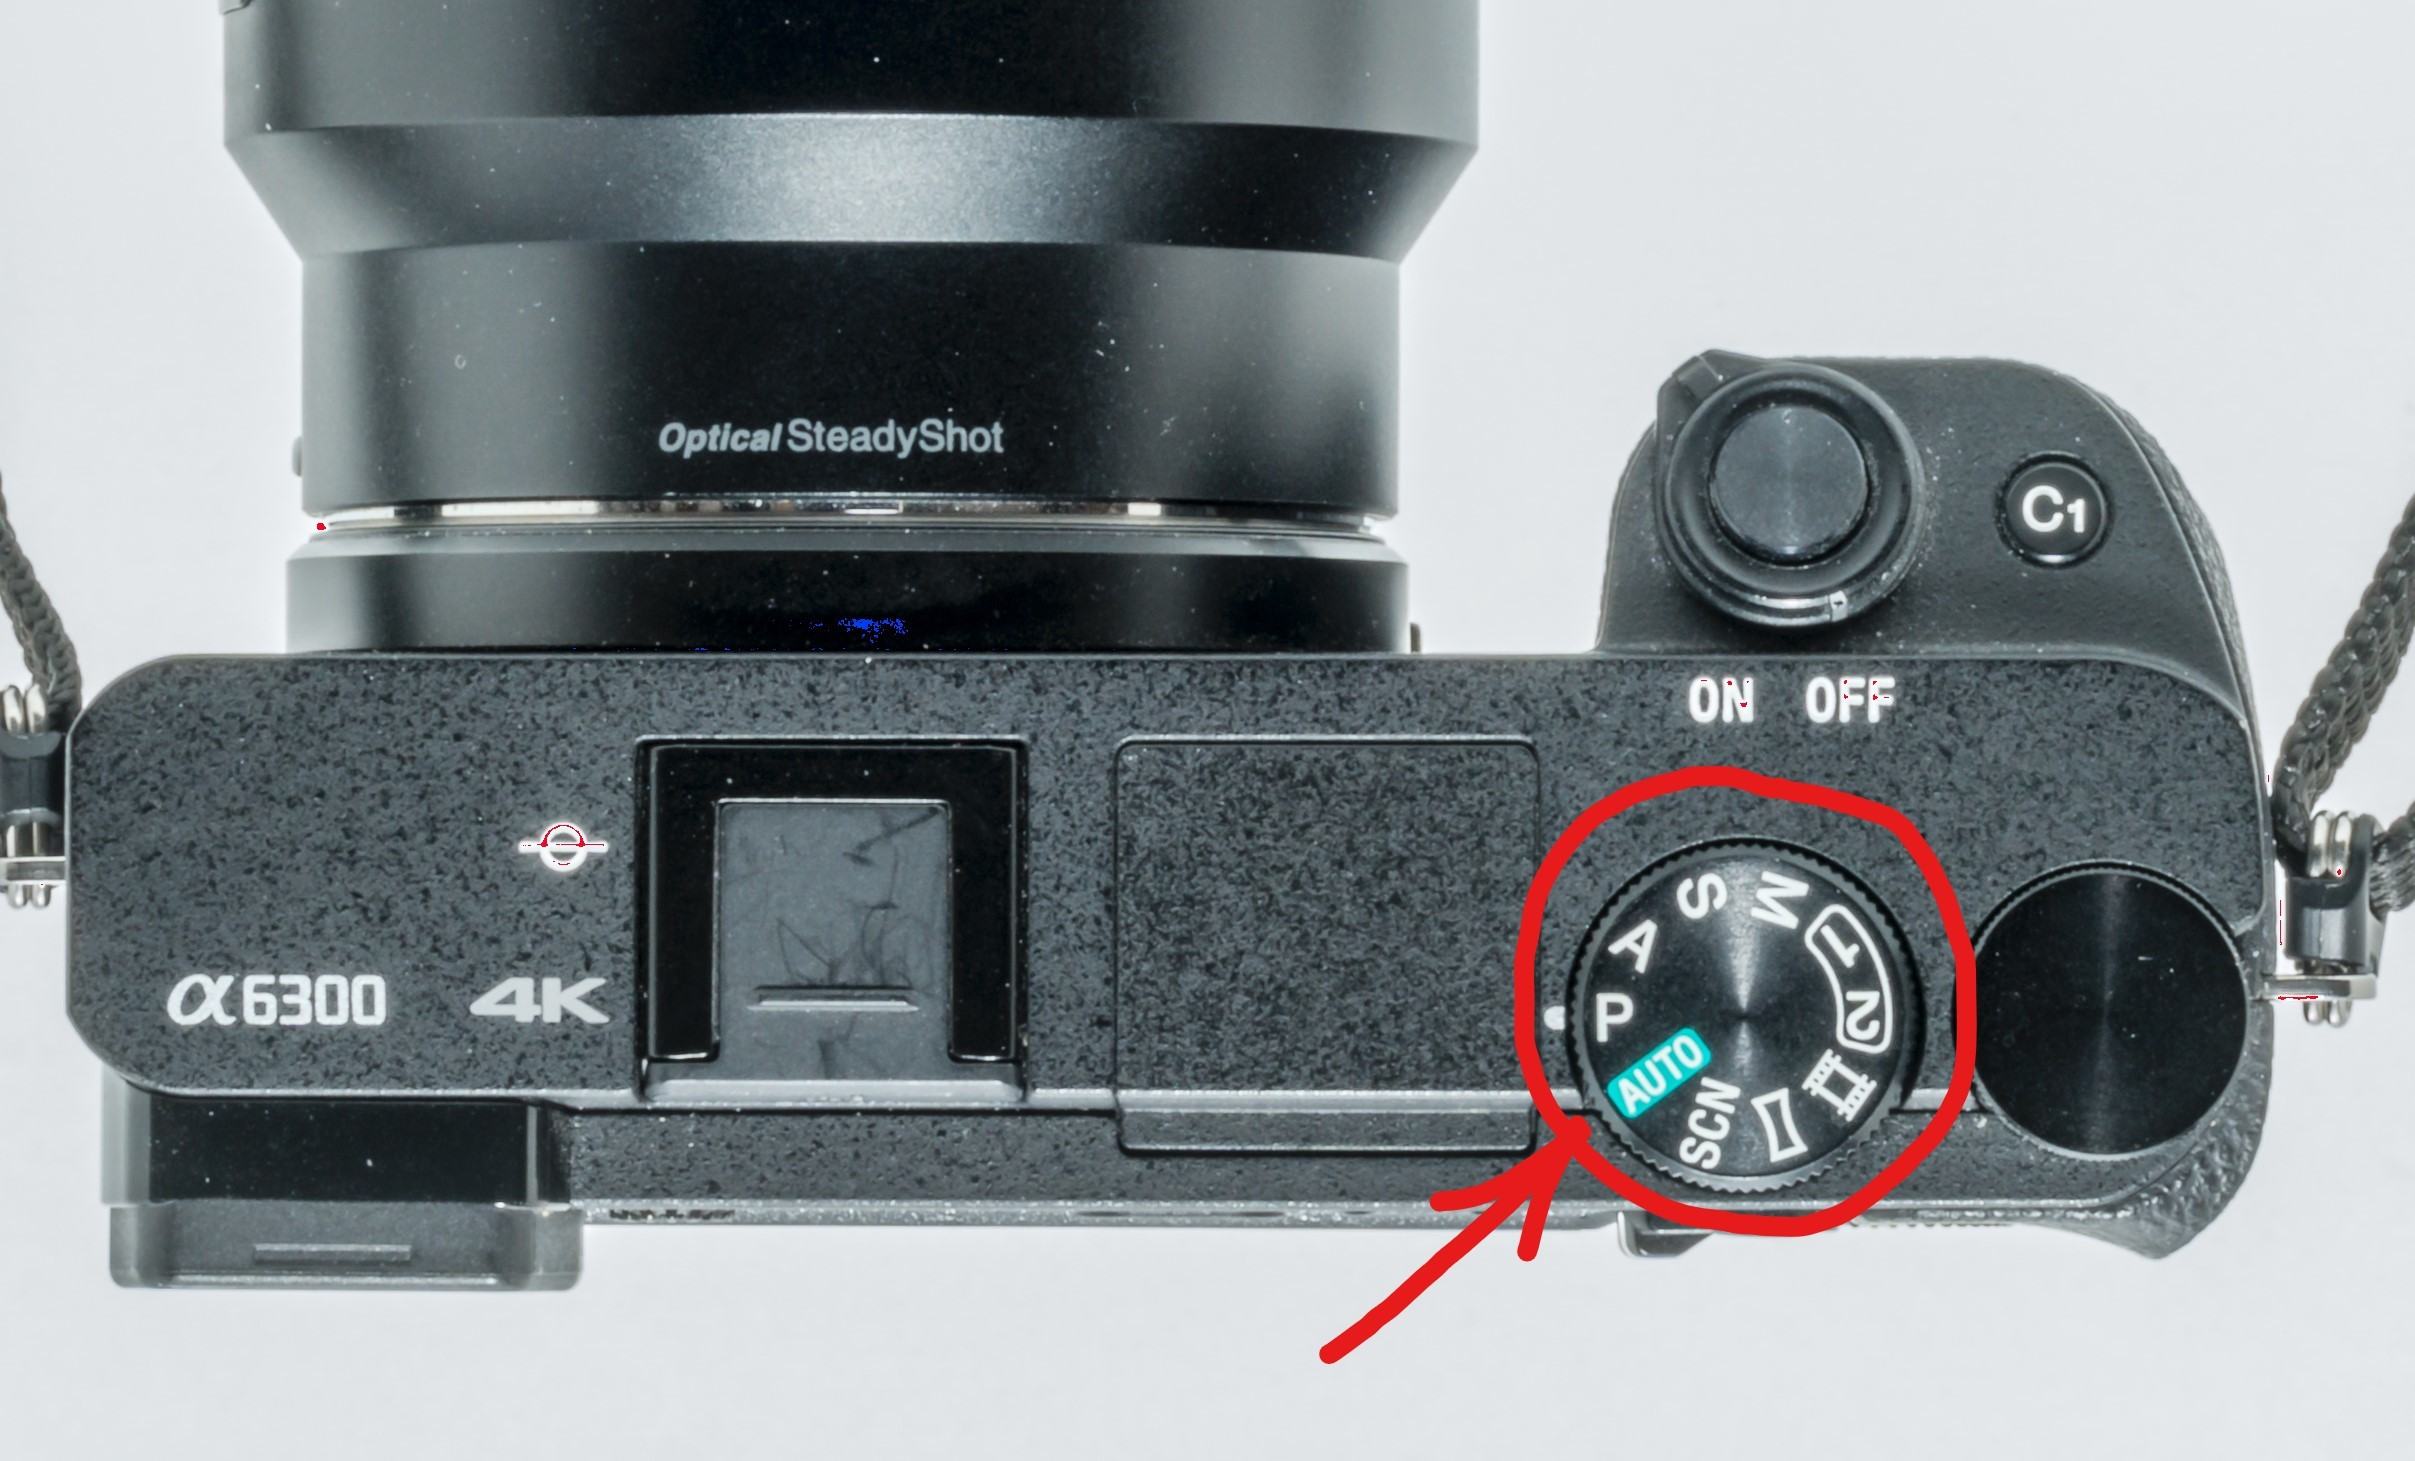
PASM Selector Dial on one of my Sony A6300s. Photograph by Charles Haacker
Every camera is different, but most will have some means of selecting one of the PASM settings. This is the selector wheel on my Sony A6300. Going clockwise from the green full-auto icon is Program, Aperture Priority, Shutter Priority, and Manual, then user presets #1 and #2. I ignore the rest as I shoot no video or scene modes because they output only JPEGs; I shoot nothing but RAW stills.
Key Lesson: P.A.S.M. P = Program. A = Aperture. S = Shutter. M = Manual. Should be found on all interchangeable lens cameras regardless of manufacturer.

This graphic shows the relationships among the three legs of the exposure triad: aperture, shutter, and ISO. Photograph by Hamburger Fotospots
This graphic shows the relationships among the three legs of the exposure triad: aperture, shutter, and ISO. If you use full auto for optimum exposure, the camera will choose what it “thinks” is an appropriate combination of the three. If you decide you want to change anyone, the other two will be affected. In full manual mode, you must change each one separately. The automated PAS modes take some of the burdens off your hands, allowing you greater flexibility while still maintaining full control unless the automation is “fooled” by conditions. The manual is often the best workaround.
Key Lesson: It is a myth that the manual is more “creative”; it does not matter how you are controlling the camera so long as it is not controlling you.
I hear often from workers that insist that any sort of automation is “uncreative.” Nonsense. It is important to fully grasp manual control so that you understand what the camera is doing in auto. If I can make the camera choose the same settings that I would make manually, then the camera is doing my bidding yet allowing me to concentrate solely on the picture; “blinking.” I am not ceding control to the camera; I am controlling the camera.
Key Lesson: You can’t blindly rely on automation. You need to learn to control it, not the other way around.
Program
Program Mode is semi-automatic. It lets you vary the shutter and aperture reciprocally, but it assumes you are locking in an ISO, exactly as if you were shooting film. If the ISO you pick is too high for bright conditions, then you will have trouble avoiding overexposure; if you choose too low an ISO for darker conditions, then you will struggle to get a good exposure. Program auto goes back to the earliest auto settings, even older than autofocus. I had it in my Canon T90s and made good use of it.
Key Lesson: Program Mode is semi-automatic. You must choose and lock in an ISO.
What makes Program auto great for beginners is that it allows you to adjust the shutter and the aperture reciprocally by turning one wheel or dial. For most average scenes, there is one optimum exposure – the specific amount of light over time that is allowed to strike the sensor – but either the amount or quantity of the light or the time that amount of light is allowed in can be varied for different effects.
What makes Program auto great for beginners is that it allows you to adjust the shutter and the aperture reciprocally by turning one wheel or dial.
You know that if you want a deeper depth of field you want to “stop down,” to make your aperture smaller because that increases DOF. But that changes the amount of light coming through the lens. If you don’t slow down the shutter speed to compensate, you will underexpose. If you are in manual mode, you have to make the shutter adjustment separately; Program eliminates the extra step automatically. If the aperture is changed, the shutter is equally changed in the opposite direction, achieving identical overall exposure but with either more action stopping or greater depth of field, but not both without increasing the ISO.
- Stop down and the aperture gets smaller and the shutter goes slower. DOF is deeper, but action-stopping is hampered unless you raise the ISO.
- Open up and the aperture gets larger and the shutter goes faster. You can freeze more action at the expense of DOF unless you raise the ISO.
- Raising or lowering the ISO in Program Mode must be done manually, exactly as if you had a roll of ISO (ASA) 100 (or whatever) film loaded. You cannot use Auto ISO in Program.
Key Lesson: In Program Mode, if you need more DOF, stop down and the shutter compensates, slowing by an equal amount. If you need action-stopping, then increasing the shutter speed causes the aperture to open up by an equal amount, automatically.
Recommended Reading: Want a step-by-step guide on photography skills with your DSLR? Grab a copy of our best-selling guide, the DSLR Crash Course.

Program Mode ring around. Notice how every exposure is identical. Compare the DOF between the top left and the lower right. Photograph by Charles Haacker
This ring around was made in Program Mode. The three objects are equidistant. The critical focus in every frame is on the nearer can. The exposure was determined for the top-left frame, wide open at f/4. Each of the following frames was altered by one full stop each. You can see that as the settings are changed reciprocally, the exposure remains the same throughout. What varies is the apparent DOF, the overall sharpness of the further objects as the lens stops down from f/4 to f/22. Notice what happens to the shutter speed as the aperture gets smaller; the shutter gets longer (slower) to compensate by exactly one f/stop interval.
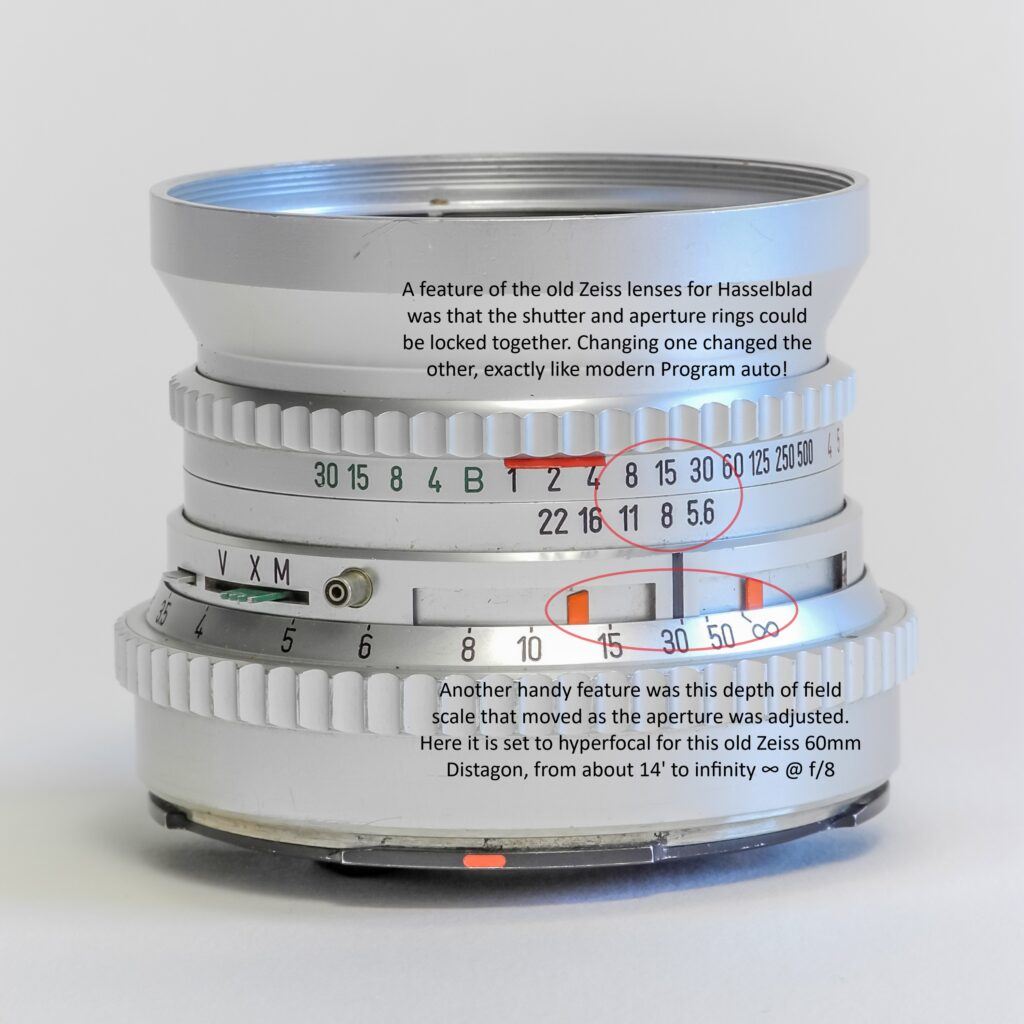
Carl Zeiss figured out a way to include P-Mode in a lens/shutter combination. Photograph by Charles Haacker
When I shot weddings back in the Lower Paleophotographic, I used Hasselblads equipped with Zeiss lenses like this one, a 60mm f/5.6 Carl Zeiss Distagon in Copal shutter. I show it because it had this clever feature where the shutter and aperture rings could be locked together. Changing one automatically changed the other, reciprocally, just like modern-day Program mode. Things don’t really change so much as they evolve.
Aperture Priority
Aperture Priority allows you to choose a specific aperture (f/stop) and the camera automatically selects the appropriate shutter speed. Many professionals (me included) gravitate to Aperture Priority because it allows us to vary the DOF while the camera keeps up by adjusting either the shutter, the ISO, or both.
I shoot events which are “fast break” assignments, “run and gun,” recording the action. I use a couple of fairly sophisticated “prosumer” Sony A6300 bodies with overlapping zooms. I shoot nothing but RAW and I post-process every shot I show in Lightroom and/or Photoshop. When I am out shooting, I rely a lot on Aperture Priority, which is probably the most useful and recommended auto setting.
Here’s a look at my go-to general-purpose preset:
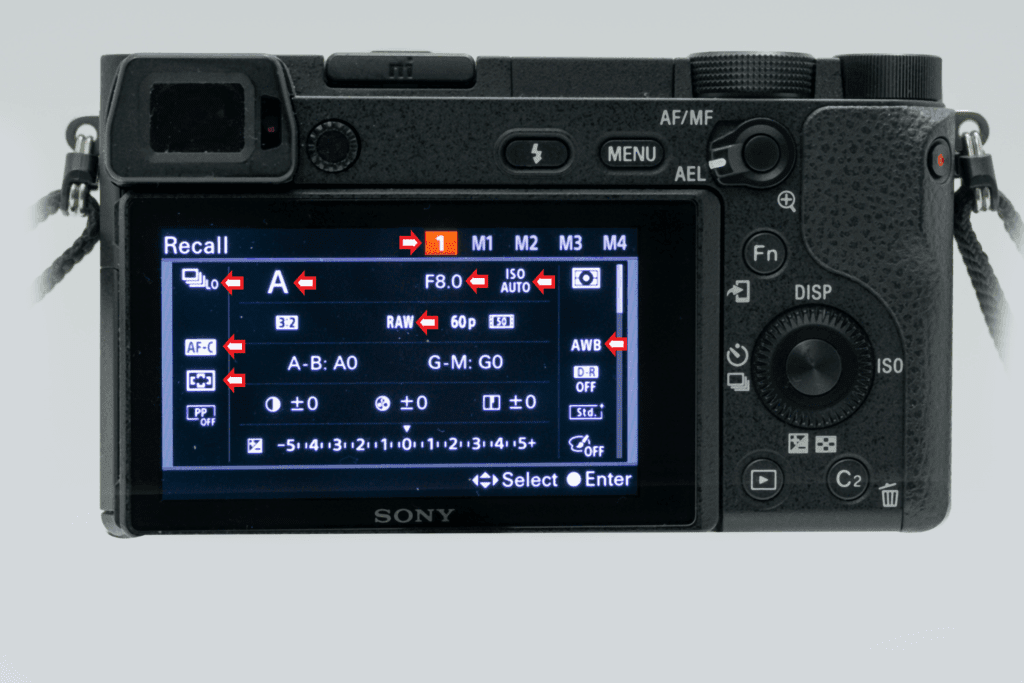
My most-used Aperture Priority user preset. Photograph by Charles Haacker
User Preset no. 1 on my Sony A6300. Starting at the top and working down, left to right.
- This shows that the camera is in Preset 1
- Burst mode Lo (3 FPS). I can squeeze off singles if I want.
- Aperture Priority
- f/8 (can easily be changed)
- Auto ISO, usually “capped” at 6400. I call it “floating” ISO.
- RAW capture
- Continuous autofocus, sport mode
- AWB = Auto white balance
- Wide focus area
Any or all of these settings can be changed on the fly; this is my favorite for just picking up the camera, pointing, and shooting. I could accomplish almost the same thing by leaving the camera in full auto mode (green icon). That’s the setting where the camera makes all the decisions, but I prefer my preset because I can change anything anytime. If I am shooting diagonally down a table, I can stop to f/11 or f/16 to gain DOF. If the happy couple is running toward me, I can open up for less DOF (more bokeh) plus an action-stopping shutter. If I let my ISO “float,” it will ensure that the shutter is fast enough to freeze the action without my having to think about it.
For me, the benefit of this combination is that it allows me to wander about, indoors and out, concerning myself only with the desired DOF that I can adjust with the control dial under my right thumb. RAW capture helps enormously as I can always adjust a finicky white balance in post-processing. Auto ISO helps because it does not care if I am inside or out. I am free to concentrate on the picture itself, and blink!
Key Lesson: Aperture Priority is the most popular auto setting because it’s the most useful and flexible. I confess to making probably 60% of all my pictures using it.
Shutter Priority
Shutter Priority allows you to choose a specific shutter speed and the camera automatically selects the appropriate aperture. I can easily switch from Aperture Priority to Shutter Priority and shoot the same. That’s good for freezing action with a fast shutter, and any other need for prioritizing the shutter speed over the aperture, such as deliberately slowing the shutter down to pan with moving subjects.
Manual Mode
Manual Mode is still crucial since auto can and does fail, usually by doing something you didn’t want. If you have never worked your expensive camera in manual, I strongly recommend that you learn it. You may think you will never need it, but you are misinformed. It’s not that it’s “more creative” – it encourages creativity by yielding control to you. Have you ever experienced wanting to take a picture a certain way and being stymied by the automation preventing it? The quickest way to get the camera to do what you want is to disable some or all of its automation and go manual.
Manual Mode is still crucial since auto can and does fail, usually by doing something you didn’t want.
Key Lesson: Manual Mode is always there when automation fails to get the picture, and it will. Automation should be a tool, not a crutch.
There are many things that manual does better than automation:
- Manual lets you lock in any or all settings, so shots are absolutely consistent.
- Autofocus is often fooled, especially if focus points are selected incorrectly; manual focus stays where you put it.
- Auto exposure is also easily misled. Very bright or very dark scenes will often photograph incorrectly because the camera meter “sees” everything as an average middle gray. Snow is a good example. Shot at the camera’s recommendation, snow will almost always photograph a middle gray because that’s how the camera “sees” it. Your exposure should be bumped up a stop or two to get the correct exposure.
- Manual gives you a better grasp of what automation is doing. You can learn the manual by duplicating the good settings that automation chooses. From there you can experiment with changing the settings to see exactly what each does.

If you rely on a reflected light reading, you are very apt to underexpose snow. Photograph by Charles Haacker
Simple point-and-shoot automation will read and render white snow as a middle gray. This is when you either bias (compensate) your exposure up, or go manual. Conversely, an overall dark scene will photograph too light as the camera meter tries to render it as middle gray.
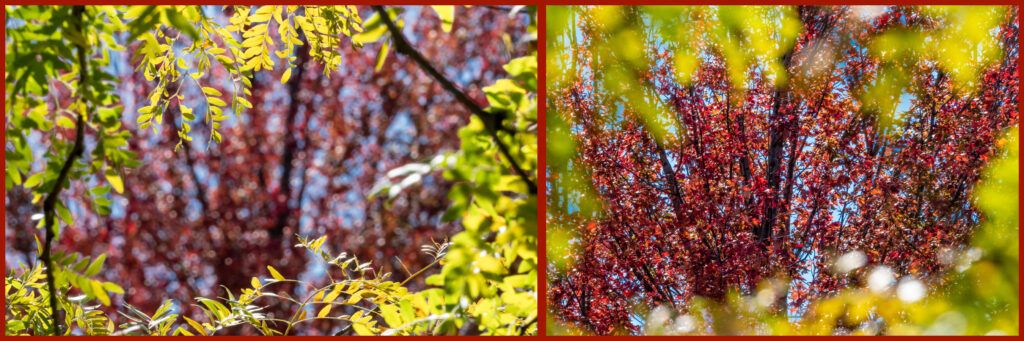
Manual focus sometimes makes selective focus easier than relying on automation. Photograph by Charles Haacker
Autofocus can often be easily fooled because it tends to focus on whatever is nearest the lens. If I want to focus far through a hole in the leaves but it keeps defaulting to the nearer objects, manual focus is a surefire way to lock it in.
Recommended Reading: Want a step-by-step guide on photography skills with your DSLR? Grab a copy of our best-selling guide, the DSLR Crash Course.
Conclusion
Remember that automation is a tool, not a crutch. The purists aren’t wrong when they urge you to learn the manual operation of your camera, but whatever settings you use will yield the same results whether arrived at manually, semi-automatically, or automatically. The trick is in knowing what those settings should be. Blindly letting the camera make the decisions isn’t highly creative. Those of us that learned on manual everything was joyfully liberated by embracing automation to help us attain the same goals with less sweat. I especially appreciate that my success rate increased with automation simply by making fewer mistakes. Goofs that were far too easily made with all-manual cameras are less likely to happen if the camera takes over some of the mundane tasks so we can literally focus on the subject. When I was a full-time working pro, the only thing that mattered was getting the picture. Clients have zero interest in how you do it, but they become intensely interested if you don’t. Make good, intelligent use of your tools.
Self-Check Quiz:
- True or False: Manual mode is more creative than any automatic mode.
- True or False: Programmed auto is semi-automatic.
- True or False: Aperture Priority auto is the least popular.
- True or False: Shutter Priority auto is helpful when shooting fast action.
- True or False: Using any automation means you are ceding control of the camera to an algorithm.
- True or False: Automation should be a tool, not a crutch.
Assignment:
You can start to learn the manual by duplicating the good settings that automation chooses. Take a picture in one of the automatic modes. Review it with the settings displayed. See if you can duplicate those settings in manual mode and take the same picture again. Try changing the manual settings to see what happens. Repeat the experiment often. Learn things.


