

Dodging and burning are fundamental and robust post-processing techniques. But they are often overlooked by digital photographers.
In this article, I’ll introduce you to the dodge and burn tools found in many post-processing programs. I’ll show you how to use the tools for dramatic effect and push the idea of dodging and burning to the next level.
The tools are simple to use but can have powerful results.
What we’ll cover:
- Introduction to dodging and burning
- Dodging and burning tools in Lightroom and Photoshop
- How to use dodging and burning in your images
- Extending the definition of dodging and burning
Recommended Reading: If you want to learn how to enhance your photos and create better images, grab a copy of Photzy’s premium guide: Ultimate Guide to Fundamental Editing.
Introduction to Dodging and Burning
Dodging and burning are post-processing techniques adapted from film photography. In the darkroom, film photographers blocked light on parts of their image with something physical like cardstock. Other parts of the image received more light.
Both terms both mean changing the exposure in selected parts of the image.
- Dodging means selectively brightening parts of an image.
- Burning means selectively darkening parts of an image.
Dodging and burning could be tedious processes in the darkroom. The photographer had to replicate the changes with each print. Digital post-processing has made the process of dodging and burning much simpler. And you only have to do it once.
Dodging and burning allow you to correct exposure, but they can also add depth and dimension to an image.
Exposure Correction
Digital cameras capture a wide range of light information (dynamic range). But capturing the information does not mean that the image looks the way our eyes saw the scene. Shadows may be too dark and highlight too bright. By dodging and burning, we reveal subtleties lost when translating reality to image.

Before and after comparison. The ‘after’ image shows dodging on the man in the lower right-hand corner and on the interior architectural detail. Photograph by Jenn Mishra
Let me give you an example. I took this image because I liked the framing and the way the tourist was peeking out at the Taj Mahal. I increased the exposure and lightened the shadows. But details of the interior structure and the tourist were still lost in shadow. If I brightened the image more, the exterior would be too bright.
I had to selectively brighten shadows by dodging the tourist and interior structure.
The differences don’t have to be drastic. In cases like this, you probably don’t want your viewer to notice that you’ve altered the image at all.
Depth and Dimension
You can also use dodging and burning to add depth and dimension to an image. This is an artistic use of the tools.

Before and after comparison of a cabbage. The ‘after’ image shows the results of dodging and burning using tools in Lightroom. Photograph by Jenn Mishra
This image of cabbage growing in a neighbor’s garden started out with fairly even light. But it wasn’t the light that caught my attention; it was the lines and shapes created by the cabbage leaves. I saw the artistic possibility in the vegetable.
I dodged areas that I wanted to brighten and burned areas that I wanted to darken until the image became much more interesting.
Key Lesson: Dodging and burning can be used to even out exposures or to add dramatic effect.
Dodging and Burning Tools in Lightroom and Photoshop
Many post-processing programs allow you to selectively change parts of an image. In this guide, I’ll describe dodging and burning tools in Lightroom and Photoshop. Snapseed, a mobile app, also allows for selective editing.
Lightroom
The tools you’ll need for dodging and burning in Lightroom are found near the top of the right-hand panel in the Develop Module.
These tools are, from left to right, the Graduated Filter, the Radial Filter, and the Brush tools.
- The Graduated Filter tool allows you to lighten or darken the edges of the frame. The effect fades out as it gets closer to the center (or closer to the edges, depending on which way you drag the filter).
- The Radial Filter tool allows you to draw a circle around the area that you want to lighten or darken.
- The Brush tool allows you to paint the exposure you want in selected areas.
Dodging and burning allow you to correct exposure, but they can also add depth and dimension to an image.
I use the Radial Filter tool 90% of the time when I’m dodging and burning. If you want to change an area that isn’t circular, select the Brush tool instead. Paint the area you want to change. If you want to change a larger section of your image, the Graduated Filter may be the best choice.
The menu for each of these filters is the same. There are a couple of things to notice about the menu.
Lightroom comes with presets in the Effects dropdown menu. Among others, there are presets called “Dodge (brighten)” and “Burn (darken).” You can also create your own presets.
Even though dodging and burning are primarily about exposure, you can adjust other sliders as well. We’ll talk more about expanding the definition of dodging and burning later in the guide.
In the Lightroom menu below, notice the feather slider at the bottom. This controls edge sharpness. I like my filters to feather into the background, so I set mine at about 80%.
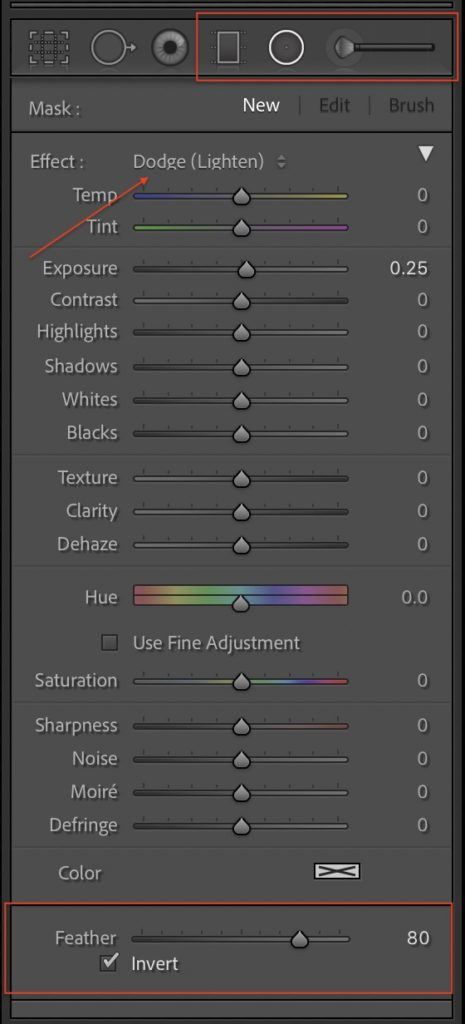
Screenshot showing the dodging and burning tools and menu in the Lightroom Develop module. Photograph by Jenn Mishra
Also, notice the Invert tick box. If you tick the box, the effect is applied inside the filter. If you untick the box, the effect is applied outside the filter. I usually apply the effect inside the filter, but sometimes it’s better to apply the effect outside. For instance, when I’m adding a vignette, I want to darken the area outside the circle that I draw. So, I untick the check box.
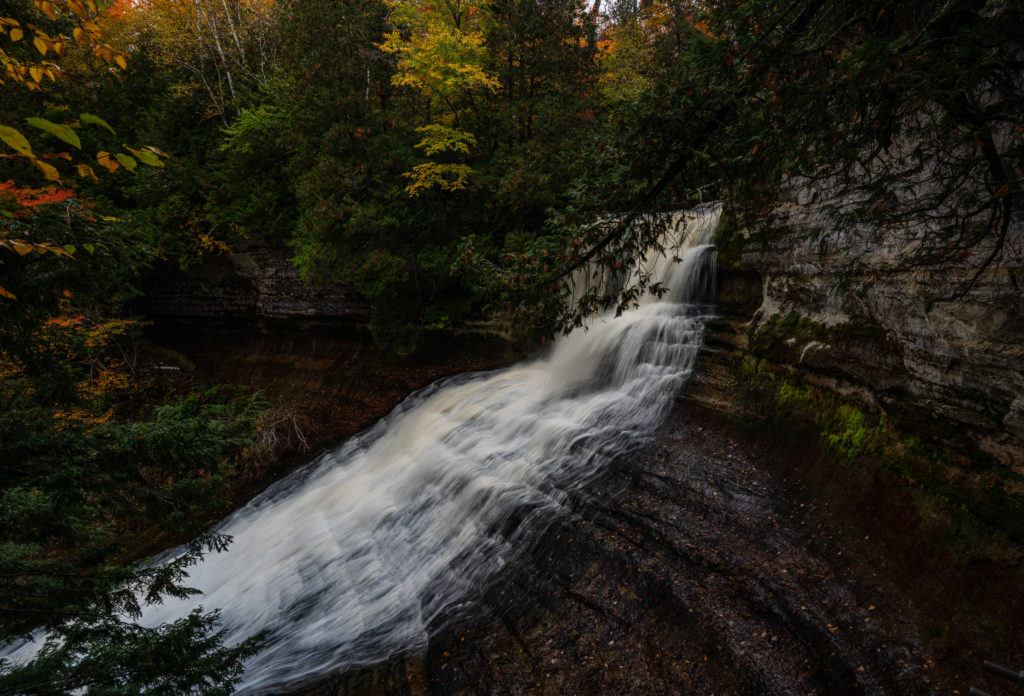
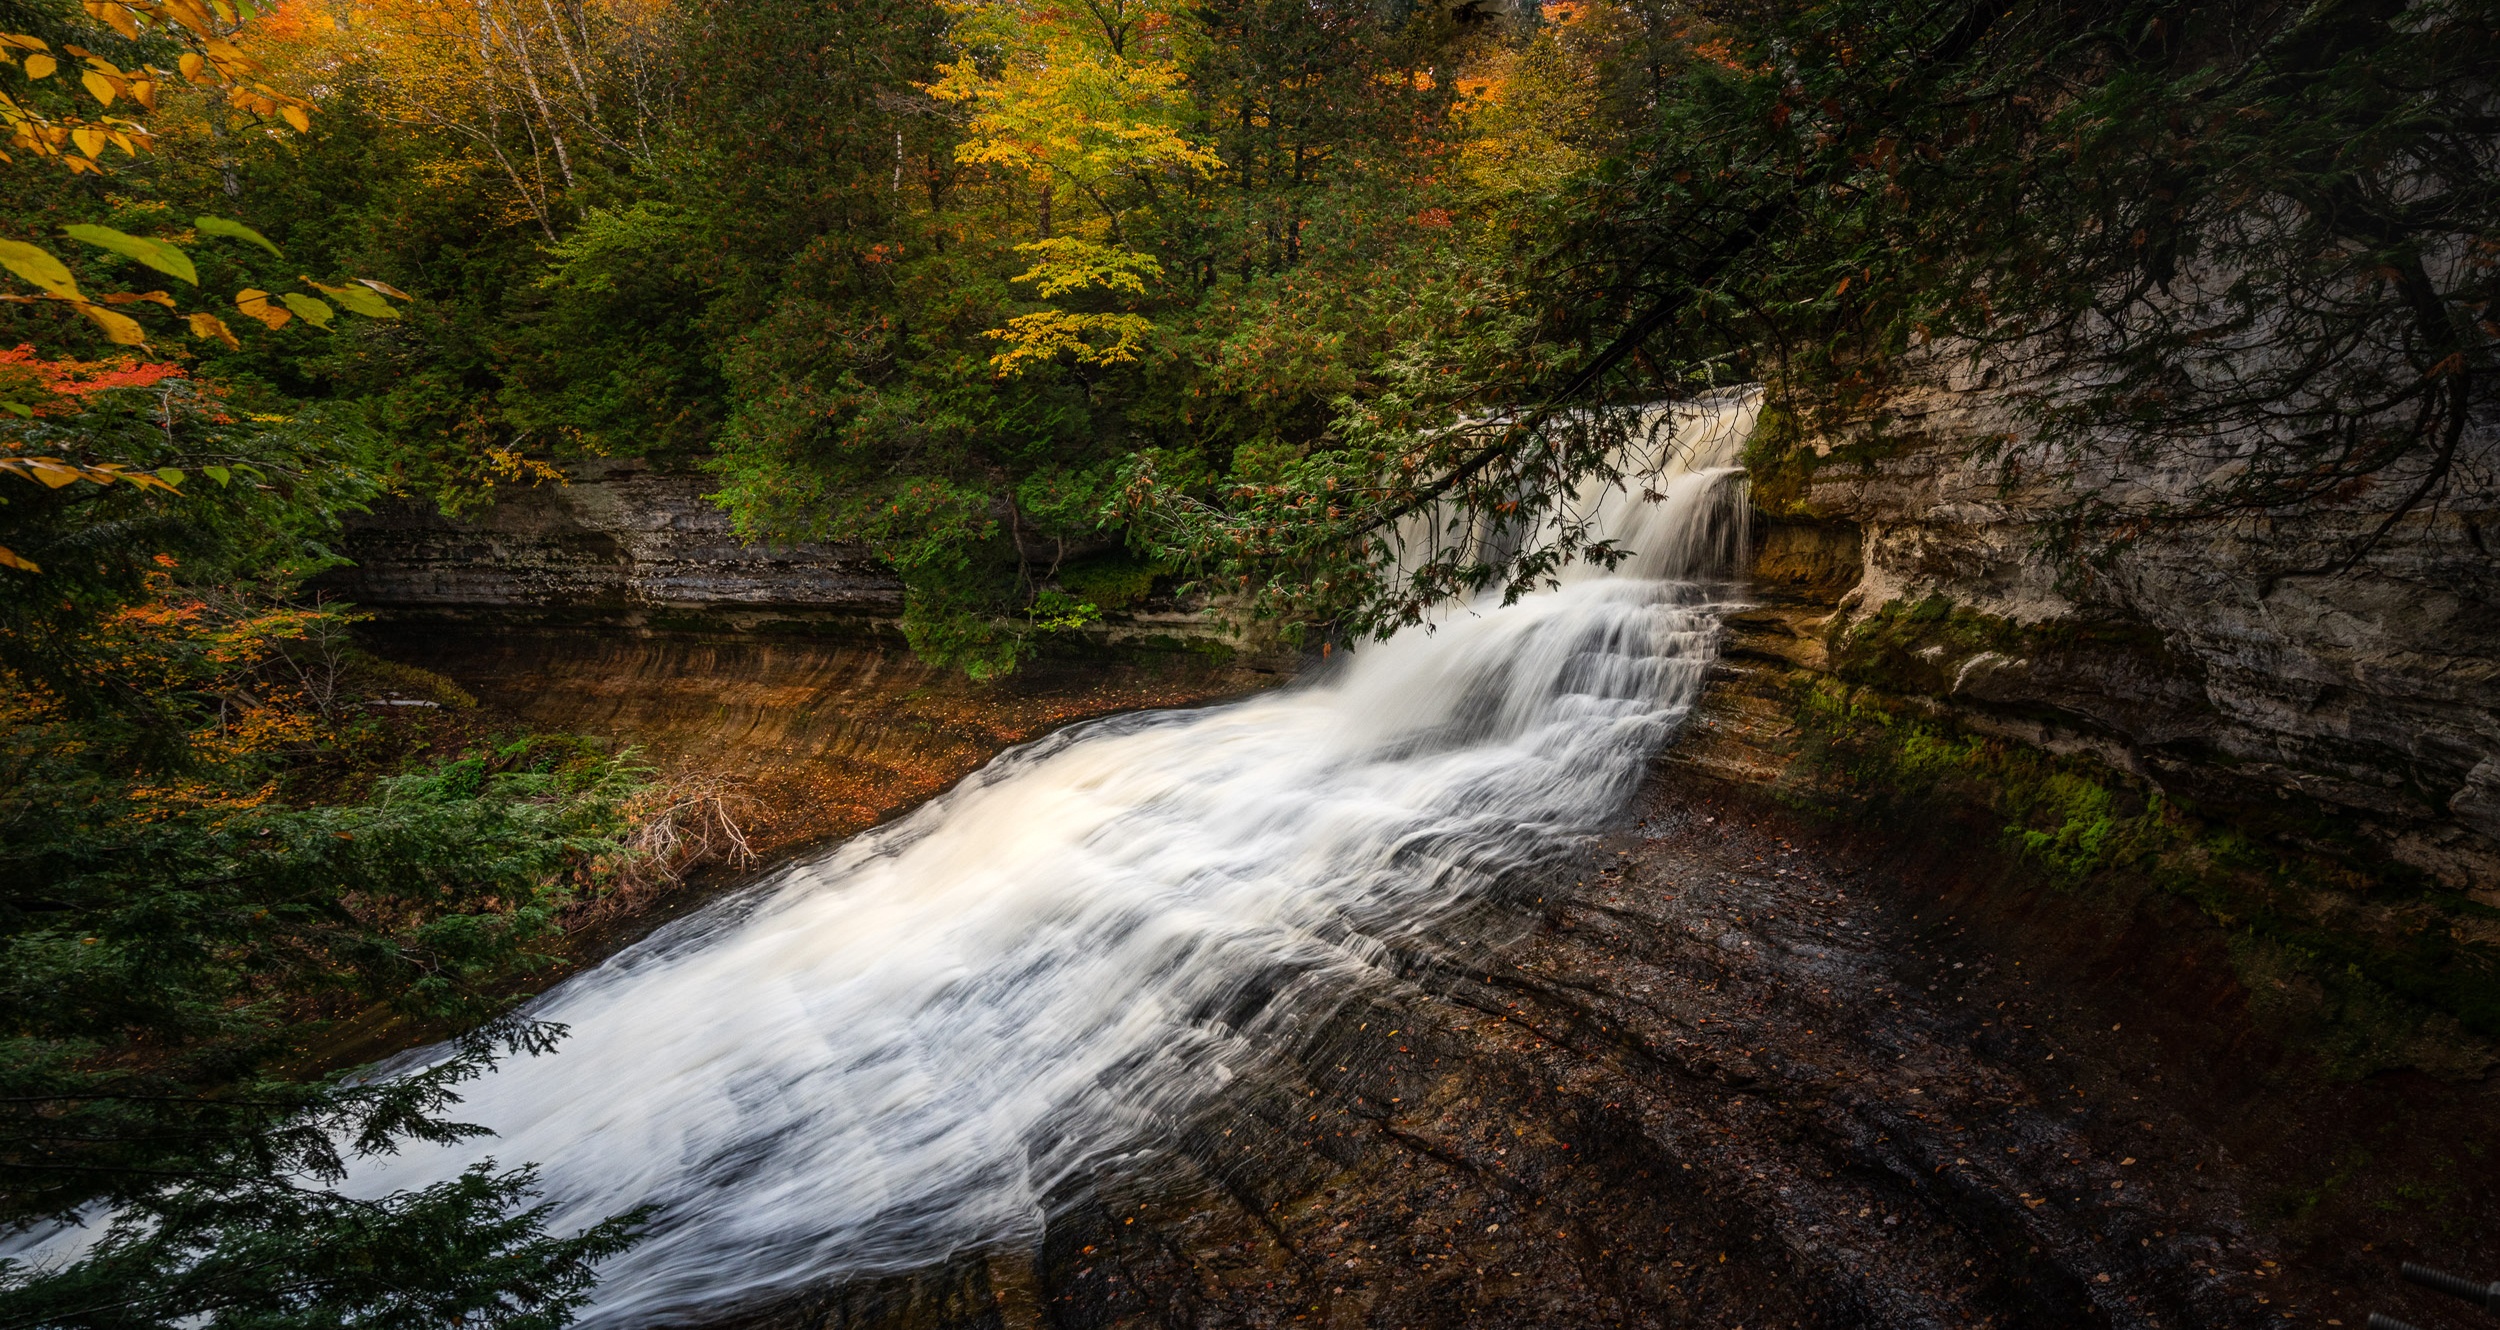
Image of the waterfall before dodging and burning. Photograph by Jenn Mishra
Here is an image before I began adding Radial Filters. The image is dark because I didn’t want to overexpose the water in the falls.
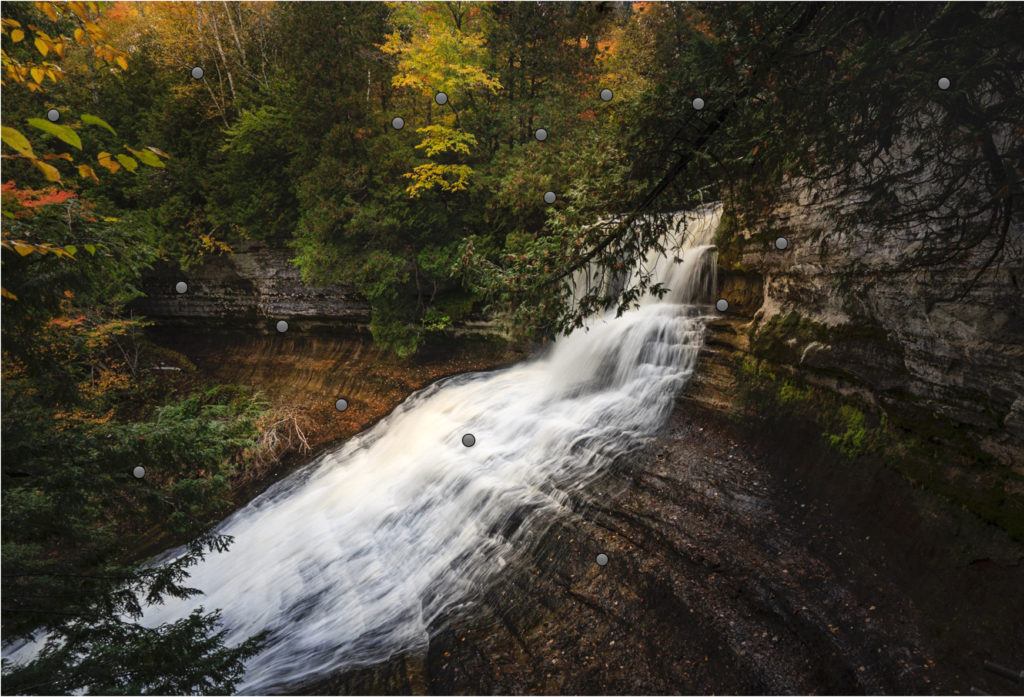
Image of a waterfall showing pins where Radial Filters were applied in Lightroom. Photograph by Jenn Mishra
Using the Radial Filter tool, I drew circles around what I wanted to be lightened or darkened. I drew quite a few Radial Filters. Each of the dots in the screenshot represents a Radial Filter. There’s no limit to the number of circles you can draw.
Photoshop
I tend to use Lightroom to dodge and burn as the filters are easy to use and give me a lot of flexibility. But if you prefer to edit in Photoshop, there are a couple of ways to dodge and burn.
Dodge and Burn Tools
Photoshop includes tools called Dodge and Burn. The dodge tool looks like a lollypop, and the burn tool looks like a hand making a shadow puppet. (At least that’s what the icons look like to me!)
These tools work a lot like the brush tool, allowing you to paint light directly onto your image. It’s always a good idea to work on a copy in case you make a mistake or want to try something different. To make a copy of your image:
- right-click on the background layer, and
- select Duplicate Layer.
You can also use the keyboard shortcut Ctrl or ⌘J.
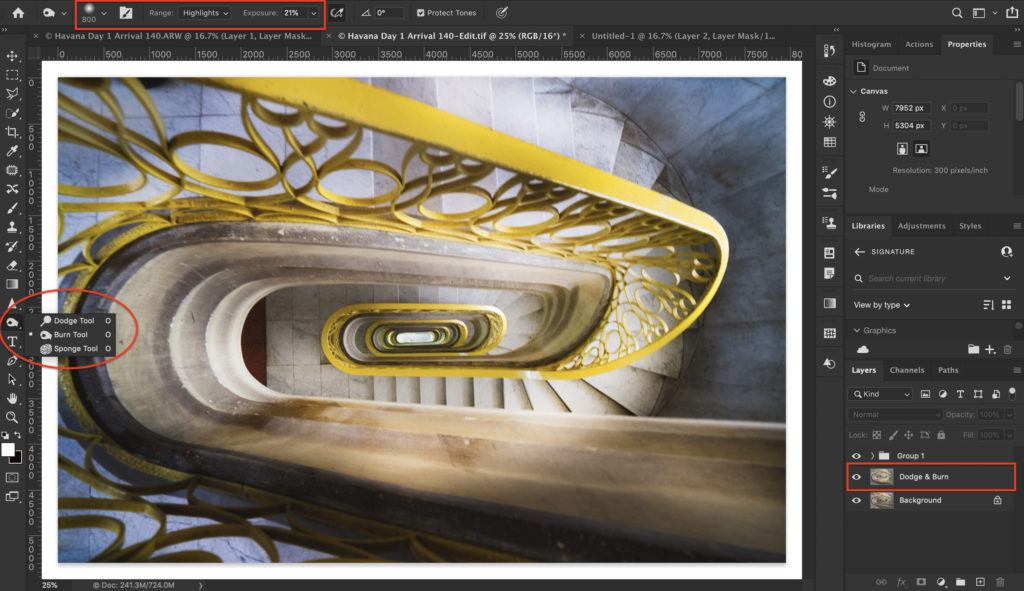
Screenshot of the Dodge and Burn tools and duplicate background layer in Photoshop. Photograph by Jenn Mishra
The Dodge or Burn Tool menu on the top of your screen allows you to select the size and softness of your brush. You can select whether you want to change the shadows, mid-tones, or highlights. And you can change exposure. I usually set the exposure to around 10-20%. If I want more, I paint over the area again and build up the effect.
The Dodge and Burn tools in Photoshop are easy to use, but there are some drawbacks. It’s difficult to correct a change later, and there’s no way of tracking your changes.
Most Photoshop users use a different technique for dodging and burning.
Recommended Reading: If you want to learn how to enhance your photos and create better images, grab a copy of Photzy’s premium guide: Ultimate Guide to Fundamental Editing.
Dodge and Burn Layer
Another way to dodge and burn in Photoshop is to create a dodge and burn layer.
Go to Layer > New > Layer or use the keyboard shortcut Ctrl or ⌘N.
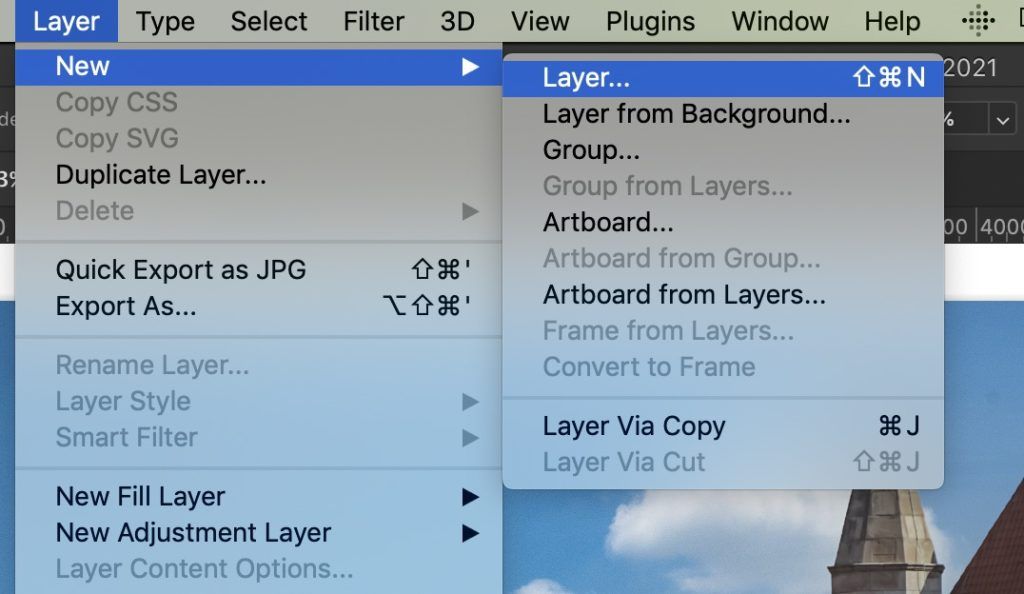
Screenshot of how to create a new layer in Photoshop. Photograph by Jenn Mishra
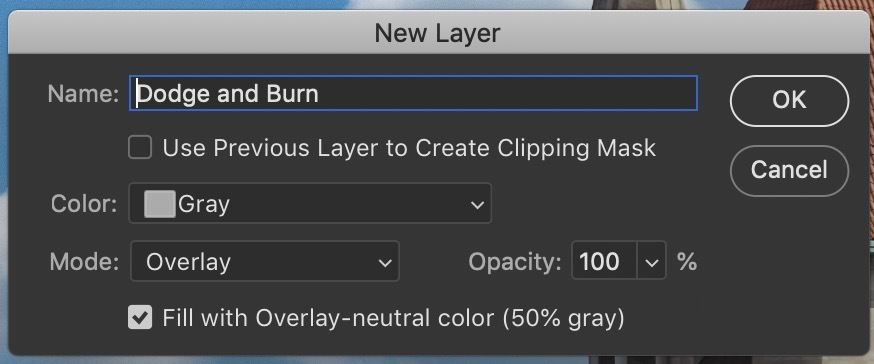
In the dialog box that appears:
- name the layer “Dodge and Burn,”
- select Gray from the Color dropdown menu,
- select Overlay from the Mode dropdown menu, and
- check the box next to “Fill with Overlayneutral color (50% gray).”
Screenshot of the dialog box settings when creating a new layer in Photoshop. Photograph by Jenn Mishra
Select this new layer and a soft brush (keyboard shortcut b) with about a 10% opacity.
On the new Layer, paint white on the places you want to dodge and black on the places you want to burn. If you make a mistake, toggle the paintbrush to the alternate color (keyboard shortcut x) and paint again. You can increase the effect by painting over a section multiple times.
If the effect is too strong, lower the opacity of the entire Layer. If you’re familiar with Photoshop, the process may seem similar to painting on a layer mask.
Key Lesson: Post-processing software programs like Lightroom and Photoshop have multiple tools for dodging and burning.
Using Dodging and Burning in Your Images
Let’s turn to some common ways to use dodging and burning in your images. The tools are flexible and can make a dramatic difference in your post-processing.
Add a Vignette
A vignette darkens or lightens the edges of your frame. Darkening the edges helps your subject stand out.
Many post-processing programs have a vignette tool, but burning the edges allows you the most flexibility. Use a Radial Filter in Lightroom or a large, soft brush in Photoshop.
A vignette darkens or lightens the edges of your frame. Darkening the edges helps your subject stand out.
Start by adding a Radial Filter over the subject of your image or where you want your viewer to look first. This will remain the brightest spot. Click the Invert check box and darken the edges. I often start with a heavy vignette and dodge to bring up the exposure.
If you’re working in Photoshop, remember to feather the vignette. Darken less in the center and more towards the edges.
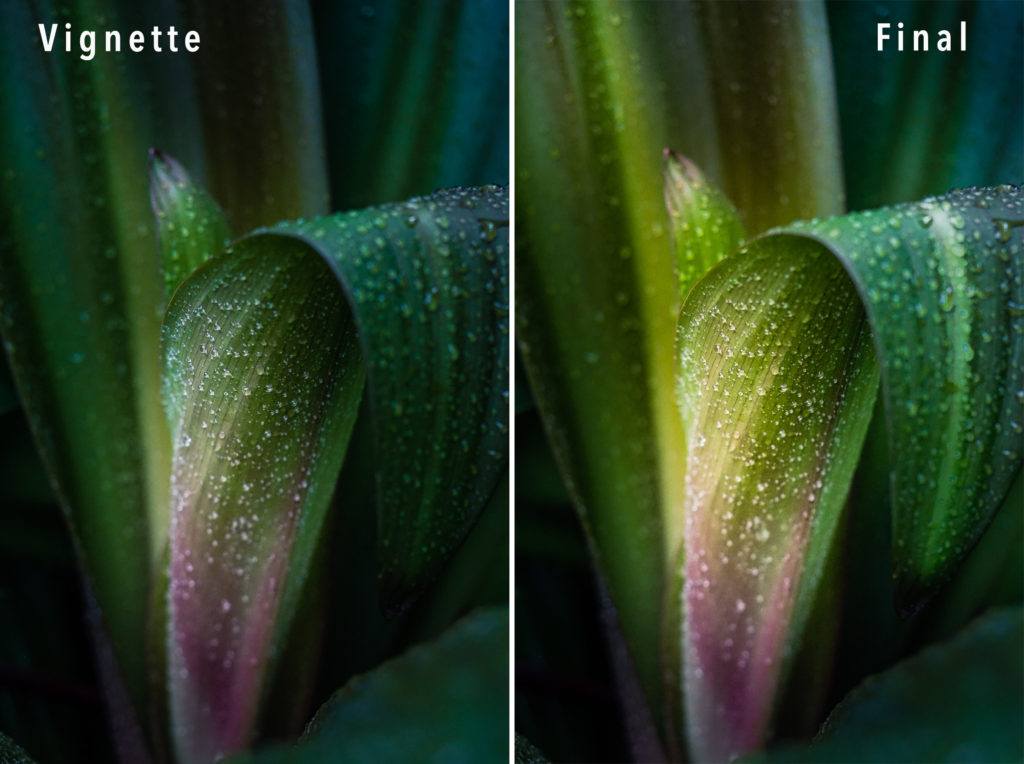
Before and after comparison of raindrops on a leaf. The ‘before’ image shows a heavy vignette centered over the
purple leaf coloring. The ‘after’ image shows the final image after dodging using tools in Lightroom. Photograph by Jenn Mishra
Dodge the Subject and Leading Lines
Dodging allows you to guide your viewer’s eyes through the scene. You can dodge the main subject as well as leading lines directing the eyes towards the subject.
Rather than one Radial Filter, build up the effect using overlapping Radial Filters. This gives a more natural look.
Lighten Shadows
Dodge areas of dark shadow to bring out some detail. You are not making the shadows equal in exposure to other parts of the image; just bring up the exposure enough so your viewer can see detail.
Increase in Contrast
Exaggerating the light and dark parts of your image increases contrast and separation. This can add drama. For instance, you can make storm clouds pop using dodging and burning. This is particularly effective in black and white images.
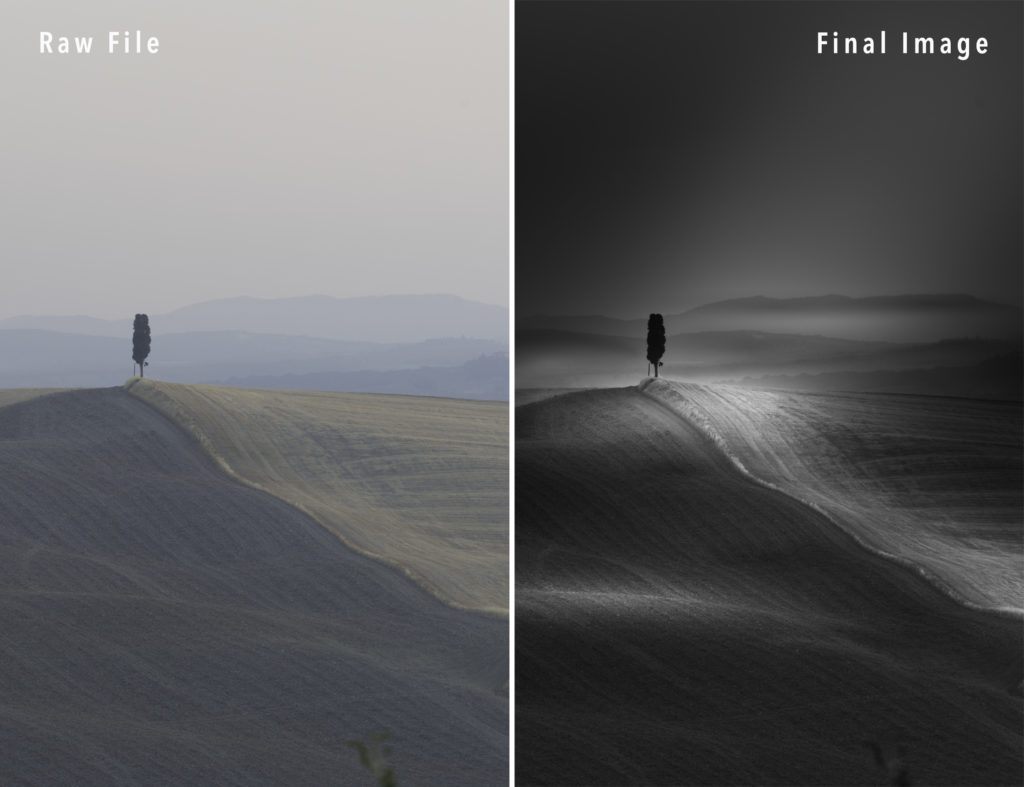
Before and after comparison of a Tuscan tree. The ‘before’ image shows a RAW file. The ‘after’ image shows the final image, including an alternate light source, after dodging and burning using tools in Lightroom. Photograph by Jenn Mishra
Add or Alter a Light Source
You can dodge an area to create an implied light source.
In the photo of the Tuscan tree, I used a long, thin Radial Filter to create a slant of light. This gives the illusion that the sun is just out of the frame in the upper right-hand corner. The RAW file shows that the sun was on the right side of the field but much lower in the sky than the final image implies.
When altering a light source, work towards lighting consistency in your image. Imagine where the shadows would be in your image if the light had, in fact, been coming from that direction. It’s all about creating a believable reality.
Brighten Faces and Eyes
With studio lighting, you can control exactly where the light falls. But there are situations where you have less control. For instance, when shooting street portraits.
Use a Radial Filter with a slight exposure increase to highlight a person’s face. You may even want to add a second filter to brighten the eyes.

Before and after comparison of an Indian merchant. The ‘after’ image shows the subtle effects of dodging on the face and eyes and burning a vignette. Photograph by Jenn Mishra
I added three Radial Filters to this street portrait:
- One as a vignette to darken the edges of the frame
- One to lighten his face
- One to further lighten his eyes
Key Lesson: Dodging and burning tools are used to emphasize or deemphasize parts of the image and guide the viewer’s eyes through the frame.
Expanding the Definitions of Dodging and Burning
In the strictest sense, dodging and burning only refer to changes in exposure. Digital photography expands the definitions to include elements like contrast, sharpness, and temperature.
The expanded definitions of these techniques are as follows:
- Dodging means selectively emphasizing parts of an image.
- Burning means selectively deemphasizing parts of an image.
Dodging can be more than increasing exposure. It can be increasing areas of contrast, sharpness, saturation, and warmth, all of which draw the eye.
Burning can be more than decreasing exposure. Burned areas may become softer by adding blur and lowering contrast and sharpness. They also may be desaturated with a touch of coolness to the light.
Dodging can be more than increasing exposure. It can be increasing areas of contrast, sharpness, saturation, and warmth, all of which draw the eye.
Let’s look at how these expanded definitions apply to some of the common ways to use dodging and burning in your images:
- When adding a vignette, also desaturate and lower the contrast and clarity a little.
- When calling attention to a subject by dodging, also increase the clarity and sharpness.
- When adding a light source, also add a bit of warmth to the increased exposure.
- When brightening eyes, also add a bit of clarity.

Before and after comparison of the Oculus in New York City. The ‘after’ image shows the use of expanded dodging and burning. Photograph by Jenn Mishra
Each Radial Filter added to the images above of the Oculus in New York City had multiple changes. The structure is white, but my eyes saw blue skies through the slits in the ceiling. I remember the scene bluer than what my camera captured. This may be my faulty memory, but I wanted to bring out the blue and white I remembered. I changed exposure, shadows, and temperature sliders and even included a color cast in some of the Radial Filters.
Changing multiple elements is easy with Lightroom filters but a bit more challenging in Photoshop. One way to approach the task is to add an adjustment layer for each element (e.g. Contrast). Invert the mask to hide it and selectively paint the effect where you want it to be.
Key Lesson: The definition of dodging can be expanded beyond just exposure to include any element that draws the eye. The definition of burning can be expanded to include elements that deemphasize parts of the image.
Recommended Reading: If you want to learn how to enhance your photos and create better images, grab a copy of Photzy’s premium guide: Ultimate Guide to Fundamental Editing.
Conclusion
In addition to making global changes to your image in post-processing, make localized changes by dodging and burning. The concept of dodging and burning is simple. The power is in how you use the tools. You can even-out selected areas of a scene or add drama to the light.
In the strictest sense, dodging means brightening, and burning means darkening select areas. But the techniques encompass much more with digital postprocessing. Dodging draws the eyes to an area. Burning deemphasizes an area.
Dodging and burning allows you to create with light, and light can make anything beautiful.
Self-Check Quiz:
- What is the difference between dodging and burning?
- What are two general ways to use dodging and burning?
- In addition to exposure, what other elements draw in the eyes?
- Name the three tools in Lightroom that can be used for dodging and burning.
- Why might it be best to create a dodge and burn layer in Photoshop rather than use the Dodge and Burn tools?
- What does Invert do when using Lightroom tools for dodging and burning?
- List three common ways photographers use dodging and burning in their images.
- What does feathering mean?
- What is the difference between the traditional definitions of dodging and burning and the expanded definitions?
Assignment:
- Open an image in a post-processing program that allows for selective edits (like Lightroom or
Photoshop). - Rather than making global changes (e.g. changing the exposure of the entire image), do all of your postprocessing
locally. - Dodge the center of interest.
- Add a vignette by burning the edges of your frame.


