


If you’ve been involved in photography for any period of time at all, you’ve likely heard of the neutral density filter, sometimes referred to as an ND filter.
This accessory is one of the most useful that you can insert into your camera bag.
However, it can be a bit baffling to unravel what exactly an ND filter is. What does it do? What does it NOT do? What are the differences? Because there are many differences!
When you finish this article, you will have a solid understanding of each of these questions.
Here is what we will cover:
- What material is a neutral density filter made of?
- What are the different shapes of neutral density filters?
- What are the different mounting systems of neutral density filters?
- What does a neutral density filter do?
- How are neutral density filters rated and thus quite different?
- What is a graduated neutral density filter, and how do they differ?
- What does a neutral density filter do to your exposure? · What is the single best neutral density filter to have in your camera bag?
- What special effect can you achieve with a neutral density filter?
- What problems can occur when using a neutral density filter?
- What about variable neutral density filters?
- Why not just use a polarizing filter as an ND filter?
Recommended Reading: If you’d like a comprehensive guide on using ND filters and producing gorgeous long exposures, grab a copy of Photzy’s premium guide: The Complete Guide to Long Exposure Photography.
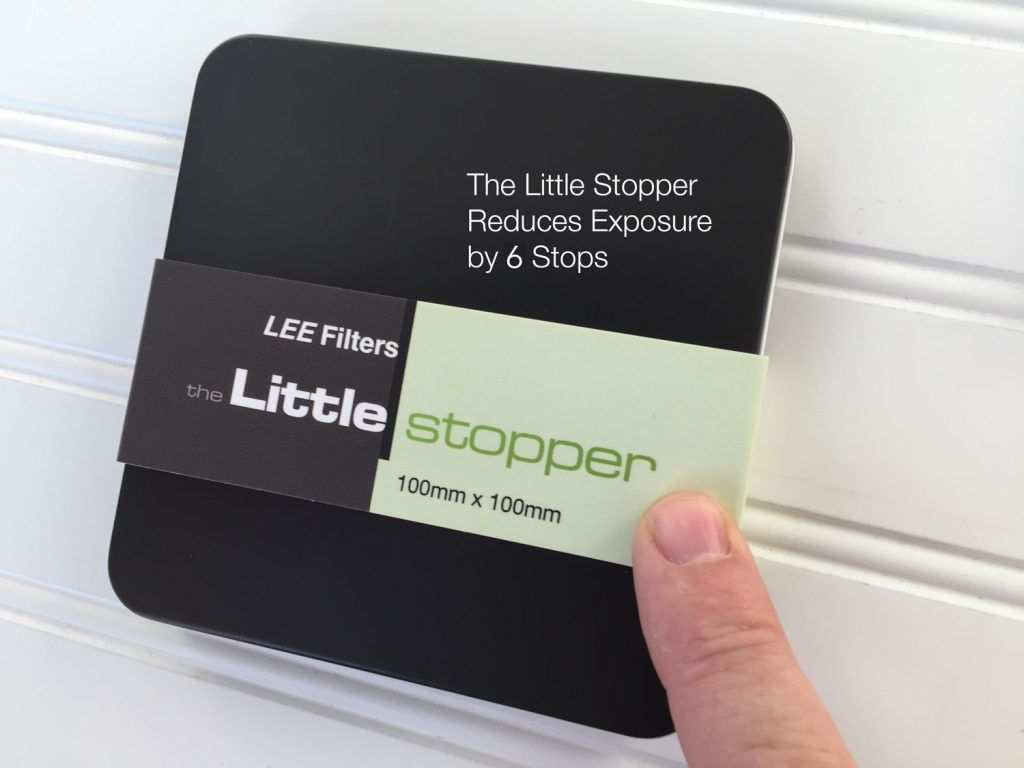
Photo by Kent DuFault
What Is a Neutral Density Filter Made of?
The optical portion of the filter is glass, resin, polyester film, polycarbonate, plastic (or some combination of resin), glass, polycarbonate, or polyester film.
Is one material better than the other? Well, it depends on who you ask. I have tried a number of different manufacturers and surface materials and most produced a reasonable result. The only material that I would not recommend is straight plastic; these would be the cheapest ND filters out there.
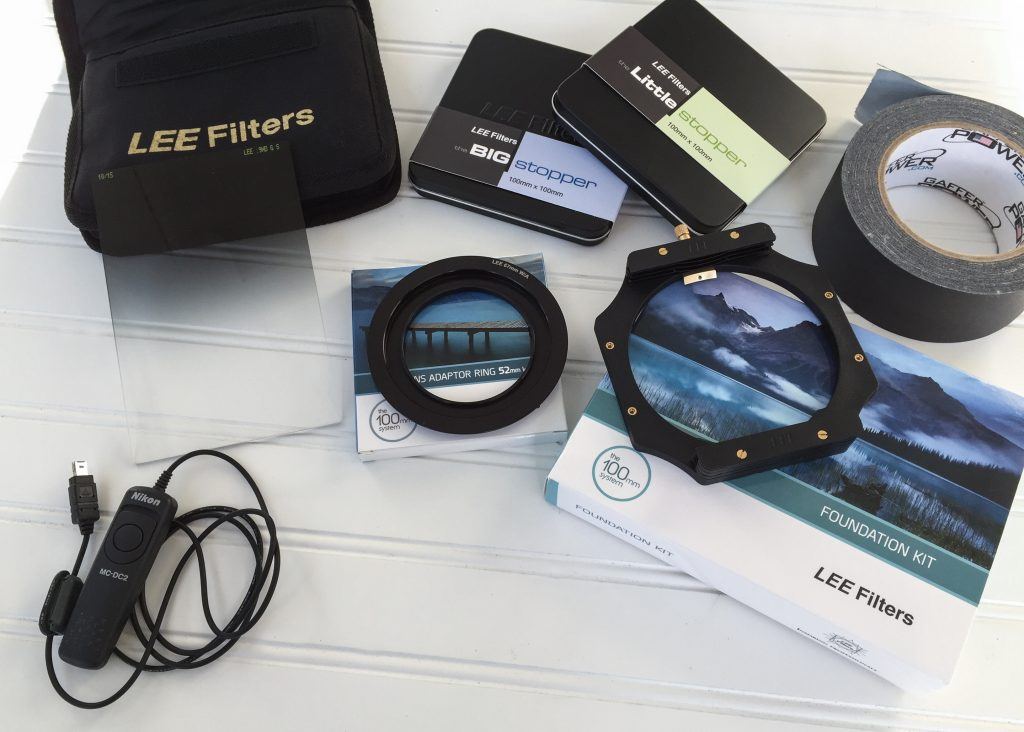
The ND filter system that I eventually chose is square and made of glass.
Key Lesson: ND filters are made of various optical materials. All can produce good results, with the exception of plastic. Avoid plastic, as it scratches easily and is prone to stronger color shifts.
What are the Different Shapes of Neutral Density Filters?
ND filters come in three shapes: circular, square, and rectangular.
The advantage of a circular filter is that no mounting system is required. You simply screw it onto the threads on the end of the lens.
One downside to circular filters is that you must purchase adapter rings to fit the diameter of the filter onto different lenses that have different diameters, or you must purchase more than one filter of the same type to fit the different diameters. It has been my experience that these adapter rings are quite prone to seizing up, and they can be difficult, or impossible, to separate once they have seized up.
One manufacturer of circular filters, Breakthrough Photography, offers a circular filter system that is held onto the lens via a magnetic holder. Just in case you like the idea of circular ND filters, you may want to check that out.
ND filters come in three shapes: circular, square, and rectangular.
ND filters also come in square or rectangular shapes. Both operate the same way. They are attached to the lens via a filter holder. These filter holders allow you to attach more than one filter, which is often necessary.
I think there are many advantages to the square and rectangular systems, which is why I chose that option with my own gear.
One of those advantages occurs when stacking filters. Circular filters will tend to vignette the image fairly easily when you begin to stack them, especially with wide-angle lenses, unless you buy a filter with a very large diameter, which can significantly raise the cost.
Another advantage to the square and rectangular filters is that you can slide the filter up and down as well as rotate it. Circular filters can only be rotated.
Key Lesson: ND filters come in circular, square, and rectangular shapes. Circular filters have a robust build quality and also have no light leak problems when stacked. However, the disadvantages of circular filters are significant, including the potential of binding threads, creating a vignette when stacked, and the inability to ‘slide’ the filter up and down as well as rotate it. Square and rectangular filters are far easier to work with when utilizing neutral density filters. However, you have the added cost of the holder and adapter rings. Plus, they are more fragile, and thus require more careful handling than when using circular ND filters.
What are the Different Mounting Systems of Neutral Density Filters
A slight disadvantage to square and rectangular ND filter systems is that you have the additional expense of the filter holder and the filter rings. The rings are used to connect the holder to the lens. You also must be aware of light leaks if you stack several filters together in a holder.

Photo by Kent DuFault
In this image, you can see how easy it is to stack several ND filters together when using the square or rectangular systems. This filter holder can hold three filters. Sliding the filters in and out of the holder is much easier than screwing and unscrewing circular filters.

Circular filters can also be stacked. They have a male thread on one side and a female thread on the other side. However, these threaded filters can also be prone to binding up when connected, and when using ND filters there is some necessary maneuvering, which, quite frankly, is a lot easier with the square or rectangular systems than the circular systems. You will often find yourself putting a filter on and then needing to take it back off, before putting it back on once again. This is far easier when you’re simply sliding it into a holder versus screwing it on and off.

Photo by Kent DuFault
In this image, you can see the filter holder for the Lee filter system. This is what I use for my ND filter photography. There is a ring that threads to the end of the lens. It has a very robust build quality, so it is not prone to binding. The holder has a snap mechanism to the ring. This makes it very easy to attach and detach the holder from the ring. The advantage is that, if you put a ring on each lens, you can quickly change lenses without a lot of fuss changing the holder.
What Does a Neutral Density Filter Do?
A neutral density filter has one job: it reduces exposure by a calculable amount without measurably altering the color. Let me add a caveat to that statement: A ‘good’ neutral density filter reduces exposure by a calculable amount without measurably altering the color.
Cheap neutral density filters are known for creating dramatic color shifts that are quite problematic.
If you are going to add ND filters to your kit – and I highly recommend it – then buy the best ones that you can afford. This is one of those cases where you truly get what you pay for.
Even the best ND filters may shift color slightly depending upon the lighting, but the shift will be well within tolerance for you to correct.
Key Lesson: Take your time. Research the various brands and options for neutral density filters. Purchase the best quality ND filters that you can afford. It may be tempting to purchase a cheap plastic one to ‘try it out.’ However, you won’t like the resulting images that you produce, and you will likely give up without experiencing the wonders of what this amazing tool can do for your photography! The sole purpose of an ND filter is to reduce exposure without significantly altering color.
How are Neutral Density Filters Rated?
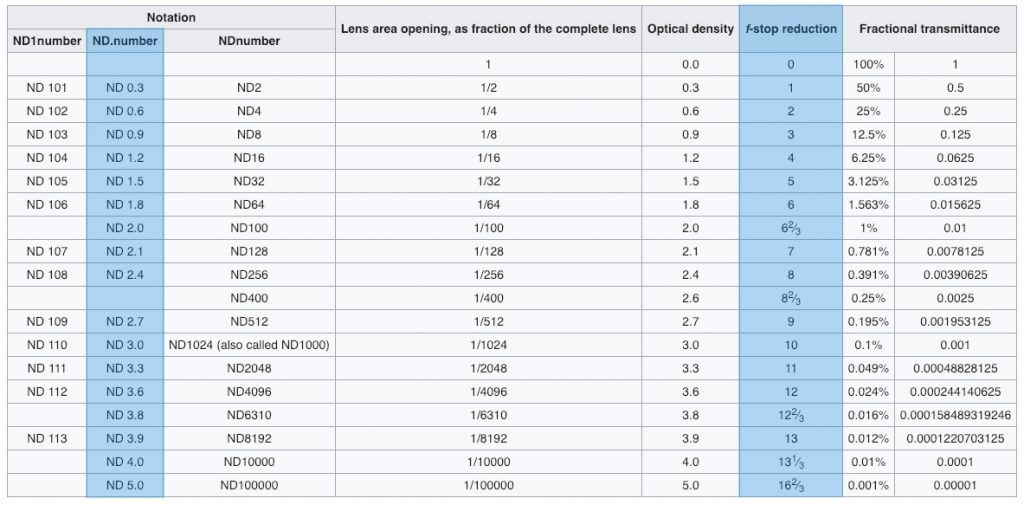
Image courtesy of Wikipedia
This is a very important point, so pay attention!
As with all things optical, there can be a gigantic amount of technical information for you to consume when purchasing ND filters. That becomes confusing very quickly.
When dealing with ND filters, there are really only two numbers that you need to be concerned with, and they are in the blue columns (above).
On the left is the optical density number and on the right is the f/stop reduction factor.
Later in the guide we will touch upon graduated ND filters. They add a third caveat that you must consider.

This image represents the tech data for three different ND filter manufacturers who are referencing their particular neutral density filter line. Composite by Kent DuFault
The featured item at the top of the product list, in the image above simply references how many ‘stops’ will be lost when this particular filter is used. In this case, you would lose 6 stops of light.
For example, if the unfiltered aperture for correct exposure were f/32, then what would be the correct aperture, after applying the filter factor, for this advertised ND filter when changing your exposure via changing the f/stop? f/32, f/22, f/16, f/11, f/8, f/5.6, or f/4.0? The new aperture, for correct exposure, would be f/4.0. That is 6 stops of additional exposure.
Key Lesson: Even though the filter exposure factor is referred to as ‘stops,’ it doesn’t necessarily have to be f/stops. The exposure adjustment could also be made through the shutter speed setting and possibly even the ISO setting, or a combination of all three.
Study the image above. You see that there are several references to the number of ‘stops’ of light that the filter will remove. This number comes from the blue column on the right of the table (see chart above).
You will also see several places where the number ‘3.0’ is used. This comes from the blue column on the left of the table.
You will also see a name called “Big Stopper.” This is simply a brand name. Some manufacturers use brand names to help consumers understand what the filter will do. The Big Stopper reduces light into the camera by 10 stops. What is the optical density number of the Big Stopper? The number is 3.0.
Lee also has a filter named the “Little Stopper.” The optical density number for the Little Stopper is 1.8. By how many stops of light will it reduce the exposure?
Key Lesson: When dealing with neutral density filters, it is important to understand what the optical density number of a particular filter is, and also how many stops of light will be reduced with that filter.
What is a Graduated Neutral Density Filter and How Do They Differ?
In this image, you can see some of the tools that we’ve already discussed. But what is that filter on the left? I’m talking about the filter that is dark at the top and clear at the bottom. That is a graduated neutral density filter. Photo by Kent DuFault
Where an ND filter reduces the exposure across the entire frame, a graduated ND filter only reduces the exposure by a given number of stops in a ‘portion’ of the frame.
This is very important to understand. When you use an ND filter, you adjust the exposure accordingly to maintain a proper exposure.
When you use a graduated ND filter, you do not adjust the exposure!
When you use an ND filter, you adjust the exposure accordingly to maintain a proper exposure. When you use a graduated ND filter, you do not adjust the exposure!
Here’s why:
The graduated ND filter has one purpose. That purpose is to balance out the exposure when the contrast of the scene is too great for the camera to record.
For example, you want to photograph a sunset and keep some detail in the foreground. The light levels, and thus the exposure, are significantly different from the sky to the foreground. By inserting the graduated ND filter so that it only covers the sky portion of the frame, the filter reduces the exposure of the sky by the number of stops that it is rated for, thus bringing the exposure for the foreground and the sky into a contrast tolerance that the camera can more accurately record.
Key Lesson: When using an ND filter and a graduated ND filter together, place the graduated ND filter into position and then carefully place the ND filter into position afterwards. ND filters are very dense; once they are in place, you may not be able to see through the viewfinder of your camera at all. Get your exposure setting first, and set it using Manual Mode. Manually focus the lens. Then place the graduated ND filter (if you’re using one). Next, place the ND filter onto the lens. Finally, adjust the exposure for the number of stops lost from the ND filter (do not add in the graduated ND filter factor, if you are using one).
The additional ‘element’ that comes into the equation when using a graduated ND filter is the transition. This is an indication of how quickly the filter transcends from the full ND effect to the full clear non-ND effect.
Now, I used the word ‘element’ rather loosely in the previous paragraph. The manufacturers actually label the transitions with three different words:
- Soft – The transition occurs over a large area of the filter
- Medium – The transition occurs more quickly than the soft, but slower than the hard
- Hard – The transition occurs very quickly
Key Lesson: When starting out, it’s a good idea to include both an ND filter and a graduated ND filter in your kit at the same time. My recommendation for your first graduated ND filter would be a .9 (3 stop) reduction in a soft transition.
Recommended Reading: If you’d like a comprehensive guide on using ND filters and producing gorgeous long exposures, grab a copy of Photzy’s premium guide: The Complete Guide to Long Exposure Photography.
What Does a Neutral Density Filter Do to Your Exposure?
The ND filter reduces the amount of light passing through it and thus into the camera. It does this by a measurable amount, which is the filter factor or number of stops.
By reducing the amount of light, it forces you to increase the exposure.
Why would you want to do this?
There are two main reasons:
- It allows you to create motion blur in bright daylight hours. This is referred to as the long exposure effect.
- It allows you to gain shallow depth of field, by opening up the aperture, in brighter light without having to alter the shutter speed or the ISO setting.
What is the Single Best Neutral Density Filter to Have in Your Camera Bag?
- General Landscape Photography: 1.8 (6 stop) reduction ND filter
- Depth of Field Reduction: .9 (3 stop) reduction ND filter
- Extreme Long Exposure Photography: 3.0 (10 stop) reduction ND filter
- 1.8 + .9 = a 9-stop reduction
- 1.8 + 3.0 = a 16-stop reduction
- .9 + 3.0 = a 13-stop reduction
- .9 + 3.0 + 1.8 graduated = a 13-stop reduction!
What Special Effects Can You Achieve With a Neutral Density Filter?

The most well-known effect for neutral density filters is capturing motion in water and clouds, while retaining sharp details in other areas of the photograph, while shooting under bright light.

You can also use an ND filter to reduce exposure in a quantified manner when trying to achieve special effects. For example, in the image above, let’s say you want a wide aperture, a low ISO setting, and a blurred exposure effect; however, there is too much light. The solution: attach the appropriate ND filter.

Finally, let’s say you wish to combine a minimal depth of field along with motion blur, and your ISO is already at its lowest setting. The solution: attach an appropriate neutral density filter.
What Problems Can Occur When Using a Neutral Density Filter?

Photo by Kent DuFault
There are three primary concerns when using neutral density filters.
The first is color shifting from long exposures. Some color shifting will generally occur. Compensate for this by purchasing the best ND filter that you can afford. This will minimize color shifts.
Secondly, shoot using the camera RAW format. This will allow you complete control to adjust white balance and color in post-production.
The third concern is light leaks.
The extended exposures that come with the use of neutral density filters can create light leaks that can ruin an image.

Photo by Kent DuFault
A likely place for a light leak to occur is through the viewfinder. Some cameras allow you to close a shutter inside the viewfinder, which is a very nice enhancement. In lieu of that, as in this image, you can use a piece of opaque tape to cover the viewfinder eyepiece. I like to use black gaffer’s tape, which is available on Amazon and in many camera stores.

Photo by Kent DuFault
The second place that light leaks are likely to occur, especially when using the square or rectangular ND filters, is at the filter holder. This is especially true if you’re stacking multiple filters. Again, use opaque tape and lightly tack it in a U shape around the upper part of the filter stack. You don’t have to worry about the side facing the ground. Again, I like to use black gaffer’s tape. You don’t need to press it on hard; just lightly tack it to the setup. Circular filters do not have light leak issues at the lens.
The final concern is lens focus. Once you’ve attached an ND filter to your lens, you won’t be able to see through the lens clearly or perhaps at all. It will simply appear black.
This means that you need to manually focus the lens first before attaching the ND filter.
However, a chronic problem can result. After you attach the filter, you end up bumping the focus ring, throwing your image out of focus.
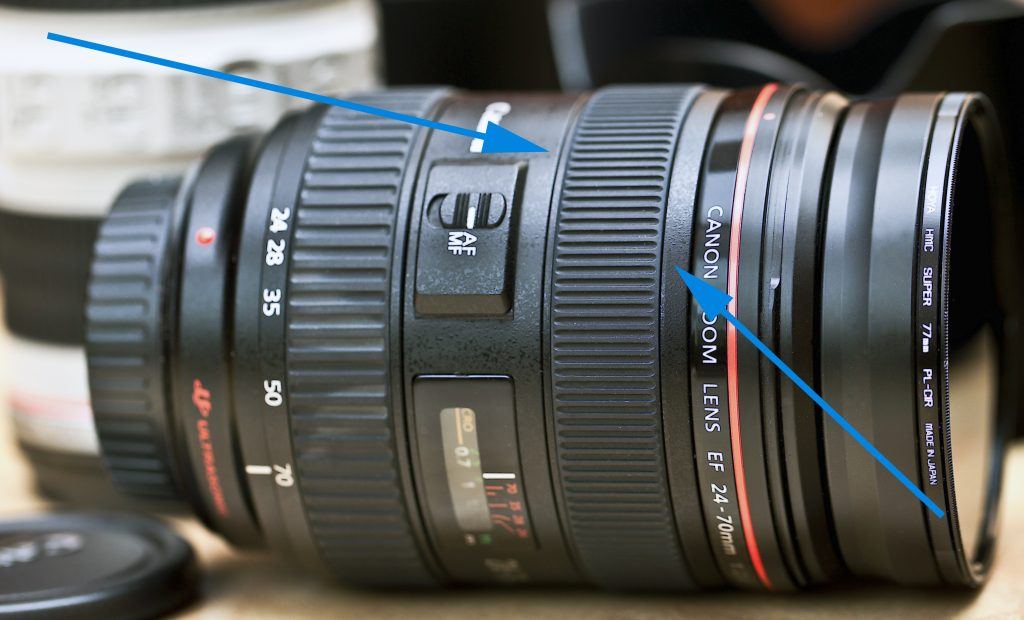
To combat this concern, go back to your opaque tape. Once you have critically focused the picture, place a piece of tape between the focusing ring and the lens barrel. This doesn’t have to be extensive or super tight. You need just enough to keep the focus ring from being accidentally bumped.
What About Variable Neutral Density Filters?
You may have heard of variable neutral density filters. By rotating two sections of the filter, the filter factor (the number of stops of light reduced) changes.
I don’t own one of these. I’ve talked to other photographers who have had problems with them. I’ve heard they tend to really throw the color off-kilter. It’s also one more variable that may get bumped off the correct setting during your shooting process.
I’m not saying that you shouldn’t consider one. However, I would definitely do my research before investing in one.
Recommended Reading: If you’d like a comprehensive guide on using ND filters and producing gorgeous long exposures, grab a copy of Photzy’s premium guide: The Complete Guide to Long Exposure Photography.
Why Not Just Use a Polarizing Filter as an Nd Filter?
You will hear some photographers suggesting this as an alternative.
To me, this isn’t a viable alternative, because the primary purpose of a neutral density filter is to reduce exposure without affecting color.
A polarizing filter will reduce exposure by approximately 3 stops. However, by its very nature, its purpose is to change colors.
My suggestion is to use the proper tool for the proper purpose!
Self-Check Quiz:
- Name two materials that the optical portion of a neutral density filter can be made of.
- What three shapes do ND filters come in?
- What is the one job that an ND filter has to do?
- What are optical density numbers?
- A 3.0 ND filter will reduce the amount of light entering the camera by how many stops?
- When making an exposure adjustment due to the use of an ND filter, which functions of the camera can be used to make the exposure adjustment?
- With what type of ND filter do you NOT make an exposure adjustment?
- What are the three types of transitions in a graduated ND filter?
- ND filters should affect exposure, but not affect ___________.
- Can an ND filter be used in the adjustment of depth of field?
- Name three problems that can occur when using neutral density filters.
- At what point in the process should you focus the lens when using an ND filter?
- Why is a polarizing filter not recommended as a ‘fill-in’ neutral density filter?


