

The Blue Hour occurs twice a day, just after sunset and just before sunrise. The light progression of sunset is the inverse of sunrise. The light during the Blue Hour provides a sense of tranquility that resonates with all of us as silhouettes and shapes drift from light to dark, or vice versa. A beginning and an end. There is something wonderful about experiencing the light during either Blue Hour.
The Blue Hour is one of my favorite times to create images, and it offers some great opportunities to explore color theory and different editing techniques.
In this guide, we’re going to cover the following:
- The types of light available during the Blue Hour
- How to use Blue Hour color
- Camera setup and optional equipment
- Processing Blue Hour images
- Experiments in processing
Recommended Reading: If you’d like to learn more and improve your landscape photography, grab a copy of Photzy’s bestselling premium guide: Complete Landscape Photography.
The Types of Light Available During the Blue Hour
The light you will typically find on a clear day during Blue Hour will be a growing or fading orange glow, possibly accompanied by some reddish hues if clouds are present. On the opposite horizon, you’ll find blue fading into purple, as the light from the sun fades into the black of night. I break down the Blue Hour into a beginning, middle, and end.
The light during the Blue Hour provides a sense of tranquility that resonates with all of us as silhouettes and shapes drift from light to dark, or vice versa.
As is often found in photography, regarding light, the most interesting light happens at the edges, when light is transitioning. Golden Hour and Blue Hour are themselves transitions, but within those times, the light is rapidly changing. I find the greatest joy in capturing an image during these smaller transitions.
The Beginning of Sunset Blue Hour (the End of Sunrise Blue Hour)
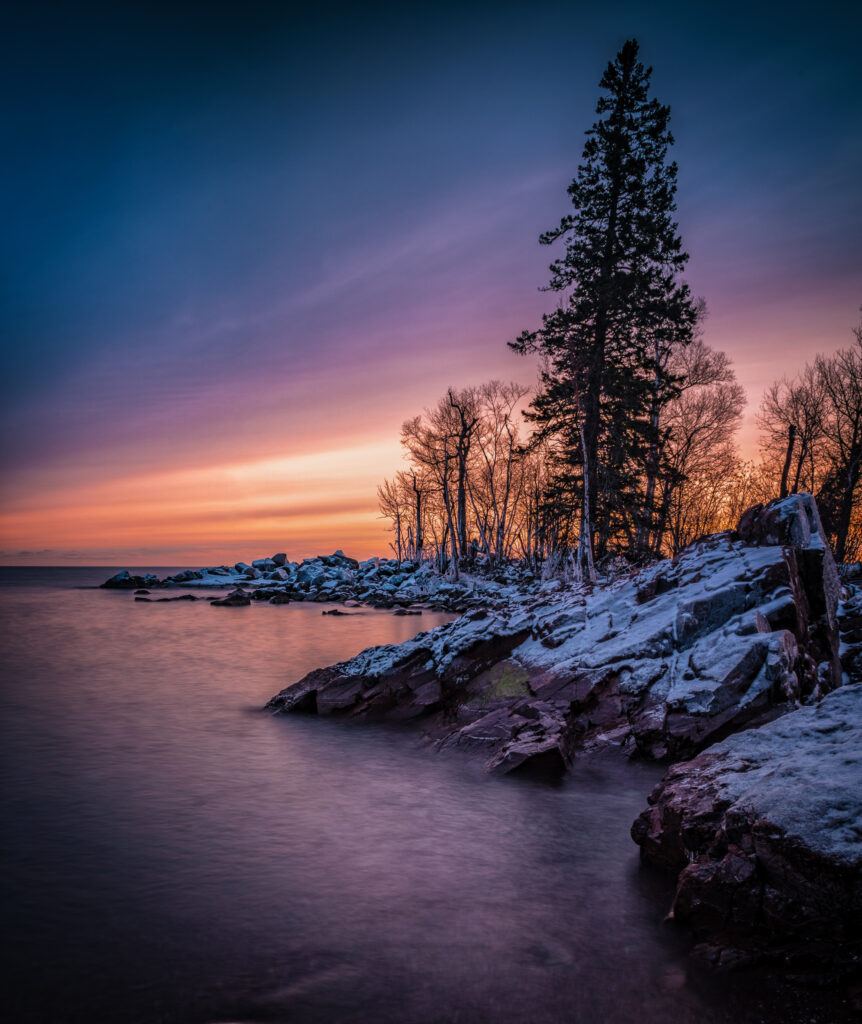
Photograph by Tomas Alvarez
In this phase, on a clear evening, the available sky color will be transitioning from blue to orange. There will also be much more ambient light.
The Middle of Sunset Blue Hour (the Middle of Sunrise Blue Hour)
In this phase, the light will be primarily blue. Most surfaces will reflect the blue tones from the sky, even the black of asphalt roads will have a tinge of blue. A star, or two, may also be visible.
The End of Sunset Blue Hour (the Beginning of Sunrise Blue Hour)
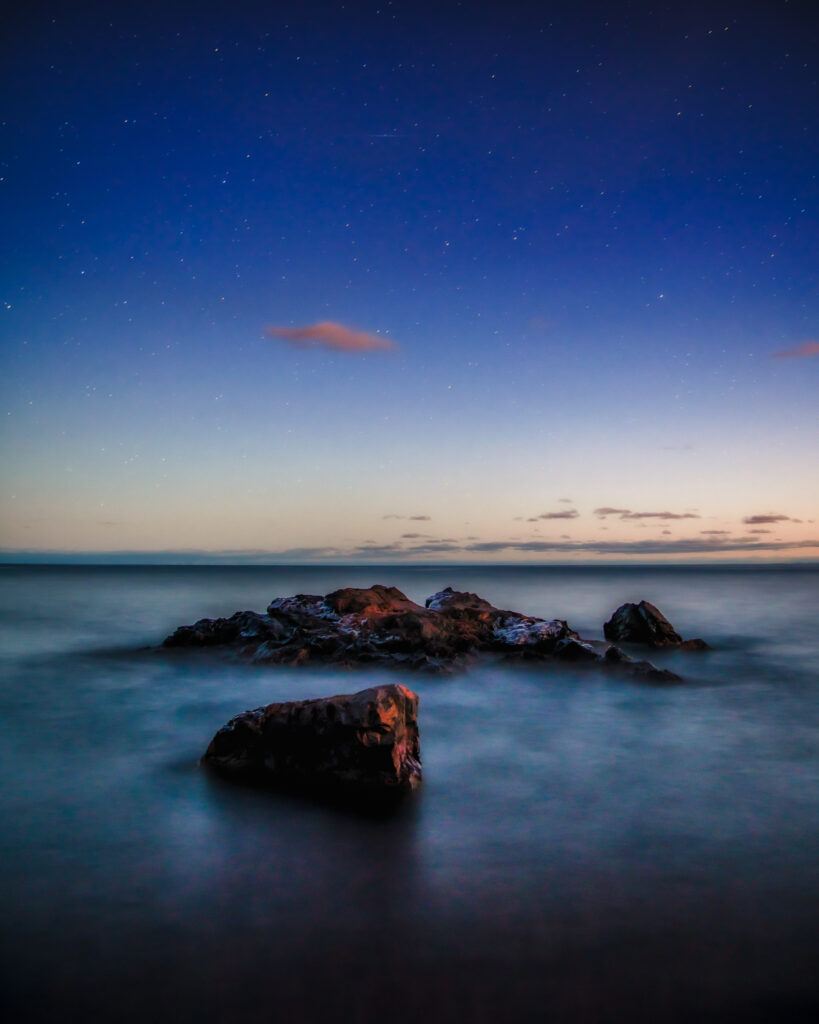
Photograph by Tomas Alvarez
Here, the light transitions from dark blue to the black of night. This is my favorite time, especially in the morning, as there are usually a lot of stars visible, and yet enough light to help you create a really ethereal image. The sun and stars in the same image are magical.
Key Lesson: The Blue Hour can be broken down into sections of time that offer different types of light and features. Sometimes, the most dramatic light appears during the transitional phases.
How to Use Blue Hour Color
Blue Hour color can be used effectively in multiple ways. However, there are a few good ways to harness it to tell stories in your images. A couple of things to look for are as follows:
- Reflective surfaces – If you are near a city or town, the Blue Hour color reflects beautifully off windows. Bodies of water also reflect the blue light with a wonderful effect.
- Outdoor lights – We’ll touch a little bit on color in a moment, but outdoor light – be it from streetlights, neon signs, or anything else that tends to be warm in tone – complements the blue sky. If you have access to a place that is well lit with the aforementioned light sources, that may be a great place to go.
Leveraging the Color Wheel
When you look at the traditional color wheel, you see colors and their complementary colors on the opposite sides of the wheel, directly across from each other. Color theory is a deep subject, and I won’t be getting into it here, except to highlight that the complementary color of blue is orange. A photograph that is primarily blue will benefit from some orange hues as accents to balance the overall image. This is why city and streetlights, which are still mostly sodium vapor, or tungsten, are great to have in your image.

Photograph by Tomas Alvarez
Key Lesson: Blue Hour images benefit from additional orange accents in the frame to help balance the overall color.
Recommended Reading: If you’d like to learn more and improve your landscape photography, grab a copy of Photzy’s bestselling premium guide: Complete Landscape Photography.
Camera Setup and Equipment
Creating images during the Blue Hour is very similar to typical low-light conditions. To compensate for less light, we either slow the shutter speed to allow more light to reach the sensor, or we increase the sensor sensitivity (ISO) – most likely a combination of both. The aperture setting you select will also require you to compensate with both shutter speed and ISO to get an even exposure. Ideally, I suggest using a slower shutter speed instead of increasing your camera’s ISO to keep noise to a minimum. But if you don’t have a stable platform available, a high ISO combined with a faster shutter speed will work.
For the darker portions of the Blue Hour, you’ll want to use a tripod for camera stability during those long exposures. If you have a remote shutter, use it; otherwise, set your camera’s self-timer for five seconds.
Ideally, I suggest using a slower shutter speed instead of increasing your camera’s ISO to keep noise to a minimum.
White balance is the primary camera setting (outside of the exposure triangle) that you’ll need to address as part of your camera setup. You can use Auto White Balance (AWB), however, your camera may have a difficult time metering the scene and determining the correct color temperature to use. Adjusting your white balance setting in terms of temperatures in Kelvin is an ideal method because it provides a level of precision. Experiment with your camera’s live view to find the best setting between 6,500K and 7,000K. If you can’t change your white balance in Kelvin, you could try the Cloudy or Sunlight settings. Adjustments to white balance can be made in post-processing as necessary.
Key Lesson: Use a tripod for the darker periods of the Blue Hour. Adjust your white balance toward blue, using your camera’s predetermined settings, or preferably in Kelvin.
Processing Blue Hour Images
Process your Blue Hour photos as you would any other of your images. As mentioned previously, you may want to adjust the white balance to find a value that best represents the conditions you experienced when you were in the field.
There are some things to watch out for as you make changes. Certain adjustments will accentuate the blue in your images, sometimes making the image overwhelmingly blue. The adjustments below will add more blue tones than you intended:
Dehaze – The algorithm used to remove haze from your images will also add blue to the edges of highlights and shadows. For Blue Hour photographs, using dehaze may add an unintended amount of blue to your image.
Vibrance – Adding saturation via the vibrance slider also tends to prioritize blue, thus adding a lot more of the color to an image.
Tone Curve – Adjustments to the tone curve, especially on the side nearest black, adds saturation to an image deepening any blues to a possibly unrealistic amount.
Luckily, fixing the resulting issues that these sliders create is easy. To reduce the amount of added blue, open the HSL panel in develop mode and click on Saturation at the top. Use the Blue slider to reduce the saturation of blue in your image. Start small and work your way down as needed.

Screenshot by Tomas Alvarez
Key Lesson: Certain photo editing modifiers will add additional blue tones to your image. Use Lightroom’s HSL panel to reduce the saturation of blue to compensate.
Experiments in Processing
Blue Hour images lend themselves to some really cool editing techniques that really make stunning finished photographs. In this section, we’re going to walk through a couple of ways to add a little drama to your images and make them stand out.
Shifting Yellow to Orange

Screenshot by Tomas Alvarez
Lightroom allows us to easily shift all of the yellow colors toward orange via the Yellow slider in the Hue section of the HSL panel. Moving the slider to the left will shift all the yellow colors to orange, and then moved to the right, the yellows shift toward green.
When you are editing your Blue Hour images, try adding some additional orange to the image to offset the blue. Don’t overdo it, but you should see a noticeable difference.
Crush the Blacks

Screenshot by Tomas Alvarez
Chances are, you’ve seen an image that has a matte, or flat, look on social media. That look is created by using the Tone Curve and lifting the dark end of the curve above absolute black, making dark gray the darkest possible value in the image. This has a way of softening the image in shadows and dark areas. As with the shifting of color, a little can go a long way.

Photograph by Tomas Alvarez
Try one, or both, of these techniques when you are editing your Blue Hour photos. You’ll see they add some pizzazz immediately. You may find these techniques will add a bit of added drama to your other photos, too.
Key Lesson: Experiment with some different techniques to see if you can add more color drama to your images.
Recommended Reading: If you’d like to learn more and improve your landscape photography, grab a copy of Photzy’s bestselling premium guide: Complete Landscape Photography.
Final Thoughts

Photograph by Tomas Alvarez
The Blue Hour is a fantastic time to create some interesting images. It’s also a nice reprieve if you’ve arrived late to your location for a sunset shot – there’s still time to create a good image. The Blue Hour offers a different perspective, in terms of color, of the subjects you may regularly photograph, and leaves a lot of room for creative experimentation.
The Blue Hour is arguably my favorite time to create images. I hope you find as much enjoyment in it as I do.
Self-Check Quiz:
- When does the Blue Hour occur?
- What properties of subjects may make for good Blue Hour photographs?
- What is blue’s complementary color as seen on a color wheel?
- If you can’t adjust your white balance in Kelvin, what common white balances should you try?
- Name a Lightroom Develop Module adjustment that may add more, unintended, blue tones to your image?
- If you wanted to add more orange to your image, what is a way to do that?


