


Hidden inside Photoshop is a very powerful tool: the Liquify Filter. The tool was designed primarily for portrait photographers, but it is useful for any photographer who pushes the boundaries of reality in their post-processing.
Liquify is one of Photoshop’s distortion filters. It’s a surprisingly flexible tool. If you’ve never used it, you might be puzzled as to what it is and why you might want to use it. In this guide, we’ll explore the tools included in the Liquify Filter workspace. I’ll show you how to use the tools to retouch portraits and for artistic effect.
What we’ll cover:
- What is the Liquify Filter?
- Tour of the Liquify Filter workspace
- Liquify Filter for portrait retouching
- Liquify Filter for creative post-processing
Recommended Reading: If you’re interested in improving your post-processing workflow, check out Photzy’s Understanding Masking premium guide. It has sections on Lightroom and Photoshop, as well as Snapseed for mobile users, too.
What Is the Liquify Filter?
The Liquify Filter makes the pixels in your image malleable; it makes them fluid or liquid. You can soften or smooth, melt or twist elements in your image. You can expand or contract, plump or tuck. The Liquify Filter lets you alter reality. Your changes may be slight and almost unnoticeable, or you can go for a full surrealist look.
That’s a description of what the tool does, but the reason to use the tool may not be immediately obvious from the tool’s name. “Liquify” isn’t as descriptive as “Blur” or “Denoise.”
The Liquify Filter lets you alter reality. Your changes may be slight and almost unnoticeable, or you can go for a full surrealist look

I used the Forward Warp, Pucker, and Bloat tools in the Liquify Filter to bend and twist the straight lines in this leaf. Photograph by Jenn Mishra
Portrait photographers use the Liquify Filter to subtly change facial features or remove a few pounds. Creative photographers use the Liquify Filter to shape or bend objects. With the Liquify Tool, you can exaggerate a curve or create one from a straight line. This tool has practical applications in portrait photography, but it also allows you to explore the wildest limits of your imitation.
If you want to shape pixels, this is your tool.
The Liquify Filter is not just one tool. It’s a workspace within Photoshop. Let’s start with a quick overview of the tools and layout of the Liquify Filter workspace.
A Quick Tour of the Liquify Filter
Open the Liquify Filter workspace by selecting Filter > Liquify (Shift-Ctrl or ⌘X)
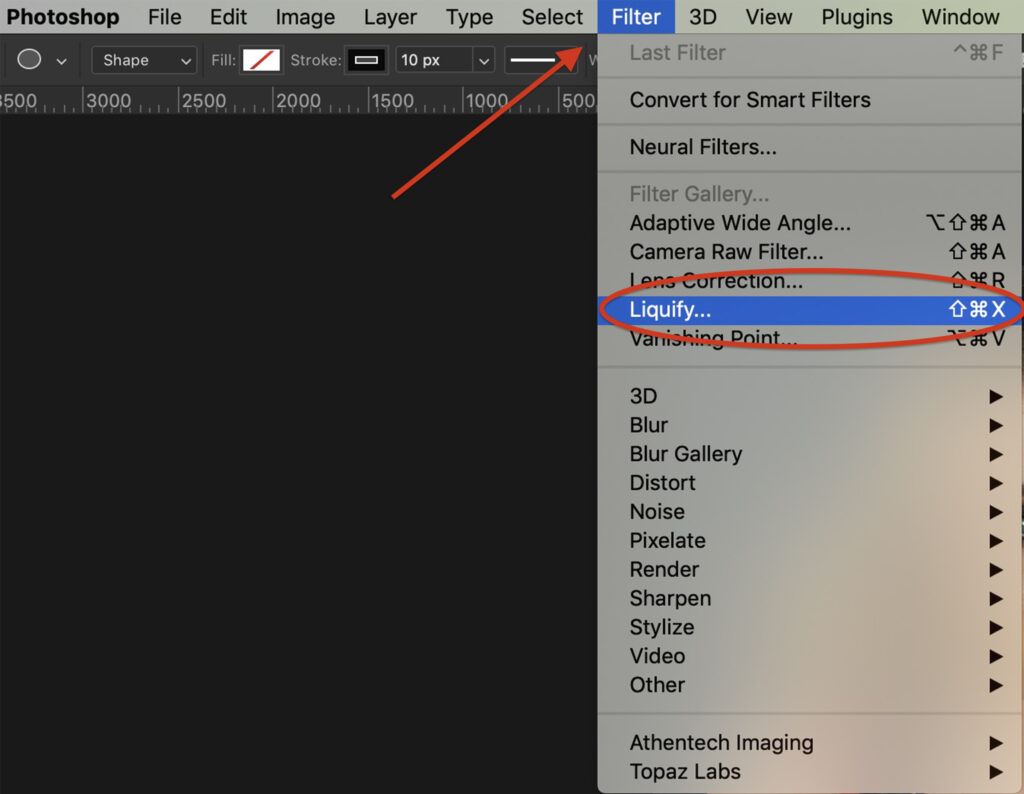
Screenshot showing how to open the Liquify Filter workspace in Photoshop. Photograph by Jenn Mishra
In the Liquify Filter workspace, your selected image appears in the center. There is a set of tool icons on the left and a column labeled “Properties” with six drop-down menus on the right.
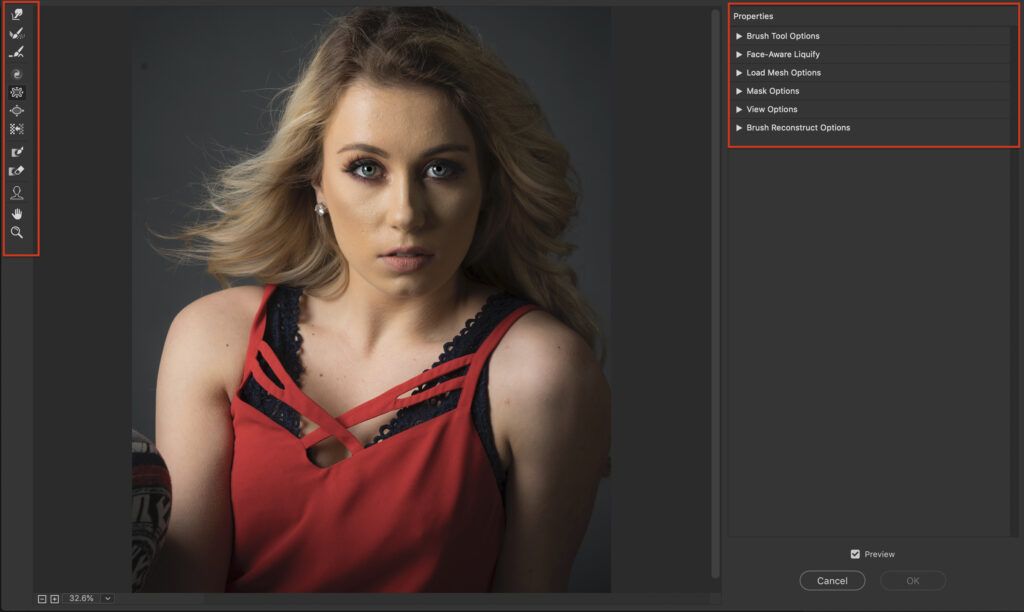
Screenshot showing the Liquify Filter workspace in Photoshop. Photograph by Jenn Mishra
Liquify Filter Tools
There are 12 icons along the left side of the workspace. I’ll define each tool here and later I’ll show you how to use them. The hotkey used to activate each tool is in brackets.
The 12 Liquify tools in order from top to bottom are:
Forward Warp [W]. The tool looks like a finger pressing on a corner. This tool allows you to nudge pixels by clicking and dragging.
Reconstruct [R]. The tool looks like a paintbrush in motion. This tool selectively erases modifications that you’ve made with Liquify tools by painting over an area.
Smooth [E]. The tool looks like a paintbrush smoothing a bumpy surface. This tool smooths edges and wrinkles.
Twirl [T]. The tool looks like a spiral. This tool twists pixels in a clockwise direction. Holding the Option [or ALT] key will twist pixels in a counterclockwise direction.
Pucker [S]. The tool looks like a square with the sides collapsed in. This tool pulls pixels to the center of the brush. It makes the center area smaller. The Option or Alt key will toggle back and forth between the Pucker and Bloat tools.
Bloat [B]. The tool looks like an oval or a circle with the sides pulled out. This tool moves pixels away from the center of the brush. It makes the center area larger. The Option or Alt key will toggle back and forth between the Pucker and Bloat tools.
Push Left [O]. The tool looks like three vertical stripes with an arrow in the center. This tool warps pixels to the left as you drag. Holding the Option [or ALT] key will drag pixels to the right.
Freeze Mask [F]. The tool looks like a rectangle with a paintbrush in the center. This tool creates an area that will not be affected by the Liquify tools. A red mask will appear as you paint on your image.
Thaw Mask [D]. The tool looks like a rectangle with an eraser in the center. This tool selectively removes a Freeze Mask from your image. The red Freeze Mask will disappear as you paint with the Thaw Mask.
Face Select [A]. The tool looks like an outline of a person’s face and shoulders. This tool selects faces in your image. As you hover over facial features, warp tools appear allowing you to change the feature’s shape.
Move Image [H]. The tool looks like a hand waving. The Hand tool moves your image around the workspace. This is especially helpful when you’ve zoomed in.
Zoom [Z]. The tool looks like a magnifying glass. This tool magnifies your image allowing you to work on the finer detail. Holding the Option [or ALT] key will zoom out.
Properties Column
The right-hand column labeled “Properties” includes six drop-down menus.
Brush Tool Options
There are four sliders: Size, Density, Pressure, and Rate. Brush size and density are controlled from this menu. The bracket shortcut keys for changing brush size also work within the Liquify Filter workspace:
[ decreases the brush size
] increases the brush size
Pressure and Rate become important when using the Liquify tools. When you hold your brush over an area, the tool will continue to work. How fast and how pressure-sensitive your stylus is (if you are using one) is controlled here.
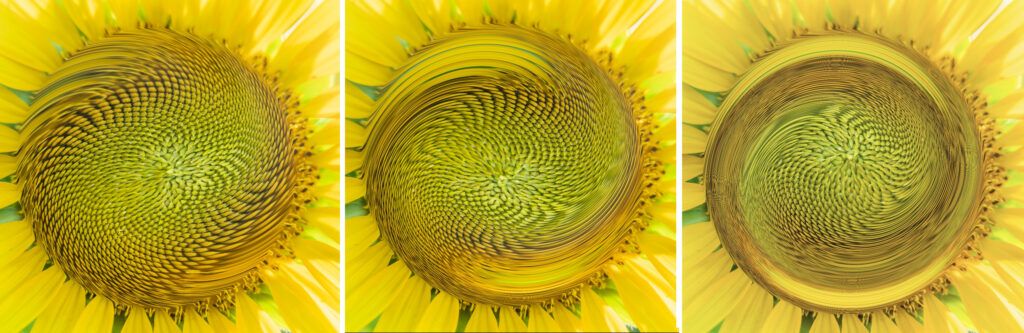
Holding the Twirl tool at the center of the sunflower for 5, 10, and 20 seconds at a rate of 80. Photograph by Jenn Mishra
For instance, a quick click with the Twirl tool won’t give you much effect. But if you click and hold, the pixels begin to spin. The longer you hold, the more of an effect you will see.
You can hold and swipe to move the effect around.
Face-Aware Liquify
This is the workspace used by most portrait photographers. It is the Face Select tool, but sliders allow for finer adjustments of facial features. We’ll go through the sliders in more detail in the next section.
Load Mesh Options
Adjustments to facial features are saved as meshes. This saves portrait photographers a great deal of time when they are editing multiple images of the same person. Save Mesh (Ctrl or ⌘S) saves your settings to a separate .msh file. Name your mesh and choose where you would like to save it. Load Mesh to apply settings to a new image.
Screenshot of Properties menus showing selections under the tabs Load Mesh Options, Mask Options, View Options, and Brush Reconstruct Options. Photograph by Jenn Mishra
Mask Options
The Mask Options tab in Properties controls masks. The Freeze Mask and Thaw Mask tools allow you to select the parts of your image that will be affected by the Liquify tools. In the Mask Options tab, you can delete an entire mask by selecting None. If you want to mask all but a small area of the image, click Mask All and use the Thaw tool to unmask the area you want to change.
View Options
The various checkboxes under this tab allow you to select what you see. You can turn on guides, change the color of your mask, or overlay before and after adjustments.
Brush Reconstruct Options
Controls the Reconstruct tool. You have the option to restore the image to its original state or you can backtrack in increments by clicking the Reconstruct button.
Now that you have an overview of the tools in the Liquify Filter workspace, let’s use them to edit a photo. Since the Liquify Filter is popular in retouching portraits, let’s start with the tools that alter facial features.
Recommended Reading: If you’re interested in improving your post-processing workflow, check out Photzy’s Understanding Masking premium guide. It has sections on Lightroom and Photoshop, as well as Snapseed for mobile users, too.
Liquify Filter for Portrait Re-Touching
Many of the tools included in the Liquify Filter workspace are designed to be used in post-processing portraits. Both the Face Select tool in the left-hand column and the Face-Aware Liquify tab in the Properties column allows you to adjust facial features. Both have similar options, but the interface is different. Let’s start with the Face Select tool in the left column.
Face Select Tool
When you select the tool, Photoshop will automatically find any faces in your image. At first, you will only see a thin bracket around each face. This simply indicates that Photoshop has identified this shape in your image as a face.
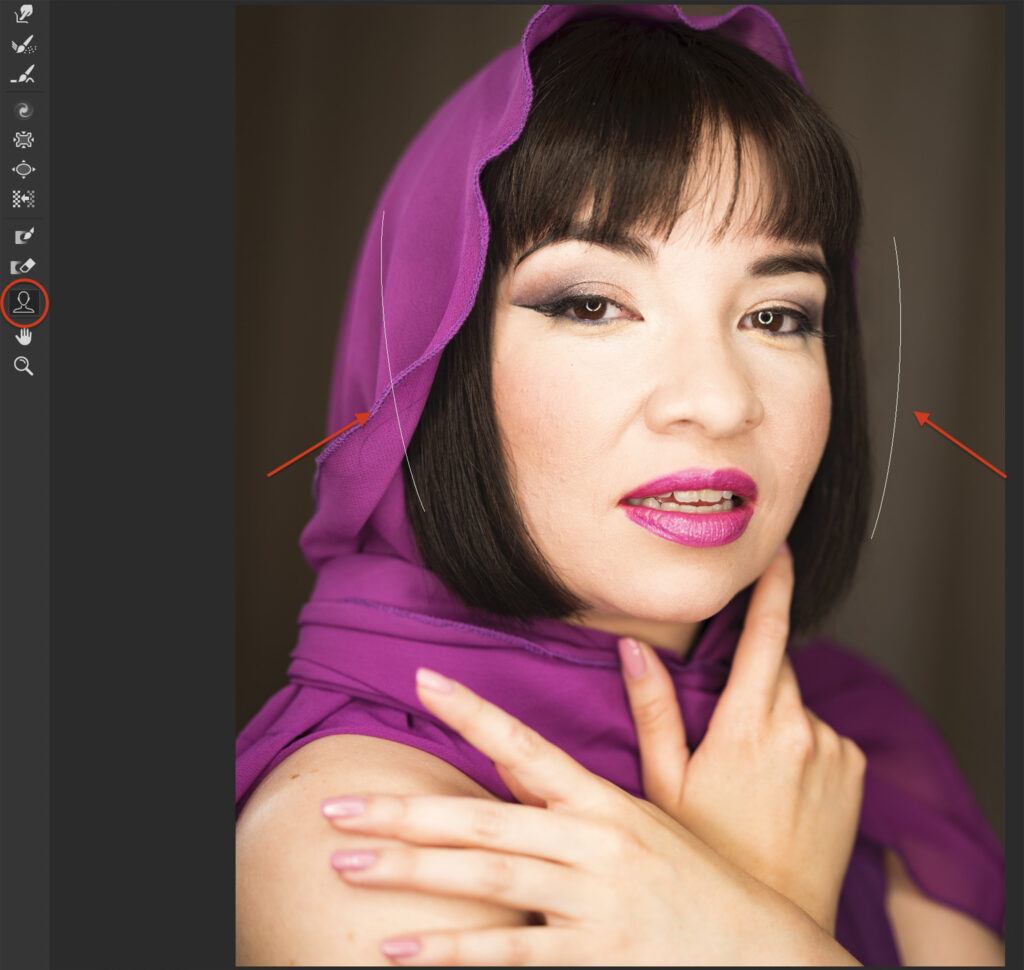
Screenshot showing brackets created when Photoshop finds a face using the Face Select tool. Photograph by Jenn Mishra
When you hover your cursor over the facial features, additional options appear. You can change the features by grabbing one of the handles and dragging it. To show you how this works, I’m going to Zoom in on one of the model’s eyes using the Zoom tool and use the Move Image tool to center it.
Many of the tools included in the Liquify Filter workspace are designed to be used in post-processing portraits.
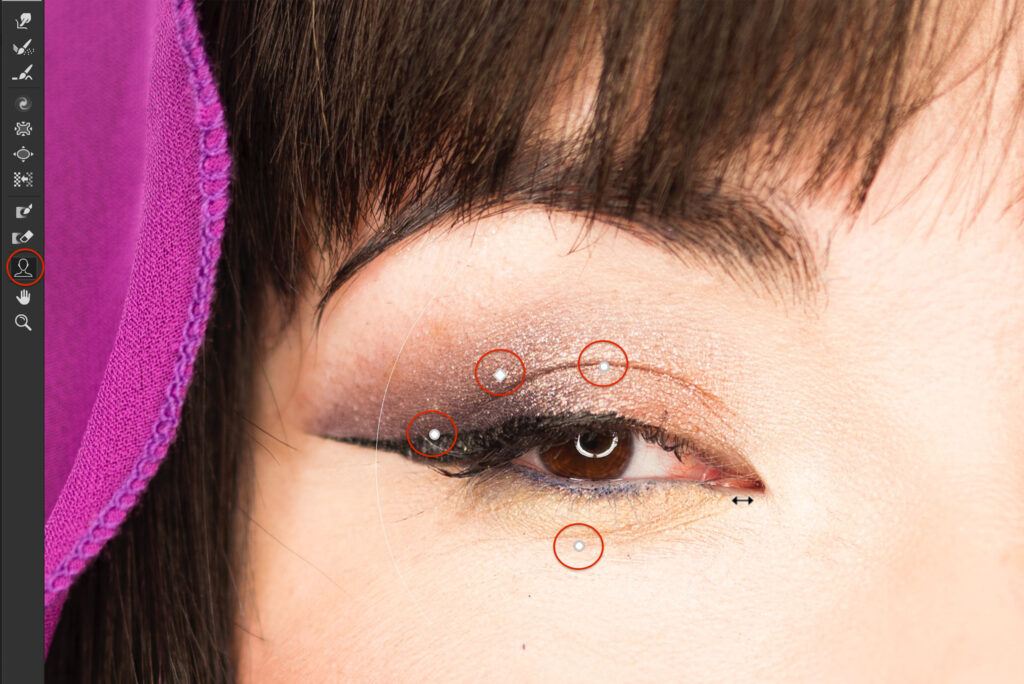
Screenshot of eye magnified showing warp handles. Photograph by Jenn Mishra
When I click the Face Select tool and hover my cursor over her eye, four handles appear. There are three circles and a diamond. Each handle controls a different dimension of the eye. When you click on the handle and drag (some handles drag left and right, others drag up and down), the feature becomes larger or smaller or shifts position.
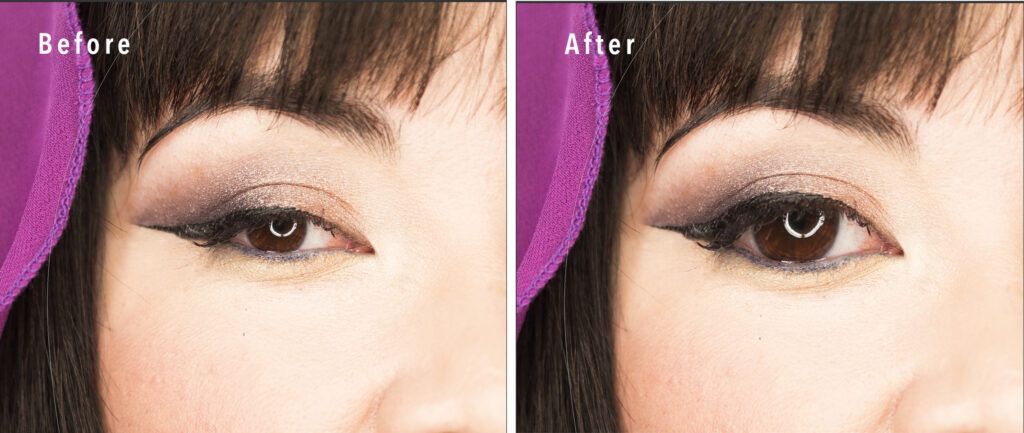
Before and after images of the model’s eye. The four dimensions controlling the shape of the eye enlarged to their maximum settings. Photograph by Jenn Mishra
I’ve exaggerated the adjustments for demonstration. Your adjustments will likely be more subtle.
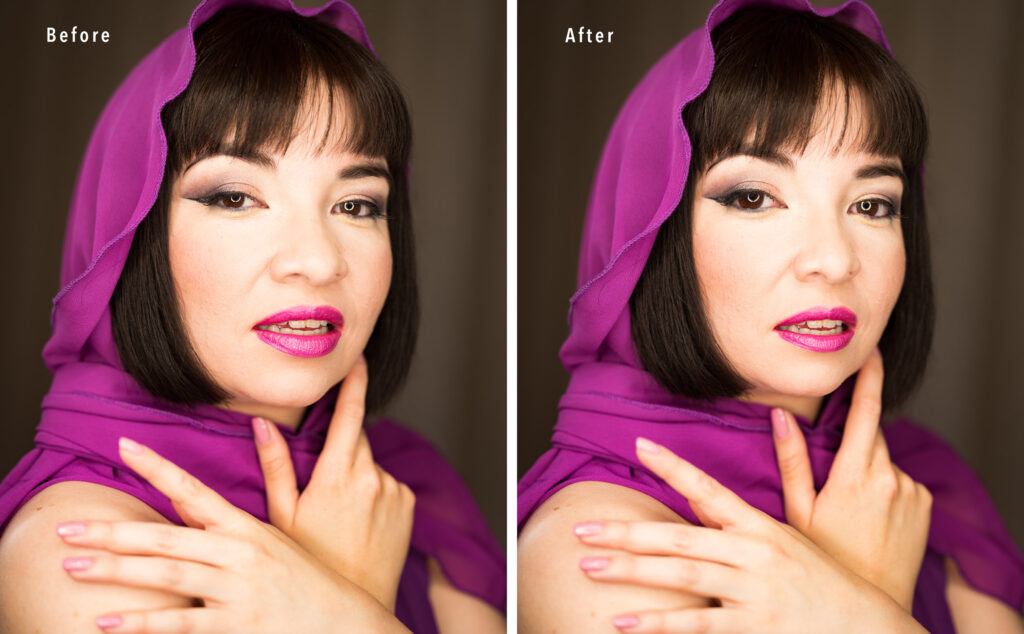
Before and after images showing facial features adjusted using the Face Select tool. Photograph by Jenn Mishra
Similarly, I can shape the model’s nose, mouth, and overall face shape. I’ve widened the model’s eyes, altered her overall face shape, and made her lips and nose slightly smaller. I’ve exaggerated to make the changes more noticeable.
The Face Select tool lets you adjust the most common facial features by clicking on the feature and dragging. The Liquify Filter workspace includes another interface that uses sliders for more precise editing.
Face-Aware Liquify
The Face-Aware Liquify tab in the Properties column is the same as the Face-Aware Select tool found in the left-hand column. The interface is different from the Face-Select tool, but the options are the same. This tool allows you to adjust facial features in a more refined manner using the sliders or entering a value. The default is 0. The sliders move from -100 to 100 for full effect.

Screenshot of Face-Aware tab under Properties on the right-hand side of the Liquify Filter workspace. The sliders show adjustments made to the model in the next image. Photograph by Jenn Mishra
Eyes can be adjusted individually for height, width, tilt, and overall distance. You can adjust nose and mouth height and width. You can add a smile (or a frown) and individually adjust the size of the upper and lower lips. You can adjust the overall face shape including the height of the forehead and the width of the jawline.
Before and after images showing facial features adjusted using the Face-Aware Liquify tool. Photograph by Jenn Mishra
The first change I made in post-processing this portrait was to add a smile. For demonstration purposes, I also changed the shape of the model’s face and made adjustments to her eyes, nose, and mouth.
Both the Face-Select and the Face-Aware tools control the most common facial features. But there are other adjustments you may wish to make that are specific to the person you are photographing. Other tools in the Liquify Filter workspace allow you this flexibility.
Liquify Filter Tools
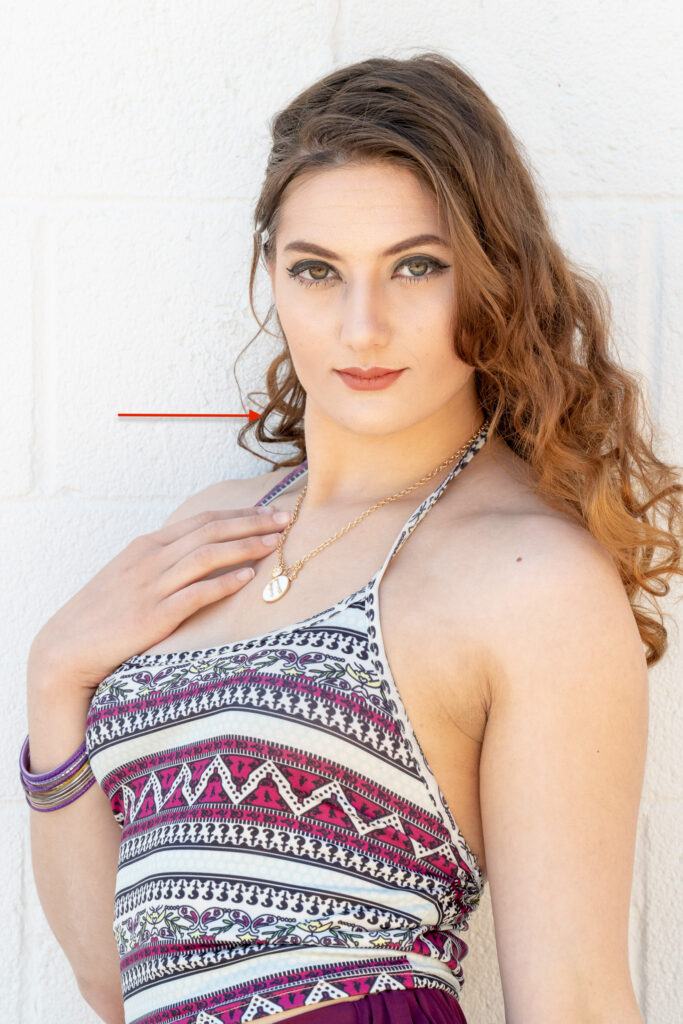
Portrait highlighting bulge in model’s neck. The Liquify Filter tool will help me fix this. Photograph by Jenn Mishra
Because of the way this model is standing, she has a slight bulge on her neck. I find this bulge unattractive. With the Liquify Filter tools, I can straighten out the bulge. I also want to slightly reduce the width of her arm to go with the slimmed-down version of her face.
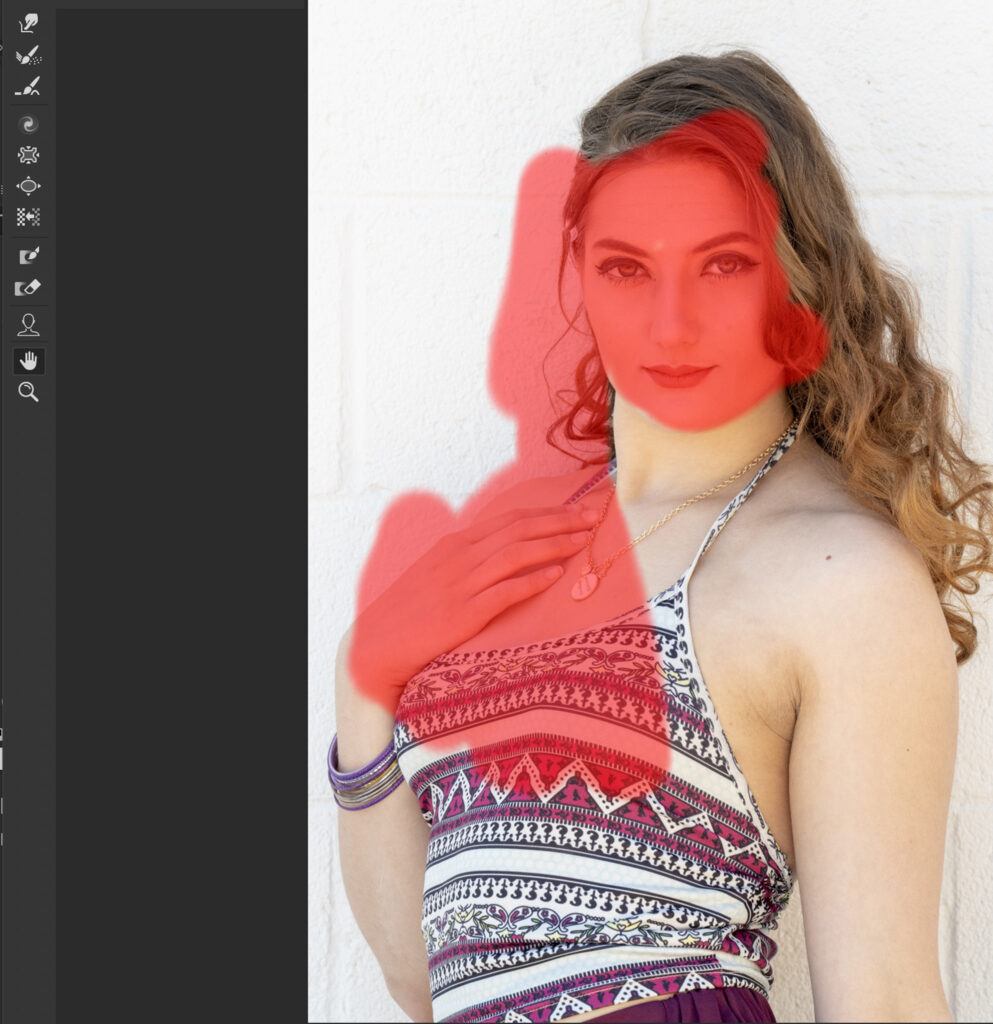
Screenshot showing Freeze Mask in red around the bulge on the model’s neck that will be adjusted. Photograph by Jenn Mishra
First, I’ll add a Freeze Mask to her face, hand, and hair to keep these elements from changing. The mask doesn’t need to cover the entire image, only the area where I’ll be working. Then, I’ll use the Forward Warp Tool to push the pixels of her neck into a straight line. I use small, gentle pushes rather than one big push to make the change look natural.
Don’t overdo adjustments. Work towards a natural look. Think about natural body anatomy and stay true to the body’s natural curves. Remember, you can always use the Reconstruct tool to undo changes you have made.
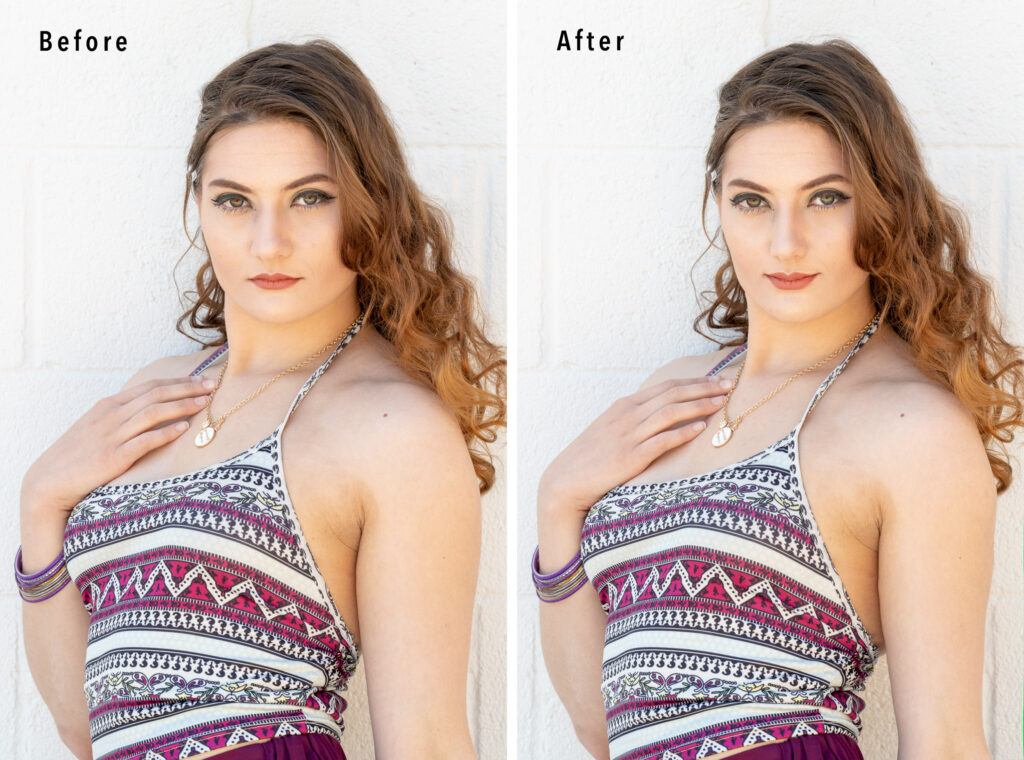
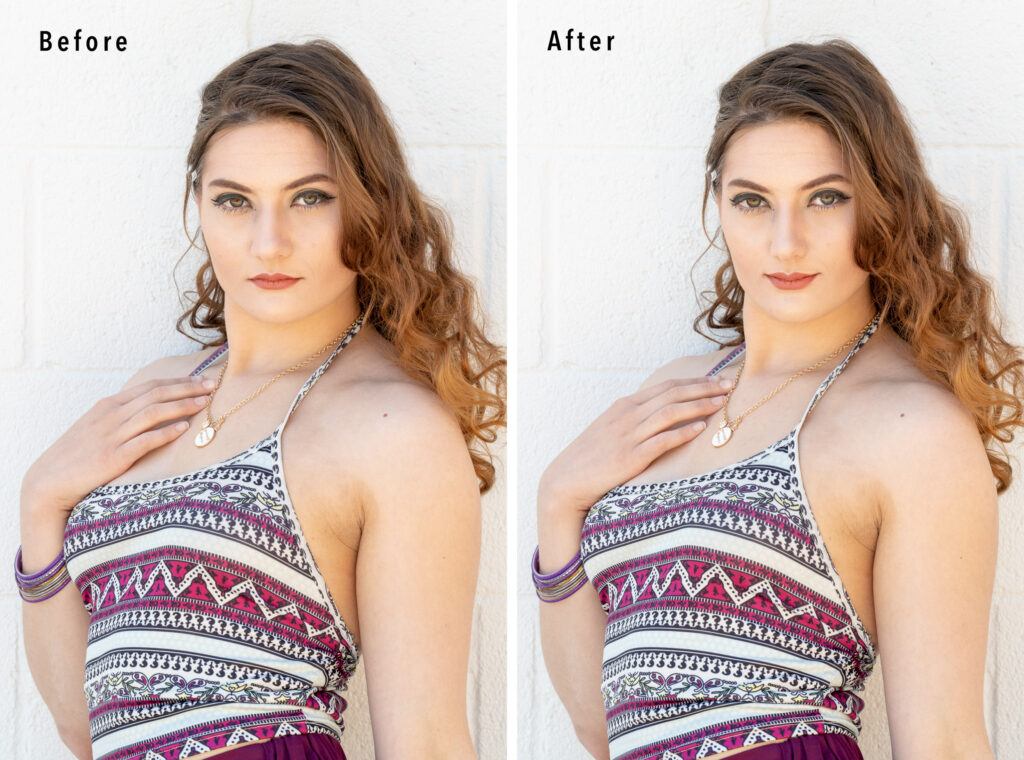
Before and after images showing facial features adjusted using the Face-Aware tool, removal of the neck bulge, and slimmed arm using the Forward Warp tool. Photograph by Jenn Mishra
The Face-Select and the Face-Aware tools in the Liquify Filter workspace have limits to ensure you don’t go too far with the alterations. But the other Liquify tools allow you to push a portrait into a caricature. Rather than do that, I’m going to move away from portraiture to demonstrate the remaining tools in the Liquify Filter workspace.
Liquify Filter for Creative Post-Processing
Portrait photographers generally lay claim to the Liquify Filter, but photographers working with creatively altered reality may also find the tools useful. The Liquify filter tools allow you to push the bounds of reality. Think Dali or Van Gogh.
Bloat and Pucker Tools
The Bloat and Pucker tools work in tandem. Bloat expands and Pucker contracts the center of your brush. You can select one and toggle back and forth using the Option or Alt key. While you can use these tools on a person to enlarge eyes or plump lips, you can also use them to create a waterdrop.
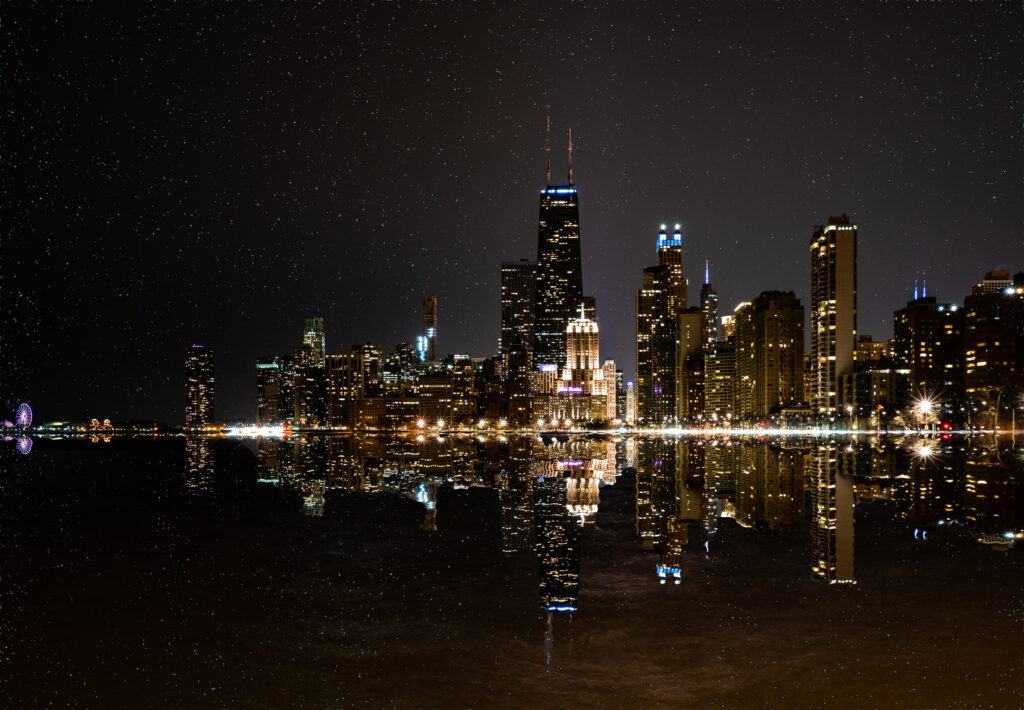
Chicago skyline at night reflected in the lake. The reflection and stars are added to the original image. Photograph by Jenn Mishra
I’m going to add a surrealist waterdrop to the reflection of Chicago’s skyline at night. I’ve already manipulated the image by creating a reflection of the city at night in the water and adding some stars.
I’ll start by magnifying the reflection of the Willis Tower with the Zoom tool. I add a Freeze Mask around the building to ensure that only one building is affected by my changes.

Screenshot showing reflection of Willis Tower elongated with the Forward Warp tool. Photograph by Jenn Mishra
With a large brush in the Forward Warp tool, I elongate the reflection down by clicking and dragging down. I can drag in a long line or only pull the pixels a little bit. I use the Forward Warp tool a couple of times until I’m happy with the general shape. If I don’t like the way my warp looks, I switch to the Reconstruct tool and erase the change.

Screenshot showing reflection of Willis Tower shaped like a waterdrop. The Pucker tool pinched in the column of water; the Bloat tool expanded the end of the waterdrop. Photograph by Jenn Mishra
To make the reflection look like a waterdrop, I need both the Pucker and the Bloat tools. I use the Bloat tool with a large brush to expand the end of the reflection. The pixels will continue to Bloat for as long as I hold the brush in place.
The Liquify filter tools allow you to push the bounds of reality. Think Dali or Van Gogh.
I switch to the Pucker tool and contract the edges of the center to create the expected waterdrop shape. The Forward Warp tool also helps me shape the center and the top of the waterdrop.
Twist Tool
The Twist tool allows you to create swirls. As shown earlier, the longer you hold the brush in place, the more the pixels will swirl around the center point. I’m not sure how I’d use this tool in a portrait, but it works well for creating textures and abstract patterns.
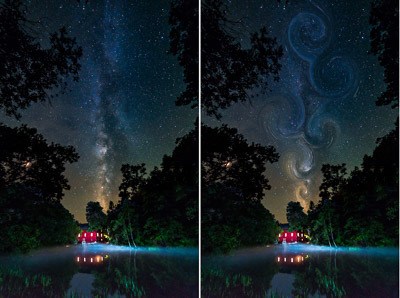
Original Milky Way image (left) and a “starry night” effect (right) created using the Twirl tool in the Liquify workspace. Photograph by Jenn Mishra
I used the Twist tool to create a “Starry Night” effect on a photograph of the Milky Way.
To create this effect, I selected the Twist tool with a large brush and held it over the area that I wanted to swirl. The tool continued to work for as long as I held it in place. Holding the Option or Alt key reverses the swirl. I can move the swirl gently while I hold to alter the shape of the swirl.
Using this tool is all about experimentation.
Recommended Reading: If you’re interested in improving your post-processing workflow, check out Photzy’s Understanding Masking premium guide. It has sections on Lightroom and Photoshop, as well as Snapseed for mobile users, too.
Summary
The Liquify filter tools allow you to twist, plump, move, elongate, and generally shape the pixels in your image. Your imagination is the only limit for how you shape the elements.

Photograph by Jenn Mishra
Many of the tools in the Liquify workspace are designed to retouch portraits. Common facial feature adjustments to eyes, nose, mouth, and face shape are built into the workspace. Other tools have limited application in portrait retouching but can be used to create an altered reality.
When using the Liquify Filter tool to retouch portraits, be subtle. It’s always better to make little changes that look natural rather than one huge change that looks artificial. Your client relies on your photographer’s eye to guide this process. Most people have one or two features that they’re not happy with. You can help them achieve the perfect version of themselves.
Self-Check Quiz:
- For what photography genre was the Liquify tool originally intended?
- Liquify is one of Photoshop’s __________ filters.
- The Liquify Filter makes the pixels in your image __________.
- How many tools are there in the Liquify workspace?
- In the Face-Aware tool, adjustments to facial features are saved as ______.
- In the Face-Aware tool, what happens if you hover your cursor over the facial features in the photo?
- What is a Freeze Mask?


