

We’ve all created blur in photos. Sadly, blur can occur more often than we want it to. Creating blur in our images is easy, but managing it, so that it looks great, is something else.
There are two main reasons for blurred photos that we can control. These have to do with focus and movement.
How much of our photos are in acceptably sharp focus is called depth of field (DOF). Outside this area, a composition is blurred. Five factors affect depth of field. These are:
- Aperture setting
- Sensor size
- Lens focal length
- Focus distance
- Distance of elements from the point of focus
How you choose to set your camera’s shutter speed affects movement. If the camera moves during the time the shutter is open, the photo will be blurred. The combination of how long the shutter is open and the amount of camera movement determines the degree of blur.
When you are photographing a moving subject, it may appear blurred if you are using a slow enough shutter speed. How much blur appears in the photo depends on how long the shutter is open and what speed the subject is moving at.

Four-second exposure with fill flash. Photograph by Kevin Landwer-Johan
Recommended Reading: Want a step-by-step guide on photography skills with your DSLR? Grab a copy of our best-selling guide: the DSLR Crash Course.
Fuzzy Vision vs. Intentional Blur
If we can’t see clearly, it often means there’s a problem with our eyes. If we take blurry photos, it can mean our camera has a problem. More often it means we have not managed the controls of our camera well. Alternatively, we have been intentional about including blur as a creative aspect of our photography.
If we can’t see clearly, it often means there’s a problem with our eyes. If we take blurry photos, it can mean our camera has a problem.
So, how is it that blurry pictures are either a mistake or an artistic expression?
Our cameras and our eyes are similar in some ways, but there are important aspects to note that is not at all similar. Two of these are how blurring occurs in photographs.
If our eyes are in good condition, we rarely see the blur. If you do, it’s time to get your eyes checked as you may need glasses. For most of my life, since I learned to read, the words in a book were crisp and clear on the page. Now they are not unless I have my glasses on.
Taken with a full-frame camera with 35mm at f/1.4. Photograph by Kevin Landwer-Johan
Previously, I never had to adjust focus on my eyes. Now my glasses assist me with this, and the words on a page or my computer monitor look sharp again.
This is different from our camera lenses. They are limited in their ability to focus and how much of an image is rendered sharp. We must control focus and depth of field when we take photographs. We don’t have to do this with our eyes.
When we see something moving, it appears sharp (in most circumstances). When we take photos of moving subjects, we must be careful with our shutter speed to capture it clearly in our picture. If we are using a slow shutter speed, whether our subject is moving or not, we must be careful that the camera does not move. If it does, the whole image is blurred.
Blur due to a shallow depth of field and blur caused by movement both have creative applications in photography. Used well, they can bring life to an otherwise dull image.
Taken with a full-frame camera with 35mm at f/1.4. Photograph by Kevin Landwer-Johan
Key Lesson: Knowing how and when to make the most of blur requires technical skill and creative vision.
Managing Depth of Field Blur
How much of your photo is in an acceptably sharp focus is called the depth of field. When you focus your lens, the point you have aimed at will appear sharp in your composition. Everything else on a plane the same distance from your camera’s sensor is also sharp. Any elements in your frame closer to or further from your camera will not be so sharp. How sharp or how blurred these things depend on a few different things. Managing these have a significant impact on your photos.
Photos with blurred backgrounds are popular because the main subject in an image is isolated from the surroundings. This compels a viewer to pay the most attention to the subject. Sometimes it’s desirable to have more rather than less of a photo in focus. Landscape images generally work better with a deep depth of field. Managing to capture as much of a landscape in sharp focus creates a photo that looks more like how we would see the scene naturally.
Taken with a full-frame camera with 50mm at f/1.4. Photograph by Kevin Landwer-Johan
Key Lesson: You don’t have to use one extreme or the other when it comes to depth of field. Finding the balance where the right amount of a composition is acceptably sharp will produce the most interesting image. Knowing how to control this requires some knowledge and a reasonable amount of practice.
What Factors Contribute to Depth of Field?
Depth of field is affected by camera and lens hardware, how you set the aperture, and distance relative to the camera, subject, and background.
Camera Hardware and Depth of Field
The larger the sensor is in your camera, the shallower the depth of field will be. Therefore, it’s difficult to take photos with a blurry background when you’re using your phone or a compact camera. These cameras have the smallest sensors so it’s more challenging to capture photos with a shallow depth of field.
Medium and large format cameras provide more of a challenge when you need to capture a photo with a very deep depth of field.
You can sometimes overcome these limitations by managing other aspects that influence the depth of field.
Lens Hardware and Depth of Field
Shorter focal length lenses capture images that appear to have more focus than longer focal length lenses. This is one reason why landscape photographers often prefer to work with wide-angle lenses.
The longer the focal length lens you use, the more distance compression you will see in your photos. Long lenses tend to make elements in your photos look closer together than they are. This contributes to the appearance of a shallower depth of field.
This happens regardless of what size sensor your camera has. A long lens and a camera with a large sensor will produce photos with a shallower depth of field. A wide lens on a camera with a small sensor (this is typical of most smartphone cameras) produces images that have a very deep depth of field.

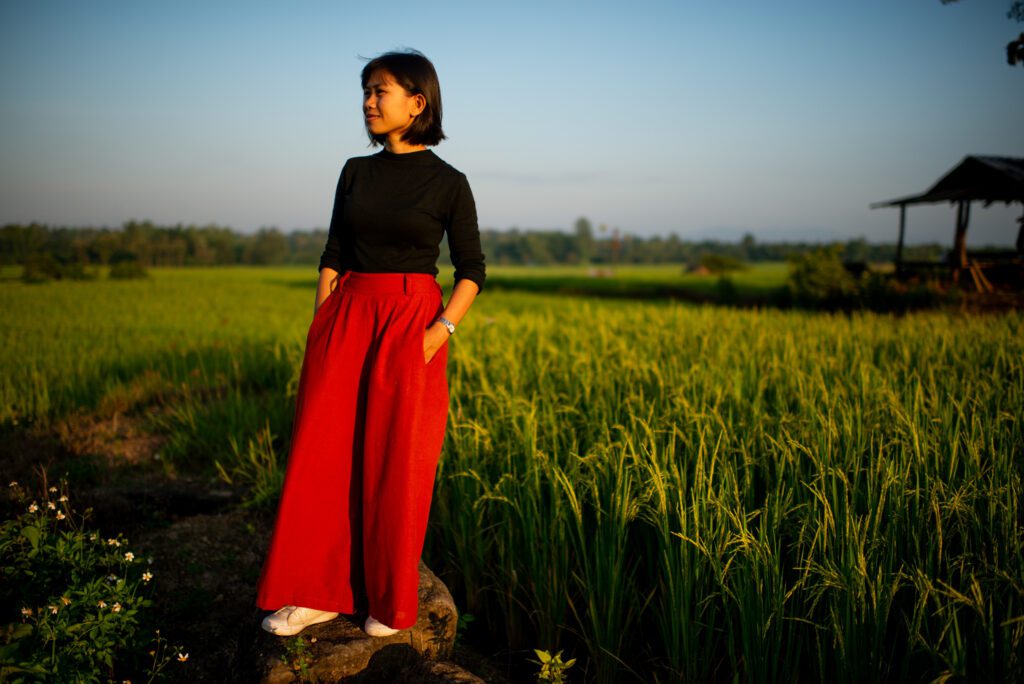
Taken with a full-frame camera with 85mm at f/1.4. Photograph by Kevin Landwer-Johan
Aperture Setting and Depth of Field
Controlling the aperture setting is sometimes the only aspect of depth of field that new photographers know about. The wider the aperture, the lower the f-stop number, and the shallower the DOF is.
Prime lenses usually have wider maximum apertures than zoom lenses of equivalent focal lengths. So, using a prime lens when you want a very shallow DOF is helpful.
Controlling the aperture setting is sometimes the only aspect of depth of field that new photographers know about.
Kit zoom lenses (the standard types that come with a new camera) typically do not have very wide maximum apertures. This does make achieving a shallow depth of field more challenging, but not impossible. By zooming to the longest focal length and being a suitable distance from your subject, you can still isolate it with a shallow DOF using a kit lens.
Relative Distances and Depth of Field
The distance you are from your subject and that your subject is from the background has a significant influence on DOF.
Getting closer to what you are focusing on will always produce a shallower depth of field. This is true whatever camera and lens you are using and the aperture setting you have chosen. When your lens is set to f/22 or f/2, the closer you are to your subject, the less of the image is acceptably sharp.
How far your subject is from the background does not affect the DOF, but it does change the amount of blur. The further your subject is from the background, the more blurred it appears in your photos.
Taken with a full-frame camera with 35mm at f/1.4. Photograph by Kevin Landwer-Johan
Key Lesson: By managing each of the factors that control depth of field, you can best manage how much of your photo is in acceptably sharp focus. There is more to it than setting your aperture!
Recommended Reading: Want a step-by-step guide on photography skills with your DSLR? Grab a copy of our best-selling guide: the DSLR Crash Course.
Managing Motion Blur and Camera Shake
There are two types of movement that cause motion blur in photos: when your camera moves and when your subject moves. You can avoid both types of motion blur by choosing a shutter speed fast enough to freeze the moment.
Camera Shake Blur
Every beginner photographer has had the disappointment of checking their photo only to find that it’s not as sharp as they thought it would be. This is often because the shutter speed they used was too slow.
If you handhold your camera and use a slow shutter speed, you run the risk of camera movement. This is also often called a camera shake. How slow the shutter speed is set before it causes a problem with blurring depends on a few different things.

Two-second exposure with fill flash and camera movement. Photograph by Kevin Landwer-Johan
How steady are your hands? What’s your camera-holding technique like? With steady hands and good technique, you can handhold a camera better than if you are not so attentive to what you’re doing. Leaning against a tree, wall, or some other solid thing will help steady your camera when you are handholding it. So will bracing your elbows on a table or other sturdy support.
The weight of your camera and lens also impacts how well you can hold it. A smaller combination of camera and lens is easier to hold steady than a heavy camera and long lens.
Cold weather can make it more challenging to hold your camera steady. We shiver when it’s cold. Your level of fitness may also impact your ability in some circumstances. If you must run after your subject or have just climbed one thousand stairs to see the view, you might be breathing too heavily to hold your camera still.

Two-second exposure with random camera movement. Photograph by Kevin Landwer-Johan
Key Lesson: The solution is to use a faster shutter speed when you want your photos to be sharp. An alternative to this is to make the most of camera movement to create unusual and abstract images.
Making Creative Use of Camera Movement
When camera movement is not a mistake, the resulting photos can be rather mysterious. They almost certainly will be images that we can never see with our eyes. The blur from the camera movement is unnatural. You can use it to make pictures that seem other-worldly or that somehow defy time and space.
Moving your camera while using a slow shutter speed creates a particular kind of a blur. It looks different than focus blur or subject movement blur. No part of the image is likely to appear sharp unless you’ve engaged in some other form of trickery (I’ll talk more about that shortly).
The longer you leave the shutter open and the more you move your camera, the greater the blur. These decisions are part of the creative process. The variables involved lead to endless possibilities. You’ll probably never be able to exactly replicate an image you’ve made using camera movement. Each one will be unique.

Two-second exposure with controlled camera movement. Photograph by Kevin Landwer-Johan
Using longer shutter speeds, you also have the option of moving the camera and then stopping the movement before the exposure is complete. This can result in some parts of the image appearing sharp and translucent. The shutter speed, amount, and speed of the camera movement, and how long your camera is still for, will impact the result. By holding your camera still at the beginning of the exposure, the image you create will look different than when you hold the camera still at the end of the exposure.
Another fun trick is to pop in some flash during the exposure. Doing this with rear curtain flash sync makes things a little more predictable. But with long exposures, you can manually fire the flash any time the shutter is open, whether the camera is moving or not. The flash will help add light to your image and it will also have some effect towards freezing the movement for a moment.
Key Lesson: Experimentation is key. There are no set rules. Take time to try different shutter speeds, apertures, and ISO combinations. Move your camera more quickly sometimes and slowly at other times. Review your images to see how each change alters what your camera captures.
Blur Caused by a Moving Subject
Much like blur caused by camera movement, using a slow shutter speed when photographing a moving subject can result in blur. How much blur depends on how long the shutter remains open and what speed the subject is moving. Using a very slow shutter speed can mean you don’t see your subject at all. This happens if they have passed through your composition and not remained in the frame for long.
By managing the balance between the shutter speed and subject speed, you can capture an acceptable amount of blur. When you’re photographing people walking and want them to blur suitably, use a shutter speed somewhere between one-tenth and one-quarter of a second. To photograph a faster-moving subject, you’ll need a faster shutter speed to capture a similar amount of blurring.

Full-frame camera with 110mm focal length at 1/8th of a second. Photograph by Kevin Landwer-Johan
How much blur is enough is up to you and the style of photos you want to make. The slower the shutter speed concerning the speed your subject is moving means you’ll have more blurring, even to the point of a subject not being recognizable or visible in the image at all.
As with camera movement, when you add flash to a long exposure with subject movement, the subject can appear partly frozen. Because of the variables involved, it’s very unpredictable. This is unless you are working in a very controlled environment and have practiced a lot already. Popping some flash into an image with a moving subject can be a lot of fun because of the level of unpredictability.
As with camera movement, when you add flash to a long exposure with subject movement, the subject can appear partly frozen.
Having the flash fire at the beginning or the end of exposure will change how the image looks. I prefer the look using rear curtain flash sync makes in an image that involves motion blur. The blur trail will appear to follow the subject and the flash makes the subject look clearer. The amount of light in relation to the ambient light also influences how the flash affects the picture.

Full-frame camera with 35mm focal length at 1/4 of a second. Photograph by Kevin Landwer-Johan
Key Lesson: Camera shake and a moving subject create a different type of blur. The easiest way to determine the difference is to look at the elements in your frame that were not moving. If they are blurred, your camera has moved while the shutter was open.
Photographing Lights and Including Blur
Night lights can look wonderful when they are blurred in your images, either as background blur that’s beautifully out of focus or because of movement.
By making use of bright lights as an out-of-focus background, you can create magical-looking photographs. The lens you use will affect the quality of the blur. Each lens has a different bokeh appearance. Other factors that influence depth of field will also influence the quality of blurred lights in an image.

Full-frame camera with 35mm focal length at 30 seconds. Photograph by Kevin Landwer-Johan
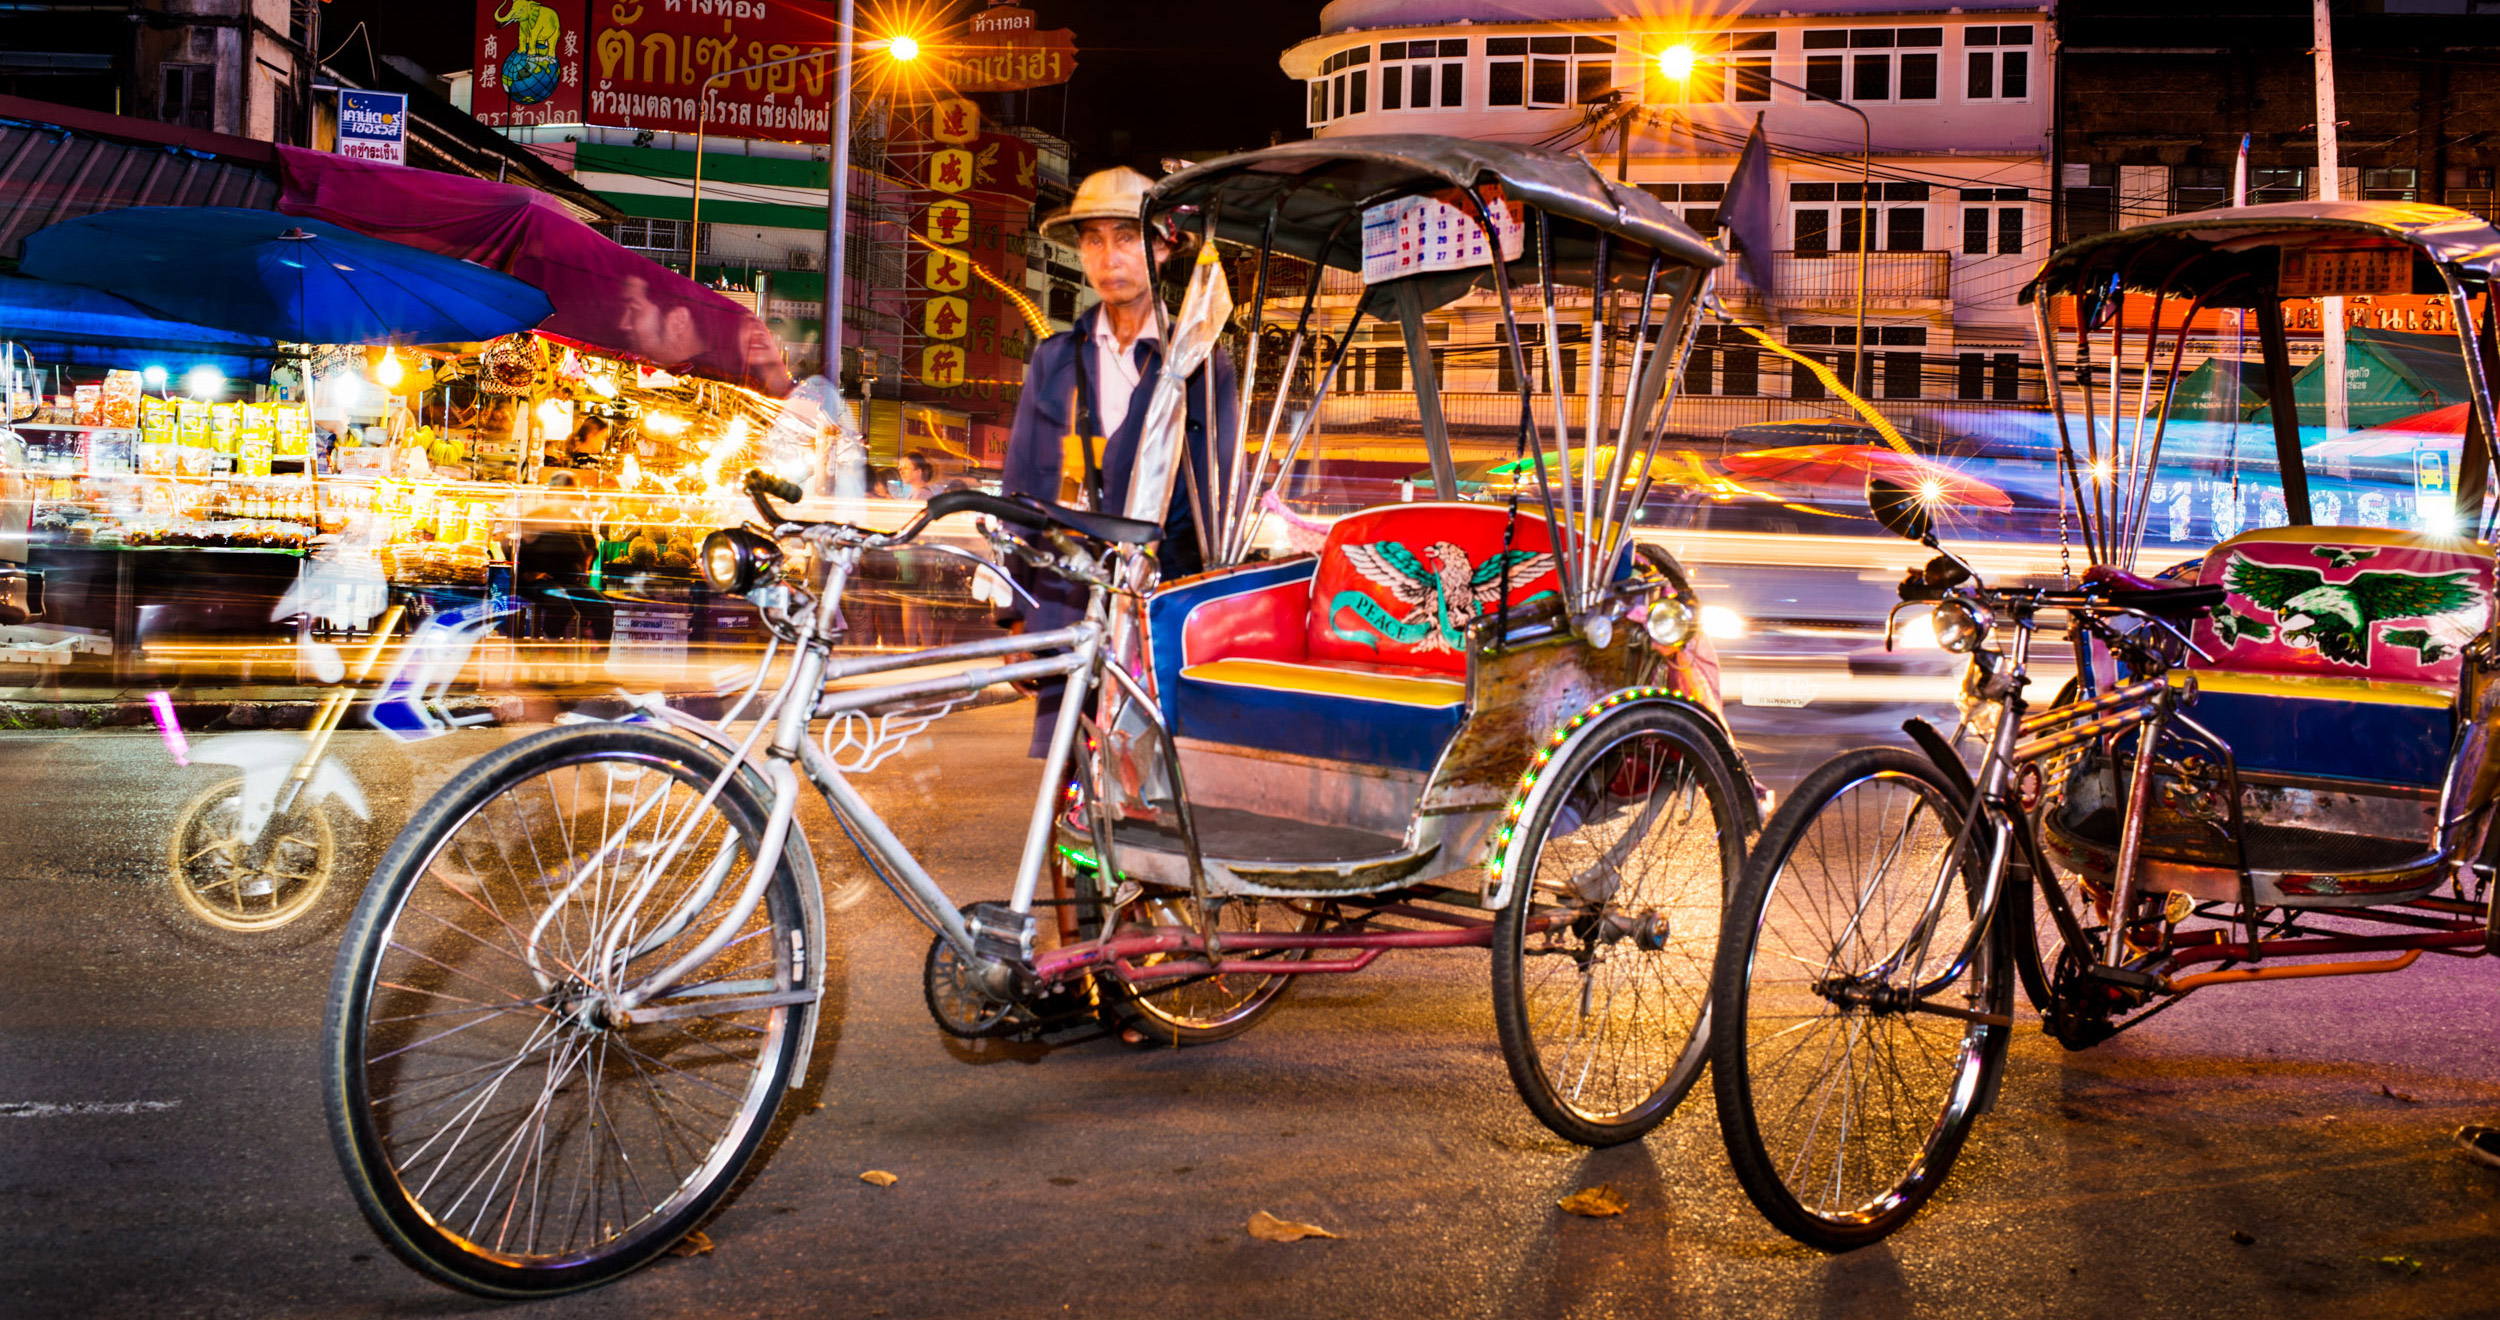
Photographing lights that are moving creates fabulous light trails in images. Think of moving traffic at night, or someone light painting with a flashlight. The duration of the shutter and the color and intensity of the lights govern how this type of image will look.
Moving your camera while photographing lights also create light trails. How you move the camera determines how the lines will look. You can create straight light trails of curved or wiggly ones. Again, the shutter speed and light intensity, and color will influence the results.
Adding a pop of flash into an image that involves lights and movement provides another opportunity for creative experimentation. The light from a flash will help to partly freeze the movement. It will also complicate the exposure.
Conclusion
Full-frame camera with 50mm focal length at 20 seconds. Photograph by Kevin Landwer-Johan
Blur in photographs does not have to be a bad thing when you manage it well. Experimentation is the key because there are so many variables. Embracing the unpredictability makes including blurring in your photos much more fun.
Do you love to be in control and know how your photos will turn out before you press the shutter button? Then you’ll need to experiment even more to better control the variables. Taking time to embrace the unpredictable nature of adding blur to photos opens a whole new realm of creative potential.
Recommended Reading: Want a step-by-step guide on photography skills with your DSLR? Grab a copy of our best-selling guide: the DSLR Crash Course.
Self-Check Quiz:
- What are the two main reasons for blur in photos?
- Can you use blur artistically in photos?
- What is a depth of field?
- What factors affect depth of field?
- Does a larger or smaller-sized camera sensor make it easier to take photos with a shallow depth of field?
- When you are close to your subject, will the depth of field be shallower or deeper?
- Using a slow shutter speed, what are two types of blurs that can occur?
- Are there any set rules for managing blur while using a slow shutter speed?
- What effect does flash have when combined with a moving subject and a slow shutter speed?


