

Photoshop’s Sky Replacement tool is easy to use. In two clicks, you can completely change the sky and the mood of your image. Photoshop is good at finding skies above the horizon, but it skips reflections of the sky in the water. This is severely limiting if you like photographing water as much as I do. Here is what happens when I try to apply a sky replacement on an image with a water reflection. The sky above the horizon looks great, but the water reflects the sky from the original photo.
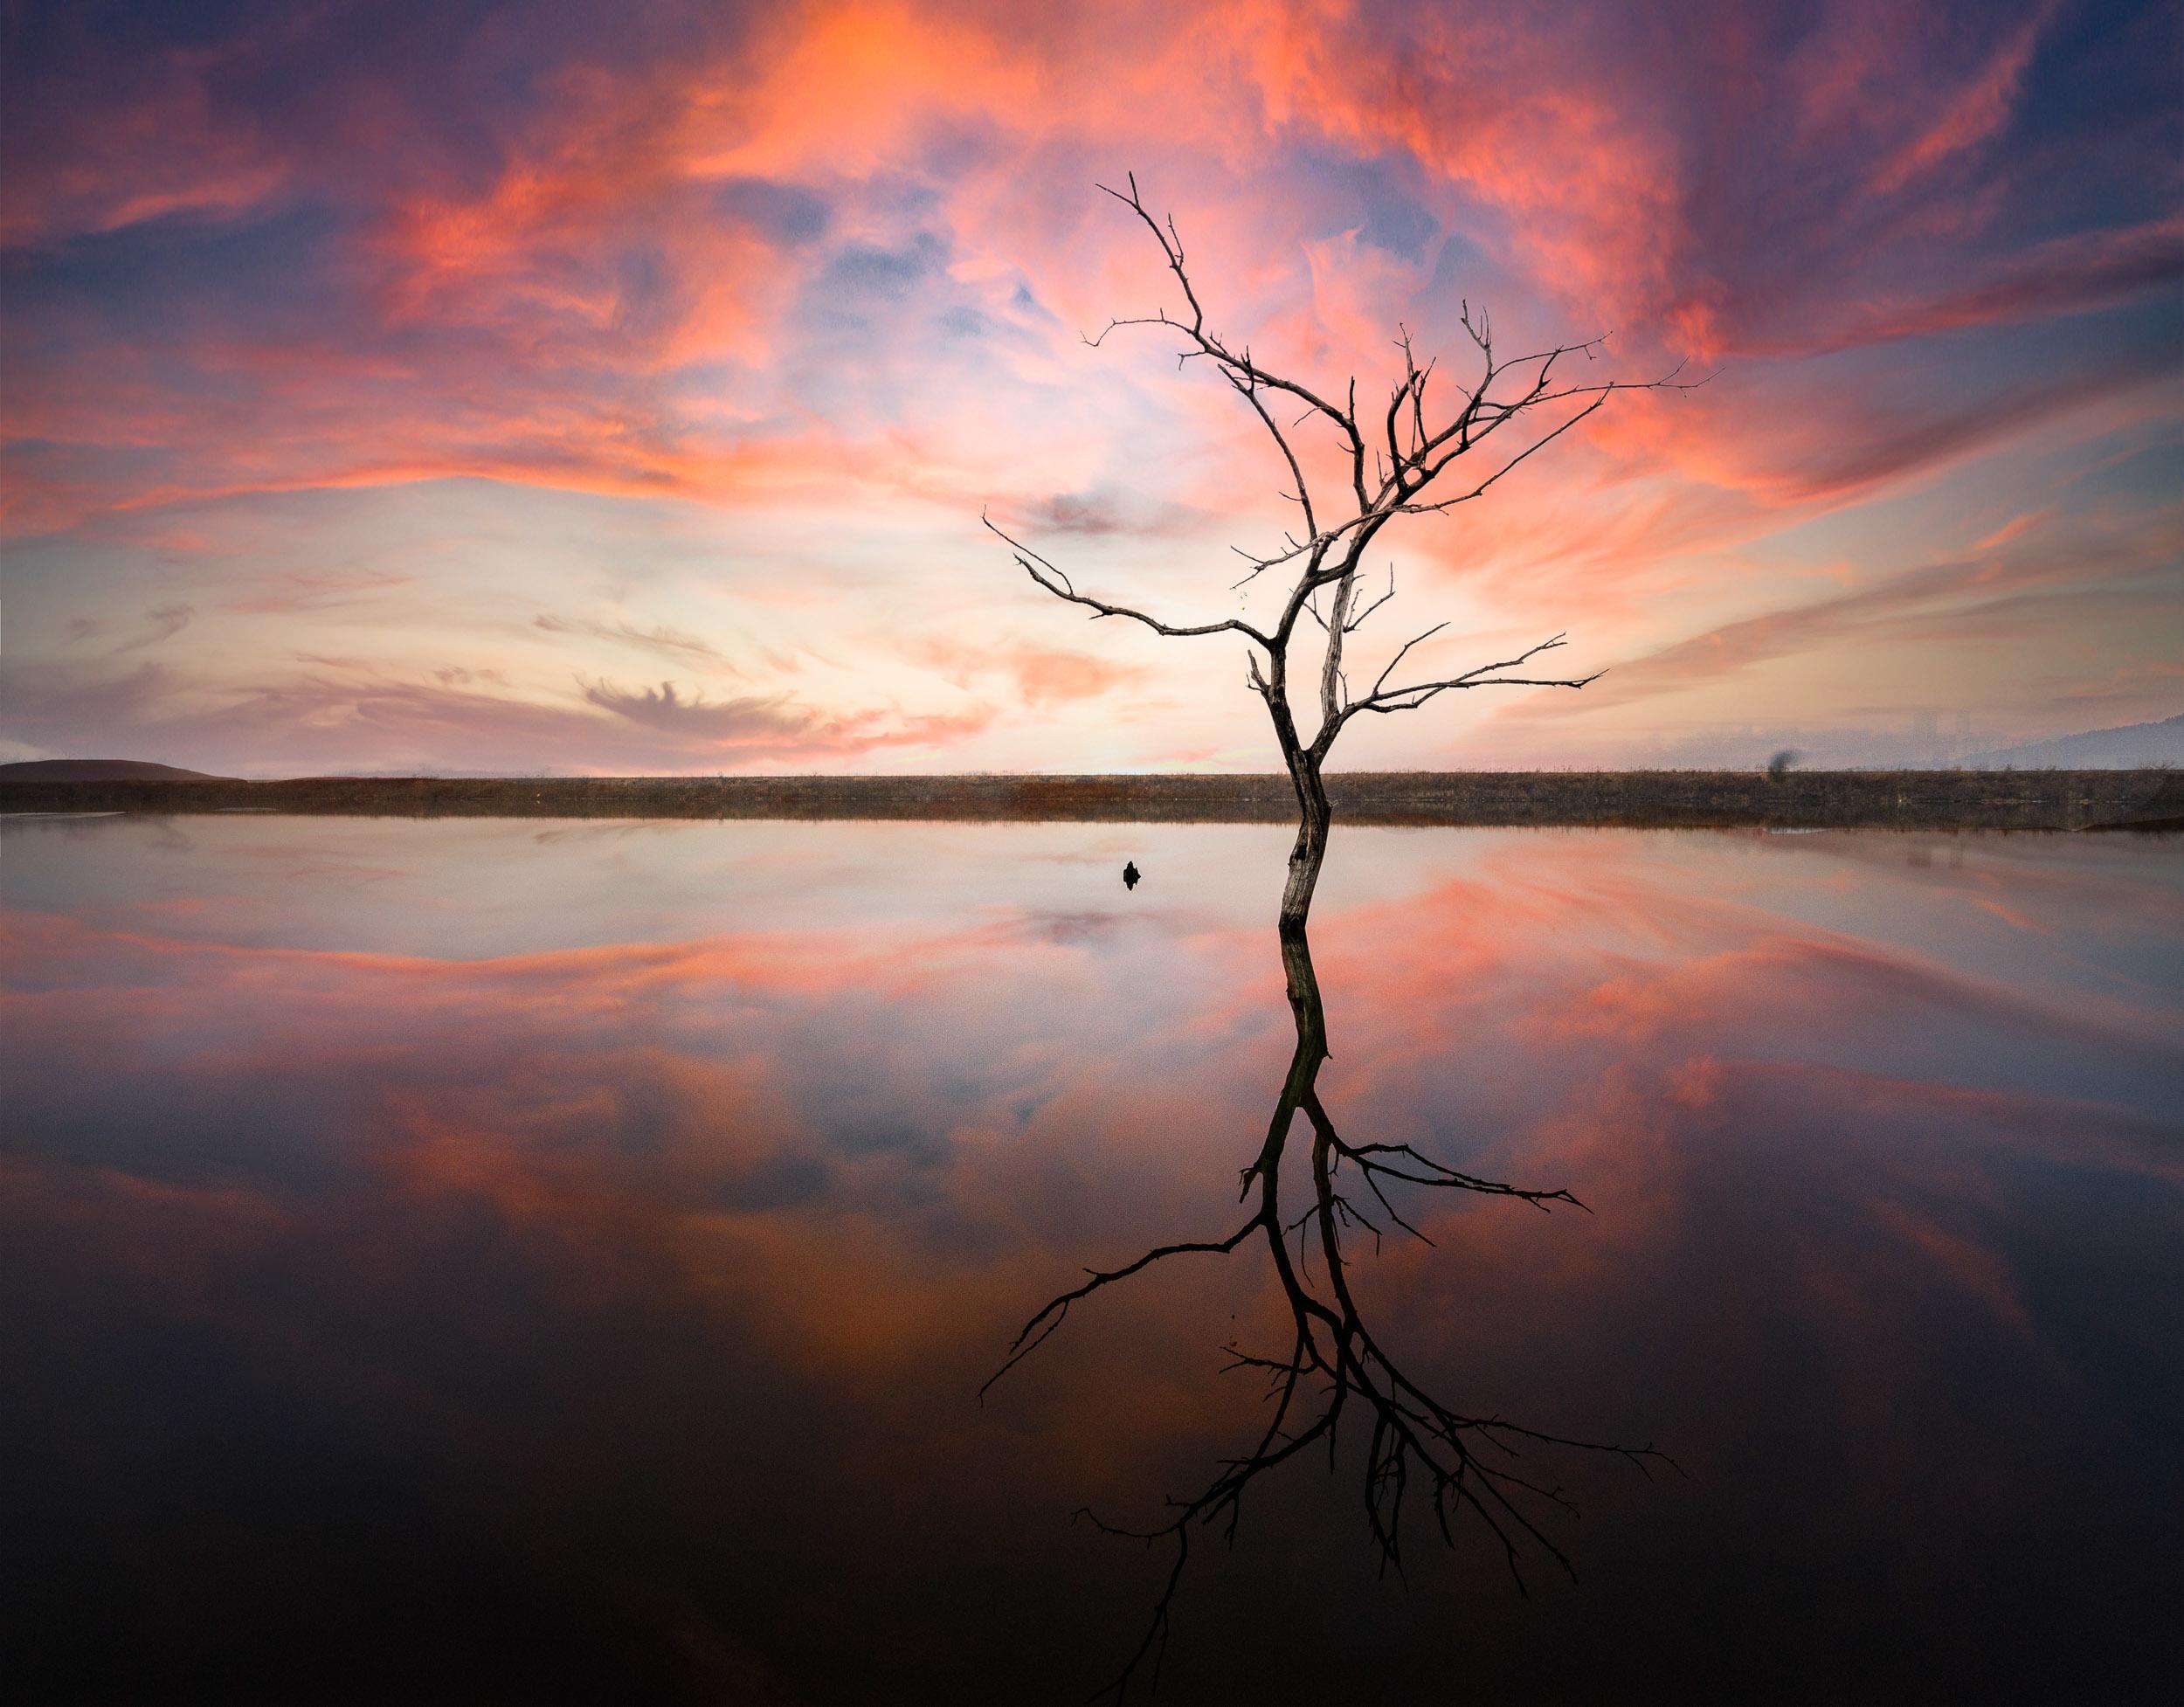
Photoshop will apply a sky replacement above the horizon. The original sky is still reflected in the water. Photograph by Jenn Mishra
In this guide, I’ll show you how to adapt the Sky Replacement tool to mirror a new sky in the water. The Sky Replacement tool in Photoshop is easy to use. This makes the tool widely available to photographers of all skill levels. But adding a sky replacement to a reflection takes a little bit more Photoshop know-how. The process has some additional steps, but it is well worth the effort.
What we will cover:
- Introduction to Photoshop’s Sky Replacement tool
- A step-by-step guide to reflecting sky replacement in water
- Tips for a natural look in reflections

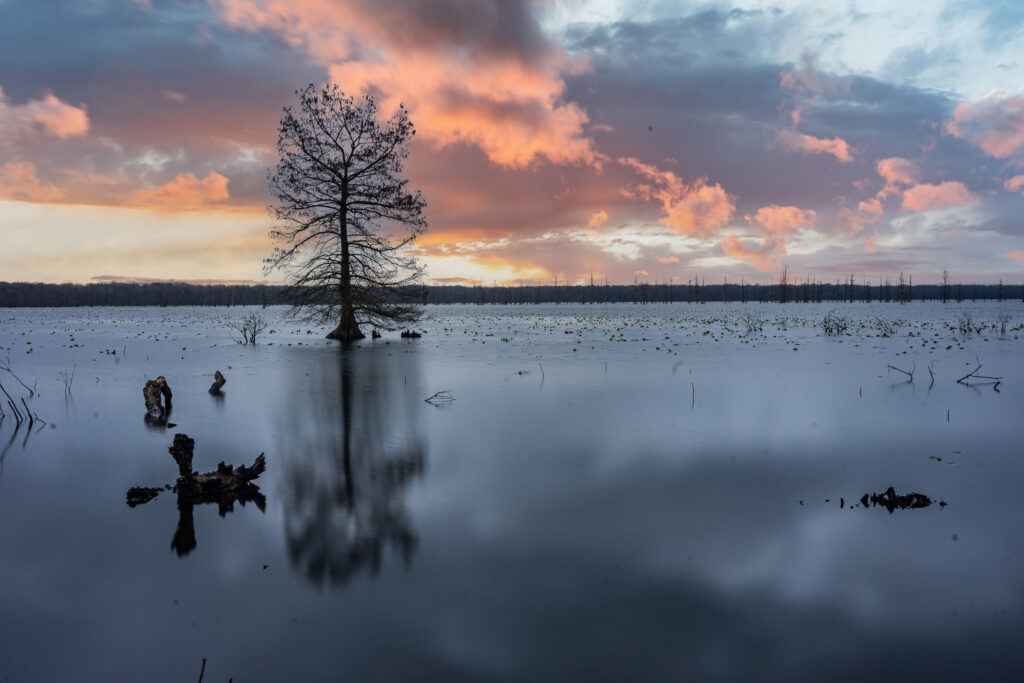
Sky replacement reflected in the water. Photograph by Jenn Mishra
Recommended Reading: If you’re interested in improving your post-processing workflow, check out Photzy’s Understanding Masking premium guide. It has sections on Lightroom and Photoshop, as well as Snapseed for mobile users, too.
Introduction to Photoshop’s Sky Replacement Tool
Adobe added the Sky Replacement tool in the 2021 version of Photoshop. If you are using an older version of Photoshop, this tool is absent. You will need to upgrade to the newest version of Photoshop. This tool allows you to replace a sky in your image. Let me give you a quick tour of this feature. If you are familiar with sky replacement, feel free to skip ahead to the next section.
In the past, if you wanted to replace a sky in Photoshop, you would have to carefully mask around the foreground, add a sky layer, then blend the layers to get a believable image. Now, the Sky Replacement tool does all this for you. The results are quick and generally good.
In the past, if you wanted to replace a sky in Photoshop, you would have to carefully mask around the foreground, add a sky layer, then blend the layers to get a believable image
The tool is under the Edit drop-down menu. Clicking Edit > Sky Replacement will open a new window. Adobe has included some skies for you to use so you can get started right away. The skies are labeled “Blue Skies,” “Spectacular,” and “Sunsets.” I will show you how to add your own skies in the step-by-step section.
Screenshot showing the location of the Sky Replacement tool in Photoshop. Photograph by Jenn Mishra
Photoshop detects the sky automatically and replaces it with a selected sky. To choose a different sky, select the arrow icon next to the sky image. Click through various options. Some skies will look better than others with your foreground. Try to match any directional light in your original photo.
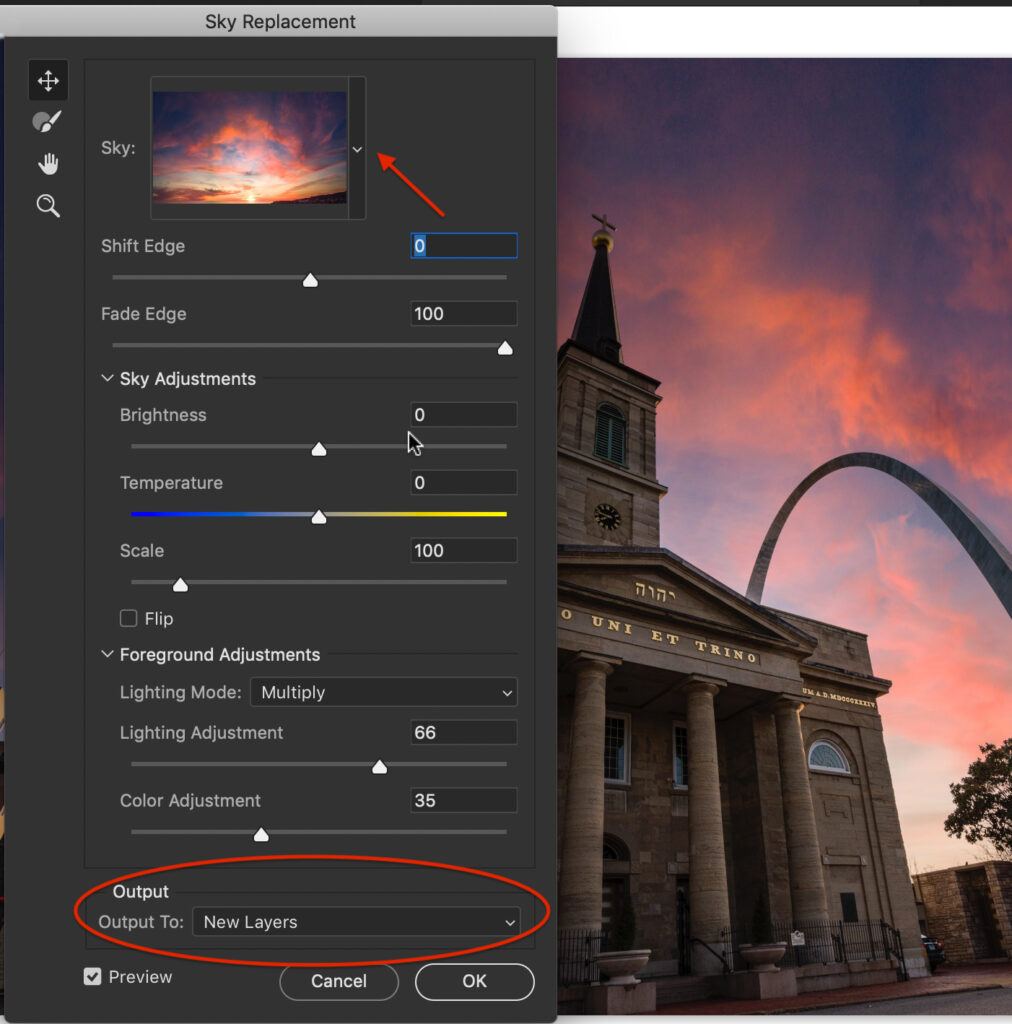
Screenshot showing the Sky Replacement window. To change the sky, click the arrow key next to the sky image. To replace the sky reflection, the output must be set to New Layers. Photograph by Jenn Mishra
Photoshop masks the foreground and adjusts the light to match the lighting of your chosen sky. The Sky Replacement window includes various controls that let you change how Photoshop does this. You can adjust the sky and the foreground.
In the Sky Replacement tool window, you have the option to change the output, but it is important to use the default option: “Output to New Layers.” This creates separate layers in a folder. We are going to work with these layers when we reflect the sky.
When you are happy with how the sky replacement looks, click ‘OK.’ The Sky Replacement tool is easy to use and works well on most skies. But Photoshop will not detect a sky’s reflection in the water. We need to adapt the tool to reflect the sky.
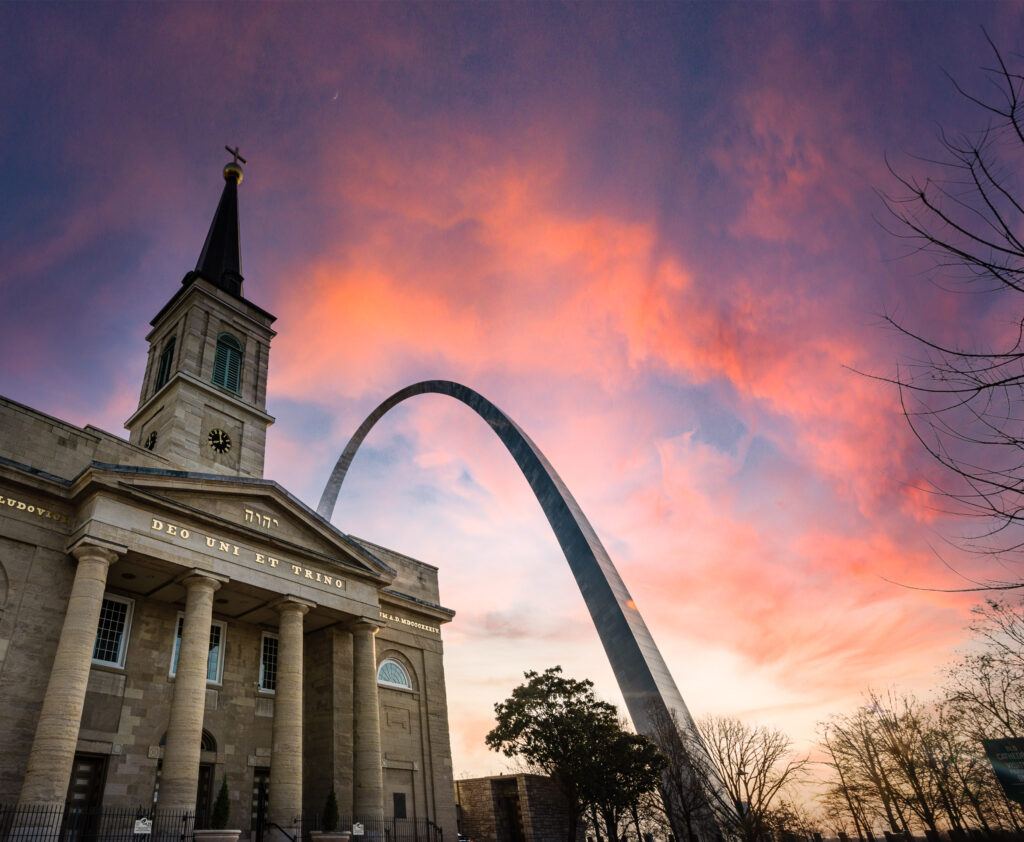
Sky replacement result. Photograph by Jenn Mishra
Exploring Sky Replacement Layers
To reflect the sky, you will need to work with Photoshop layers. Photoshop is very transparent in the sky replacement steps. The program shows you all the steps in layers. You can manually adjust anything you want. Photoshop creates a folder called “Sky Replacement Group” in the layers panel. In this group, you will see layers with layer masks and adjustment layers. If you cannot see the layers panel, go to the Window drop-down menu and select Window > Layers.
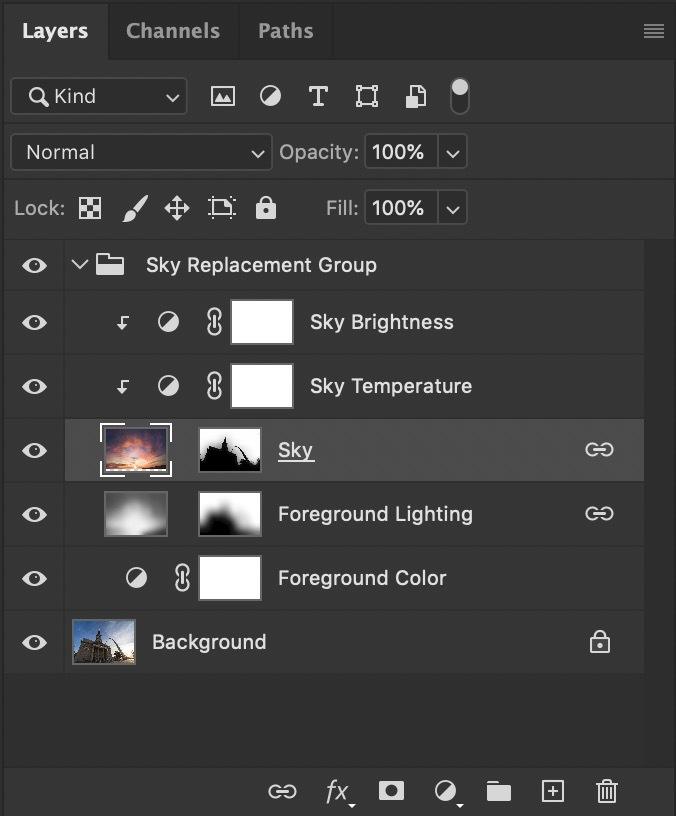
Screenshot showing group and layers created by Photoshop’s Sky Replacement tool. Photograph by Jenn Mishra
The layer labeled “Sky” in the Sky Replacement Group is the actual sky replacement. You will see the sky image on the left. Next to it is a black and white mask. Notice that the foreground is picked out in black and the sky is in white. Black hides the sky. White shows the sky.
If you right-click on the layer mask and select “Disable Layer Mask,” your foreground disappears, leaving only the sky. Photoshop does a good job of detecting the sky and foreground in your image, but if you think the program has made a mistake, you can adjust the layer mask manually by painting white or black onto the layer mask.
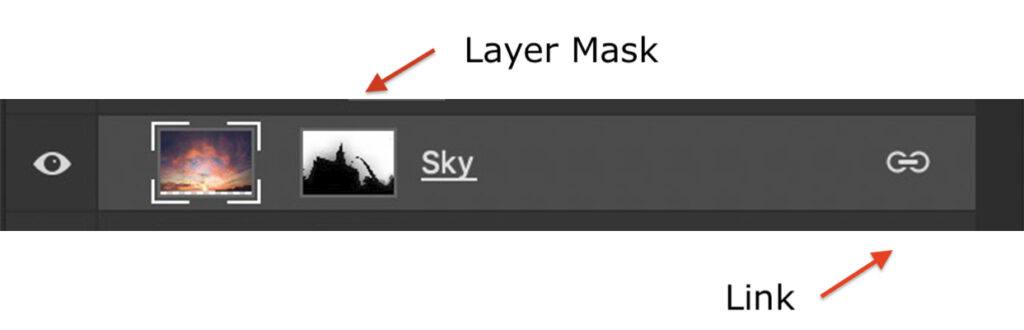
Screenshot showing Sky layer highlighting layer mask and link icon. Photograph by Jenn Mishra
The two layers below the Sky Replacement layer adjust the color of your foreground to match the colors in the new sky. The two layers above the Sky Replacement adjust the light to balance with the foreground. Click the eye icons next to each layer to toggle them off and on. This lets you see what each layer is doing.
Photoshop does a good job of detecting the sky and foreground in your image, but if you think the program has made a mistake, you can adjust the layer mask manually...
There is one other thing to notice. When you click on the “Sky” layer, a link icon appears on the right side. This tells you that the layer is linked with another layer. These layers change as a unit. We will be unlinking the layers in a moment.
Step-by-Step Guide to Mirroring Sky Replacement
Let us go through step-by-step how to mirror a sky replacement. This image is of a pagoda at a local park reflected in a pond. It was sunset, but not a very exciting one. I decided to replace the sky with a sunset that I took on another day. You can use one of the skies included in Photoshop or one of your own.
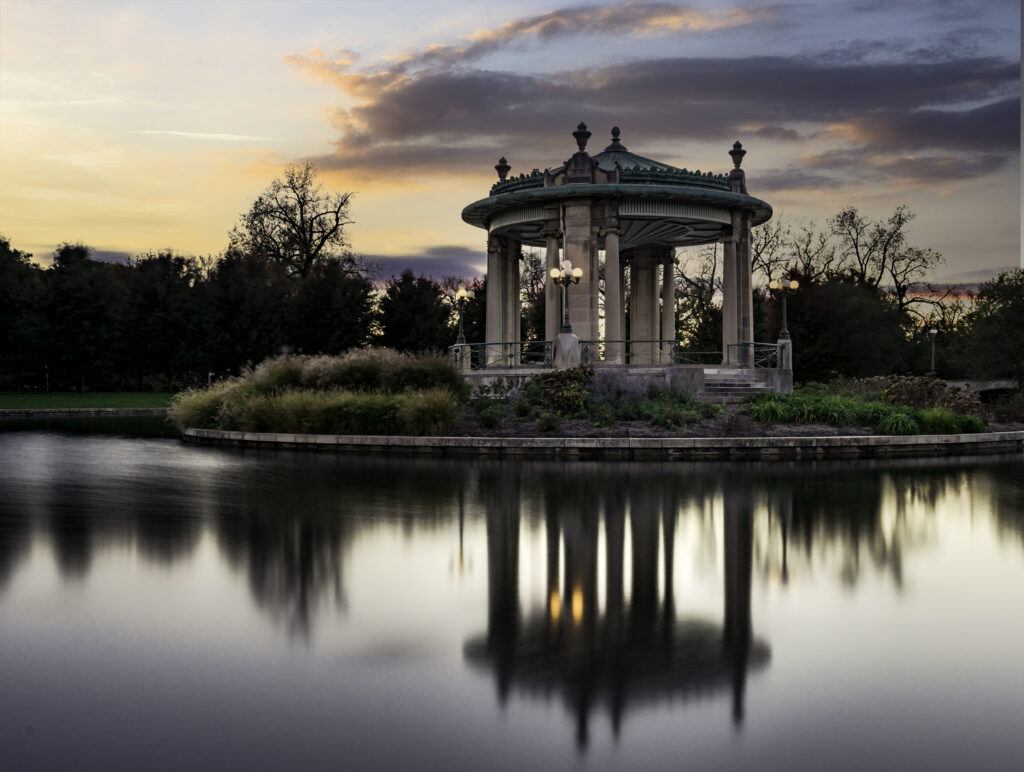
Original image of a pagoda at dusk reflected in a pool of water. Photograph by Jenn Mishra.
Step 1: Replace the Sky
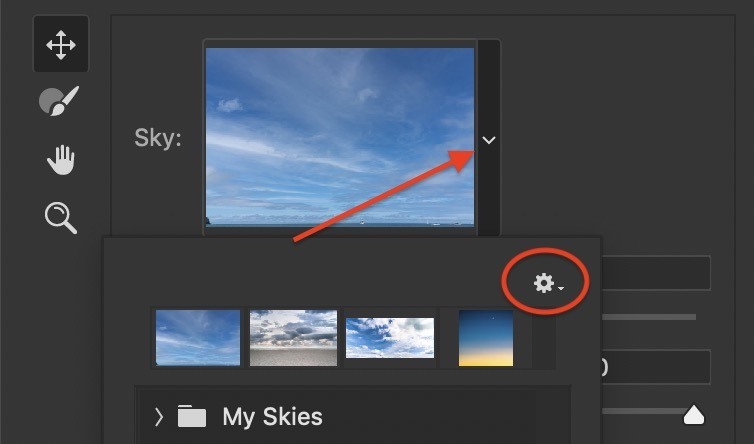
Open your image in Photoshop and select Edit > Sky Replacement. For my image, I want to use a sky that I photographed on another day. To import your own, click the arrow next to the Sky image at the top of the Sky Replacement dialog box. Then, select the gear icon.
Screenshot of Sky Replacement dialog box showing how to access the import features. Photograph by Jenn Mishra
Choose the “New Sky” option, navigate to your sky image, and select Open.
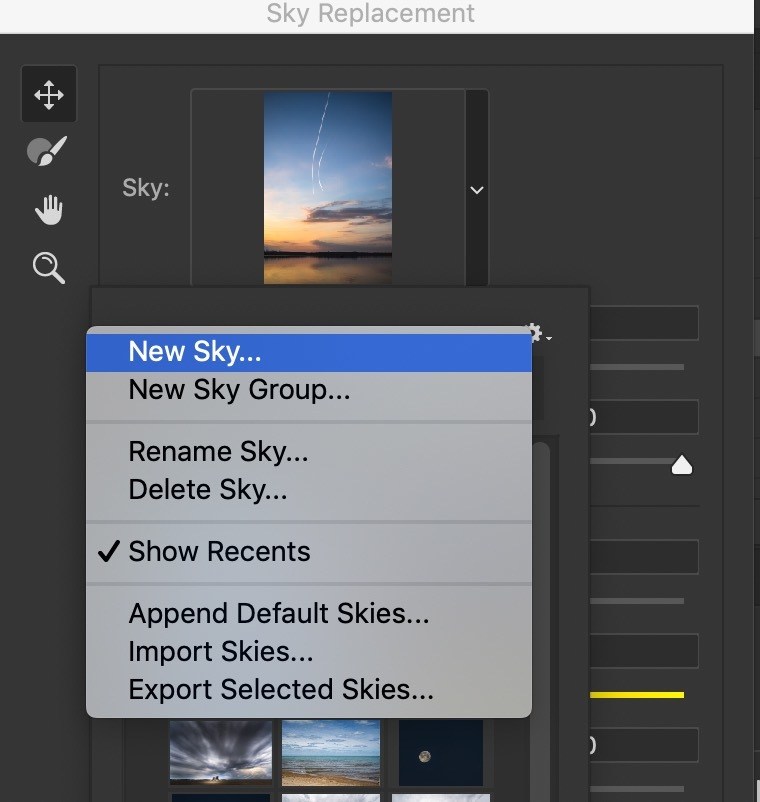
Screenshot of Sky Replacement dialog box showing how to add a new sky. Photograph by Jenn Mishra
Your sky will import, and Photoshop automatically applies it to your image. Use the sliders in the Sky Replacement window to adjust the lighting to blend the two as naturally as possible. I often try a couple of different sky replacements before I finalize my choice. Some skies work better with my foreground than others.
Check that your Output is set to “New Layers” and click OK.
The Sky Replacement tool has successfully applied a new sky to the image, but the water still reflects the original sky.
Image of a pagoda at dusk with the sky replaced. The old sky is still reflected in the water. Photograph by Jenn Mishra
It is time to add the sky replacement to the water reflection. We will do this by flipping a copy of the sky replacement vertically.
Recommended Reading: If you’re interested in improving your post-processing workflow, check out Photzy’s Understanding Masking premium guide. It has sections on Lightroom and Photoshop, as well as Snapseed for mobile users, too.
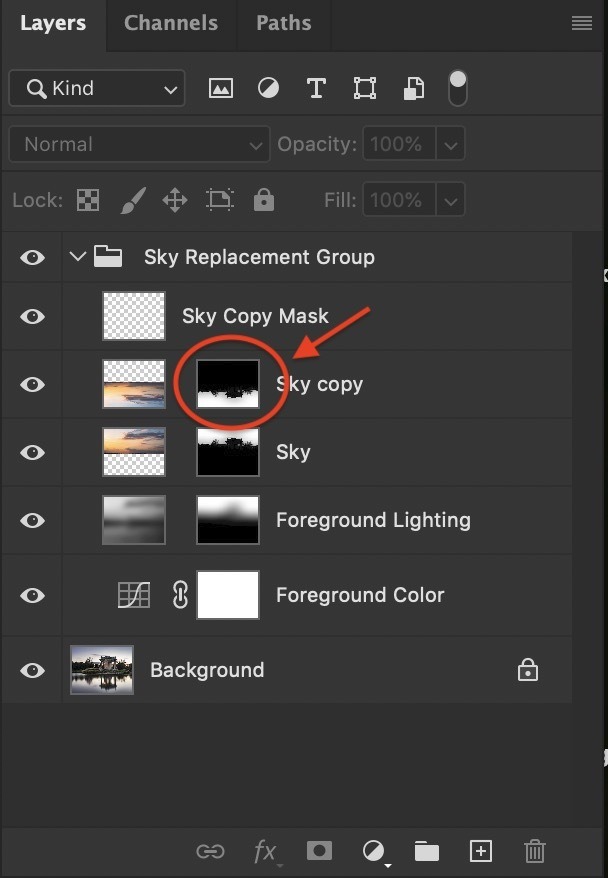
Step 2: Copy Sky Layer
In the layers panel, click on the “Sky” layer in the Sky Replacement Group. Duplicate the layer by right-clicking and selecting Duplicate (or use the hotkey Ctrl or ⌘J). Right-click on the “Sky Copy” layer and select Unlink Layers. This will remove the link icon next to the layer. The original Sky layer is still linked with the Foreground Lighting layer.
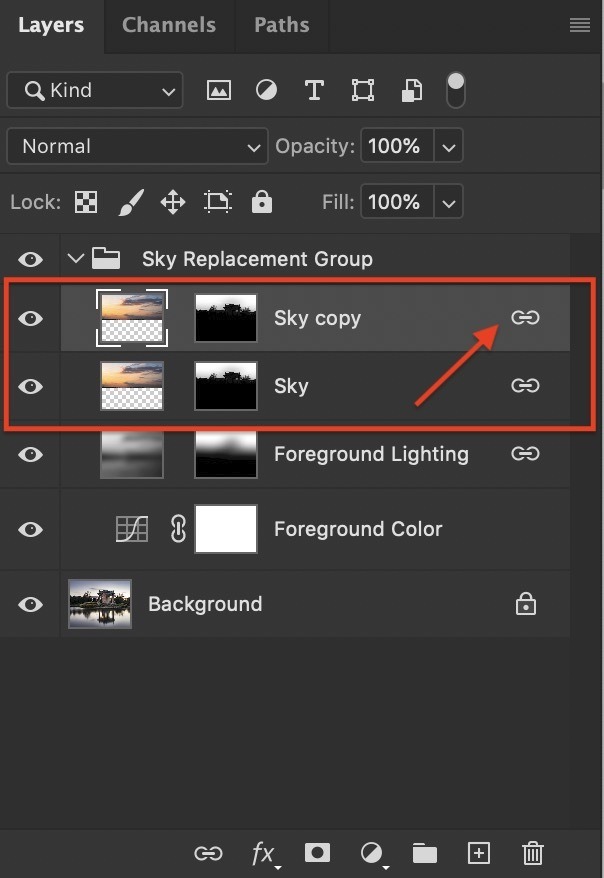
Screenshot of Photoshop layers panel showing Sky Replacement layers. By default, the layers are linked. Photograph by Jenn Mishra
Step 3: Flip Sky Copy Vertically
Flip the sky replacement copy vertically to make a reflection. We need to flip both the sky and the layer mask next to the sky separately. We will flip the layer mask first.
Create a new blank layer by selecting the + icon below the layers panel or (Shift-Ctrl or shift-⌘N). Label this new layer “Sky Copy Mask.”
Choose the layer mask from the “Sky Copy” layer and drag it onto the new blank layer. Make sure you move only the mask and not the entire layer. Select the mask on the “Sky Copy Mask” layer. Select only the mask and not the blank layer. Flip the mask vertically. Go to Edit > Transform > Flip Vertical. Notice that the bottom part of your mask is now white, and the top part is black. This is reversed from the original sky replacement layer.
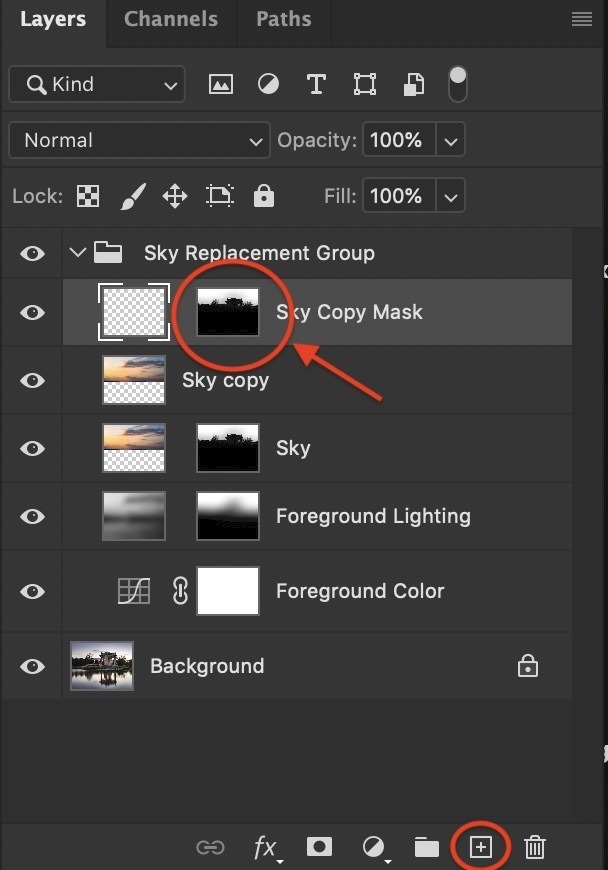
Screenshot of Photoshop layers panel showing the sky copy layer mask moved onto a blank layer. Photograph by Jenn Mishra
Now, let’s flip the sky. Select the “Sky Copy” layer and flip it vertically. To do this, select the layer and go to Edit > Transform > Flip Vertical.

Screenshot showing how to flip layers vertically. Photograph by Jenn Mishra
Step 4: Align Sky Reflection
Reposition the “Sky Copy” layer so that it shows a mirror image of the sky. I find it helpful to reduce the opacity of the “Sky Copy” layer to 50%. I can see both the mirror image and the original image.
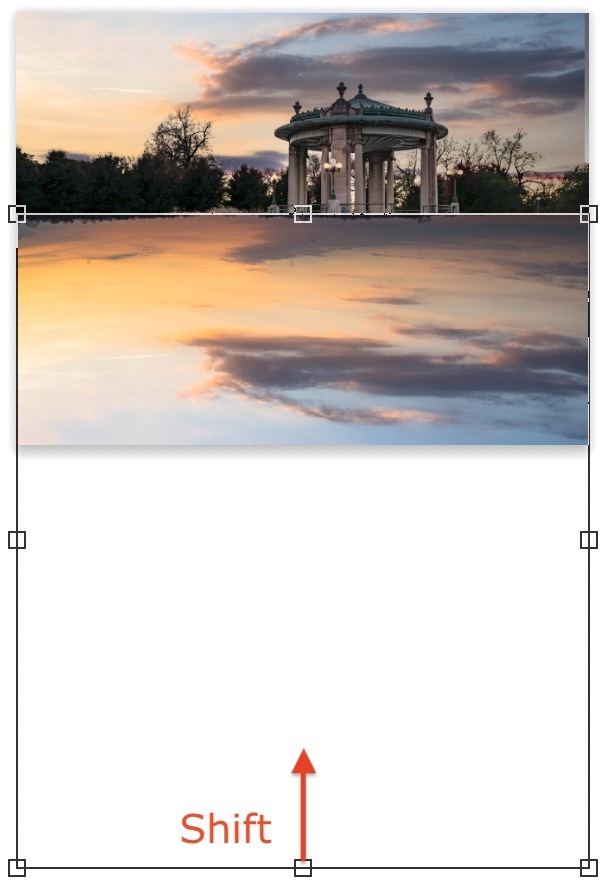
The reflection will be more realistic if you compress it a little bit. Do this by selecting Edit > Free Transform (Ctrl or ⌘T). This creates a box around the image. If you cannot see all of the edges, zoom out by going to Select View > Fit to Screen (Ctrl or ⌘O). Hold the shift key and drag up from the lowest edge. Click Enter or Return.
Screenshot showing how to compress the reflection using the Transform tool. Photograph by Jenn Mishra
Now let’s recombine the reflected sky and the reflected layer mask. Select the mask in the “Sky Copy Mask” layer and drag it back onto the “Sky Copy” layer. The “Sky Copy Mask” layer is now empty and you can delete it.
Move the “Sky Copy” layer mask until it roughly matches up with the existing reflection. Make sure you select only the layer mask. You can use the same process described above to slightly compress the layer mask.
Screenshot of Photoshop layers panel showing a copy of the sky layer mask moved back onto the “Sky copy” layer. This leaves an empty “Sky Copy Mask” layer. Photograph by Jenn Mishra
Using a soft, white paintbrush set at 25-50% opacity, paint on the mask. Fit it to the existing reflection. With lower opacity, you may need to brush over the mask a few times. This will blend the edges better than using a brush at 100% opacity. Pay particular attention to edges. If you make a mistake, switch to a black brush (hotkey “X”) and paint over the error.
Notice that not all foreground features are reflected in the water. For instance, trees further away from the water’s edge are not reflected.
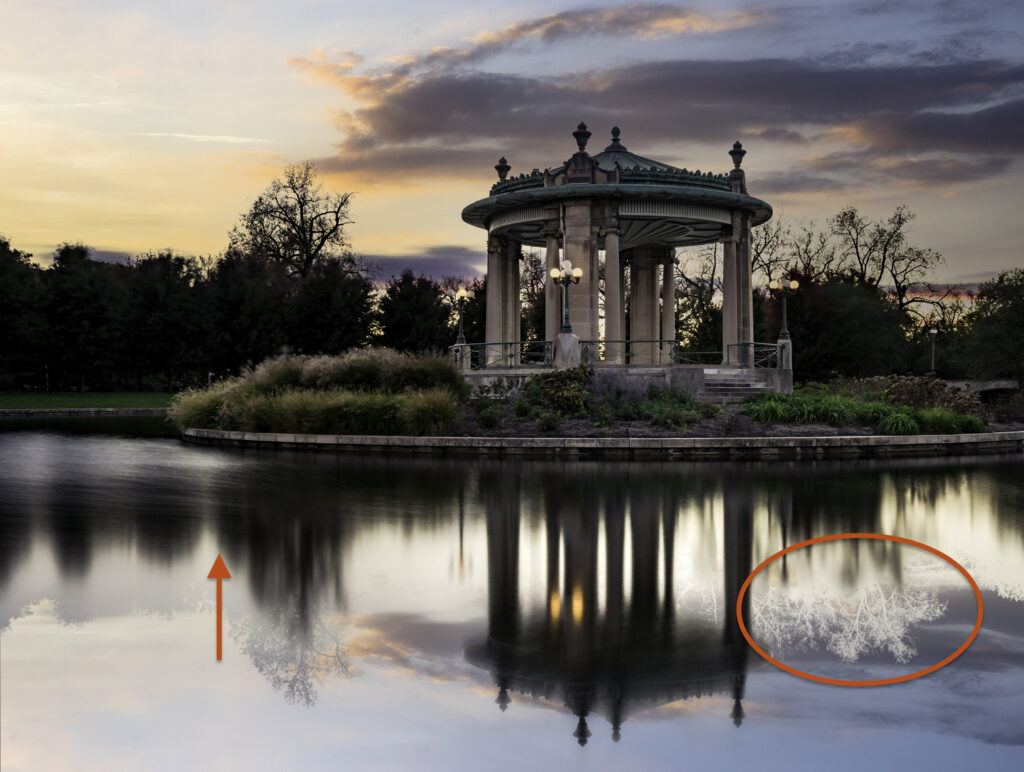
Copy of layer mask roughly positioned over the existing reflection. Notice that some of the trees in the mask do not correspond to the actual reflections. I will hide these reflections to be more realistic. Also, notice that the real reflections are compressed. Photograph by Jenn Mishra
Step 5: Change the Blend Mode
Select the “Sky Copy” layer and change the blend mode to Multiply. The blend modes are near the top of the Layers panel. By default, the drop-down menu is set to Normal. The Multiply blend mode darkens the reflection and makes it look more natural. Take a look at your layer mask again. Darkening the reflection may show areas of masking that you missed. Adjust the opacity of the sky reflection. The reflection may look best at 50% or 80%.
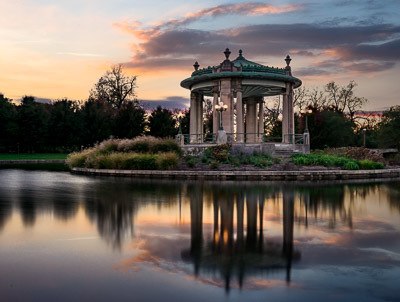
Image of a pagoda at dusk with the sky replaced and reflected in the water. Photograph by Jenn Mishra
There you have it; a sky replacement reflected in the water. I find this process works with most of my sky replacement reflections, but there are times when I have to adjust the reflection to make it look more realistic. Here are a few ways to fine-tune the reflections.
Recommended Reading: If you’re interested in improving your post-processing workflow, check out Photzy’s Understanding Masking premium guide. It has sections on Lightroom and Photoshop, as well as Snapseed for mobile users, too.
Fine-Tuning Reflections
In some images, vertically flipping the foreground layer mask created by Photoshop does not match with the existing reflections. You can fine-tune this by adjusting the layer mask as I described above. With a very complex or detailed reflection, I sometimes create my own layer mask rather than using the one created by Photoshop.
With a very complex or detailed reflection, I sometimes create my own layer mask rather than using the one created by Photoshop.
To do this, first, delete the layer mask in the Sky Copy layer. Right-click on the layer mask and select “Delete Layer Mask.” Then go to the Layer drop-down menu and select Layer > Layer Mask > Reveal All or click the layer mask icon below the layer panel. I use a black paintbrush and mask out my foreground.
If the reflection is sharp in the water, you may not need to mask it at all. Changing the blend mode of the Sky Copy layer to Multiply or Overlay may reveal the underlying reflection without using a layer mask.

In this image, I did not need to mask the tree reflection at all. The reflection showed through when I changed the blend mode to Multiply. I created a new mask to mask out the reflected sky above the horizon. Photograph by Jenn Mishra
As I mentioned above, reflections tend to be compressed from the original. They are also a bit darker. The multiply blend mode will darken the reflection. If you want it to be even darker, add a Brightness/Contrast adjustment layer. Apply this only to the reflection layer.
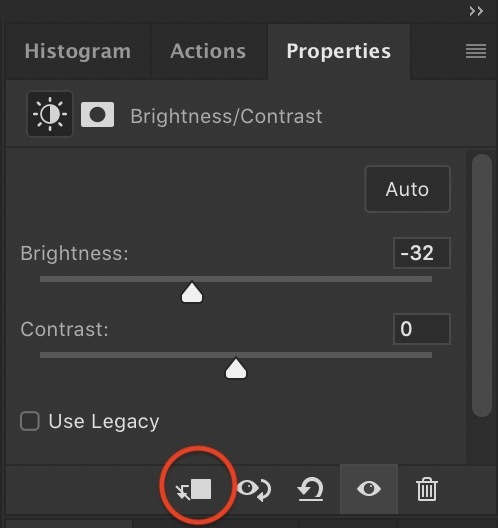
Click this symbol to apply the adjustment layer only to the layer immediately below. Photograph by Jenn Mishra
To make the sky reflection more realistic, you can also add some Gaussian or motion blur. Create a copy of your Sky Copy layer (Ctrl or ⌘J) and go to the Filter drop-down menu. Select Filter > Blur > Gaussian Blur. Add between 5 and 10 pixels to the reflection.
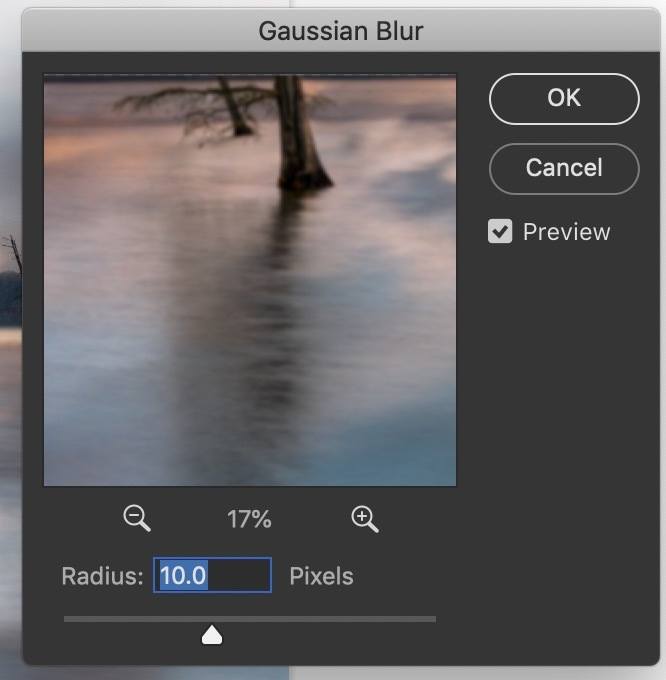
Screenshot showing Gaussian blur window set to 10 pixels. Photograph by Jenn Mishra
You can also add some ripples to the water. Create a copy of your Sky Copy layer (Ctrl or ⌘J) and go to the Filter drop-down menu. Select Filter > Distort > Ripple. Start with medium ripples at 100%, but you can adjust the ripples to your preference.
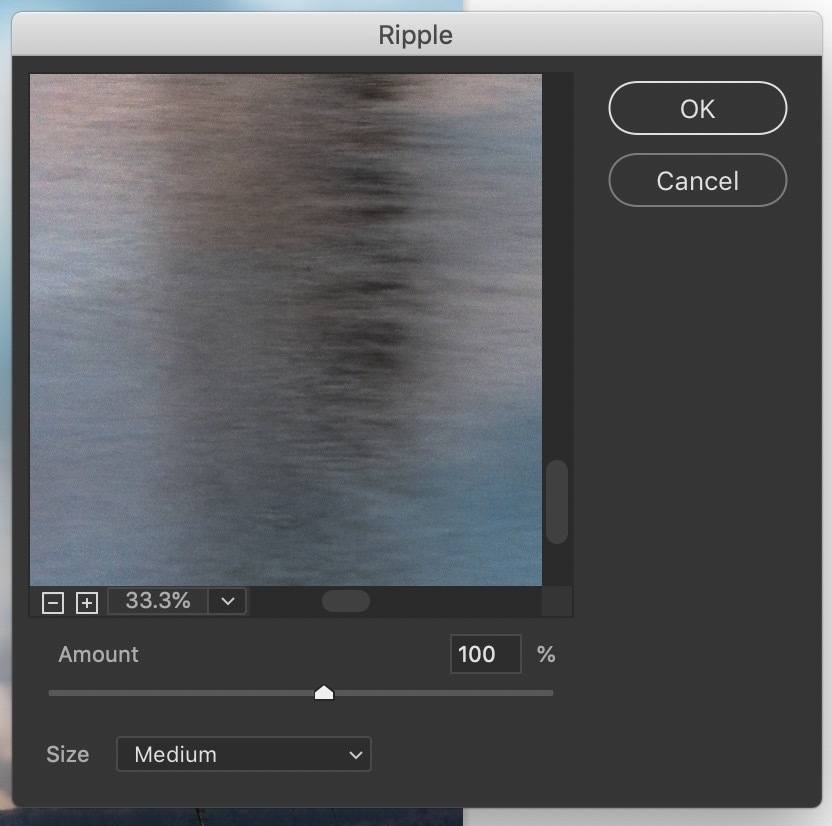
Screenshot showing ripple filter window set to 100 medium and 100%. Photograph by Jenn Mishra
Conclusion
The Sky Replacement tool in Photoshop 2021 is easy to use, but it does have limitations. One major limitation is that replaced skies are not applied to reflections. By vertically flipping the layers and layer masks created during the sky replacement process, you can easily create a mirror image of the new sky.
Self-Check Quiz:
- When did Adobe add the Sky Replacement tool to Photoshop?
- Where is the Sky Replacement tool located in Photoshop?
- In the Sky Replacement window, what lighting adjustments can you make to your foreground?
- What is the name of the group and the five layers created by Photoshop when you replace a sky?
- What does black mean in a layer mask?
- How do you add one of your own skies into the Sky Replacement tool?
- How do you copy a layer in Photoshop?
- How do you flip a layer vertically in Photoshop?
- What does the Multiply blend mode do?
- What filters can you add to make the reflection look more realistic?
Assignment:
- Open an image in Photoshop that has a reflected sky. For this exercise, it doesn’t matter what the original sky looks like.
- Follow the steps in this guide to replace both the sky and the sky’s reflection.
- Experiment with different pre-loaded skies or upload your own.
- Adjust the reflections and add a Gaussian filter or a ripple effect.


