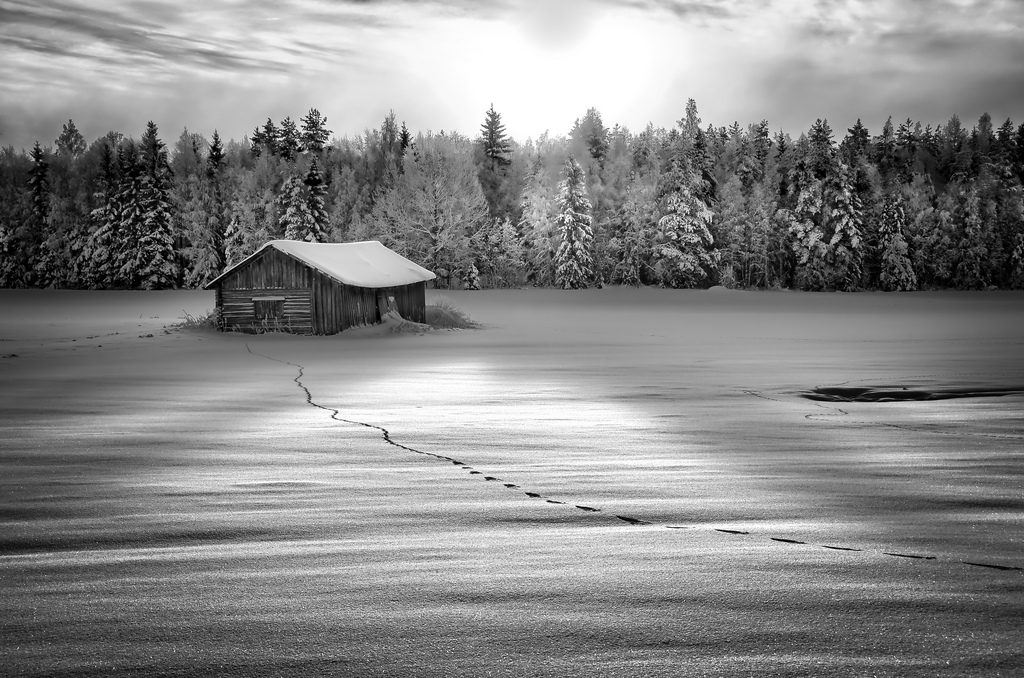
Photo by Jyrki Salmi
Can you imagine a more iconic image that represents the art of photography than a perfectly composed, processed and displayed black & white print? As photographers, we can often find ourselves standing quietly in an art museum, our hands in our pockets, staring blissfully at an Ansel Adams print. With the magnificent detail, tone and texture,one could almost feel the wind in our face, the sun beating against our brow, or the chill in the air.
A properly crafted black & white image wields much power. It does this by forcing our brain to see details it might overlook in a color image.
The art of black & white photography is revealed through texture, tone and lighting. In this beautiful portrait, the child’s face would have competed with the vibrant colors of the ocean and sky behind her.
Many photographers see black & white photography as a backup- a way to save a poorly executed color image- but nothing could be further from the truth. Producing a superb black & white image requires more skill than its color equivalent.

Photo by Kent DuFault
Learning to recognize tone, shape, light and shadow is the key to great black & white photography.
We’re going to tell you why this is true, and how you can take your black & white images to the next level!
"Learning to recognize tone, shape, light and shadow is the key to great black & white photography."
In the pre-digital era, black & white photography required a completely different skill set, film choice, and lab set-up. In today’s world, producing a black & white image can be simply a choice that you make somewhere along your production line.

Photo by Kent DuFault
It’s easy to make a black & white image –

Photo by Kent DuFault
It’s not easy to make an extraordinary one.
One of the most common problems with a digital conversion to black & white is either a lack of contrast, or, too much contrast. It’s our assumption that most of our readers are shooting digital, so for that reason, we’re going to forego the discussion on black & white photography regarding the use of film. However, many of the principles discussed in this guide would also apply to film photography as well.

Photo by Frank Kovalchek
What Will Be Discussed in This Beginner's Guide?
- What is a monochromatic image?
- Understanding tone versus color.
- Should you create your black & white image in camera?
- Exposure considerations for black & white.
- Adjusting composition for black & white.
- How to use your image processing software as a darkroom.
- How colored filters adjust tone.
- Using tint for mood and emotional impact.
- Should you use a custom lab to print your prized photograph?
- The archival nature of black & white prints.
What is a Monochromatic Image?
You may be asking yourself- “Where did the term monochromatic image come from? I thought we were talking about black & white photography?”
Well… We are. A black & white photograph IS a monochromatic image- but so is a sepia photograph or a blue toned photograph. This concept was easier to understand in the film days because these “coloring” processes were chemically applied to the actual black & white photo paper. It could be a sepia print, but it was also a black & white print; it was a sepia toned black & white print. Nowadays, we click a button in our software and suddenly the image is black & white, or all blue, or all red, or yellow. We want you to understand that these are all monochromatic prints. A monochromatic photograph means that the full color spectrum has been removed.
This is a monochromatic black & white photograph – despite the fact that it is toned “red”.

Photo by Pink Sherbet
Understanding Tone Versus Color
If you get nothing else out of this guide,we want you to pay special attention right here!
From birth, our brain is trained to see the world in color.
For this reason many photographers, especially first-time photographers, have trouble re-training their brain to think in terms of tone.
Tone does not differentiate color. Two colors of the same tone will appear the same in a monochromatic image.
Real world example-

Photo by Kent DuFault
This macro shot of a dried flower has interest because of the subtle shades of color: yellow, blue and purple.

Photo by Kent DuFault
A black & white conversion of the same image appears lackluster and lifeless. This is because all the colors were similar in tone.
When converting your images to black & white there are ways to adjust the color values to certain tones. We will discuss this
further momentarily.
More importantly, you need to train your brain to see tone.
A great way to do this is to buy a pair of deeply shaded sunglasses with non-colored lenses. When you think you want to shoot an image for black & white reproduction, put on the sunglasses and view the scene through one eye. The sunglasses will effectively eliminate all color in the scene (reducing everything to shades of grey), and by looking through one eye you are getting the two dimensional perspective of a camera lens.

Photo by PunkJr
Should You Create Your Black & White Image In Camera?
We would suggest you do not. Although many cameras now allow this option, there are significant disadvantages. The one reason you might choose to do so is if you have no post-processing software.
We suggest not creating the black & white file in camera because you lose control with the conversion. You’re letting the camera decide what the tone values should be. If you do the conversion using software, you have much greater control over how the colors are turned into tones.
A great tip for mastering black & white photography is to study the masters: photographers such as Andre Kertesz, Alfred Eisenstaedt, Elliott Erwitt, Ansel Adams, Margaret Bourke-White, Robert Capa, and Garry Winogrand.
When you spot an image that you like, try to recreate it!

Photo by Thomas Leuthard
Exposure Considerations for Black & White
Exposing for a black & white image is similar to color photography.
But, when you get into post-processing, you want to take special care with the black point and the white point.
Have you ever looked at a black & white photograph and thought to yourself, “The blacks look inky… like someone poured black ink onto the print.” Or, conversely, have you noticed highlights that are bleach-white? For example, you can’t even see the buttons on a white shirt worn by a man in the photograph.

Photo by Pixydust8605
These are problems with the black point and white point levels.
In general, when you’re exposing for a black & white image you want to expose for the highlights. Make sure you don’t overexpose and let the details burn out!
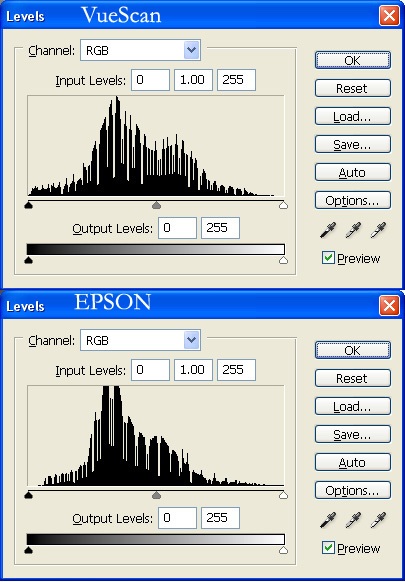
Photo by Nesster
Once you’re at the post-processing stage, open up your histogram and adjust the levels so that the black point is no less than 10 and your white point is no greater than 248. At these settings your black values will reproduce deep and rich without looking “inky”, and your highlights will look white without being “blown out”.
Adjusting Composition for Black & White
The tools of composition apply equally to color versus black & white. But, once again, it goes back to training your mind to see in tone. Take, for example, juxtaposition. If your juxtaposed elements are of a similar tone they could lose the contrasting values that made them a good tool of composition to begin with.
The tools of composition such as leading lines, the S curve and juxtaposition still apply. You just want to make sure that they don’t lose their impact when converted to a monochromatic image.

Photo by Kent DuFault
How to Use Your Image Processing Software as a Darkroom
We decided earlier that it was a good idea to convert our image to black & white in our post-processing software.
There are a number of ways to take your color image to black & white. The simplest method is to de-saturate the image or turn it into a grey scale format rather than RGB. These methods aren’t recommended as they tend to create flat images without a full range of tones. They also limit your ability to manipulate the tones of the image afterwards.
Recommended Software: If you’re serious about creating top notch black & white images, we suggest you invest in a plugin such as Nik Software’s “Silver Efex Pro”, or, Topaz Labs, “B&W Effects”. There are other options available- these are just our favorites.
You may also want to check out this website: http://www.powerretouche.com/. We’ve heard excellent things about their conversion software. Another option where you can experiment with their program for free is BWStyler.

Photo by Kent DuFault
If you don’t want to mess with additional software, do your conversion through the channel mixer. When you open it up in Photoshop, you will see a monochrome button. Click that and it will do a conversion. You can then adjust the RGB tone values by moving the sliders up or down.
The plugins offer the highest degree of control over the conversion process and the tone values assigned to various colors within the image. We highly recommend that you go down this route.
"If you don’t want to mess with additional software, do your conversion through the channel mixer."
Carefully examine the following photographs. You should take note of how each method evaluated the color and converted it to a monochromatic tone.

Photo by Kent DuFault
This (above) is a simple desaturation of the image.

Photo by Kent DuFault
This is a conversion using the Channel Mixer in Photoshop.

Photo by Kent DuFault
This image was converted using the Nik Silver Efex Pro software.

Photo by Kent DuFault
This last image was converted using the Topaz Labs B&W Effects software.
How Colored Filters Adjust Tone Value in Black & White
If you apply a green filter (either optically or electronically) to a color image, you get a green colored image. The filter removes all the values of the color spectrum except for green.
With black & white imaging the effect is exactly the opposite.
This is a very important point!
You can adjust the tone value of colors within your black & white image by applying a colored filter. This can be done optically or electronically. We suggest you do it electronically as it will allow a greater degree of control.
In black & white photography a color filter absorbs its own color of the spectrum. The result is that whatever color the filter is it will lighten the tone of that color in the image. Opposing colors on the color wheel will become darker.
Real world example-
You place a green pear and a red apple on a table and create an image. The resulting black & white image is lackluster because the green pear and red apple are the same tone. You then apply a green filter (either optically or electronically). This results in the pear becoming lighter and the apple (red being the opposing color on the color wheel) becoming darker; you now have a more pleasing photograph due to the contrast difference.

Photo by Leopard Print
Colored filters are an important tool when imaging black & white. One of the benefits of the plugins mentioned earlier is that you can even adjust the shade and intensity of the colored filters which provides precise control over your tone changes!
"Colored filters are an important tool when imaging black & white."
Using Tint for Mood and Emotional Impact
When black & white prints were produced by film photographers, they would occasionally “tone” the print. This was done chemically by soaking the print in a toning solution. Common toners include sepia, selenium, gold, blue and red.
There were two reasons to tone a print: mood and longevity.

Photo by Joel Bedford
Let’s talk about mood.
A toned monotone print can add mood to your image. Consider a black & white desolate beach scene that is toned blue, or, a heavily treed park with the sun shining through that is toned gold.
Use tone sparingly, only when it enhances your subject.
Longevity is added to a black & white photographic print when it is chemically toned. In order to accomplish this you would need to talk to a lab or do it at home.

Photo by Torsten Reuschling
Should You Use a Custom Lab to Print Your Prized Photograph?
This really depends on what you want from your final image. For example, you can have a black & white print made by your local convenience store lab but the problem is they aren’t really producing a “true” black & white print. They are creating a color print with black & white tone. That’s why they will often have a color skew. If you want a true black & white image with the full range of tones, with black & white photographic paper and archival quality, you’ll find this only at a custom lab.

Photo by Magdalena Roeseler
The Archival Nature Of Black & White Prints
This final comment is one of our favorite aspects regarding black & white photography: Black & white photography has a known archival lifespan. A properly produced black & white photograph has the potential to last 100+ years. This is a proven fact.
"A properly produced black & white photograph has the potential to last 100+ years."
Manufacturers of inkjet products claim this kind of lifespan, but do so only through their own testing. Black & white paper prints have actually stood the test of time.
If it’s important to you to have your art outlast your lifespan, you now know what you need to do.
- Have a true silver halide black & white paper print made at a custom lab.
- Have your print chemically toned (if it fits the mood) which can increase the lifespan of the image.
- Mount and frame your image using only archival quality materials. When framing, you should put the image under UV glass.
We hope this information and these tips will inspire you to shoot more black & white images and proudly display them. Who knows, maybe you will be the next Ansel Adams!