


Have you ever been awe struck by those super quality bird shots in a magazine or on social media? I clearly remember ‘that’ stage of my bird photography venture a few years ago when the capture of magazine-quality images was not even a dream. It was something that belonged to a world far removed from my own. Very far. I neither had the know-how nor the budget or the self-belief to make it happen!
I was simply amazed by the amount of detail and sharpness of the images portrayed in the top bird photography magazines and I just knew that producing similar quality photos with the modest bridge camera in my hand was not even a remote possibility. Yes, I could zoom in using its 20x optical zoom feature, but the result was never really going to be something to brag about!
A few years later I joined online bird photography forums (birdphotographers.net being the best I’ve seen so far). I was struck with awe yet again when observing stacks of magazine-quality images being produced daily, by ‘ordinary’ people like us! Even better: I was able to chat to them and it slowly dawned on me that ‘Hey, if they can do it then just maybe so can I!’
Long story short: I’m quite confident that you can also compete with some of the best out there as far as sharp, quality images are concerned. But how? In this guide, I’m going to tell you how I believe you can end up producing the same quality images as some of the best out there – or at least something quite close to it!
In this article, I’m going to help you achieve sharp, in-focus bird shots by focusing (pun intended) on two of the most important traits of a good-quality image. These traits sound similar, and they are. They’re not identical, though, so let me explain what I mean by them for the purpose of this guide.
1. Focus
By ‘in focus’ I mean that the image is not blurred. An in-focus image can usually be sharpened successfully in post-processing. An out of focus (blurred) image cannot be rescued by sharpening tools in postprocessing and is thus destined for the bin.
2. Sharpness
For the purpose of this guide, a ‘sharp’ image is an image that is in focus but in addition to that, the detail about the bird is clear and sharp. For example, you can see the surrounding environment reflected in your bird’s eye and/or you can see the finest feather detail of your subject.
How Do They Do It?
So what are the tricks applied by the masters of bird photography to obtain sharp, in-focus images? Well, let me start by getting something off my chest first.
Have you heard the saying that it’s not the camera that makes an image, it’s the photographer? Yeah, right! Look, I’m not saying all of that is a lie, but I do believe that it’s a white lie. If everything depended on the photographer, then why do the best of the best out there invest in equipment so expensive that we middle class guys can only dream of owning the same? Take a few seconds to think about that…
Now let’s have a look at how to go about producing sharp, in-focus images.
Recommended Reading: If you’d like to improve your composition skills for better nature photography images, grab a copy of Photzy’s best-selling premium guide, Understanding Composition.
Decent Kit
Fact of life: you may be able to take decent shots of a caged bird with your mobile phone, but if you want to snap a bird in flight then you’re going to need a DSLR camera and a decent lens.
Yes, I know – us middle class mortal beings can only dream of owning an f/2.8 prime lens with a focal length of 300mm or more. If you can afford one of these, fantastic! Don’t even think about it – buy it! Also, get a 1.4 teleconverter (‘extender’ for Canon) to enhance its reach, but keep in mind that you do lose at least one f-stop of light in the process (in simple terms that means your f/2.8 lens turns into an f/4 or even slower when using a 1.7x or 2x teleconverter).
Fact of life: you may be able to take decent shots of a caged bird with your mobile phone, but if you want to snap a bird in flight then you’re going to need a DSLR camera and a decent lens.
Fortunately Canon and Nikon thought of us when recently producing very decent zoom lenses in the 100-400mm and 200-500mm ranges. Tamron and Sigma have also taken huge steps ‘for mankind’ with their recent releases of the Tamron 150-600 G2 and Sigma 150-600 Sports lenses. The Sigma 150- 600 Contemporary lens is nothing to scoff at, but personally I’d rather add the extra few bucks and buy the Sports version. Rather be safe than sorry!
If you are after sharp, in-focus images, then invest in one of the lenses mentioned above. It’s worth every penny! You might get away now and again with a kit lens like the outdated Tamron 70-300mm, but you’ll only be able to opt for ‘easy’ shots (for example, static birds in good lighting conditions). There will be many times, however, where you will kick yourself for not investing in something more decent. It’s only a matter of time before you upgrade. Take my word for it!
Key Lesson: Bird photography requires more than ‘average’ capabilities from your kit. It has to cater for small subjects at far off distances, sometimes moving erratically and/or fast. It therefore makes sense to invest in at least one quality lens – zoom or primary.
Zoom lenses are more flexible in bringing your subject closer and are cheaper than ‘pro’ (f/2.8) primary lenses. The latest generation of zoom lenses offer awesome features and image quality, so if you cannot afford one of the ‘pro’ lenses, they are a good alternative.

Photograph by Tobie Schalkwyk
The Tamron SP 150-600mm F5-6.3 Di VC USD G2 (image above) is currently (May 2018) Tamron’s latest-generation long range zoom lens.
It competes with the following lenses in terms of price and quality:
- Canon EF 100-400mm f/4.5-5.6L IS IIUSM
- Nikon AF-S 200-500mm f/5.6E ED VR
- Sigma 150-600mm f/5-6.3 DG OS HSM Contemporary
- Sigma 150-600mm f/5-6.3 DG OS HSM Sports
Use Focus Settings to Ensure In-Focus Shots
Set Your Auto Focus Mode to AF-C
All DSLRs have AF-S (‘Single Area’ for Nikon or ‘One Shot’ for Canon) and AF-C (‘Continuous’ for Nikon or ‘AI Servo’ for Canon) auto focus modes. Some have one or more hybrid versions of this, such as AF-A (Nikon) or ‘AI Focus’ (Canon) AF modes.
Since we know that we are working with moving subjects, my recommendation is to select AF-C auto focus mode. That will ensure that your camera keeps on re-focusing as your subject moves around, as long as you keep the shutter pressed down half-way (or while you’re pressing the back button if you are using the back button focusing technique). You may want to switch back to AF-S only in the event of bad lighting conditions to prevent the focus mechanism from consistently hunting for high contrast points.
Note: In most cameras, the switching between AF modes is not as straight forward as for other settings. Make sure that you know where and how to change yours if needed. On my Nikon D600, one has to push down a round button inside the AF/M focus switch. You then check the current AF mode selection on the back-LCD screen after pushing the info button, or on the top LCD screen whilst rotating the main settings dial.
Use Back Button Focus
In the standard focusing mode your camera focuses for the last time just before you press your shutter release button to beyond the halfway mark. With back button focus, it keeps on re-focusing regardless of what is happening with the shutter release button.
At first, back button focusing feels a bit strange (and you might even ‘forget’ to hold it down the first few times), but once you’re used to it you will never go back to standard focusing mode. Check your guide or use Google to find out exactly how to set back button focusing on your particular camera.
Tell Your Camera to Only Release the Shutter if a Subject is in Focus
Do you know that most DSLRs have a setting to tell it to only release the shutter on the condition that your subject is in focus? If it is not in focus, then it would simply refuse to take the shot, implicitly letting you know that you have to try again. Your default setting might already reflect this, but it’s worthwhile to check it to ensure it does. How do you do this?
- Nikon: Select Custom Settings / Auto focus / AF-S priority selection / Focus; Now do the same for AF-C priority selection.
- Other camera brands will be very similar to this.
If Needed: Use Manual Focus
Mmmmm. Manual focus. A swearword in some photographers’ dictionaries, a scary term for some, a life saver for others! There are certain instances where you’ll not be able to take a shot at all without focusing manually. I’d like to urge you to make sure you know how to do this without the need to remove your view from the viewfinder. You’ll thank me later!
Most lenses nowadays allow you to focus manually by rotating the focus ring on the lens, even with your kit set up to auto focus. Keep in mind that if you’re not on back button focus, you’ll have to first select Manual focus on your camera or lens (either one), otherwise your manual focus adjustment will be overridden when you press down your shutter release button. Make sure you know where to disable auto focus when needed.
Most lenses nowadays allow you to focus manually by rotating the focus ring on the lens, even with your kit set up to auto focus.
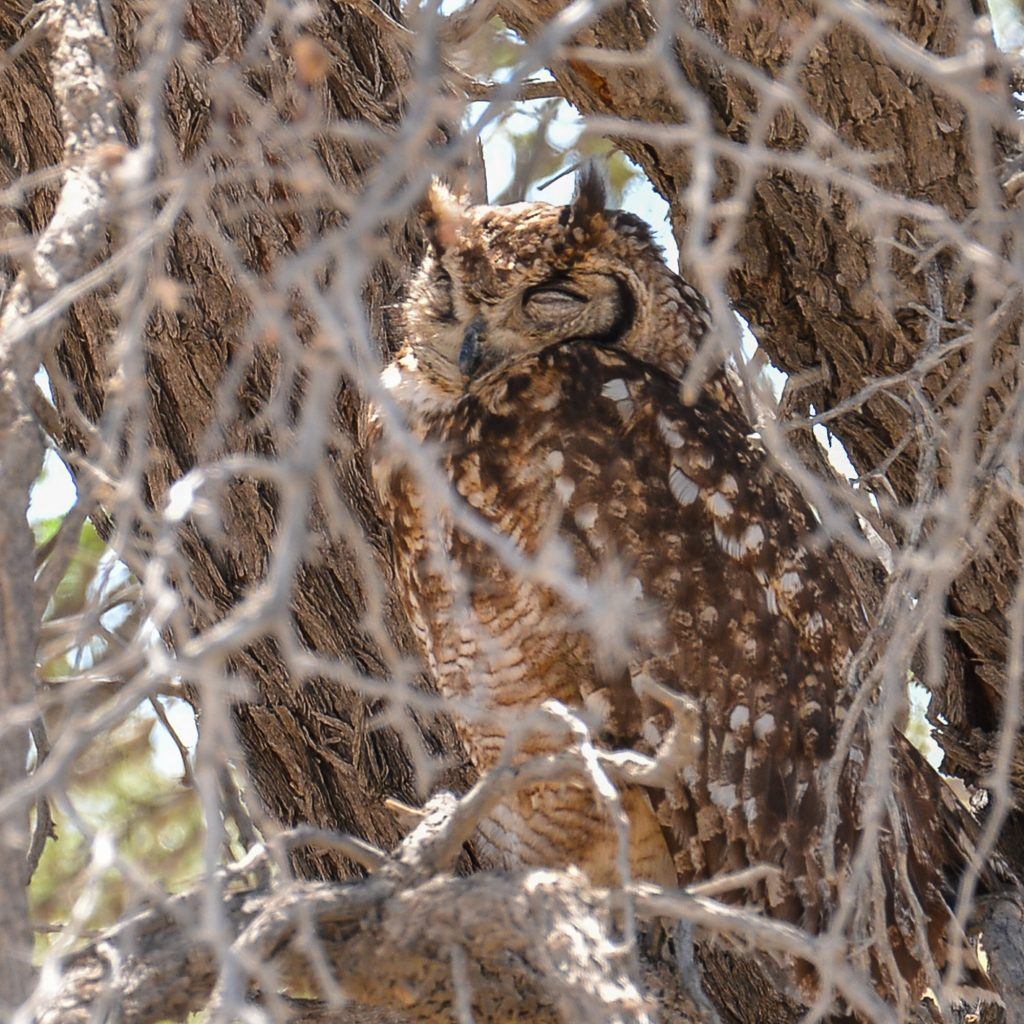
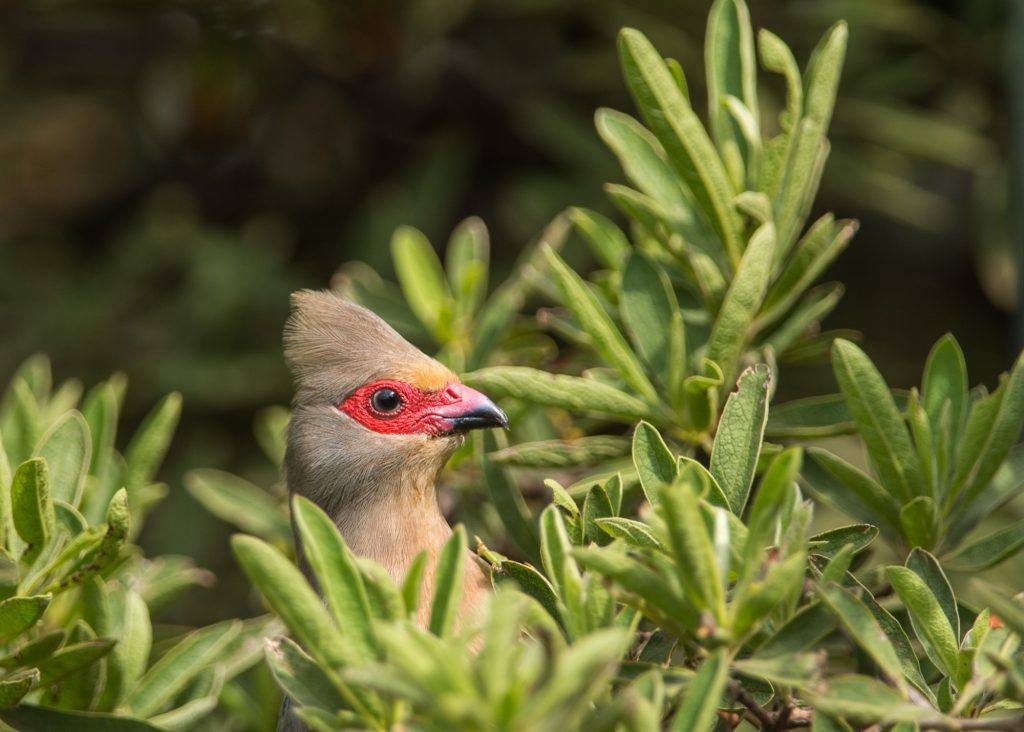
Nikon D600 + Tamron 150-600mm G2 @ 600mm | f/8 | 1/125s | 320 ISO | beanbag in car wind | Photograph by Tobie Schalkwykow
This image (above) would not have been possible without using manual focus, as the camera would keep on focusing on one of the branches in the foreground.
Key Lesson: Sometimes auto focus will not be suitable for certain shots, such as when your subject is partially hidden behind branches or leaves, or when it’s too dark for the camera to focus all by itself. Manual focus is the only way of landing these shots, and if you can do so without first fiddling with switches and settings, then good for you!
Stay Away from Your Lens’ Limits
This may or may not be a factor depending on what era your lens comes from and what quality lens you’re using. In general, your pro lenses (f/2.8 or wider aperture prime lenses) are less problematic as far as this topic is concerned, but not so for the vast majority of kit lenses (mostly entry level zoom lenses).
Every lens has a ‘sweet spot range’ as far as aperture and focal length is concerned. If you’re not using a pro lens, you can generally assume that you’re not going to get your sharpest shots at its wider aperture. In general, your sweet spot is going to lay between f/7.1 and f/8.
Similarly, your non-pro zoom lenses are generally not at its sharpest when fully zoomed in. Try to stay away from the last 20- 25% of its range. For example if you’re using a 70-300mm zoom, try to avoid anything beyond 220-250mm focal length.
If you HAVE to shoot close to these limits for some reason, try to avoid shooting close to both simultaneously. In other words, if you HAVE to shoot at your widest aperture, try to stay away from your longest focal range and vice versa.
Obviously sanity must prevail; I’d rather have a 90% or even 60% quality shot than nothing at all! So if you have to ‘cross these lines’ then do so, and do everything else possible to get a good-quality shot (image stabilization, camera stability support, etc.). Most of the time, if an image is reasonably sharp, it can be sharpened a bit more (within limits) in post-processing. Having said all of the above, both the brand and ‘generic’ names have recently made huge strides in getting good-quality shots at the ends of their latest zoom lenses’ apertures and focal length ranges. I have taken numerous super-sharp shots with the Tamron 150-600mm G2 at f/6.3 and 600mm and I have seen the same from Sigma’s 150-600mm Sports lens, Nikon’s 200-500mm, and Canon’s 100-400mm Mk II lens.
Whatever lens you’re using, Google its reviews and take note of its limitations (if any) so that you can stay clear of them as far as possible.
Key Lesson: Unless you have one of the latest generation zoom lenses (or one of the ‘pro’ prime lenses), you may lose image quality when using it at its widest aperture/longest focal range or both of these together. Know your lens’ limitations and stay clear of those for the sake of super-sharp in-focus images.
Apply the Reciprocal Rule of Photography
This is particularly true for hand-held shots. The rule is as follows: your current shutter speed should be at least as fast as the reciprocal of your current focal length. In other words, if you’re shooting hand holding your camera at 400mm, then your shutter speed should be 1/400 or faster.
The rule is as follows: your current shutter speed should be at least as fast as the reciprocal of your current focal length.
In general, this should not be a problem for bird photography as the nature of your subjects is such that you’d mostly prefer to use shutter speeds of 1/640 or faster. Having said that, if you mount your 150-600mm lens on a crop sensor camera, your implied focal range goes up to 900mm. If you do not keep this in mind when applying your reciprocal rule (and use a tripod regardless), then you’re going to be hugely disappointed with the results!
Just to make things more interesting, the use of optical stabilization turns the reciprocal apple car right on its head. Theoretically, it allows you to slow down your shutter speed by as many f-stops as your particular lens’ specifications specify. For example, Nikon’s 200-500mm is offering 4.5 f-stops of vibration reduction.
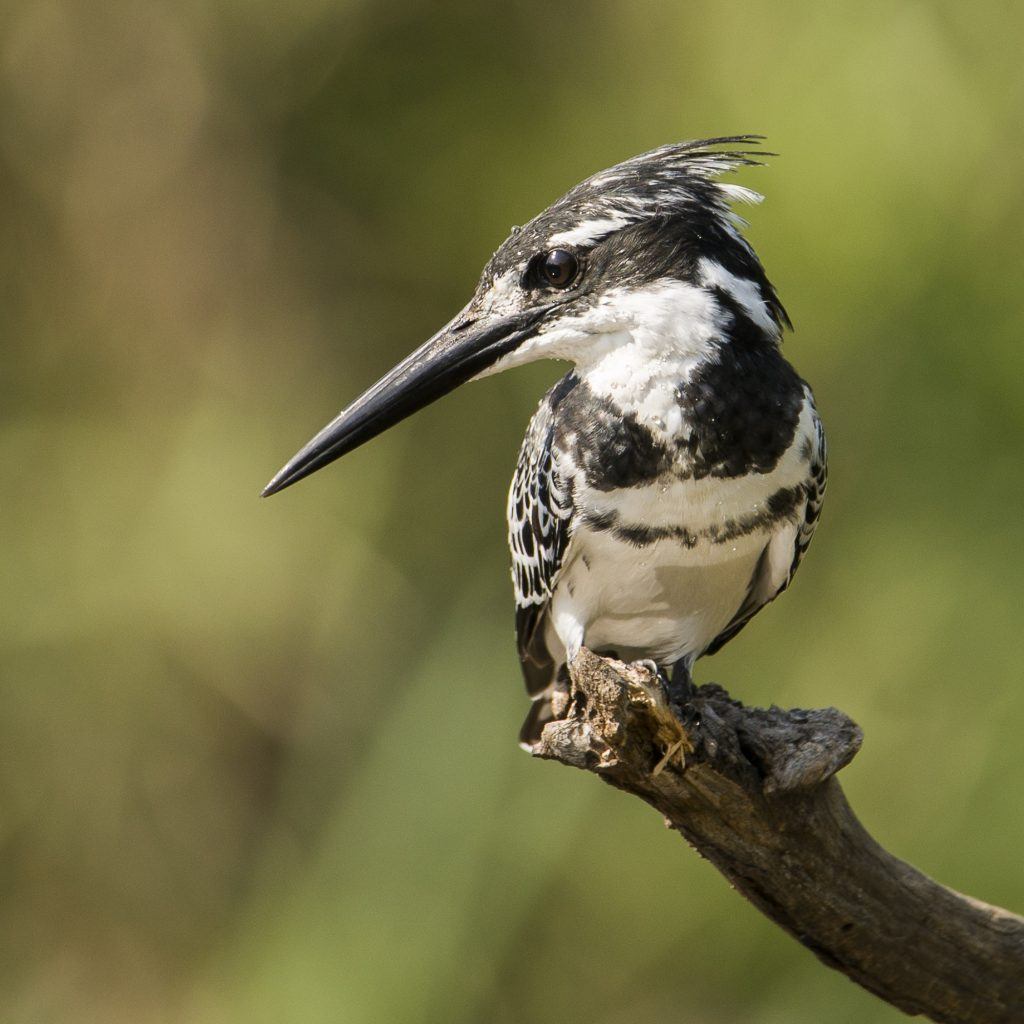
Nikon D600 + Tamron 150-600 G2 @ 600mm | f/6.3 | 1/640s | 160 ISO | Beanbag | Photograph by Tobie Schalkwyk
Panning in the event of a bird in flight also makes the reciprocal rule obsolete, because relative to the ground a bird might be traveling at 60km/h, but relative to your camera’s panning movement it’s only traveling at 1 or 2 km/h (unless it’s moving erratically like swallows etc.). Your shutter speed in this case is more based on how much you’d like to freeze the bird’s moving feathers. Quite high shutter speeds may be necessary to freeze it 100%.
I tend to ignore the number of f-stops offered by image stabilization for the sake of simplicity. As far as bird photography is concerned, decreasing your shutter speed by 4.5 f-stops is guaranteed to give you blurred images because of the movement of your subject if not for any other reason.
Use Image Stabilization Sensibly

Photograph by Tobie Schalkwyk
Image stabilization is a great tool for preventing camera shake or slow bird movements, so use it for static birds.
Disable it for flying birds, though (and when using a tripod or bean bag), as it might slow down (or interfere with) your focus speed, preventing you from getting a super-sharp shot or sometimes any shot at all.
Image stabilization is perfect for static or semi-static birds such as those looking for nectar.
Note: Some lenses have different image stabilization options to choose from. For example, one option might stabilize the scene in the viewfinder, whereas another only stabilizes it in the camera. Be aware of the options offered by your lens and select the one that works best for you.
Consider and Know Your Lens’ Currently Selected Total Focal Length Range
Most lenses have a switch to limit your lens’ focal range in order to speed up the time it needs to find and focus on your subject. My Nikkor 70-200mm offers me 2.5m – infinite (∞) as well as ‘Full.’ My Tamron 150-600mm offers me three settings: 2.2m – 10m, 10m – ∞ and ‘Full.’
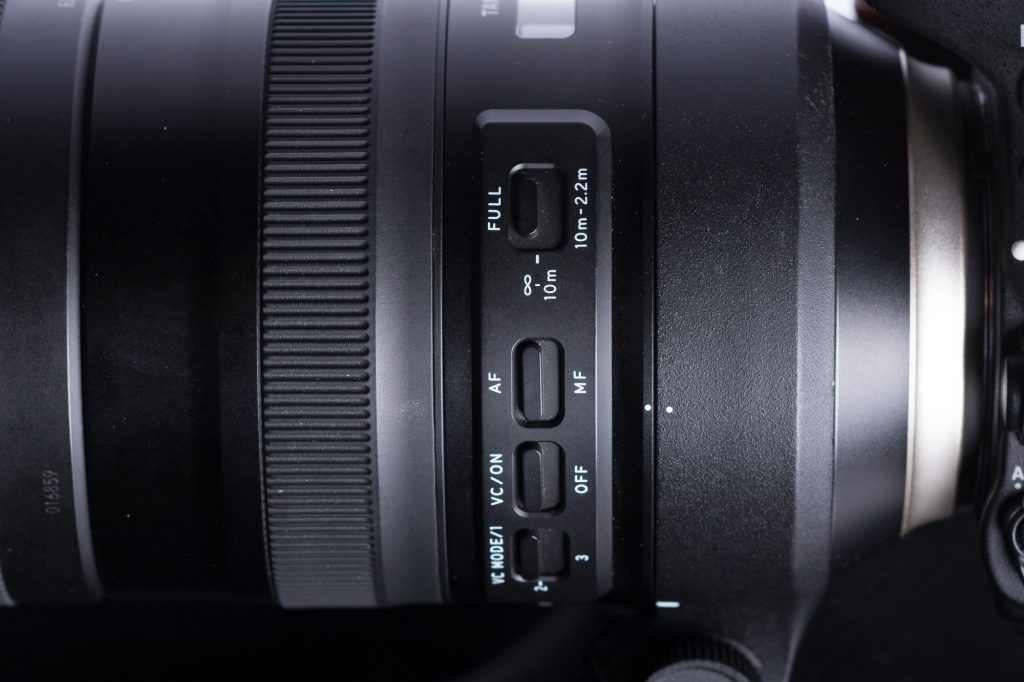
Photograph by Tobie Schalkwyk
Take note of the options on your lens and use them sensibly. Keep in mind that the ‘Full’ range might cost you a nice shot because it took too long to go through the full focal range in order to find your bird and focus on it in time, especially with birds in flight.
Similarly, you might miss a shot of a bird which suddenly perches 3 meters from you because your lens’ current setting prevents it from focusing so nearby. KNOW where the switch is on your lens and practice finding and adjusting it without looking away from your viewfinder. Yet again, you will thank me later!
Focus on Your Subject in Time
Photograph by Tobie Schalkwyk
This is quite important in the event of bird-in-flight photography. Unless a perched bird is taking a rest (for example, an owl in daytime), it is only a matter of time before it flies off.
Focus on it and then be patient and wait. If it takes a poop, then go on high alert!
Your lens will focus much easier on a bird in flight if it was already focusing on it before it took off, simply because it did not have to search for it first.
Get Close
I sincerely believe that most long range lenses are bought for the totally wrong reasons by amateur photographers. It is not to zoom in on faraway subjects. Yes, that’s the cherry on the cake, but there are a few other great benefits offered by it.
Firstly, if you get close to a subject at a long-range focal length it will give you a great blurred background. This will add perceived focus and sharpness to your subject as it is clearly separated from its surroundings.
Secondly, if you’re taking a close shot, it is going to give you fantastic detail of your subject. The perfect shot is one where your subject fills your frame to such a degree that you do not have to crop it later in post-processing to bring it closer or to recompose it. If you can do that whilst applying all of the recommendations mentioned above, you’re going to be pleasantly surprised by the results!
I never waive the opportunity to shoot a close-up of a bird using a long focal length, no matter how ‘dull’ the bird is. Nothing can give me greater pleasure than seeing and studying the detail of my subject afterwards
Recommended Reading: If you’d like to improve your composition skills for better nature photography images, grab a copy of Photzy’s best-selling premium guide, Understanding Composition.

Nikon D600 + Tamron 150-600mm G2 @ 600mm | f/6.3 | 1/640s | 800 ISO | beanbag | Photograph by Tobie Schalkwyk
This wagtail (image above) appeared 3 meters from me while snapping birds from a bird hide. It was still satisfying just to see the feather detail, in spite of it actually being a ‘dull looking’ bird.
What Shutter Speed Should I Use?
How long is a piece of string? I have seen a tendency on social media lately whereby any bird shot taken at shutter speeds slower than 1/2000 is negatively criticized just for the sake of criticism. I can understand to a limited degree where these critics are coming from. Basically they’re trying to eliminate every chance of getting a blurred shot, and if you have not done the same then you were ‘wrong’ in spite of taking a beautiful, sharp shot.
Reality strikes, however, when you have a camera that’s not that good at handling high ISOs and/or a lens that cannot go as wide as f/2.8. Then something has to give, right? Right!
The secret is to know your subjects. Some birds have very erratic head/tail/wing movements even when perched in one spot. In that case you’d sacrifice ISOs in order to prevent blur, or simply take a lot of shots hoping that a couple of them would catch it in between some of those erratic movements. Heck, we’re living in the digital age where we can later bin as many shots as we want!
Some birds have very erratic head/tail/wing movements even when perched in one spot.
I have taken super sharp owl shots at 1/8 simply because I know that the chances of it moving once it has found a place to settle down for the day are close to zero! So, know your subject and use common sense – what a fantastic combo to ensure a lot of great shots!
In general, my shutter speed is on 1/640–1/800 when shooting birds. I might go to 1/1250 or higher when shooting fast-moving birds in flight (swallows etc.). I think I can count on my one hand my shots taken faster than 1/2000.
Key Lesson: There are many theories about the minimum shutter speed for bird photography out there. Some of them are true; some of them are insane!
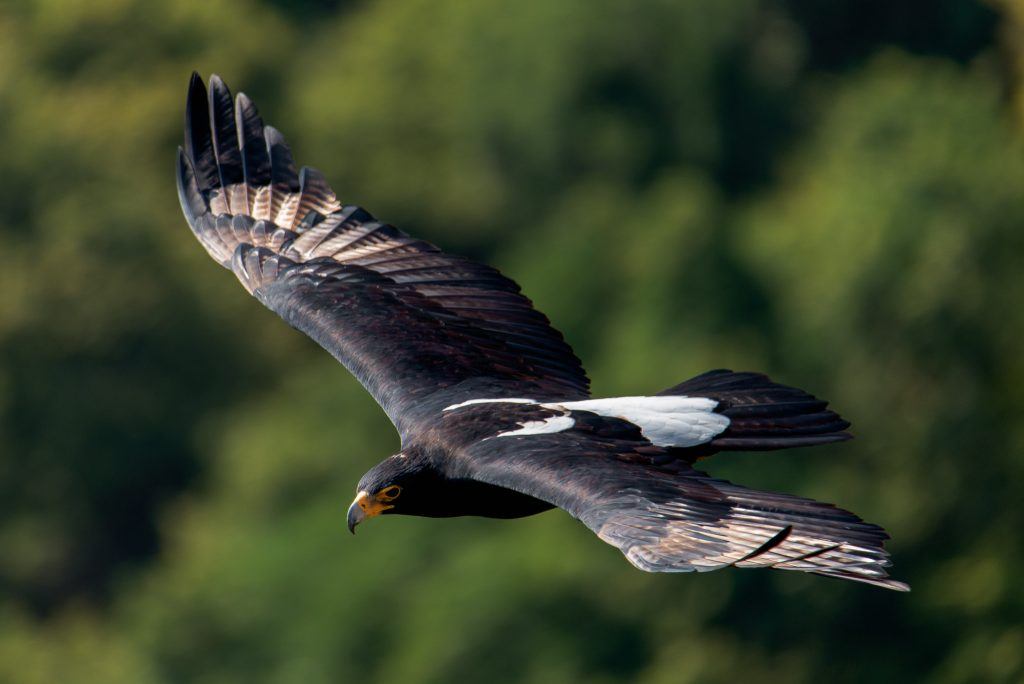
Nikon D600 + Tamron 150-600 G2 @ 600mm | f/6.3 | 1/640s | 400 ISO | Handheld | Photograph by Tobie Schalkwyk
Common sense is a virtue in this case. It makes no sense photographing a sleeping owl at 1/2000 ‘just because they say so.’ Similarly, if you try to capture fast-flying swallows or bee eaters at 1/400, you’re going to be disappointed. Try it if you want to, just to prove a point to yourself, but then return back to what works – and always remember the reciprocal rule of photography.
Sharpen Your Image in Post-Processing (If Needed)
Sometimes you know that your image is well in focus but it just needs that extra little ‘oomph’ to make it look really sharp. One of the reasons might be that you were forced to use your lens at its focal length and/or aperture limits. I’ve found that I needed to sharpen most of my images just a touch in the days when I used a Nikkor 300mm f/4 lens mounted on a 1.4x teleconverter. I usually do the following:
Lightroom Editor
As a rule, my default Sharpening Amount in Lightroom sits at +/- the 33 point mark. If needed, I might push it up to 40, and if I’m still not satisfied I call in the big guns by right-clicking and then selecting the ‘Edit in Adobe Photoshop’ option.
I’ve found that Lightroom is not great in extensive sharpening, causing pixelation if you ask too much of it. The result is pixelation, especially when displaying the image on social media.
Lightroom Export
I usually have the Export popup’s Output Sharpening checkbox selected (Screen/High). Sometimes images from my Tamron 150-600mm G2 lens appear ‘too sharp,’ in which case I’d deselect this checkbox and if needed also bring the Sharpening amount in the Lightroom editor back to zero.
Photoshop
Sharpening in Adobe Photoshop (PS) is way superior to Lightroom’s sharpening. This is actually a topic on its own as PS has a whole selection of different sharpening techniques, each suited to specific scenarios and end results.
I have tried various techniques and eventually settled down on its unsharp masking option (Filter/Sharpen/ Unsharp Mask) with Amount on 25%, Radius on 1 pixel and Threshold on 1 level. I may repeat the unsharp masking process once or twice if needed.

Photograph by Tobie Schalkwyk
Key Lesson: Sometimes, but not always, an image can do with a bit of sharpening in post-processing. Various sharpening methods are available, depending on your post-processing tools and personal preferences.
Make sure you know where and when to use these methods, and when to STOP! This is usually where beginner photographers go overboard and go way beyond what looks natural in their images, implicitly spoiling what were otherwise great shots.
Be on the lookout for pixelation (small light dots and lines) and noise appearing in your image and if so, back up the sharpening process by one or two cycles until the pixelation disappears (select Edit Step Backward in PS).
Know Your Gear
A few of the cameras which have entered the market recently have mind-boggling features to ensure infocus shots. If you have some of these latest cameras, study their guides and use Google to make the most of these. One can write a whole guide on this topic alone, so I’m just going to touch the surface.
Example: Nikon D500 has an ‘Auto AF Fine Tune’ feature whereby the camera automatically adjusts AF Fine Tune settings for the attached lens after achieving focus in live view. This is a nice way of fine-tuning your camera/lens combo all by yourself!
The D500 also has ‘Group Area AF Mode’ whereby it uses multiple focus points simultaneously, but only focuses on the closest object from amongst those picked up by them all. This will not work where your subject is surrounded by other objects closer to you than itself because it will then focus on one of these ‘other’ objects. It will work excellently in all other cases, though, for example for birds in flight against a clear sky or across a dam where you do not have other objects in the frame closer to you than your subject.
The Canon 5D IV has ‘expansion points’ to assist the center focus point in keeping a subject (such as a bird in flight) in focus. If you’re fortunate enough to own this beast of a camera, do your homework to know how and when to use this.
Key Lesson: There are numerous camera tools and features available to assist you in obtaining perfect focus, depending on the brand and how recently it came onto the market. Make sure you know which to apply to your particular camera by studying guides and reviews, by using Google, and by building up relationships (online and personal) with photographers using the same camera. You’ve paid the bucks, now use your camera optimally to justify your investment!
Recommended Reading: If you’d like to improve your composition skills for better nature photography images, grab a copy of Photzy’s best-selling premium guide, Understanding Composition.
Conclusion
Photograph by Tobie Schalkwyk
Sharp in-focus bird images are a result of good gear, well-selected camera settings, and common sense. They do not just ‘happen by chance.’ Well, not as a rule. Make sure you know which of these are applicable to your specific kit and how to use them optimally.
If you feel that you have to invest in a higher-than-kit-priced lens, do so. No money can buy the satisfaction of looking at an image and thinking to yourself, “Really? Have I produced this?” Most of all, enjoy this fantastic hobby and share your great images with the world out there. There are a lot of guys out there wishing to do what you do but they cannot, due to financial or other limitations. Viva bird photography!
Self-Check Quiz:
- Can you sharpen an out-of-focus picture in post-production
- Name two-third party lens manufacturers who make fabulous lenses for bird photography.
- What type of lens brings more flexibility to bird photography
- What autofocus mode should you use?
- Name the alternative focusing button that is very helpful for bird photography.
- True or False: Never use manual lens focusing for bird photography.
- What does it mean to “Stay Away From Your Lens Limits”
- Describe the Reciprocal Rule.
- What would you use a beanbag for
- What is the general range of shutter speeds when photographing birds?
- What is the term that describes the small light dots and lines that occur if you over-sharpen your image?


