

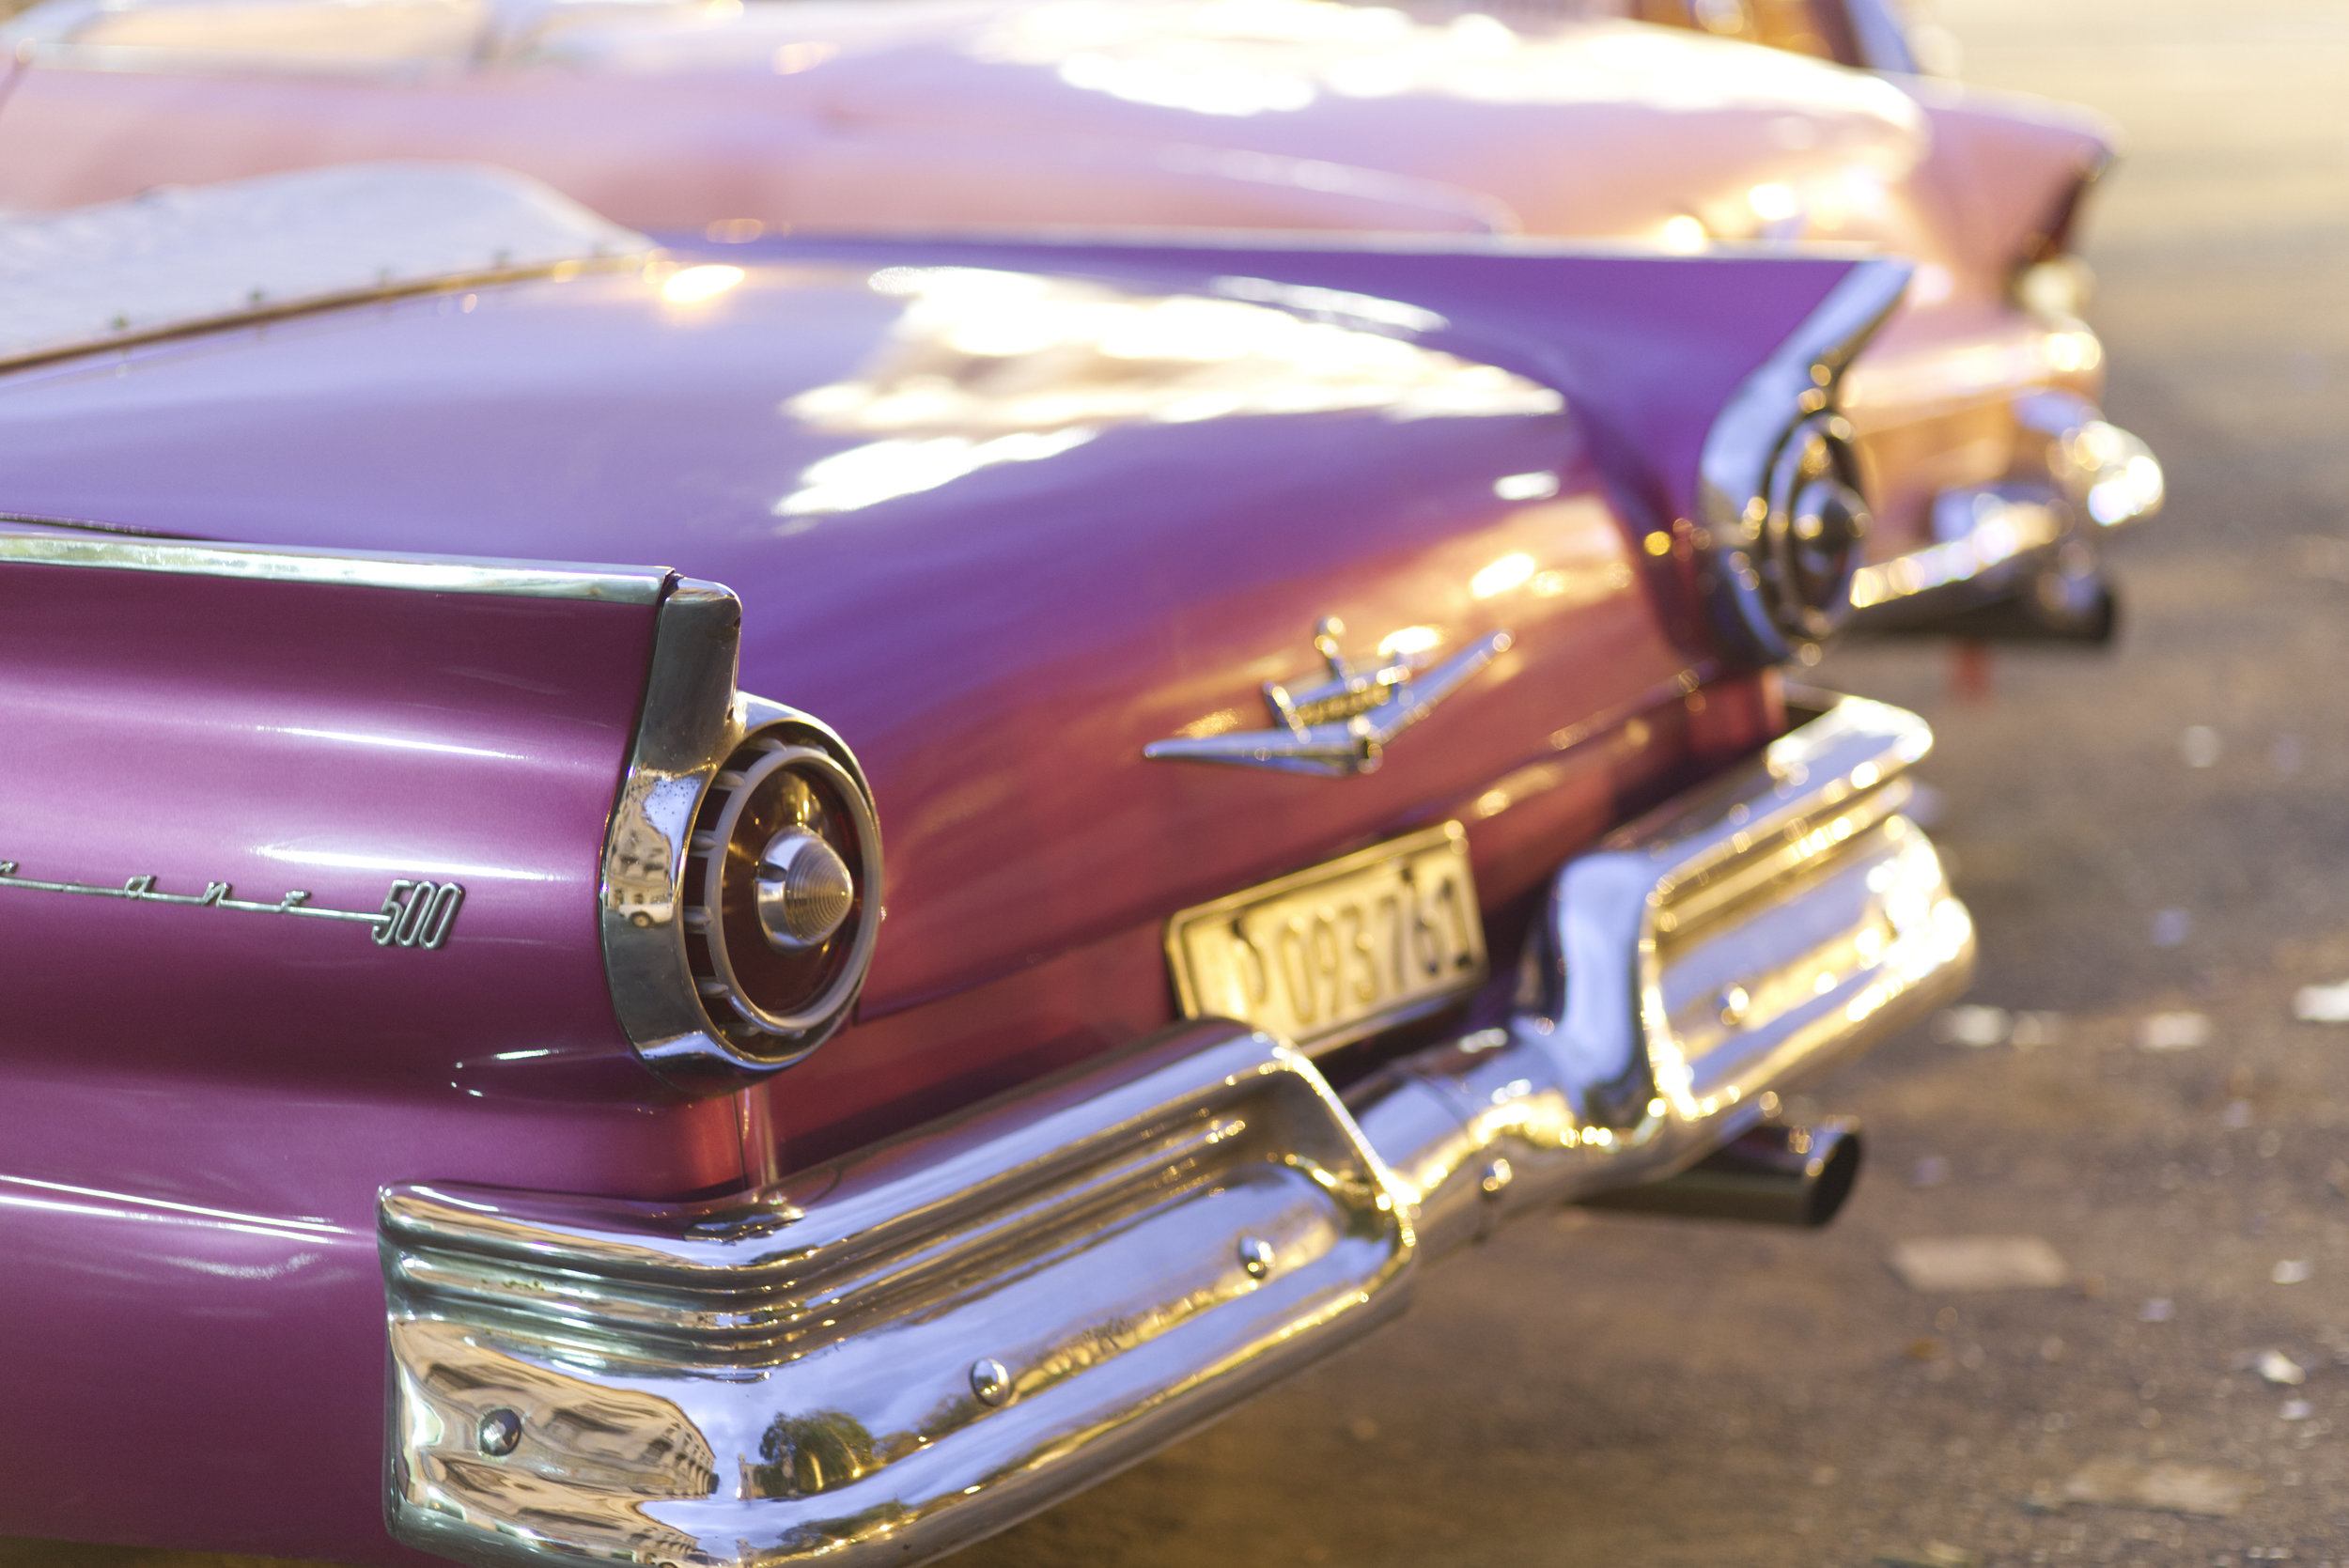
Havana at f/1.8. My proximity to the car’s tail fin renders it pin-sharp while the background melts into perfect, smooth softness. That’s the power of bokeh – used to concentrate the eye on one part of the image while softening everything else. Photograph by Robin Nichols
To be honest, I was never really convinced that this bokeh thing – the quality of the out-of-focus bits found in the backgrounds of our images – was really up to scratch. But that was long before I had the money to invest in some really good lenses and see for myself.
Creative photographers have several ways with which to influence their audiences. The most important factors include the following:
- Subject
- Exposure
- Tone
- Foreground interest
If any one of these topics are found wanting, chances are the image ends up looking a bit run-of-the-mill or, dare I say it, just boring.
Importantly, you don’t need to have all of these boxes ticked at the same time; although, doing so would clearly help produce a stronger result. And while technology clearly has a part to play in this list, most pointers rely more on human input than on owning the best camera you can afford.
Here’s what we’ll cover in this article:
- The correct pronunciation of the word bokeh
- The true meaning of bokeh
- How to create shallow depth of field effects
- What lens characteristics work best for this DOF look
- Beautiful bokeh lenses (suggestions)
- How to troubleshoot focus issues
Recommended Reading: If you’d like to master camera settings to create gorgeous, creamy, blurry backgrounds, grab a copy of Photzy’s premium guide: Beautiful Background Blur.

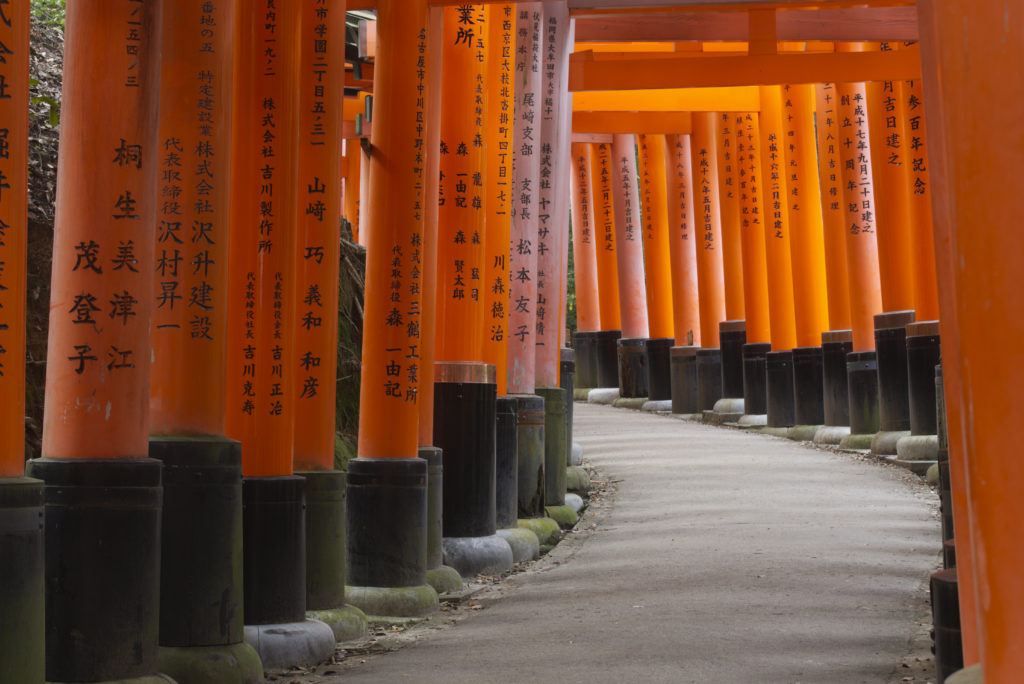
Here’s an example of where the bokeh (the out-of-focus background) works exceptionally well. The wide f2.8 aperture on my Canon EF70-200mm lens (at 200mm) throws the background of these temple gates into a mush of sublime out-of-focus pixels – something I have come to expect from such an expensive lens! Photograph by Robin Nichols
Bokeh at Work
Many years ago, I worked in a photo processing lab. One of its most prolific clients, I recall, was a fashion photographer who’d shoot at least ten rolls of film for each client. He’d cull the processed slides down to maybe one or two shots from each roll of 36 exposures. Apart from the volume of film shot for each job, what impressed me was this photographer’s lens choice. He didn’t use what I’d call a proper portrait lens. In those days this was any prime lens with a focal length between 85mm and 135mm – good lenses with wide maximum apertures, while being just magnifying enough to fill the frame nicely without getting in the subject’s face. He used a huge f/2.8 300mm telephoto lens, not the sort of lens you’d normally associate with fashion.
But looking at the results (as I always did while packaging the slides up) it was clear why he used this specific lens. At f/2.8 or f/4, his subjects were always pin-sharp, while the backgrounds were always completely soft. This meant that the bokeh characteristic of the lens gave him sublimely soft backgrounds, regardless of the location. This was a great example of bokeh at work.
Bokeh? What bokeh? Same location, same lens magnification, but different angle and shot at f/22. Because the subject is slightly further away from the camera, the almost fully stopped-down lens produces little softness in the foreground or background, thus emphasizing maximum clarity. Photograph by Robin Nichols
Key Lesson: Longer (telephoto) lenses produce better out-of-focus effects. Wide-angle lenses produce the opposite. Lenses with faster (wider) maximum apertures also produce significantly better bokeh.
Bokeh is a Japanese term used to describe the quality of the out-of-focus parts of an image. It’s a word that is almost always mispronounced. Though written as ‘bokeh,’ it’s pronounced as if it were two words: ‘bo’ and ‘ke.’
For photographers, fashion or otherwise, emphasizing the bokeh effect is one of the most powerful ways of manipulating the viewer so they see what you want them to see, while obscuring less important or distracting parts of the image, notably the background.

I think this portrait, taken at f/1.8 with an 85mm lens, illustrates the bokeh effect nicely. Because the man is facing me directly, the very narrow depth of field produced by this aperture just holds his eyes and nose in focus, but the ears clearly are completely soft. The background, which was speckled with graffiti, came out deliriously soft, a perfect result in this context. Photograph by Robin Nichols
So, where does it come from, and can you create it using any lens, not just an expensive 300mm telephoto?
Bokeh, or out of focus-ness, is an optical phenomenon that comes about through a range of technical features which include lens focal length and aperture. The bokeh effect therefore is inextricably linked to the lens’ depth of field.
We know that the f-stop number controls how much of the subject appears sharp, in front of, and behind, that all-critical point of focus. The larger the f-stop number (the physically smaller the aperture), the more ‘stuff’ appears sharp in front of, and behind, the point of focus. Shallow focus is created when shooting with a wide aperture (i.e. f/4), and deep focus is created when the aperture is set to a small number, such as f/22.
So, although the term bokeh is technically influenced by the depth of field, it’s also about the visual quality of those out-of-focus bits, not the sharp bits. All lenses display this out of focus-ness, but no one lens bokeh is quite the same as another’s when referring to the out-of-focus bits.
Many years ago, I considered bokeh and ‘fast lenses’ to be no more than marketing hype, but then I bought a 50mm f1.4 lens and immediately fell in love with its ultra-soft out-of-focus bokeh characteristic.
Most photographers using a DSLR or a mirrorless camera start with the lens that comes attached as part of a bundle. It’s usually what’s called a kit lens, meaning it’s more of a budget starter type of lens, and it probably has a focal length range approximating to 18-55mm. Some have a wider range (i.e. 18- 135mm), while a few have a shorter focal range.
So, although the term bokeh is technically influenced by the depth of field, it’s also about the visual quality of those out-of-focus bits, not the sharp bits.
When focused on a specific subject, all types of lenses will display out of focus-ness in the bits that are neither physically focused on, as well as those bits that are not dragged into clear relief through the use of a small aperture (i.e. f/22). If I set my 18-55mm zoom lens to the 50mm setting and then compare the out-of-focus background it produces with a similar shot using a better-quality lens, like my 50mm prime lens, you will notice a difference in the quality of the softness.
So, although all lenses display bokeh characteristics, some lenses are far better at doing it than others. How is this so?
Arguably the ‘best’ bokeh is produced by lenses that contain optimum quality glass elements, as well as the fastest (widest) apertures. My fashion photographer might not have been so successful if he’d used a cheaper lens that only opened to a maximum aperture of, say, f/5.6 or f/6.7. And while most of the better lenses are ‘pro’ lenses (therefore very expensive), some companies (notably Sigma) have made a name for themselves by specifically designing products to produce the best possible bokeh.
Key Lesson: It’s worth noting that some manufacturers make a point of promoting a lens’ bokeh, which indicates that the bokeh produced will be superior to lenses designed with lower budgets in mind.
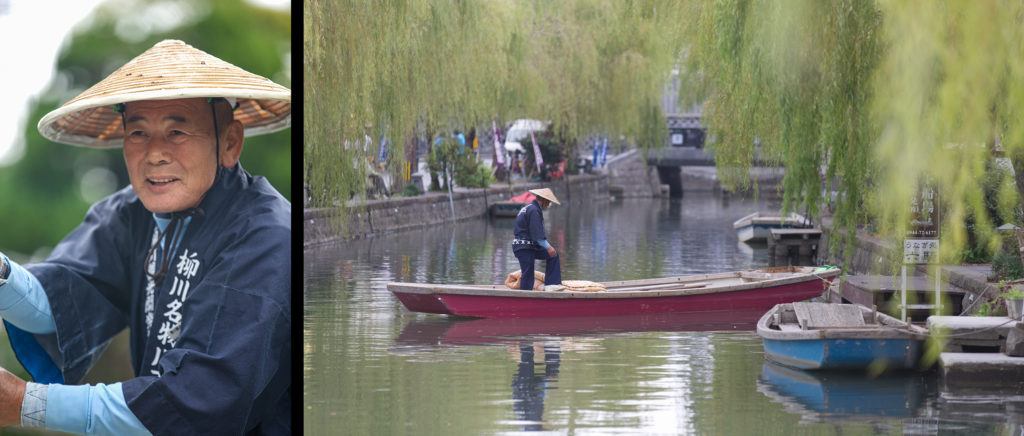
At left: Another example of a shallow depth of field. This portrait, shot using my 70-200mm lens (at 200mm), shows how effective the lack of sharpness in the background can be. I was no more than eight feet from the subject while the background was more than 50 feet away. Interestingly, you can clearly see the almost-circular highlights formed at this aperture (above his shoulder). A cheaper lens is likely to have fewer blades in its diaphragm, and therefore produce a more visibly faceted highlight – something that’s not desirable for the bokeh aficionado. The image on the right is shot at the same place but here the subject is 50 feet away, so the out-of-focus background is far less dramatic. Note also the severely out-of-focus foreground details – too much of this in an image can be visually off-putting. Photograph by Robin Nichols
Best Bokeh Lenses?
Everyone has a favorite lens for any number of applications. Just for reference, here are a few bokeh beauties that I’ve tried:
- Canon EF50mm f/1.4
- Canon EF85mm f/1.8
- Canon EF70-200mm f/2.8
- Canon EF300mm f/2.8
- Fujifilm XF 56mm f/1.2
- Olympus 75mm f/1.8
(Note: most major lens manufacturers, plus several new players, produce similar fast products exhibiting a beautiful bokeh characteristic.)
It's Not Always About the Aperture
On lenses, it’s worth noting that the more a lens magnifies, the more pronounced the background softness, which is why the fashion photographer chose the fast 300mm lens over a shorter, cheaper 50mm or 35mm lens. When looking at the effect of aperture, clearly an 18-55mm zoom lens cannot compete in the fast aperture stakes when up against a superfast f/1.8, f/1.4, or even an f/1.2 50mm prime lens. And while you might gently roll your eyes at the prospect of having to buy yet another lens, don’t panic. It’s possible to create a reasonable out-offocus ‘look’ using nothing more than a mid-range kit lens.
Even if your one and only lens is the ubiquitous 18-55mm lens, position the subject close to the lens, open the aperture to the maximum (probably to f/4), and see what you get. If the subject is close to the background, you’ll see no effect, but move them to be at least twice the camera-to-subject distance, and you’ll get an out-of-focus background.

Geisha dress-up for the day, Kyoto. I thought this an eminently appropriate image to illustrate the bokeh effect. It was shot at f/3.5 to hold sharpness in the figure, while exaggerating the softness of the distant background foliage. Shot with an EF 70- 200mm Canon zoom lens (at 150mm) which produces quite nice, soft bokeh effects. Photograph by Robin Nichols
Swap out the 18-55mm lens to that second-hand $40 f/1.8 50mm lens you just found on eBay and repeat the exercise, but at f/1.8 you’ll get a radically better background softness. I go through this exercise with my students and often joke that if I had a pocketful of 50mm prime lenses on me, I could sell the lot in ten minutes after this demonstration, it’s that impressive.
Key Lesson: The closer to the subject your lens is, the more pronounced the out-of-focus look the background has. Also, the further the background is from the subject, the more noticeable the bokeh effect.
Recommended Reading: If you’d like to master camera settings to create gorgeous, creamy, blurry backgrounds, grab a copy of Photzy’s premium guide: Beautiful Background Blur.
Creating Impressive Bokeh: Key Pointers
- Longer lenses produce better out-of-focus effects
- Faster (wider) maximum apertures are also key to success
- Position your subject close to the camera
- Ensure that the background is at least twice the camera-to-subject distance
- Unfortunately, money does influence the quality of your results. The more you pay, the better the glass in the lens. The better the glass, the fewer the aberrations and, for want of a better word, the purer the bokeh.
Diaphragm Desires
Although I have tried to demonstrate that creating a bokeh effect needn’t involve an expensive bit of kit, the best bokeh usually comes from products with fast glass (lenses with extremely wide f/1.4 or f/1.2 maximum apertures). You don’t need me to tell you that these are going to cost a lot.
Is the added expense of an f/1.8 85mm Zeiss or an f/1.4 Sigma 85mm Art lens worth nearly a thousand dollars more than an f/1.8 85mm Canon lens? If weddings and portraiture is your passion and your job, then I’d say 100% yes! Using lenses like these correctly will give any photographer a definite creative edge.
So, if glorious bokeh turns out to be your thing, it’s definitely worth splashing some cash on the best. One reason these lenses are expensive is the need to produce an optic that is sharp at all apertures. Typically, a lens might perform well at f/5.6, f/8, or f11, but many aren’t nearly so sharp when opened up to f/4 or f/2.8, for example. Why so? To create a lens that’s pin-sharp at the widest apertures involves a lot of tricky optical engineering, typically using very special aspherical glass elements, and these are expensive.
One reason these lenses are expensive is the need to produce an optic that is sharp at all apertures.
The diaphragm (the bit which opens and closes to let more or less light into the camera) is made from several moveable blades. The better the blade design, the more circular the physical aperture in the lens, and therefore the rounder out-of-focus specular highlights appear in the background of the image. The rounder they are, the nicer the bokeh looks. It all comes down to research, design and inevitably, cost.
Key Lesson: More expensive glass (lenses) inevitably produces softer, more alluring bokeh effects
Bokeh: Troubleshooting
- Big magnification telephoto lenses create really good bokeh. But they are also hard to hold steady. My fashion photographer could have used a 600mm lens instead of his 300mm lens. Doing so would have produced significantly better-looking softness. But a lens like that is eye-wateringly expensive, heavy, and extremely hard to hand-hold.
- Big magnification lenses suffer more from camera shake. If you use a 300mm lens on a full frame camera, you’d need a minimum shutter speed of 1/300s, maybe more. If it’s on an APS-C-type DSLR, you’d need a minimum shutter speed of 1/500s.
- It’s worth noting that some big magnification lenses have unforgiving minimum focus distances, essentially preventing you getting too close to the subject – something that can cause issues when shooting in a confined location.
- At wide apertures, accurate focus is vital. If you are lucky enough to own a really fast optic, such as an f/1.2 85mm portrait lens, then the extremely shallow depth of field can create focusing problems. For example, in a portrait, if you focus on the tip of the nose, at f/1.2 the eyes might not be sharp.
In fact, the closer the subject is to the lens, the more the background is going to appear out of focus. This is something that Macro photographers have to continually battle with. Going close, in conjunction with a wide aperture, certainly exaggerates background softness, but there’s a point where you’ll find yourself too close to your subject, particularly in portraiture.

Top – Here’s a portrait I shot of a guy posing for tourists in Havana. He was a great subject, but I rushed the shot and, at f/1.8, with his head turned three quarters to the lens, I missed focus on the near eye, so this was relegated to my folder of ‘almost, but not quite.’ My wife, on the other hand, shooting at f/4 (24-105mm, f/4 lens) got a far sharper result. But you can see the difference in the background softness. The highlights in the lower example are a bit ‘lumpier’ than those produced using the 85mm prime lens at top. (Lower picture by Natalie Hitchens.) Photograph by Robin Nichols
Focus Considerations
The closer the subject is to the lens, the more the background will appear out of focus. Once you have the camera-to-subject and subject-to-background distances worked out, you’ll also have to consider the focus point. As you can see in the examples of the Cuban cigar smoker, even slightly inaccurate focus can ruin a shot. Here are some pointers:
- A lens can only focus on one point at a time.
- Points on the same plane of focus will also appear sharp.
- To maximize subject clarity, pay attention to the plane of focus.
- Everything in front of, and behind, the plane of focus will appear soft.
- Consider how much stuff in front of and behind the focus point that appears sharp is controlled by the depth of field (i.e. the f-stop).
- For more specific focus control, learn to manipulate the camera’s AF points so they rest on the important aspects of the subject, such as the eyes in a portrait.
Key Lesson: Master your focal points using careful adjustment as they are critical to controlling both depth of field and the subsequent bokeh effect.
Recommended Reading: If you’d like to master camera settings to create gorgeous, creamy, blurry backgrounds, grab a copy of Photzy’s premium guide: Beautiful Background Blur.

Here’s another good example of where extreme close-ups serve well to exaggerate softness in the background. I always try to shoot as many detail shots as distant images when visiting new places. This is a close-up of a temple handrail. At f/2.8 and at the minimum focusing distance for the 70-200mm lens, the background details are totally dissolved into an incredible colored softness. Photograph by Robin Nichols
Self-Check Quiz:
- What does bokeh mean?
- Can you produce bokeh softness using any lens? (Y/N)
- Is the best bokeh is created by a long or a short lens (i.e. telephoto or wide-angle)?
- A big telephoto lens is hard to use because:
- It’s heavy
- It’s expensive
- It’s hard to hand-hold
- All of the above
- What’s the best strategy when positioning your subject to achieve optimal bokeh – close to your lens or close to the background?
- True or False: The best bokeh is created with lenses that include specialist glass elements.
Shooting Exercise:
You can read all you want about bokeh, but the best way to understand how it works on your lenses is to test it out. Grab a friend, partner, or family member as your test subject, then try this:
- Set your (kit) 18-55mm lens to the 18mm setting.
- Position your subject four feet from the camera with the background at least 10-20 feet behind the subject.
- In Aperture Priority Mode, set the aperture wide open (most likely this will be f/3.5).
- Take a snap. Note that at close range, the 18mm setting distorts facial features and the background is not very fuzzy.
- Repeat the process, but this time zoom to the max (55mm). Your subject will be bigger in the frame and the background will be softer.
- Experiment with any other lenses you might own. Remember, longer lenses produce significantly better bokeh effects than wide-angle lenses.
- Shooting with the same light and subject conditions makes it easier to compare the bokeh qualities of your different lenses, making it easier to set up next time.


