
My entire photography career has been built on an impressive foundation of mistakes.
I started in the mid-1960s with a succession of wrong cameras (well, they took lousy pictures!).
I shot my first wedding, unaided, for friends. Well, they were friends.
I took the wrong courses. I hung out a shingle and began a freelance career with nothing but spit, grit, and my maybe-sort-of-vaguely-useful degree in commercial photography.
I bought a studio from a retiring pro without having any business skills or acumen.
I went on jobs with only one of something and coined the mantra, “Whatever you have only one of, it WILL break.”
I staggered through professional life taking baby steps. Actually, I crawled first; then I took baby steps.
And here I am, still toddling along, trying to learn this stuff. I’m now 78 years old. It’s harder when you can’t remember what you had for lunch. (Wait, did I have lunch?)
Just kidding!
I transitioned to digital photography in 2007, but it took until 2015 before I plunged into raw capture plus Adobe Creative Cloud (Lightroom plus Photoshop) all at once. Total immersion, deep end.
It’s the same goofball mistake I’ve always made; the first leap, then look.
Yet, in the process I have learned things the way I’ve always learned things: try something, mess up, reread or rewatch a tutorial, try again, mess up, rinse, and repeat as often as necessary.
I staggered through professional life taking baby steps. Actually, I crawled first; then I took baby steps.
It’s what works for me.
In this guide, I hope to sketch out some of my Lightroom mistakes for you, so that you don’t make them because you are young and bright and eager to learn from the most colossally experienced goof-up in the history of photography.
Do as I say, not as I do.
In this article, we’ll review the following:
- Basic organization and filing
- Keywording (if you don’t keyword, you are doomed!)
- Ruthlessly deleting clutter
- Shooting RAW (if you don’t shoot RAW, you are doomed! Kidding.)
- Renaming or moving files outside of Lightroom
- Not paying enough attention to the histogram
- Paying too much attention to the histogram
- Clipping indicators
- Over-sharpening
- Not understanding differences between similar tools
- The backslash key – best bet tip!
There are many more mistakes lurking in the tall grass surrounding Lightroom – too many to detail in a single quick guide.
Not all of my painful lessons are from Lightroom alone. I spent literally half my working life in various darkrooms making mistakes. Much of the knowledge gained under the safelight was indeed directly transferrable to Lightroom (and Photoshop).
Basic Organization, Filing, and Keywording
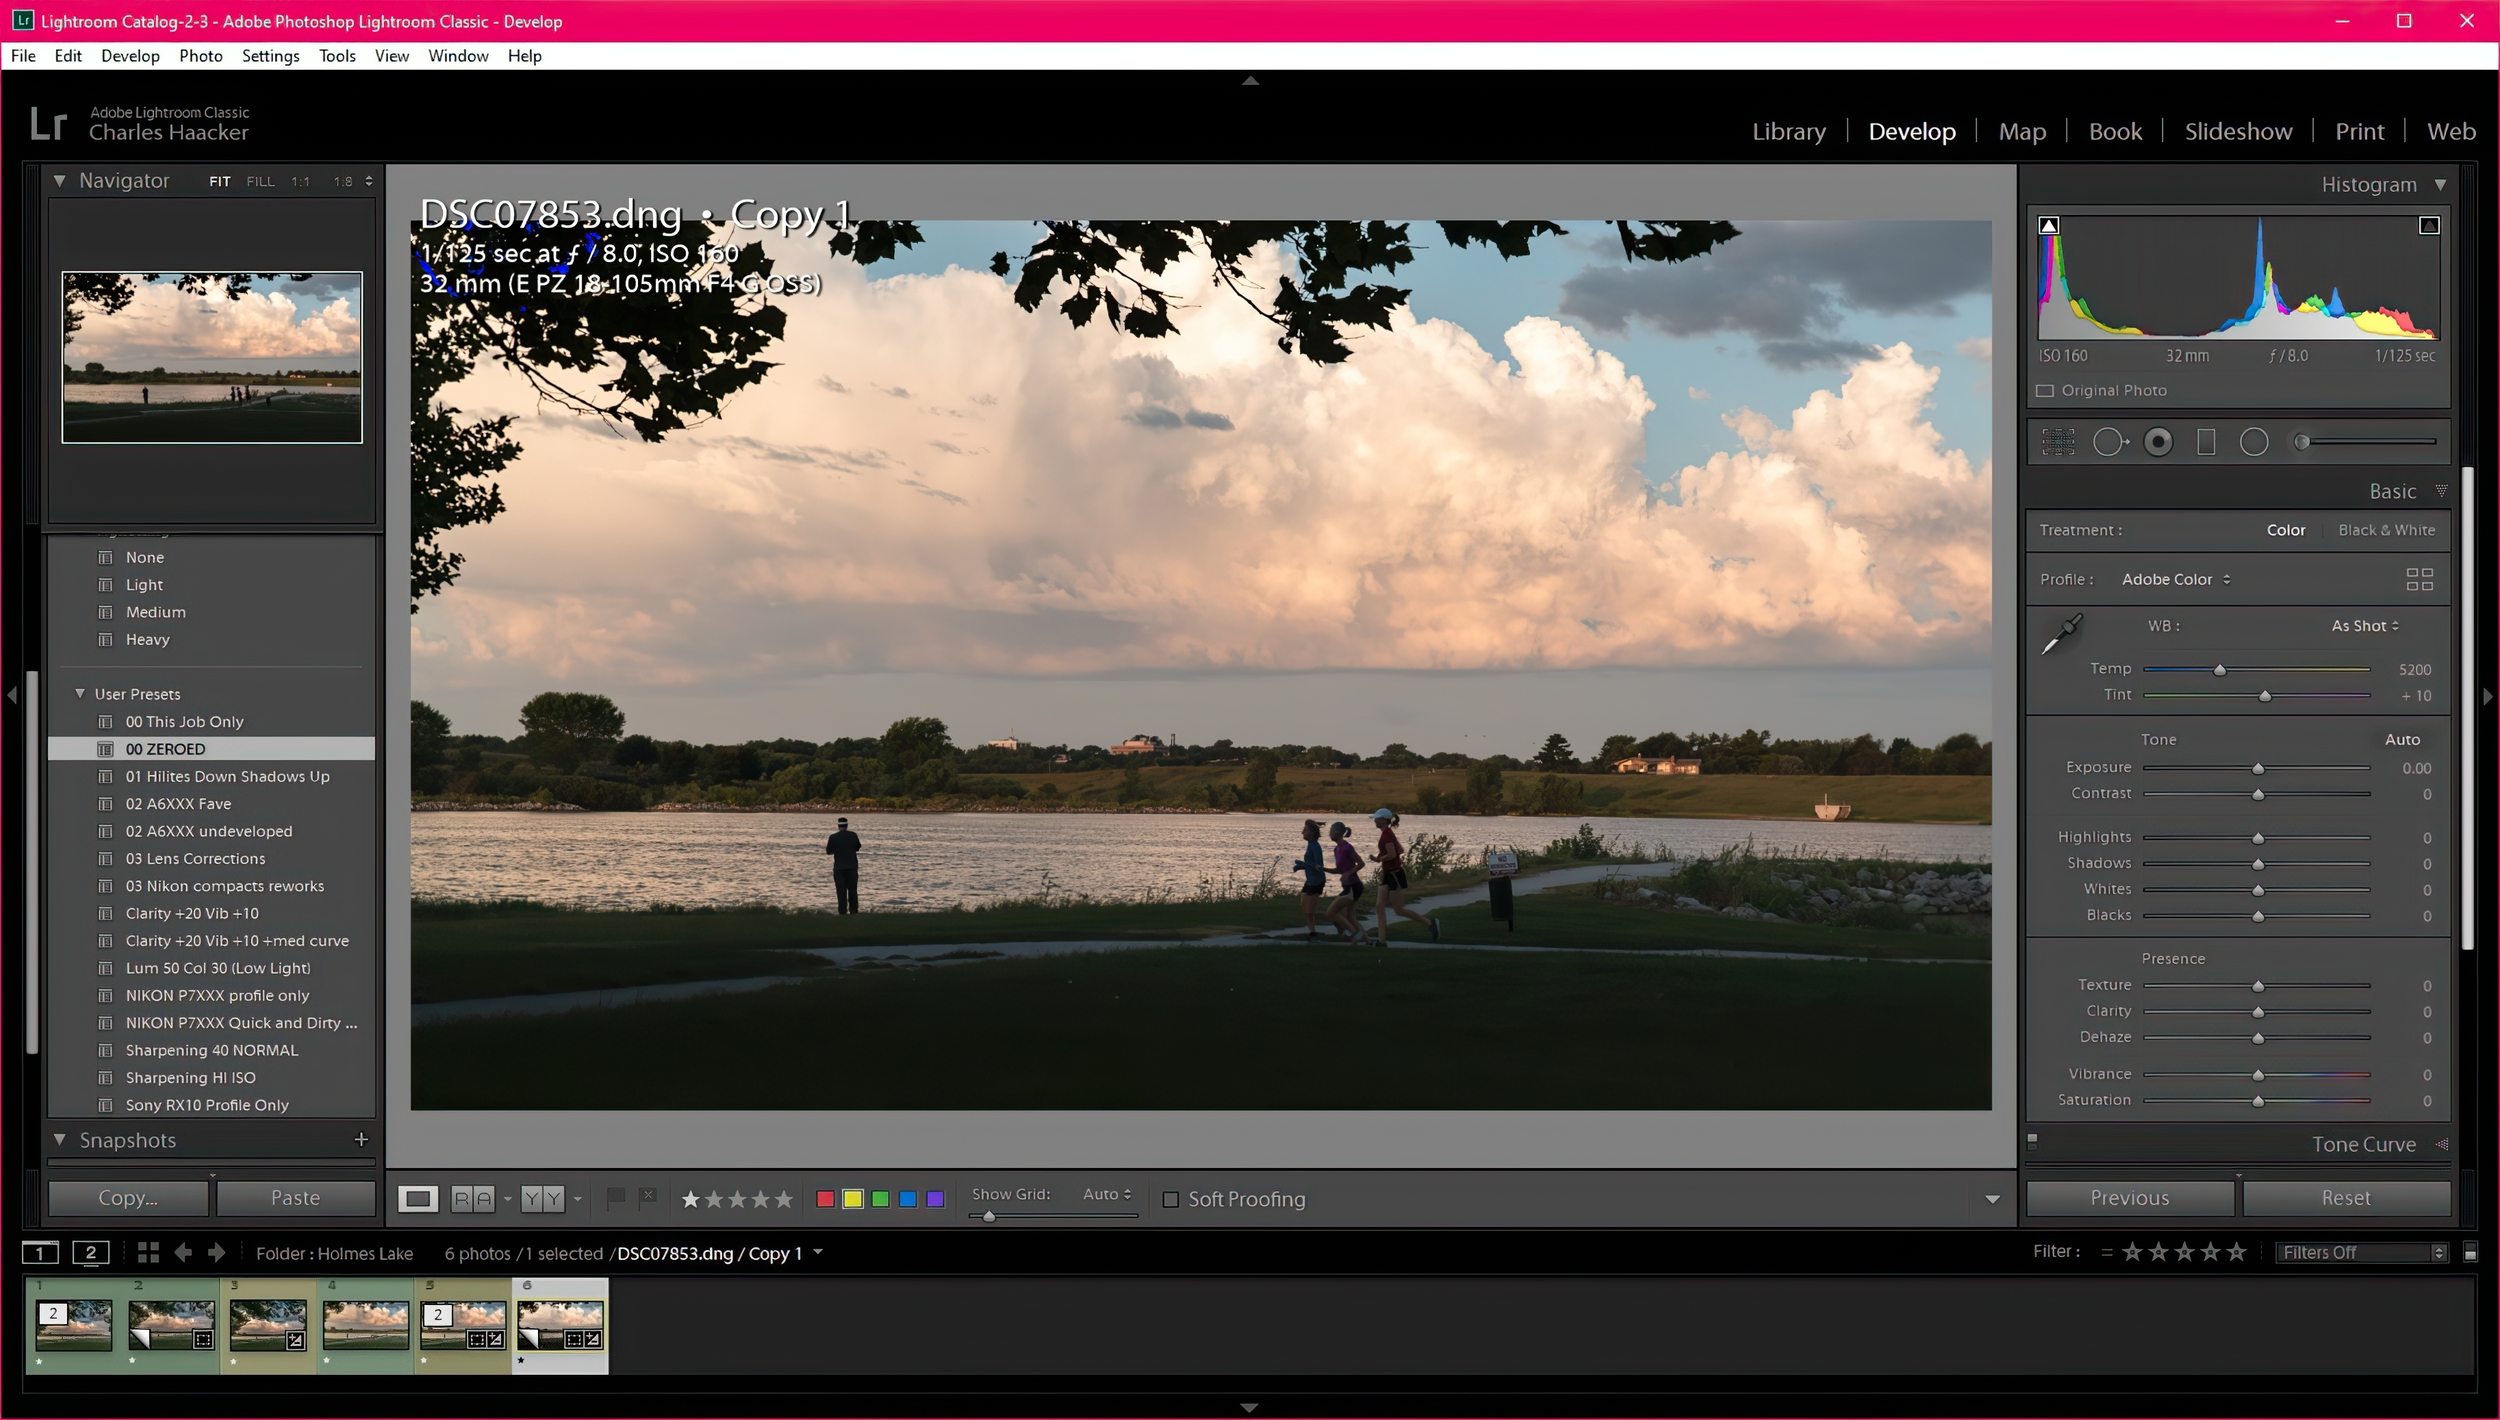
When I had my studio, everything was filed alphabetically by the year. If I couldn’t recall when a job had been done, I’d have trouble locating it.
Here in my Lightroom catalog, the 2020 folder is highlighted. Halfway through the year, there are fewer than 800, but the COVID-19 pandemic has canceled many jobs I would otherwise have shot.
Key Lesson: Whatever you do, don’t rely on your memory. You need a system.
I carried that inefficient, relies-on-memory foolishness over to digital. Even before I got into Adobe CC, I had hundreds of images filed by year, then in subfolders like “vacation.”
So far, so good? Not so much.
Eventually, I got smart enough to begin making the names of the subfolders more specific, even going back and renaming older ones, but the “system” still sucked.

When I subscribed to CC, everything in my eight-year-old archives was brought over exactly as it was, and it’s still that way. To fix it would be a monumental task, but as it is, searching for files is a monumental task.
To retrace and keyword now would be useful, but after 13 years of shooting and filing more and more digital images, now thousands of files, there is no hope of
doing that.
My advice to you?
Start keywording right now! Make it habitual!
Key Lesson: Begin keywording every image now. Choose keywords that should make it easy to find a file. Portrait. Landscape. Who, what, and where. I have really given up, but I waited far too long. You can start now!
Note that the highlighted 2009 Master Folder has 6,010 files in it. One subfolder contains nearly 3,000 files. Further down, the 2014 Master contains over 12,000 photo files, not a single one keyworded.
My clumsy workaround relies on Lightroom opening an entire year’s master folder and showing all the pictures in all the subfolders. I can at least hunt visually. It is klutzy and time-consuming. I have only just begun occasionally adding keywords to stuff as I go when I remember to do so.
Hose Out the Stables
Ruthlessly delete clutter.
When I started, I kept everything.
My wife and I took many road trips. I documented them all with compact point-and-shoots in JPEG. I always culled and went through and picked the ones I thought were best, but I never deleted the rejects.
JPEGs take up less than 1/3 of the disc space that the files from my latest 24MP APS-C cameras do, plus I’ve been shooting RAW for more than five years, but even so, there is no really good reason to have all that cluttering up the catalog. (This is a clear case of “do as I say, not as I do.” I keep telling myself I am going to go back and delete, delete, delete, but I never do.)
Once I started shooting camera RAW, I got more hard-nosed about deleting unused files.
When I come in from a job, even a just-for-myself outing, I cull, going through the entire shoot and flagging or otherwise marking the ones I think are keepers.
When I post-process, if a flagged file doesn’t pass muster (not sharp or whatever), I can see if another frame is better and substitute it.
When everything is finished, I go over the rejects to ensure I haven’t missed a gem, and then select and delete the lot!
Delete from disc, not just Lightroom. I should have been doing that from the beginning.
Key Lesson: Cull as you go and delete rejects permanently. You have the good stuff, so there’s no reason to keep garbage.
Shoot Raw
This is a personal preference, but I wish and wish I had started using camera RAW far sooner.
I was totally wedded to pocket compacts, and the first ones that I had would not output camera RAW.
I became adept at post-processing JPEGs in Photoshop Elements. I was careful not to overexpose to retain good highlight detail, then opened the shadows in Elements. I thought everything was fine. “Good enough.”
I acquired a Nikon P7000 in 2011. It was a camera RAW capable compact. I even tried camera RAW with it but lacked the patience to learn to process it. I was satisfied (I thought) with what I was getting from JPEGs.
This is a personal preference, but I wish and wish I had started using camera RAW far sooner.
It was 2015 before I decided to try again, and once I saw the difference, I’ve been kicking myself ever since for eight years of “good enough.”
I can still go back and reprocess them in Lightroom, but Lightroom cannot un-compress files with permanently missing detail.
Camera RAW is analogous to an unbaked cake – all the ingredients are there, nothing is missing. Plus, Lightroom is non-destructive – all the corrections you make are filed in “sidecars” that “remember” what you did.
The original data is never altered.
That’s true of all camera RAW processing engines. RAW data itself cannot be damaged because it’s not an image; it’s just ones and naughts.
Renaming or Moving Files Outside of Lightroom
I’m sure everyone who uses Lightroom has done this at least once.
At first, it’s hard to remember that once you are working inside Lightroom, everything you do must be done inside Lightroom.
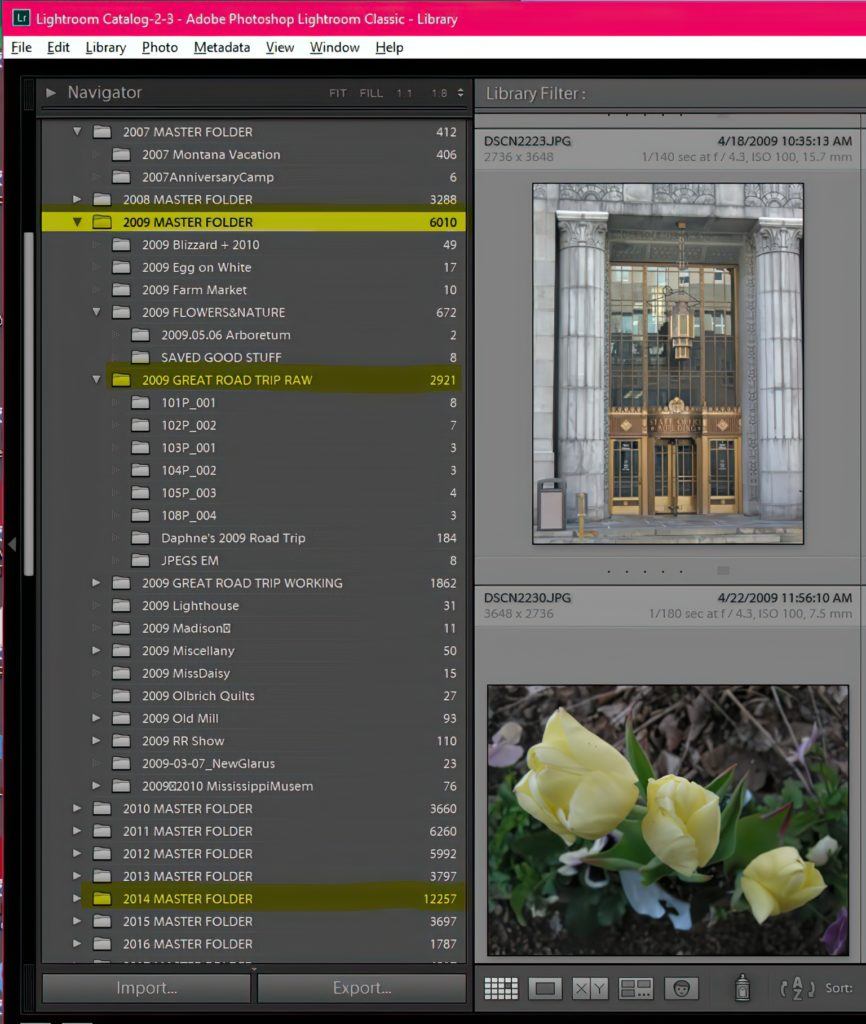
If you need to move a file and forget and instead move or rename it in Finder or Explorer, Lightroom will show an exclamation point [!] and a dialogue box will pop up telling you that the file is missing and asking if you want to find it. Well, yeah, you want to find it, so it’s off to the races.
I find the process in Windows sufficiently tedious that I rarely make the error again.
To give you an example, I have deliberately moved some files in the Explorer (Finder). The circled exclamation point tells you the file is missing from Lightroom. The dialogue pops up asking if you want to find it and where it was before it was moved outside of Lightroom.
Sometimes it can seem byzantine to rename, move, or delete files or folders within Lightroom, but it’s worth learning how to avoid hunting for missing files.
Key Lesson: Lightroom doesn’t actually have any of your images in it. It knows where to find them where they live on your drives. If you move or otherwise change something outside of Lightroom, then Lightroom can no longer find it and will throw up its little hands in exasperation and sulk until you go find it.
Paying Too Much Attention to the Histogram! Not Paying Too Much Attention to the Histogram!
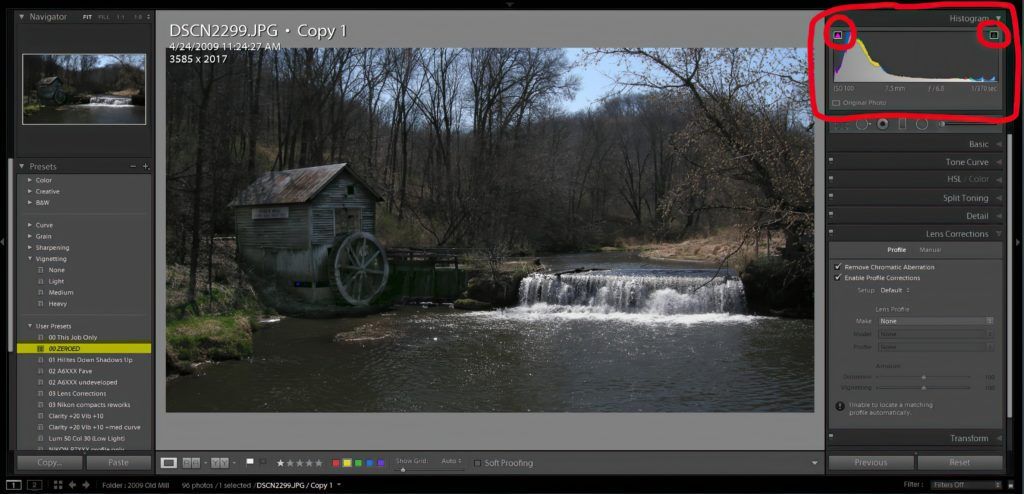
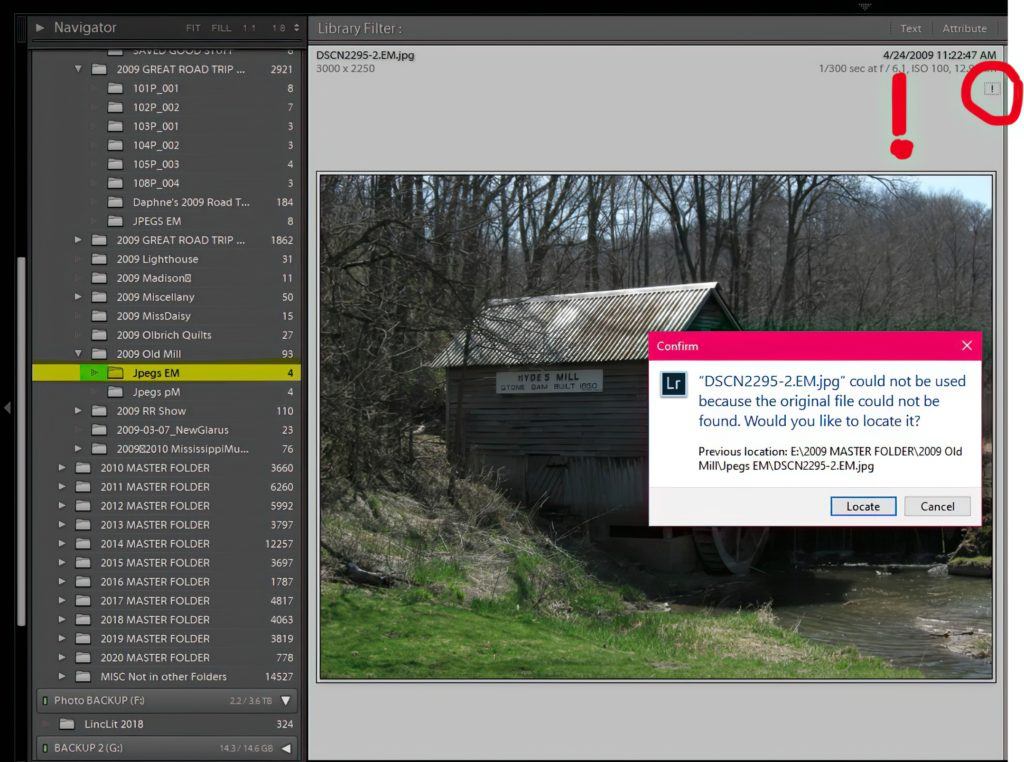
In the image above, the histogram looks pretty good. The scene is overall dark, but the waterfall looks to be close to clipping. This is a Straight Out of Camera (SOOC) JPEG, so why does it look so awful?
The scene was exposed for the waterfall because JPEGs will block overexposed highlights (no detail), but in Lightroom it tolerated my raising the exposure a stop-and-a-quarter because I also pulled the highlights all the way down while fully opening the shadows.
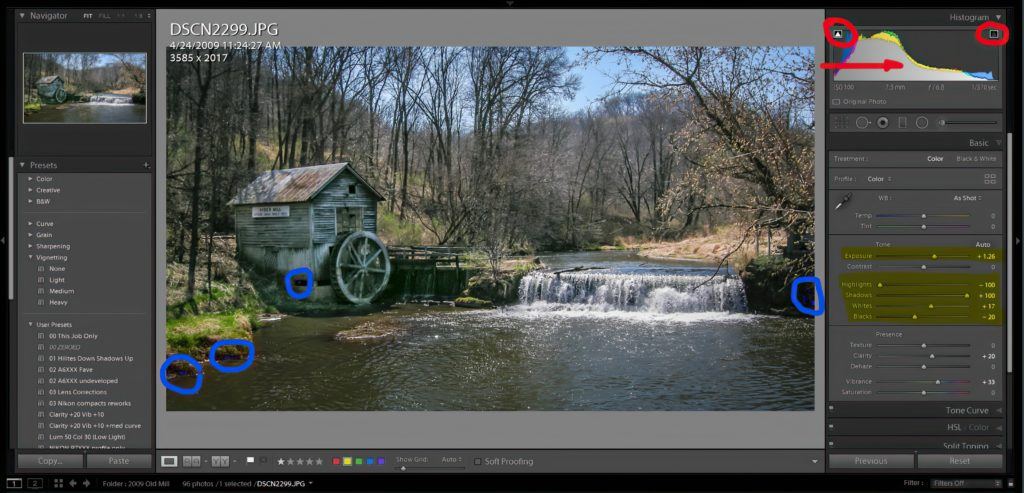
Here, the edited version shows that the white clipping indicator on the right is not lit, but there is some tiny black clipping (circled) for black points, ensuring a good base and long scale.
Paying not enough or too much attention to histograms are corollary issues.
I wrote a short Photzy guide on the use of the histogram in Lightroom.
I use them faithfully to help me process images to the best they can be, but a strictly scientific, rote approach is not the best practice.
Photography is both a craft and an art. Using the histogram to finish everything to what seems to be cookie-cutter “perfection” can result in poor outcomes.
No matter what the histogram shows, what counts is what the picture looks like.
Key Lesson: Judge the tone of your photographs in Lightroom by taking into account both the histogram and how it visually looks in the Preview window.
Clipping Indicators
“Clipping” is what we call an area with no detail, either light or dark. I generally like to keep my clipping indicators turned on so I can see when I’ve gone too far in the image. Since I take a relatively scientific approach, in most cases I want to see that there is a pure, clipped white point and a corresponding black point, but never more than a point of each. Don’t forget; both craft and art.

I deliberately overcorrected both the blacks and whites with the clipping indicators turned on. Clipped shadows are blue and clipped whites are red. Notice how the histogram shows almost no mid-tones; everything is piled high on the ends.
Key Lesson: Turn your clipping indicators on at all times and use them.
Over-Sharpening

Almost all of us do it. It’s easy to do because there is a misunderstanding of what sharpening does. For the most part, it selectively applies contrast along edges. Adding clarity does the same thing with a bias toward the middle tones.
This was a JPEG. I’ve deliberately raised the sharpening to a maximum of 150 with no masking or noise reduction (luminance). You can see the banding/haloing, and in the sky, the noise shows as crosshatching.
“Sharpening” creates the illusion that an image is sharper than it was straight out of the camera.
The problem is that over-sharpening creates edge banding or haloing.
If you get white lines along edges and other artifacts, then you have over-sharpened. If you shoot JPEGs, it’s going to be worse.
Key Lesson: Sharpen with a light hand. While sharpening, have your preview image set to 100%. If you are seeing banding or a halo along lines of contrast, then you’ve gone too far with the sharpening tool.
Not Understanding Differences Between Similar Tools
This goes to, for example, using lots of clarity together with lots of sharpening.
Clarity tends to increase overall contrast, plus slightly increasing the contrast of edges with a bias toward the middle tones.
Add global sharpening to that and you double the effects of both tools!
It’s best to take the image up to 100% and look for edge banding/haloing as you use these tools.
One tool pair that confused me initially was highlight and shadow vs. white and black. You’d think they’d do the same thing, right? No, they don’t.

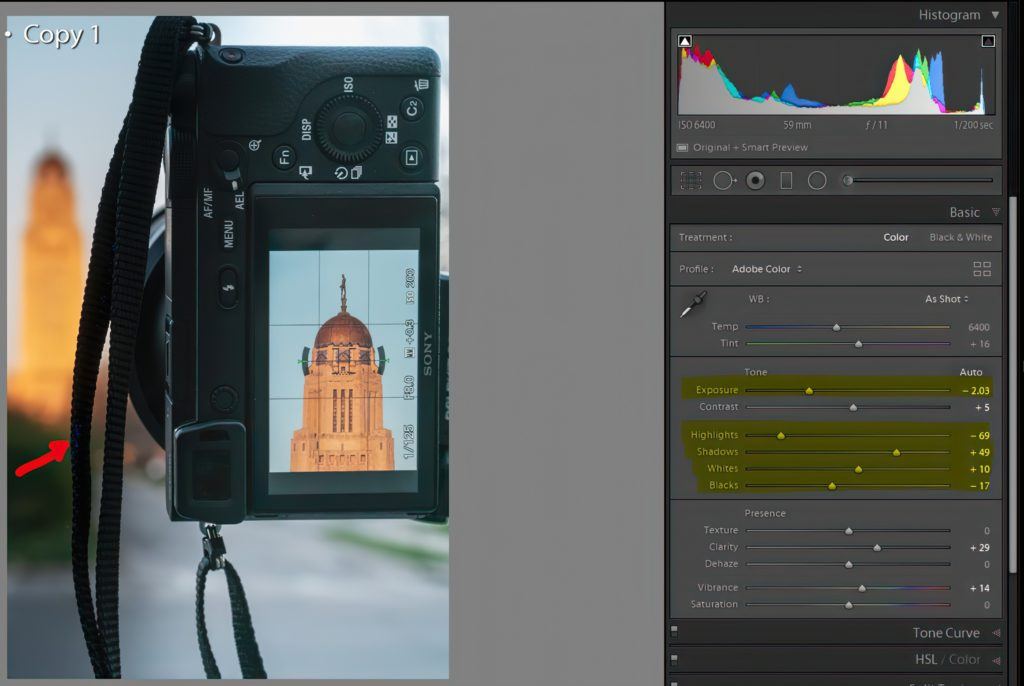
In the photo above, the original RAW capture was overexposed to ensure good detail in the camera back (you can only get away with this in RAW). Highlighted settings show the exposure was brought down by 2+ stops, highlights brought down, shadows opened, and black and white points set. The arrow points to the barely-there clipping in the camera strap.
It’s best to take the image up to 100% and look for edge banding/haloing as you use these tools.
As an old “Zone System guy,” I was trained that an ideal photograph should have a point of true white— pure, blank white—and true black—pure, pitch black, to fully encapsulate dynamic range.
The highlight and black sliders are where you set those white and black points. I normally pull back the highlight slider just a tiny bit so there is no actual clipping, but I often leave a little black clipping visible for a solid base.
The whites and shadow sliders are similar and related to the highlights and black sliders but are biased to the upper and lower thirds of the histogram scale.
If you can’t seem to get either a white or black point, you probably need to adjust the exposure slider. That’s another great reason to shoot RAW! JPEGs leave much less room for exposure adjustment, especially if overexposed.
Key Lesson: The highlight, shadow, white, and black sliders are not interchangeable. They each have similar but different functions.
But never forget that rules are only useful insofar as they don’t ruin your picture. If you set a black or white point and it looks awful, pay attention to your feelings; it is only part of science.
The Backslash Key – Best Bet Tip!
I had no idea about this one until a week ago.
Key Lesson: If you tap the backslash key (often right below the backspace key on your keyboard), it instantly renders your image as it was before you started. Tapping it again restores it to where you are in your editing. It’s a great shortcut for checking your work before and after to helpfully prevent you from going too far, which is a common mistake. Use the backslash early and often to check your progress.
Conclusion
There are many more mistakes to be made when using Lightroom—too many to detail in a quick guide.
Lightroom is a powerful tool, but it’s also easy to mess up. But that’s okay!
Remember that Lightroom is always, always non-destructive no matter what you do.
You can always come back, go to the beginning, and start from scratch.
You can make virtual copies galore and try different things. They don’t even affect your storage!
It’s often said, and I can attest that it’s true, that you learn far more from your mistakes than your successes.
Have fun, mess up, keep on.
- True or False: If I have an exceptionally good memory, it’s okay not to organize my files.
- True or False: Keywording is a tedious timewaster.
- True or False: Shooting JPEGs is better than RAW because they are easier to process.
- True or False: Shooting RAW is better because all the sensor data is there, uncompressed.
- True or False: If I rename files outside of Lightroom, I may have a hard time trying to locate them.
- True or False: For perfect pictures, the histogram is all I need to watch when post-processing.
- True or False: It is not possible to over-sharpen an image.
- True or False: Lightroom stores no images.
- True or False: Lightroom never alters an image.


