If you use Lightroom to post-process your photos, you have probably read or watched dozens of Lightroom tutorials. Maybe you have even taken classes on how to use this extensive program. Me too! But I find that many tutorials cover the same ground. They are written to help photographers answer specific questions about how to do things in Lightroom. They rarely go off the beaten path.
Rather than go over the same ground, this guide explores hidden tools tucked away in the corners of Lightroom. These are the tools that photographers do not know they need. Most of these I have discovered by accident while looking for something else. The tools are hidden in that most photographers do not know about them or use them. Most of these tools are hidden in plain sight. You have probably seen them and passed them by on your way to do something else.
For this guide, I have chosen my top 11 hidden Lightroom tools. I include many tools from the Develop Module and also include some from the Library Module and the Import screen. I hope that at least a few of these tools are just what you are looking for to make better photos.
What we will cover in this article:
- Apply During Import
- Edit Capture Time
- Quick Collection
- Keyword Set
- Quick Develop
- Profile
- Eyedroppers and pickers
- On-off buttons
- Sharpening mask and option key
- Spot removal and visualize spots
- Tone curve colors
As you read this guide, I suggest that you have Lightroom open to explore the tools yourself. I use Lightroom Classic. Lightroom CC can be different both in organization and content. I will point out differences where applicable.
Recommended Reading: If you’re interested in improving your post-processing workflow, check out Photzy’s Understanding Masking premium guide. It has sections on Lightroom and Photoshop, as well as Snapseed for mobile users, too.
1. Apply During Import
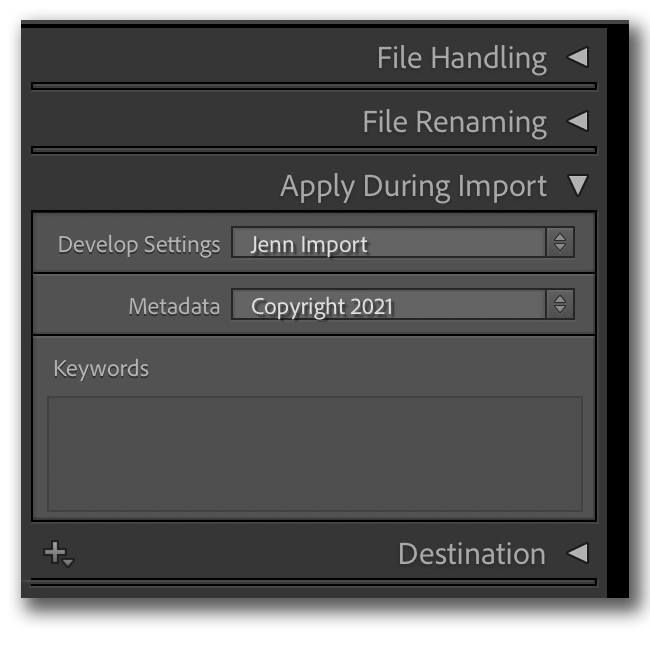
Let’s start with import tools. These tools automate a lot of the post-processing work before you even begin. When you pop an SD card into your computer, Lightroom Classic automatically opens an Import screen. Before you click “Import,” take a look at the right-hand column. You have a lot of control over how Lightroom handles your images. The best tool in this column is the “Apply During Import” panel. If it is not open, click the triangle next to the label. If you are using Lightroom CC, you won’t have this option.
Screenshot by Jenn Mishra
In this panel, you have three powerful automation tools. I use all three when I import images. In the Keyword box, you can enter global keywords to help you keep track of your images. I often enter a place, subject, and maybe a time (e.g., winter, sunset). Lightroom applies these keywords to all imported photos. Later, I will add more specific labels.
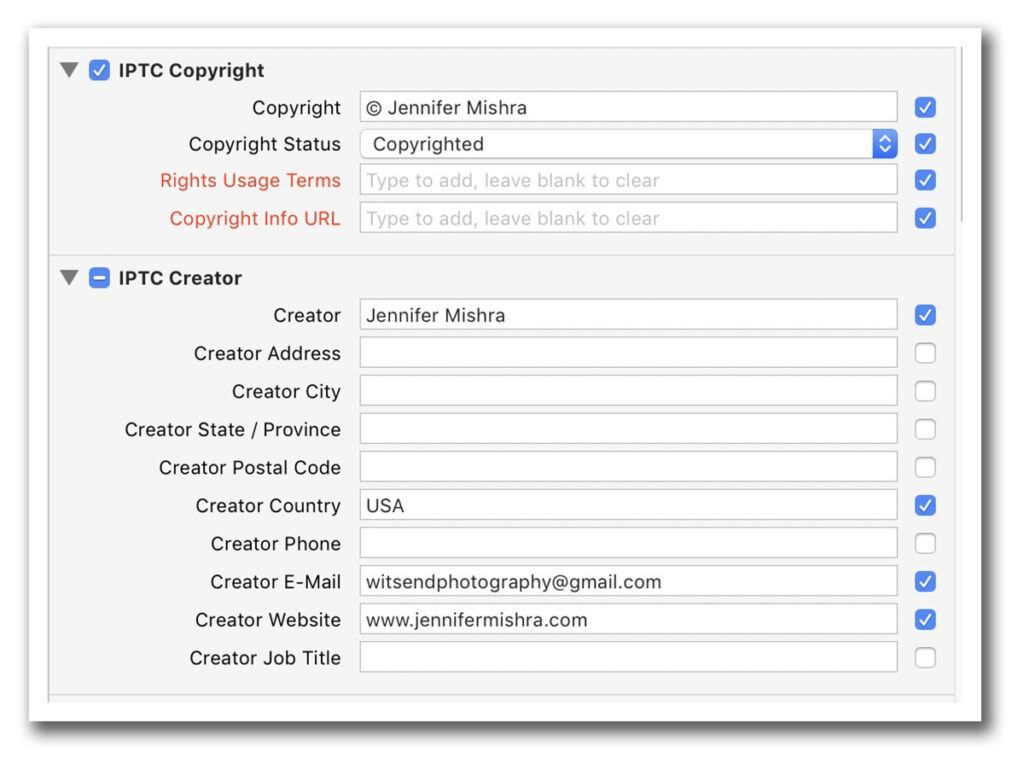
The Metadata menu embeds important information into your files. I created a metadata preset called “Copyright 2021.” Lightroom adds my copyright information to all imported files. Click on the menu and select “New.” You will get a dizzying list of options.
Screenshot by Jenn Mishra
I use only a small portion of the possibilities to add my Copyright information and contact details. I feel better embedding this information in every file. You can enter new information with each import or save your settings as a preset.
The Develop Settings are my favorite. I discovered this option by accident, and it has significantly sped up my post-processing. Develop Settings applies a preset to all imported images.
The Develop Settings are my favorite. I discovered this option by accident, and it has significantly sped up my post-processing.
I have a look that I like in my images. I do the same four changes to every image. For instance, RAW files always need more contrast, and I like punchy colors. I move the same four sliders every time I process an image (contrast, clarity, texture, and vibrance). I create a preset (Jenn Import) for these changes and select it from the Develop Settings menu. My photos arrive already partially post-processed. I start my post-processing after these changes have already been applied.
You can create as many import presets as you like. I have another import preset for black and white photographs.
The tools in Apply During Import have significantly sped up my workflow. A few clicks before import saves me hours in post-processing.
2. Edit Capture Time
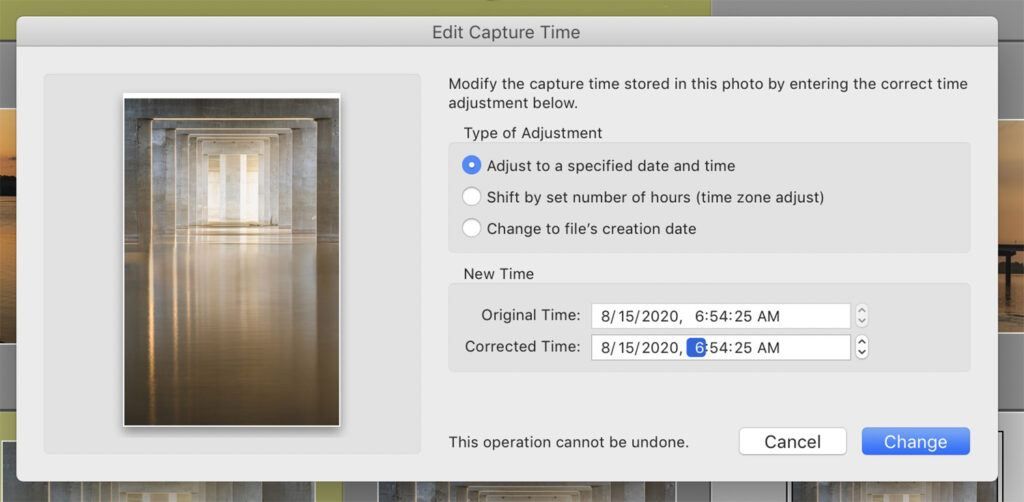
Another metadata adjustment tool that I use more often than I really should is Edit Capture Time. I can never remember to change my cameras to Daylight Savings Time or adjust the Time Zone on my cameras when I travel. It is not a problem unless I have multiple cameras on different time settings, or my iPhone photos get mixed in. Then my images are out of order. To put them in order, I need to change the capture time.
To find this tool, go to the Metadata drop-down menu and select Metadata > Edit Capture Time. Or go to the Metadata tab in the right-hand column of the Library Module and click the box containing three lines next to “Capture Time.” A new screen appears. If you are using Lightroom CC, click the “i” button in the bottom right-hand corner. Then click the pencil icon next to “capture.”
Screenshot by Jenn Mishra
You can shift a time zone or add or subtract an hour or two from all selected photos. Lightroom warns you that “This operation cannot be undone.” Don’t worry! This means that you can’t use the Undo command under the Edit drop-down menu. But if you make a mistake, you can select the images again, open Edit Capture Time, and reverse your change.
3. Quick Collection
After my images import, I have a system for culling and rating my images using stars and colors. But one organizational tool that I discovered by accident was Quick Collection.
If you do not use collections already, you may want to explore this feature in Lightroom Classic. Collections are located in the Library Module’s left-hand column. These are like digital photo albums. You can put together images on a theme without physically moving the files around.
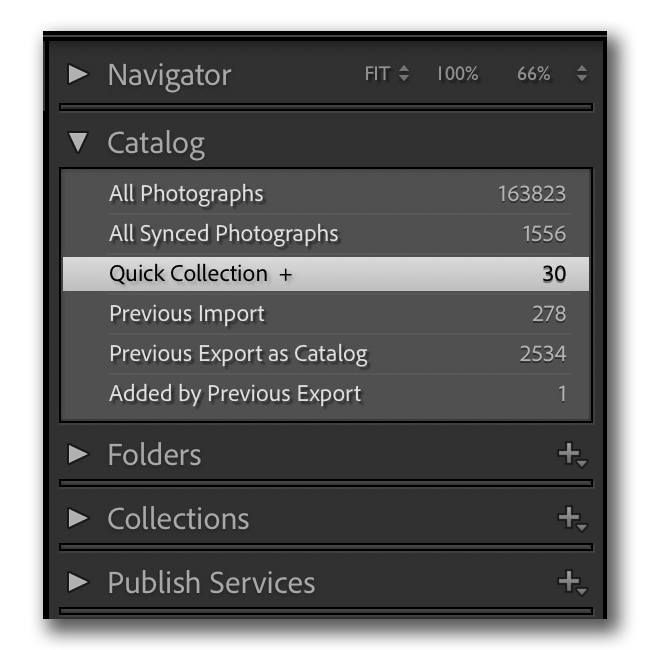
Quick Collection is built into Lightroom Classic and is meant to be a temporary place to collect images. Maybe these are all your favorite images from a shoot or photos that you want to return to for a second look. Add an image to the Quick Collection by clicking the hotkey “B.” Select the Quick Collection option in the Catalog panel and these photos appear together as a group. Remove files from the Quick Collection by clicking the hotkey “B” again.
Screenshot by Jenn Mishra
Right-click on Quick Collection and you can clear the collection or save and make this a permanent collection.
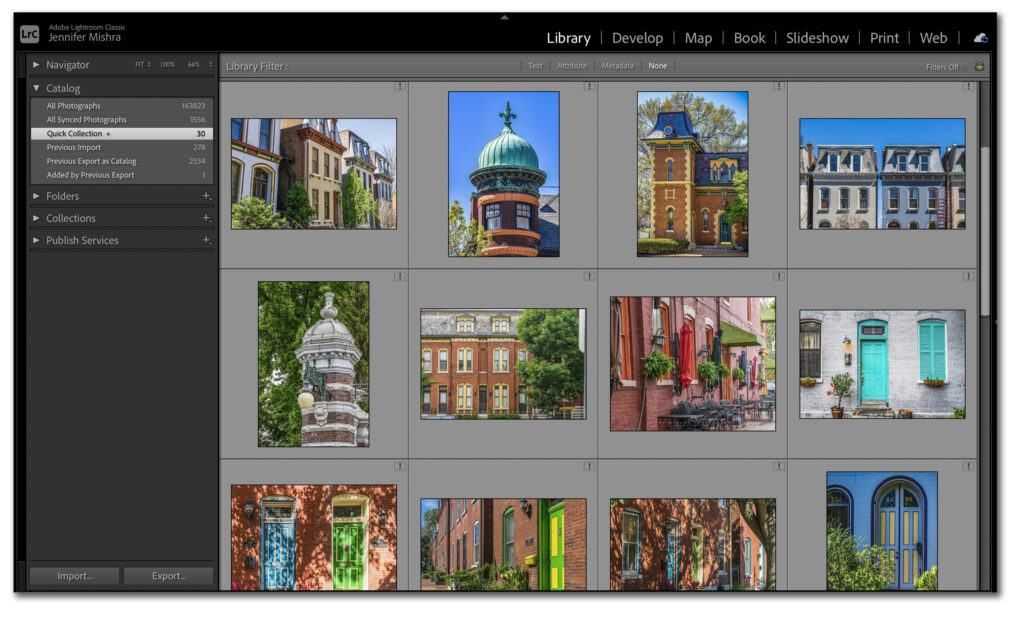
In this Quick Collection, I put together neighborhood scenes for a local real estate company. Screenshot by Jenn Mishra
4. Keyword Set
Keywording can be an ongoing challenge, but if you want to find your photos again, especially once you have a substantial catalog, you will need to develop a keywording system. I have a love/hate relationship with keywording. I understand the importance, especially after spending 20 minutes looking for a specific image, but I hate spending time adding keywords. I am always looking to speed up the process.
In Lightroom Classic, open the Keywording panel in the Library Module and you will find a couple of tools that will make keywording a little bit simpler. Of course, you can enter labels in the Keyword Tags box but look at the two tools below the box: Keyword Suggestions and Keyword Set.
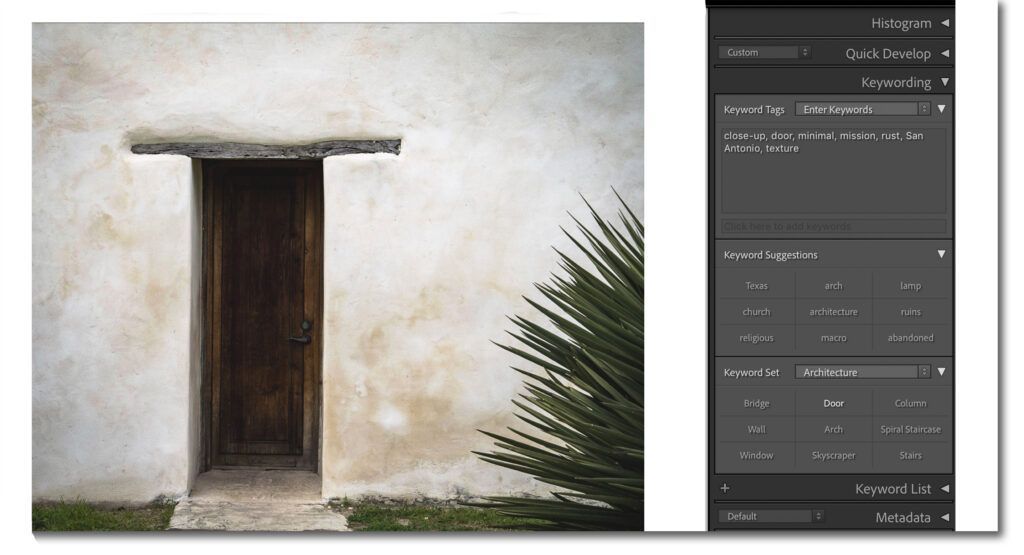
In this image, “Door” and “Wall” from my Architecture Keyword Set apply. Clicking the terms adds them to my picture. Screenshot by Jenn Mishra
Lightroom suggests keywords for your image. These are based on other keywords you’ve used on photos taken around the same time. When you click an appropriate keyword, the suggestions update and give you more choices. It is easier for me to see a word that applies to my image than to come up with the label myself.
Often, we use the same set of keywords over and over. In Keyword Set, you can create a list of your most common keywords and save these as a preset. For instance, I have an Architecture Keyword Set listing architectural features that I like to photograph.
You can make as many Keyword Sets as you like. I have set for the time of day, street photography, and even my favorite hashtags. One reason that I continue to use Lightroom Classic is that these metadata tools are absent from Lightroom CC.
Recommended Reading: If you’re interested in improving your post-processing workflow, check out Photzy’s Understanding Masking premium guide. It has sections on Lightroom and Photoshop, as well as Snapseed for mobile users, too.
5. Quick Develop
I don’t know about you, but my Lightroom Classic Develop Module works slower than my Library Module. Whenever I can, I toggle back and forth between the two (hotkeys “E” for Library and “D” for Develop). Then I realized that I could make post-processing changes directly in the Library Module.
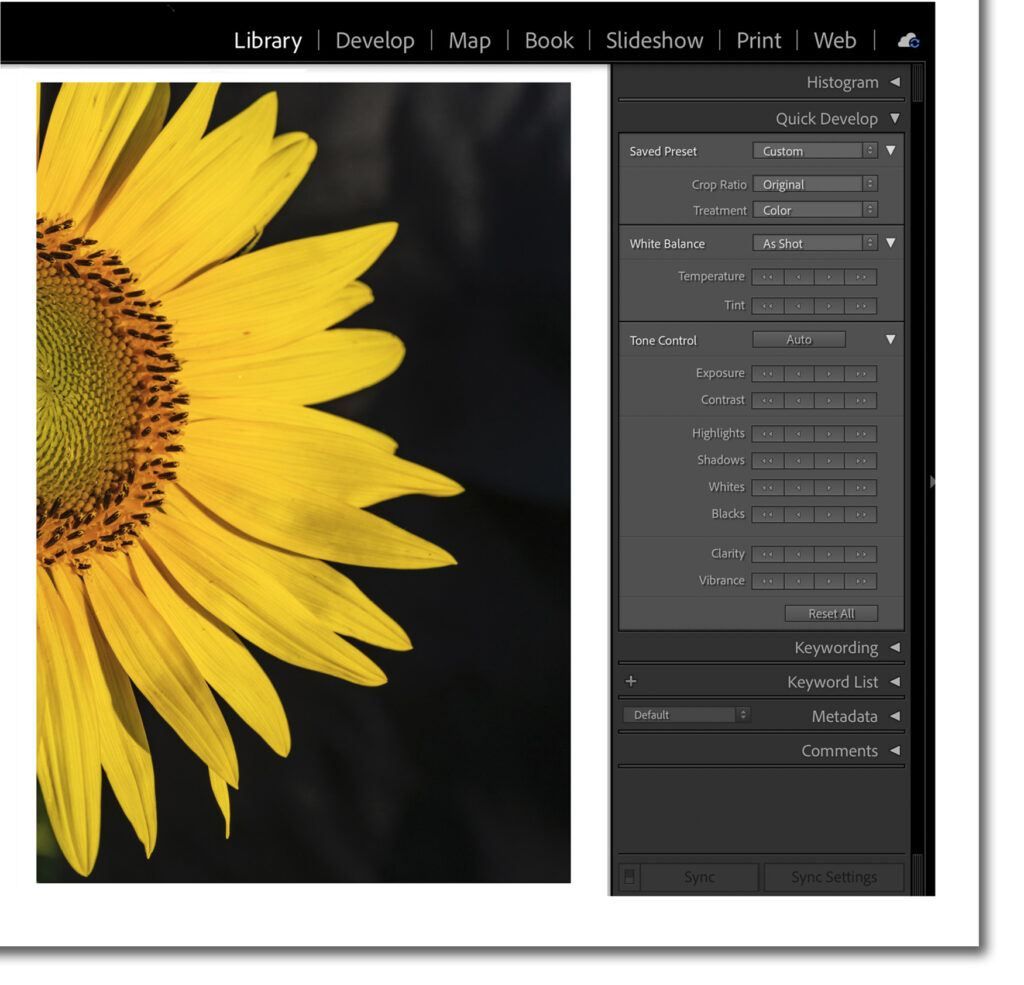
In the right-hand column, open the panel labeled Quick Develop and making changes to your image. Without ever leaving the Library Module, you can quickly apply a preset and adjust the aspect ratio or white balance. Many of the Basic settings are also included.
Without ever leaving the Library Module, you can quickly apply a preset and adjust the aspect ratio or white balance. Many of the Basic settings are also included.
The settings in the Quick Develop panel look a little different than they do in the Develop Module. Rather than sliders, you have four rectangular buttons. The two buttons on the right apply more of the adjustment. The two buttons on the left take it away. The buttons with one dot add or remove some of the effects. The buttons with two dots make more of an adjustment.
Screenshot by Jenn Mishra
For instance, if I want my image to be a bit brighter, I click the third button from the left (one dot) next to Exposure. If I want to reduce contrast by a lot, I click the far-left button (two dots) next to Contrast. Click it again to remove more contrast.
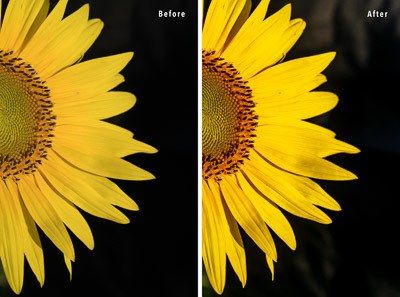
The right-hand photo was post-processed without leaving the Library Module using Quick Develop. Screenshot by Jenn Mishra
The adjustments aren’t as sensitive as those in the Develop Module, but I think of Quick Develop as a first pass. This quickly gets me close to where I want the image.
6. Profile
Moving into the Develop Module, there are a lot of hidden post-processing tools. Some of these are alternate ways to change the look of your image. Others are unique. Let’s start at the top of the Basic Panel with Profile.
Profiles have been in Lightroom for a while, but they were somewhat hard to find. In recent versions of Lightroom Classic, the Profiles moved to the top of the Basic panel. They are in a similar position in Lightroom CC. Despite their prominent position, many photographers have not yet explored this useful tool. Profiles are like presets. They give your images a look. I think of them as different types of film.
Select the Profiles menu to see a list including Camera Landscape, Camera Deep, Adobe Portrait, and Adobe Landscape. Click “Browse” or “Browse All Profiles” and you’ll have dozens more to choose from. Star your favorites for easy access.
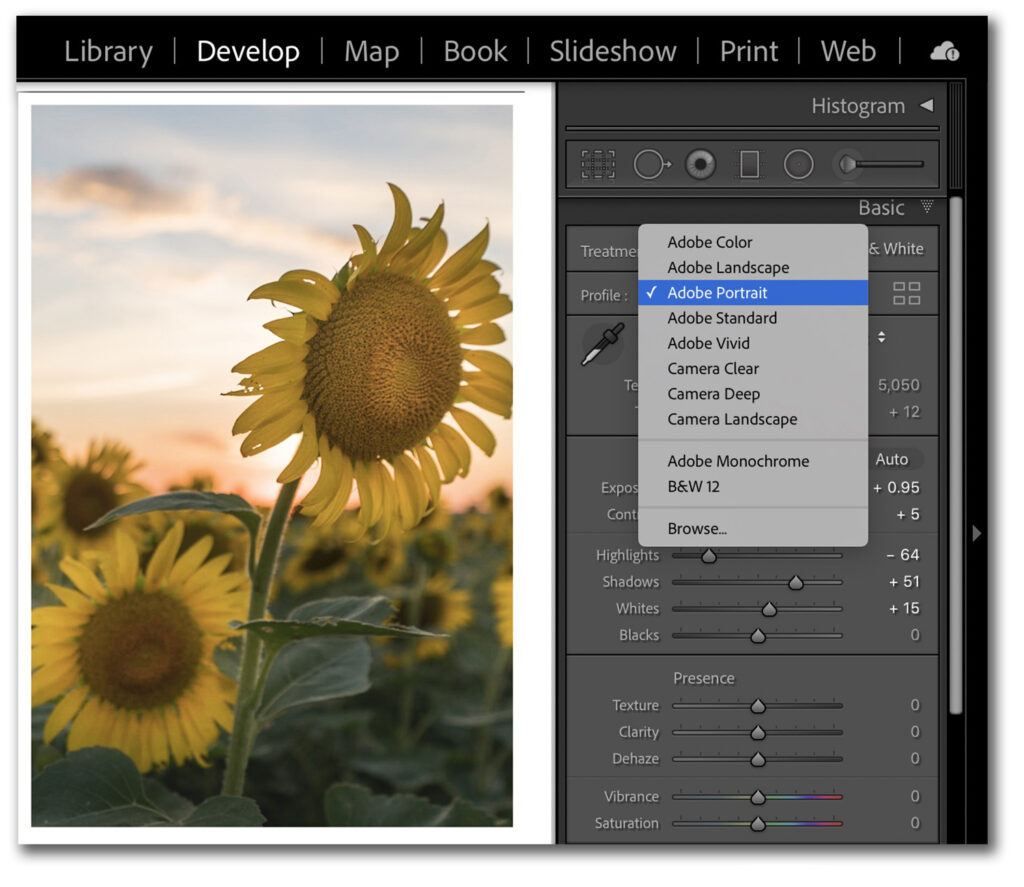
Screenshot by Jenn Mishra
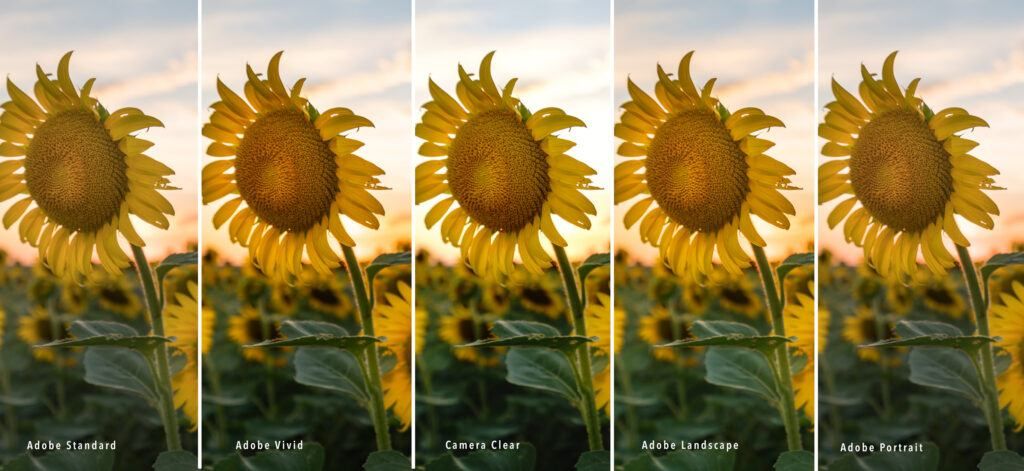
Screenshot by Jenn Mishra
Profiles are different from presets. They are applied before any adjustments. Try this. Select an image and Reset all adjustments by clicking the Reset button in the bottom-right corner of the Develop Module. Then apply a profile. The sliders won’t change. Apply a different profile. The look will change, but the sliders remain at zero. Profiles are a foundation onto which you can make further adjustments.
7. Eyedropper and Pickers
The eyedropper and pickers are tools within tools. They add functionality and allow you to interact with your image differently.
The eyedropper is part of the Basic panel attached to the white balance adjustment. It allows you to select a neutral color in your image to be a baseline. Lightroom adjusts the white balance of your image around this baseline.

Screenshot by Jenn Mishra
Select the eyedropper tool and find something in your image that should be a neutral shade of gray. Hover the eyedropper over parts of your image to see color gradations around this area. Click on a color. Lightroom does the rest. If you don’t like the result, click on a different color.
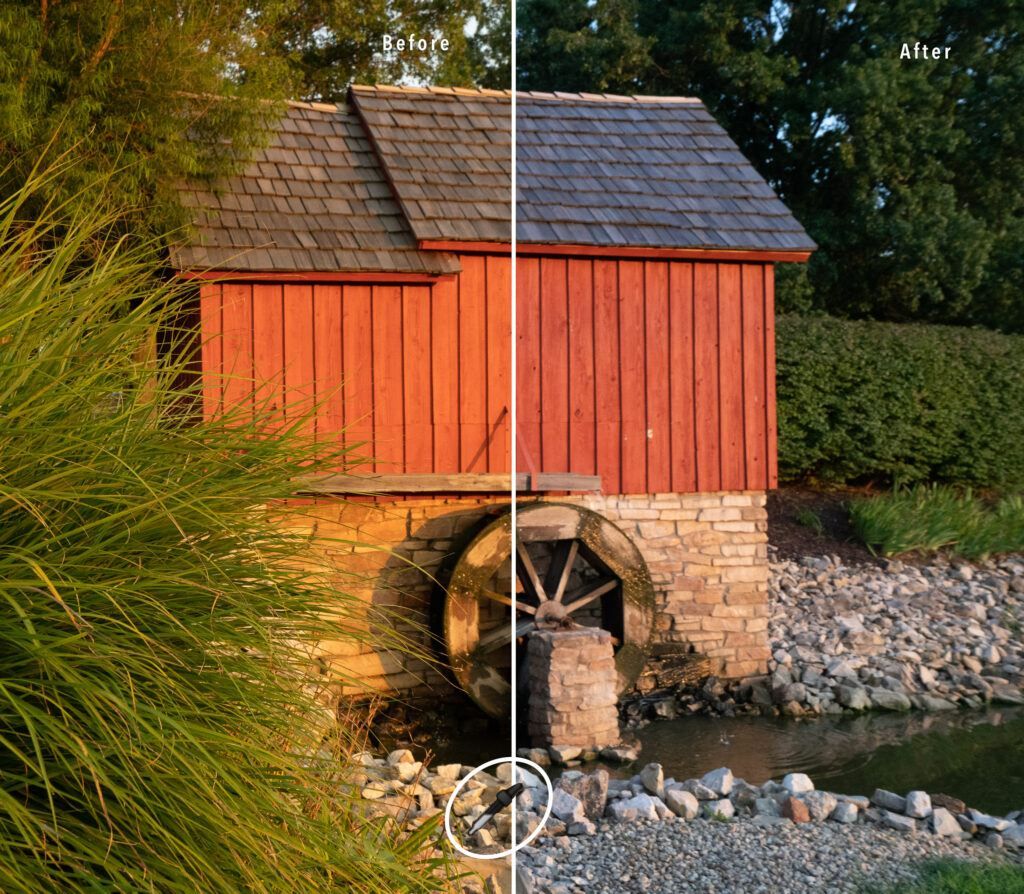
Screenshot by Jenn Mishra
You don’t have to know what temperature or tint you want. All Lightroom needs to know is what part of your image should be a neutral gray.
Picker tools work similarly. There are Picker tools in the Tone Curve and the HSL/Color panels. They look like a small circle in the upper-left corner of the panel. In Lightroom CC, the Picker tool looks a little different and is in the upper-right corner of the panel.
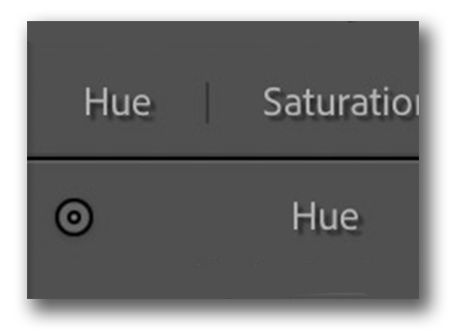
Screenshot by Jenn Mishra
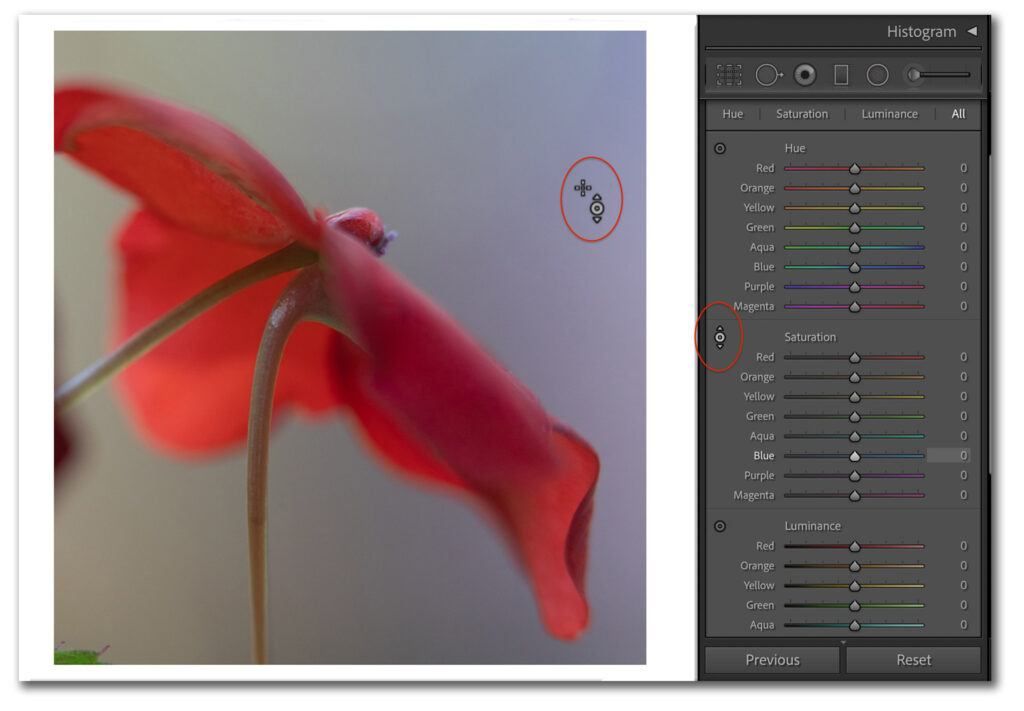
Click on the Picker and hover your cursor over the image. Your cursor now looks like a circle with arrows pointing up and down. Click and drag up or down. As you drag up, the sliders increase. As you drag down, the sliders decrease. But the Picker tool doesn’t move just one slider – it moves all applicable sliders.
Screenshot by Jenn Mishra
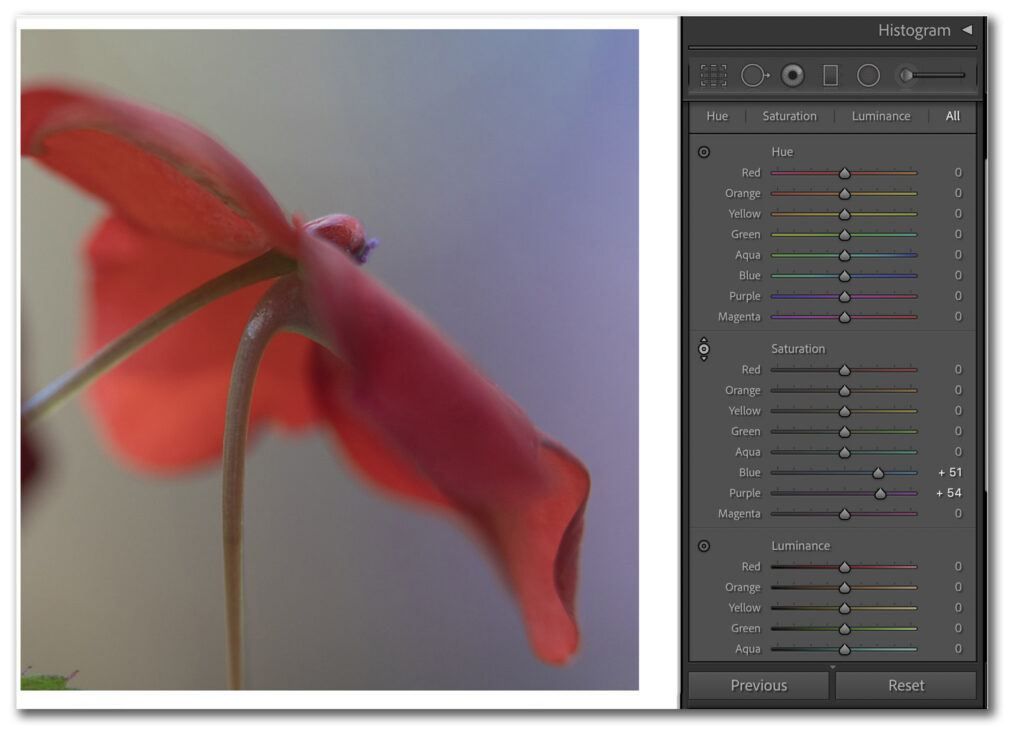
For this image, I have selected the Saturation Picker tool in the HSL/Color panel. I place my cursor over the purple background to drag up to add more saturation. The purple slider moves as I drag, but so does the blue slider. Lightroom has detected the presence of both purple and blue and changed them both.
Screenshot by Jenn Mishra
Colors are changed in proportion to their presence. There’s an even amount of blue and purple in my image, but if there was just a slight bit of magenta, this color would be changed in proportion to the other colors.
8. On-Off Buttons
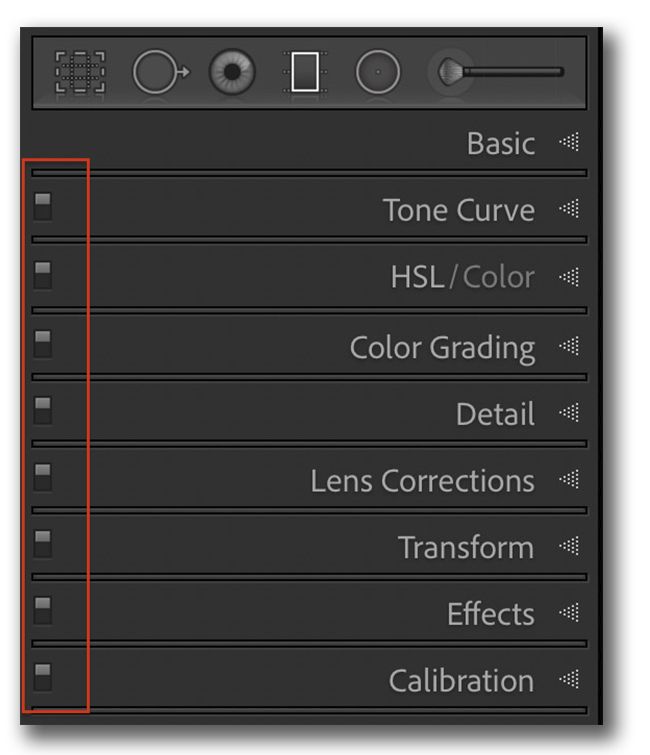
Like the Picker tool, the on-off buttons are hidden in plain sight. These buttons are located left of the labels for most Develop Module panels. In Lightroom CC, the on-off buttons are to the right of the label. On-off buttons are also found at the bottom left in each of the selective edit panels (e.g., radial filter).
They work like a light switch. The effect is on by default. Click the lower part of the tool to turn the effect off. You can toggle back and forth to see your image with and without post-processing changes. This helps you decide if you have made a change that you are happy with or if you have gone too far or not far enough with your adjustments.
To turn off all of your post-processing changes, click the Previous button at the bottom of the Develop Module or use the hotkey “\.” In Lightroom CC, this option is an icon located on the bottom right of the toolbar.
Screenshot by Jenn Mishra
9. Sharpening Mask + Option Key
When you sharpen your image, Lightroom detects edges and enhances them. Adding sharpness clarifies edges. Reducing sharpness softens edges. Most photographs benefit from a little bit of sharpening and Lightroom adds a bit to your image by default. To see this, open the Details panel. The Sharpening slider is usually not set at zero.
But Lightroom is sharpening all edges – even parts of your image that you want to be a bit blurry, like when you are using a shallow depth of field. The Masking slider under Sharpening allows you to target where Lightroom applies the sharpening. This slider is set to zero.
Adding sharpness clarifies edges. Reducing sharpness softens edges.
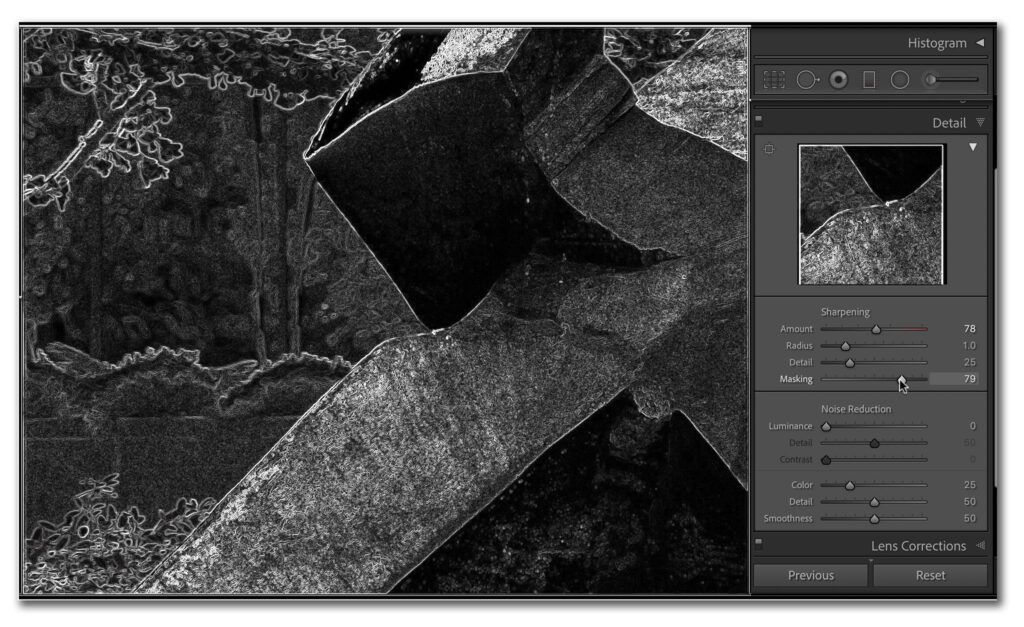
As you move the masking slider to the right, sharpening becomes more refined. To see this better, hold the Option key as you slide. The Option key on your keyboard adds a lot of functionality in Lightroom. I haven’t discovered all the things the Option key does, but I use it a lot when adding a sharpening mask. I can see exactly which edges are affected by the sharpening.
Holding the Option key when adjusting sharpening or noise switches your image into monochrome, where it is much easier to see the changes. I have not found a way to do this in Lightroom CC.
Screenshot by Jenn Mishra
10. Spot Removal - Visualize Spots
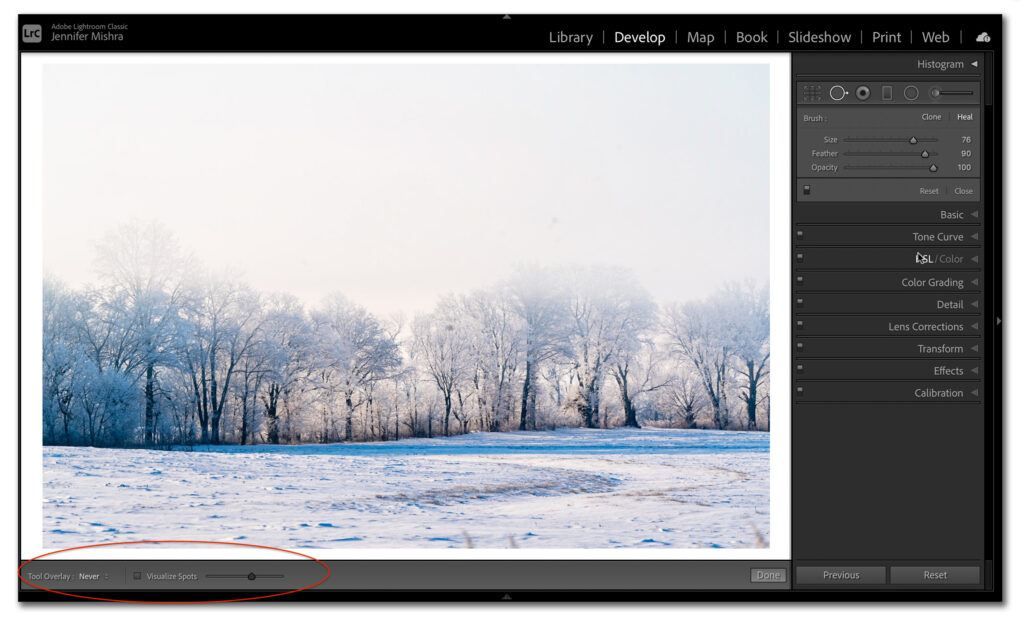
If you have not discovered the Spot Removal tool, this is your chance! It is called the “Healing Brush” in Lightroom CC. It is called “spot removal” because the main function is to take out errant spots, such as from sensor dust. The tool allows you to copy another area of your image to cover up a flaw.
Screenshot by Jenn Mishra
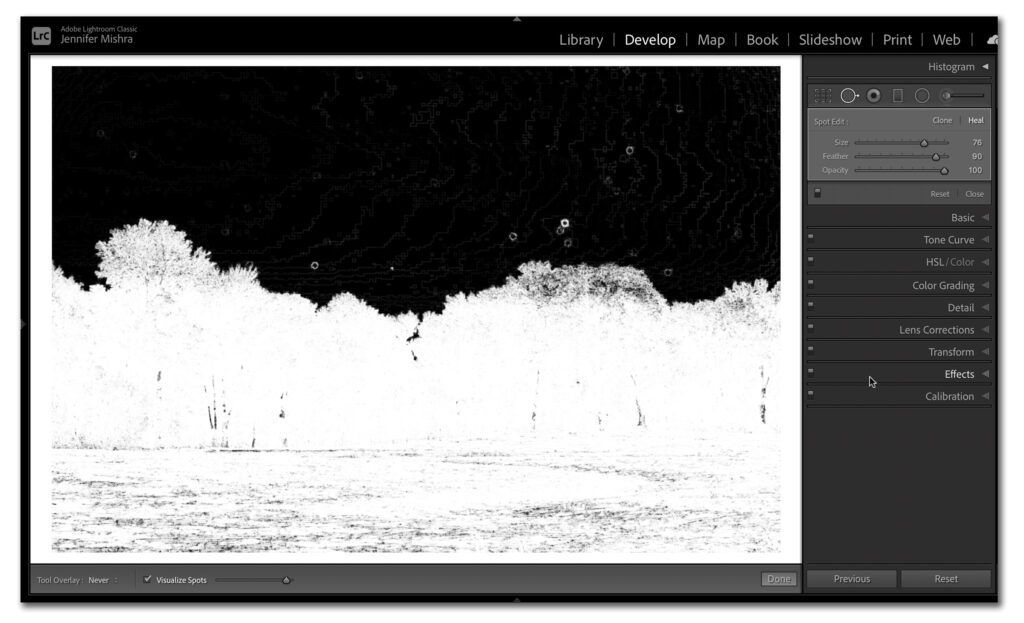
Here is an image of a winter scene. I changed my lens quickly and narrowed my aperture, which always shows more sensor dust. There are quite a few spots of dust in the sky, but they are hard to see. Knowing this, Lightroom includes a Visualize Spots feature located in the horizontal toolbar across the bottom of your screen. It will be above the film strip of images if you have that turned on. If you don’t see the toolbar, click “T” to open it. On Lightroom CC, the box is just below the sliders.
Click the box next to Visualize Spots. Your image will switch to an outline version. A few of the larger spots show up, but I know others are Moving the slider next to Visualize Spots increases the sensitivity. I can see many more spots. This makes it much easier to remove distracting spots in my image. When you’re finished, unclick the box next to Visualize Spots and your image will return to normal.
Screenshot by Jenn Mishra
11. Tone Curve Colors
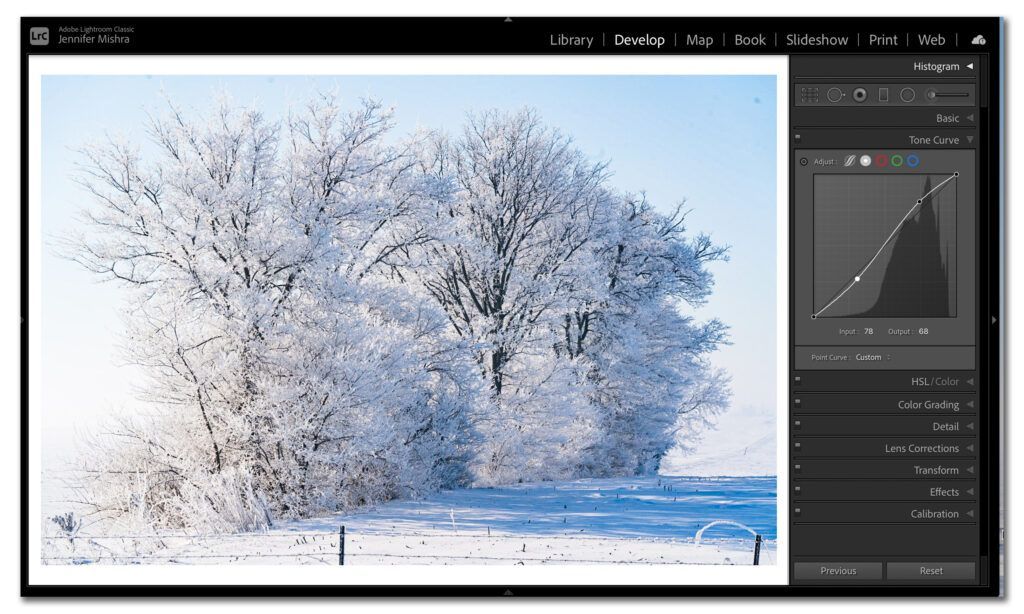
Finally, I want to call your attention to some color options in the Tone Curve panel. In Lightroom CC, Tone Curve is part of the Light panel. The Tone Curve is a way of adjusting light and dark tones in your image. The line, by default, is straight running from the lower-left corner to the upper right. You can click anywhere along the line and drag. This will increase or decrease the tones in your image. The effect depends on where you click. Roughly, the upper right controls highlights, the middle controls mid-tones, and the bottom left controls shadows. Many photographers like to put an “S” in their tone curve. This means lightening the highlights a bit and darkening the shadows. Be careful! It is easy to go overboard with this tool. The histogram in the background changes as you create your curves.
Screenshot by Jenn Mishra
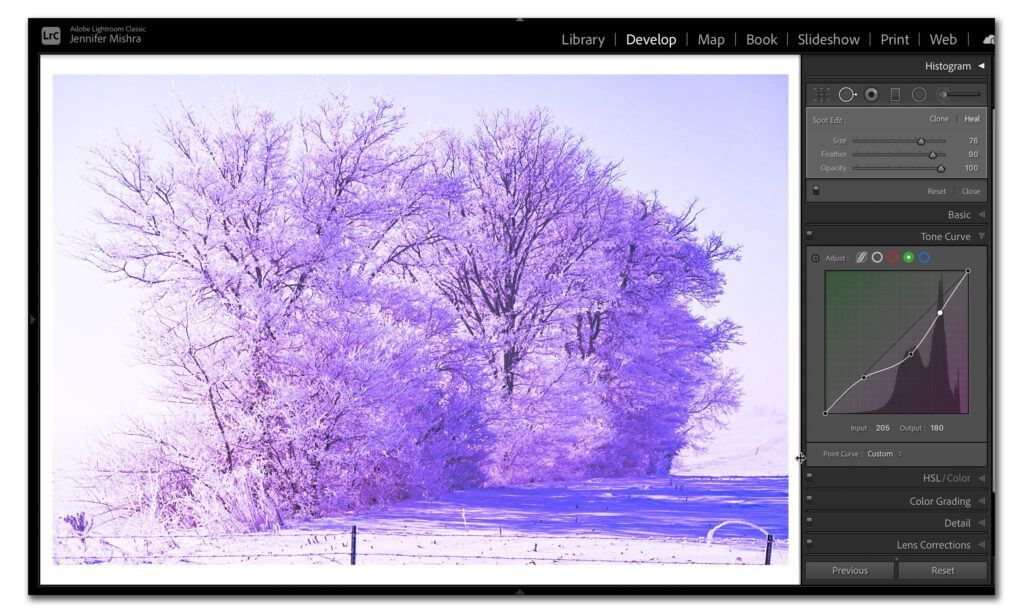
For many photographers, this tool in itself is a hidden treasure. But you can go further and selectively alter colors. Across the top, there are five circles next to the word “Adjust.” The first wavy line is the default tone curve. The second shows any adjustments you have made to the overall tones in your image. Click on the red, green, or blue tones and you can selectively adjust your colors. You can also get creative with your look.
Screenshot by Jenn Mishra
Recommended Reading: If you’re interested in improving your post-processing workflow, check out Photzy’s Understanding Masking premium guide. It has sections on Lightroom and Photoshop, as well as Snapseed for mobile users, too.

Photograph by Jenn Mishra
Summary
There are a lot of hidden tools in Lightroom. This guide includes 11 of my favorite tools, but it only scratches the surface. Some tools help you organize your images, whereas others allow you to make adjustments. Maybe you have come across some of these tools and not known what to do with them. I would love to know if you have other hidden gems!
Self-Check Quiz:
- What information can you add to your images using the “Apply During Import” panel?
- What command do you use if you want to change the date or time that your image was taken?
- What hotkey will add an image to the Quick Collection?
- What is a Keyword Set?
- Describe how the Quick Develop panel in the Library Module looks different from similar adjustments in the Develop Module.
- How do profiles differ from presets?
- What do you select with the eyedropper tool to set white balance?
- What does the Picker tool do?
- Which key do you hold to see the sharpening mask?
- How do the Visualize Spots feature help you?
Learning Assignment:
Import a photo and explore the different tools described in this guide. Don’t worry about messing up your image; this is a discovery exercise. Look carefully for small symbols and menu options that are new to you.


