Introduction
If you have been a member of one or more photography forums or social media pages, then you have probably seen this question posted at least once: “What should I start with first, Lightroom or Photoshop?” The problem with such a question of course is that it assumes ‘either-or,’ as if these two awesome products are mutually exclusive.
Well, from a photographer’s viewpoint I reckon you can get away without ever using Photoshop. You cannot get away without an editor that was specifically developed to edit and manipulate images, though (unless you’re a masochist).
Masochist: “a person who enjoys an activity that appears to be painful or tedious.”
So, am I suggesting that Photoshop is not suitable for editing images? Absolutely not. But I do not even want to try and think what it would be like to return from a wedding with 1,500 images on your memory card and to try and edit them in Photoshop. That’s like plowing your fields with a single share plow behind an ox instead of a 10-share plow behind a powerful John Deere tractor.
Lightroom is the equivalent of a ‘sleeper’ car (looking like a plain family car but having a 700-horsepower motor under the hood). Photoshop is Lightroom’s custom twin-turbo engine. The strengthened shock breakers. The nitrous injection. The wider tires. Everything that enhances Lightroom’s capabilities.
Photoshop is Lightroom’s custom twin-turbo engine. The strengthened shock breakers. The nitrous injection. The wider tires. Everything that enhances Lightroom’s capabilities.
What will you learn in this guide?
In this guide, we’re going to look at a couple of reasons why you’d want to team up Lightroom and Photoshop. We’re also going to have a quick look at how you would do that. We’ll witness them as the perfect team.
After reading this guide, you should have a good understanding of when to call in Photoshop’s help while editing images in Lightroom. We won’t go through all of the reasons to do so, but certainly the most important ones from my personal experience.
Note: I will be using Lightroom Classic in this guide, as I find it the easiest version to work with.
Recommended Reading: If you’re interested in improving your post-processing workflow, check out Photzy’s Understanding Masking premium guide. It has sections on Lightroom and Photoshop, as well as Snapseed for mobile users, too.
So, Let’s Marry Them First
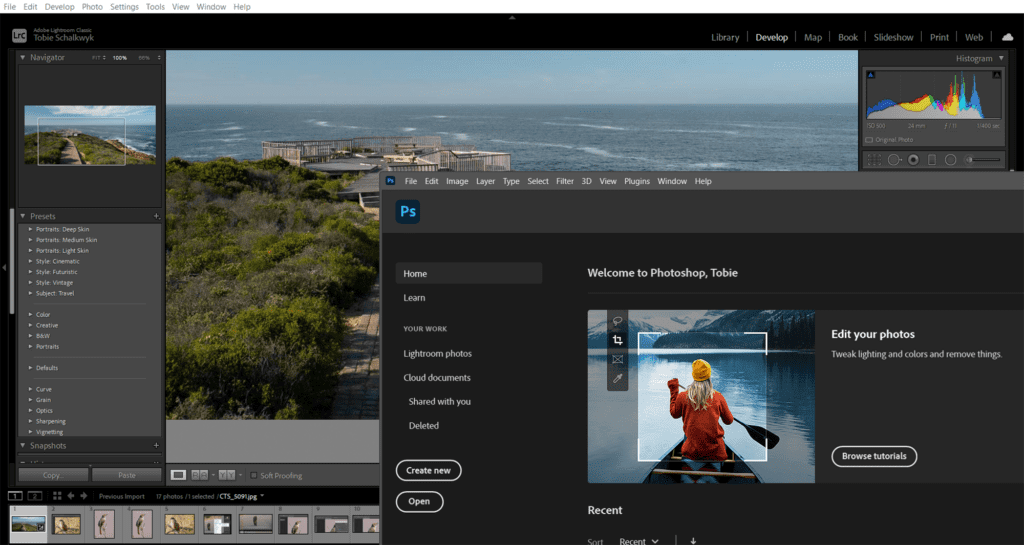
If we utilize these two products as one entity, then we certainly do not want to juggle imports and exports between them, do we? One of the coolest features of Lightroom is an ‘Edit In’ feature. The menu is invoked by selecting Photo/Edit In or by right-clicking on an image in Develop mode.

Photograph by Tobie Schalkwyk
Alternatively, you can skip the dropdown and click on Ctrl+E in Windows (Cmd+E on a Mac) and the photo will open up inside Photoshop.
When you save the image in Photoshop hereafter, it will automatically create a separate (Photoshop) .tif version of the image inside Lightroom. Now is this cool or what?

Photograph by Tobie Schalkwyk
“But how do I integrate Photoshop with Lightroom?”
Lightroom does not know by default that it should include Photoshop (or any other supporting program, for that matter) in its ‘Edit In’ sub-menu (or to invoke Photoshop when clicking Ctrl+E/Cmd+E). You have to tell it. You start by selecting Edit/Preferences/External Editing (Lightroom/Preferences on a Mac).
I am not going into detail about how to set up Lightroom to achieve optimum benefits from its marriage with Photoshop. Adobe has already done an excellent job (see here).
It was written with ‘common’ photographers in mind, so I’m sure there’s no way I can improve on it.
As usual, there is also a lot of other material available via Google searches, should you need more information or guidance from a different perspective.
My Two Most Common Reasons for Using Photoshop
So, now you’ve set up Lightroom to open images directly in Photoshop. But what do you need Photoshop for? What is Photoshop ‘better at’ than Lightroom?
I reckon the answer to this question would depend largely on your genre(s) of photography. When shooting birds and human portraits, you would probably want to remove unwanted objects quite regularly. You may want to soften faces and sharpen overall scenes. Let me discuss the two features I use most of the time and the reasons why.
1. Removal of Unwanted Objects

Photograph by Tobie Schalkwyk
“But Lightroom already has a spot removal brush,” I hear you say. True. And the spot removal brush is perfect when removing small objects on a simple background, like pesky dust spots in the sky (at some stage, cleaning your camera sensor would be a better idea!).
But what if you have more complex problems to solve? What if you have a branch crossing a bird’s body? Or a branch ‘growing out of its back? Or do you want to remove a watermark crossing a complex background?

Photograph by Tobie Schalkwyk
I’d like to return to this image as promised in my guide Lightroom Made Easy – My Top-Down Approach.
The branches and thorns spoil the image, don’t they? Fortunately, Photoshop has an amazing tool that sometimes boggles the mind! It’s the Content-Aware Fill. Let me demonstrate its use in the image on the left.
Step 1: Select the Unwanted Object
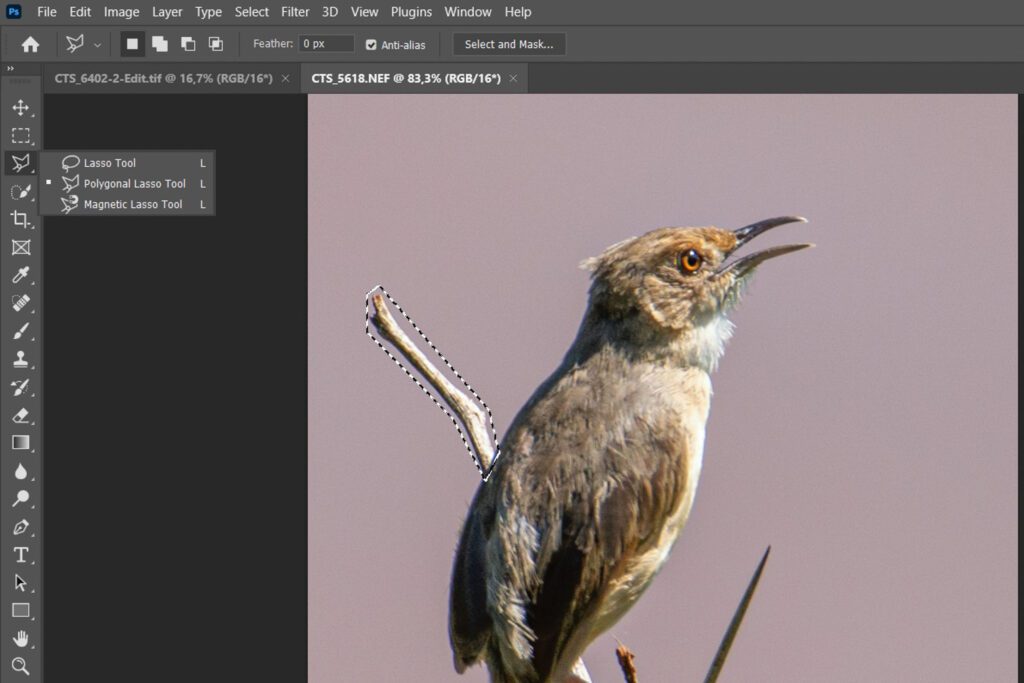
Photograph by Tobie Schalkwyk
I’ve used the Polygonal Lasso Tool for selecting the branch, as I have found that Content-Aware Fill works best when I select an area just outside of the unwanted object. Also, I want the selection to just enter the bird’s body, so the Fill touches up the bird’s contour lines.
Step 2: Activate the Content Aware Dropdown
Right-click on the selected area and then select Fill in the resultant dropdown popup. Make sure that Contents: Content-Aware is selected, as well as Dissolve Blending Mode and 100% Opacity.

Photograph by Tobie Schalkwyk
Step 3: Click OK

Photograph by Tobie Schalkwyk
Voila! Is that great or what? Now just press the Esc button to get rid of the selection lines, or select your next area.
Let’s look at a few other complex fixes (made easy by Content-Aware Fill).

Photograph by Tobie Schalkwyk
A branch was removed at the top, plus two branches crossing the bird’s body and a watermark.

Photograph by Tobie Schalkwyk
Tips:
- Do not decide beforehand that removal will be too complex for Photoshop. Sometimes one stands amazed at how well it removes objects. Just try it!
- If a removal result is not to your liking, reverse the change (Ctrl+Z/Cmd+Z) and divide the object to be removed into smaller sections.
- Finish all adjustments in Lightroom before making adjustments in Photoshop – or at least keep an eye on the adjustments in Lightroom after making changes in Photoshop. Sometimes Photoshop’s changes cause pixelations or other unexpected effects when you make further adjustments in Lightroom.
Key Lesson: You may be able to get away with most simple removal tasks in Lightroom, but once things start to get more complex, Photoshop’s Content-Aware Fill does not have its equal in terms of quality and time-saving. Its ability to fill the space occupied by a removed object is simply amazing.
Don’t spend too much time in Lightroom trying to achieve the impossible. Jump straight into Photoshop for more complex tasks and save yourself a lot of time and frustration.
Recommended Reading: If you’re interested in improving your post-processing workflow, check out Photzy’s Understanding Masking premium guide. It has sections on Lightroom and Photoshop, as well as Snapseed for mobile users, too.
2. Selective Sharpening and Blurring
In general, I leave the sharpening slider on ‘40’ during Lightroom imports. If I need more sharpening, I resort to Photoshop. Its sharpening abilities are way superior to Lightrooms. In addition to that, it has various types of sharpening, each serving a special purpose. To see this for yourself, select Filter/Sharpen or Filter/Blur from Photoshop’s top menu.
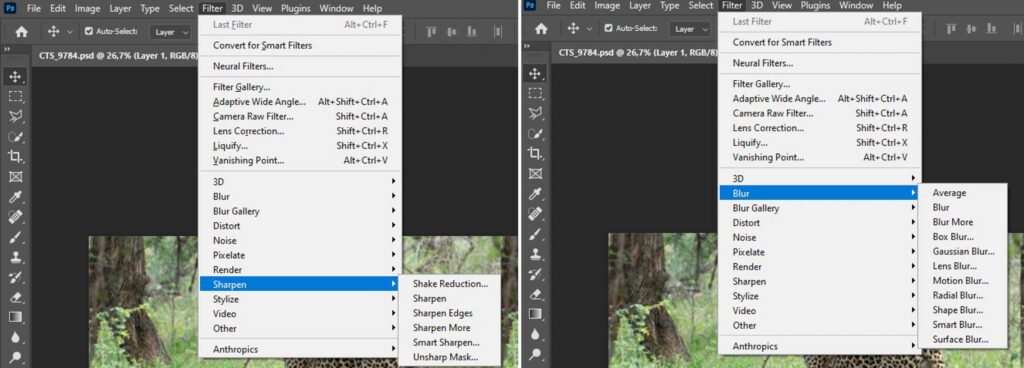
Photograph by Tobie Schalkwyk
Going into each type of Photoshop’s Sharpen and Blur type is way beyond the scope of this guide. Use Photoshop’s Help menu item to get more information about each, or Google searches. There’s a ton of information available on this topic.
Let me just add that I usually use Unsharp Mask for sharpening and Radial Blur for blurring, as I feel that they are usually perfect for my needs. In the very unlikely event of the sharpening result not satisfying my liking, I explore some of the other sharpen/blur types.
More about the ‘selective’ part…
More intensive sharpening is not the only reason why I often use Photoshop, though. The other reason is that Photoshop has advanced selection tools. You can select a specific area or object in your image and then perform sharpening and blurring on only that area.
f I need more sharpening, I resort to Photoshop. Its sharpening abilities are way superior to Lightrooms.
Sure, you can do more or less the same with Lightroom’s adjustment brush, but usage of the brush gets messy when you have to get into narrow spaces without touching the surrounding areas. Let me demonstrate.
Selective Sharpening
Let’s say I want to sharpen only the bird in this image.
Step 1: Select the Bird and Make Sure Everything Else Is Deselected
I have used Photoshop’s quick selection tool for this. Everything inside the dotted lines is selected.
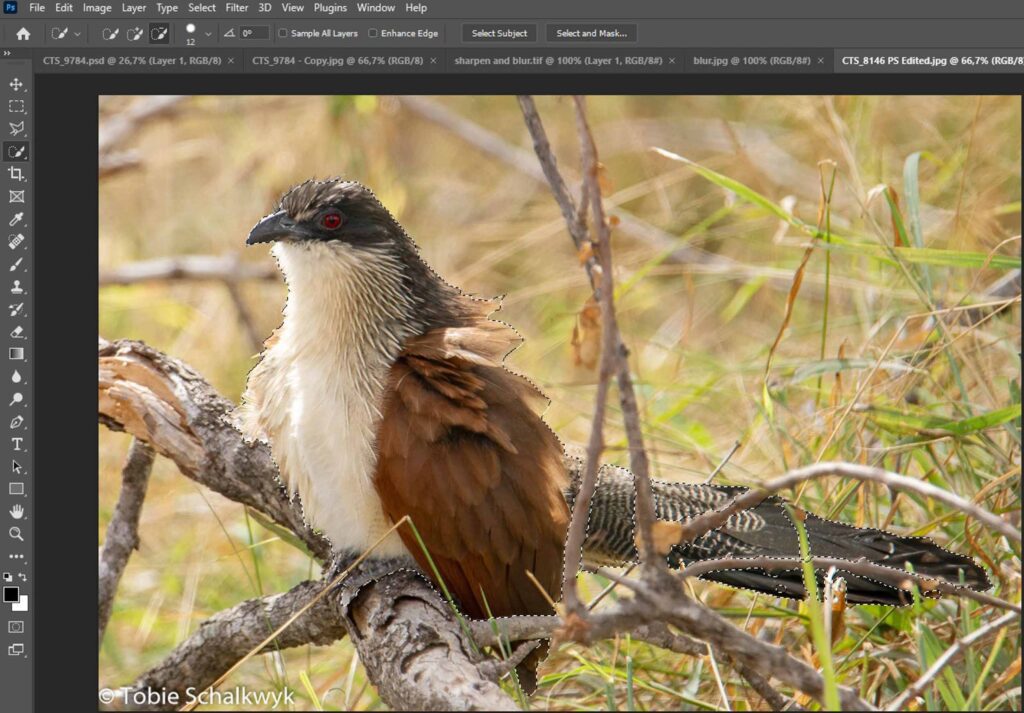
Photograph by Tobie Schalkwyk
Step 2: Sharpen the Selected Area
- Select Filter/Sharpen/Unsharp Mask. Specify a sharpening amount. Usually, anything between 30% and 50% is a good starting point.
- Set the Radius to 1,0. This controls how many neighboring pixels around high-contrast edges the filter affects.
- Set the Threshold to 0. This controls how different in value and area of pixels must be from an adjacent area for it to be affected by the filter. Zero affects the whole selected area.

Photograph by Tobie Schalkwyk
Repeat this process by selecting Filter/Sharpen/Unsharp Mask. Even better, use the shortcut key of Ctrl+Alt+F (Cmd+Alt+F on a Mac). Keep on repeating it until you are happy with the amount of sharpening, and then perhaps Ctrl+Z/Cmd+Z to backtrack your last iteration.
Step 3: Save the File
If you have opened the image from inside Lightroom, a new .tif version will be created inside Lightroom next to its original image.
Selective Blurring
Let’s say I want to blur everything except for the bird in this image:
Step 1: Select Everything but the Bird
This can be done exactly by selecting the bird above. But sometimes there’s a better way, namely to select the area you do not want to be blurred (i.e. the bird above) and then inverse your selection by clicking Select/Inverse from the top menu (or use the Shift+Ctrl+I/Shift+Cmd+I shortcut).
You will see that the outside frame of the image will have dotted lines. They indicate that the areas adjacent to the frame borders are selected. The bird will have the same dotted lines as before, but this time they will reflect the selected background’s lines, surrounding the bird.
Step 2: Blur the Selected Area
Click Filter/Blur/Gaussian Blur.
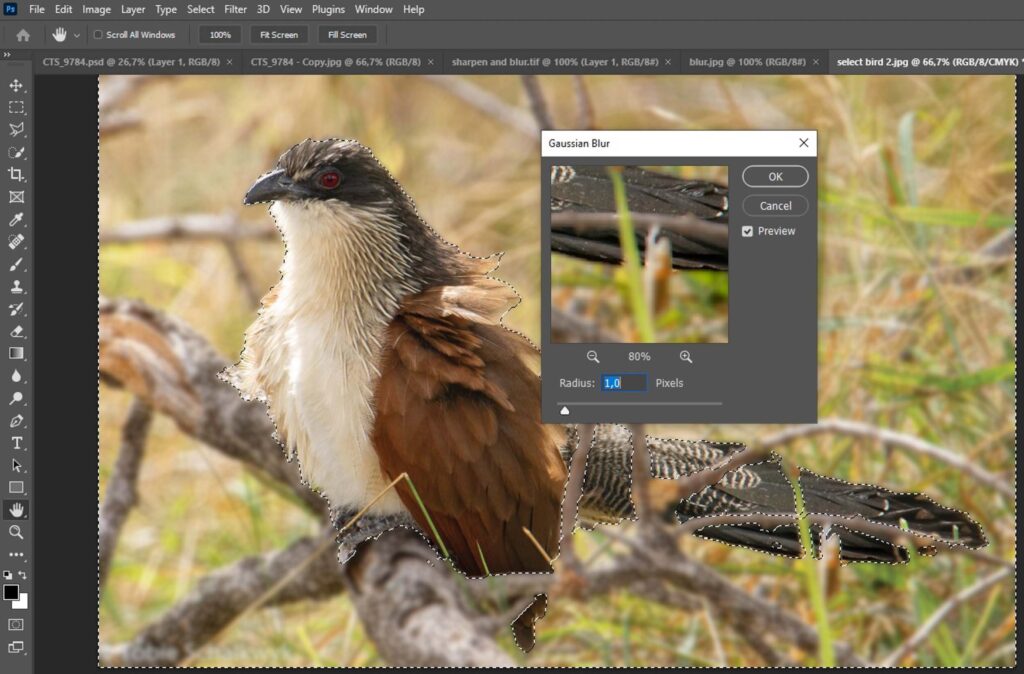
Photograph by Tobie Schalkwyk
Radius has the same purpose as sharpening. Set it to 1,0 for starters. Click OK.
Repeat this process until the background had been blurred to your liking (or click repeatedly on Ctrl+Alt+F).
Step 3: Save the File
If you have opened the image from inside Lightroom, a new .tif version will be created inside Lightroom next to its original image.
Key Lesson: The sharpening and blurring of images (or parts thereof) are probably one of the most common tasks for photographers. Rightfully so, a blurred subject or cluttered background can mess up an otherwise beautiful image. Photoshop is excellent in this area, not only providing various types of sharpening and blurring but also letting you make finer adjustments within each type.
A word of caution: be reasonable in your expectations. Just like any other editing tool, Photoshop cannot fix a ‘bad’ image – it can only sharpen subjects or images that are a touch out of focus.
I’d like to encourage you to play with the various sharpening and blurring types and adjustments inside each. Study them and make sure that you know which suits your editing style, and how and why to make adjustments during the editing process.
Recommended Reading: If you’re interested in improving your post-processing workflow, check out Photzy’s Understanding Masking premium guide. It has sections on Lightroom and Photoshop, as well as Snapseed for mobile users, too.
Conclusion
There’s a third reason I use Photoshop quite often and that is Luminosity Masks. Luminosity Masks allow you to make tonal adjustments in incremental steps and are awesome when you want to do specialized dodging and burning of under/overexposed areas in images. Be on the lookout for my upcoming guide titled How and When to Use Luminosity Masks in Photoshop’ where I will discuss this technique in detail.
I hope that I have convinced you that, even only for the two tasks above, Photoshop is an awesome ‘extension’ to Lightroom and you are poorer without it. It takes some tasks just a few steps further and its seamless integration with Lightroom makes them great partners.

Photograph by Tobie Schalkwyk
I have covered only the sharpening and blurring of selected areas, but you can also perform distortions, reduce noise (snow), and apply various effects and styles. Then you can create a range of different layers which only apply to the selected areas – and so much more!
The fact that you can do all of this from inside Lightroom (by using the Edit In feature) is like running Photoshop inside Lightroom! Keep in mind that you can get both of these products on Adobe’s Photography Plan for a mere $9.19 US per month – an absolute bargain, or rather ‘investment’! Don’t think about it, just get it!
Self-Check Quiz:
- How do you open a Lightroom image in Photoshop?
- What are the shortcut keys for repetitive sharpening and blurring?
- What is the purpose of the Radius adjustment during sharpening/blurring?
- What happens when you save a Photoshop file which was passed on from Lightroom?
- Self-study: What is ‘noise’ and why would you want to lessen it? Can you think of/find a reason to increase it?