


F/8 and Be There!
The legendary Weegee (Arthur Fellig, 1899-1968) may not actually have said that, but it emphasizes the importance of arriving ready. Newsmen would get out of the car with big press cameras in hand, huge flashbulbs in the gun, a holder of 4×5” film already in the back with the dark slide pulled, and some rough presets, f/8 to 11-ish, 1/500 sec, range 15’.
They could just walk up and grab the picture.
They knew their equipment so well that they literally didn’t think about it.
Regardless of what kind of photographer you are, whether a pro or a hobbyist, when you pick up your camera and head out the door, it can really make a difference if you’ve done some prep work beforehand.
If you are a pro, I think it’s mandatory, but it never hurts to be prepared, whatever your level of expertise.
Abraham Lincoln famously said, “Give me six hours to chop down a tree, and I will spend the first four sharpening the axe.”
Once upon a time, my kids were taking their daughter, my granddaughter, out to play in the park. Photo op! I grabbed my camera.
The kid was racing to a swing set, a perfect opportunity.
I switched on my mirrorless Sony A6300, brought it up to my eye, and… yikes, what the heck…? Everything was totally whited out! I thought my camera was busted!
A couple of days earlier, I had been shooting some tabletop stills in low artificial light levels, with my camera on a tripod, and in full manual everything: manual focus, manual shutter and aperture, and a fixed ISO of 100, so the exposures were running pretty long, between 15 and 30 seconds.
I finished that shoot, was happy with my shots, so I switched the camera off and dropped it in the bag.
Exactly like it was.
And I forgot about it.
So I arrived unprepared on location to take pictures of my granddaughter. I missed lots of good shots while I struggled to reset the camera to my usual defaults.
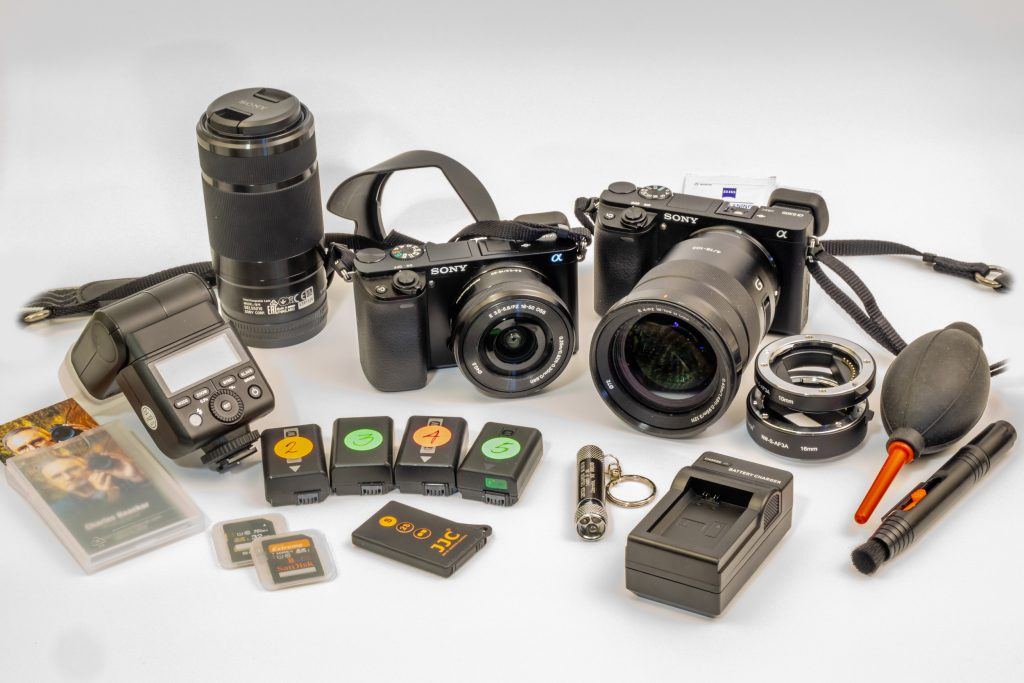
This is the stuff that I typically carry on assignment when shooting events. Photo by Charles Haacker
This has happened to all of us, some of us more frequently (guilty!). So I’d like to offer some pain-relieving suggestions:
- Read the manual
- At the end of any “abnormal” session, restore your settings for the things you shoot most
- Use programmable settings if you have them
- If you do not have programmable settings, make checklists, ideally memorized
- Put your favorite go-to lens back on
- Keep it clean inside and out
- Format your card(s) in the camera to clear them, never any other way
- Charge all your batteries
- Last resort? Put it in full auto mode so at least you will get something
- Preset everything for occasions that don’t fit your usual memory settings before you go
- Before you go out the door, run a checklist to ensure you haven’t forgotten anything
Recommended Reading: Want a step-by-step guide on photography skills with your DSLR? Grab a copy of our best-selling guide: the DSLR Crash Course.
Read the Manual
I have PDFs of all my manuals in my phone so I can quickly review something that I’ve forgotten how to do.
Modern cameras, even point-and-shoots, are devilishly complicated. It’s the menus.
In the analog days, even the highest of high-end cameras were still basically a light-tight box with a lens on one end and film (sensor) on the other.
All of the controls were external, visible, and, once understood, really quite basic. The film you loaded determined the ISO setting (ASA back then).
Modern cameras, even point-and-shoots, are devilishly complicated. It’s the menus.
Focus might have been achieved with a “scale” to set the distance, or using a rangefinder, or on a ground glass, or various combinations.
The aperture was set directly on the lens, maybe by turning a ring or moving a pointer.
The shutter was set either within the lens or in the body. Exposure was determined using a hand-held meter or by guesstimate, or both.
Key Lesson: Storing a PDF version of your camera manual on your phone, tablet, or laptop might save the day if you need a quick reference.
Think F.A.S.T.: Focus, Aperture, Shutter, Think!
My mentors told me to THINK F.A.S.T.: Focus, Aperture, Shutter, THINK!
They emphasized becoming so familiar with the camera that it became an extension of the hand, eye, and brain. The well-trained and practiced photographer didn’t need automation; we were automation.
Nowadays, you practically need a pilot’s license to fly a modern high-end camera. Operating one completely manually is still possible, but actually becomes somewhat difficult.
Cameras today are engineered for automation, and if all they did for you was focus and adjust the aperture and shutter, well, that’d be pretty good, especially for those of us who were immersed in total manual mode for many of our working years.
But using a modern digital camera, especially if you want to get creative and take it off of full auto, requires that you know what you are doing, so you can accomplish what you want to.
The menus on almost all cameras can be daunting unless you have (A) read the manual and (B) practiced beforehand.
Use These Tips to Keep Your Camera Ready for Anything!
1. Restore Your Settings for the Things That You Shoot Most
When I ended my manual tabletop session, that’s what I should have done. This is where the user-programmable memory settings can be super handy. I shoot my family, granddaughter, and other people a lot. I do a lot of probono volunteer work shooting events for nonprofits. Thus, my number one setting is “people.” My settings will not work for everyone, and may not even apply to your camera, but here’s what I do:
2. Programmable Settings
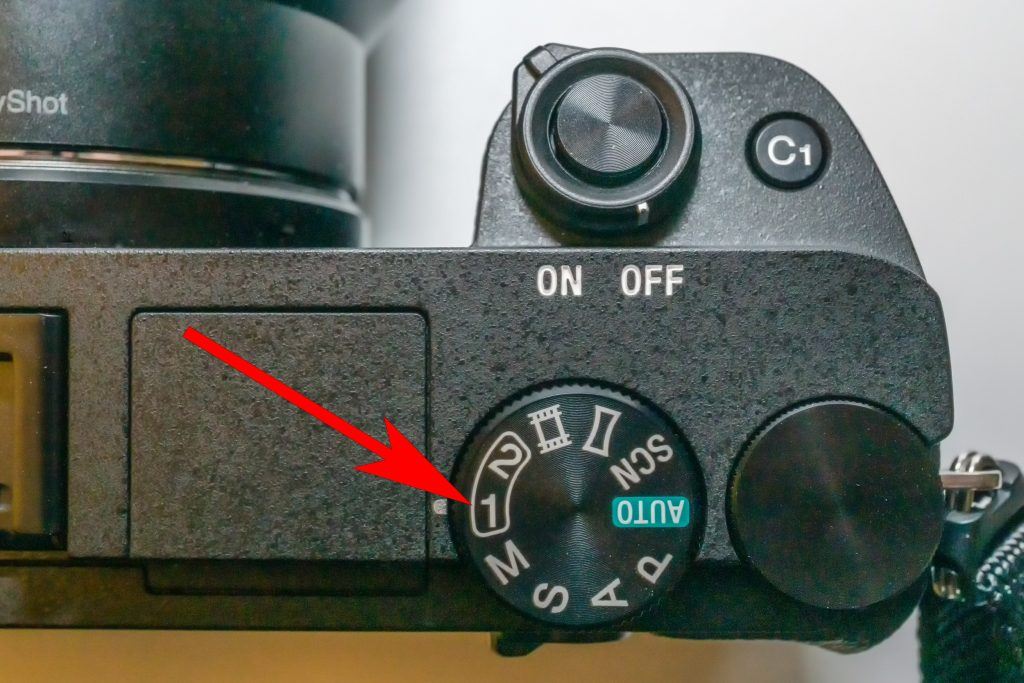
The red arrow points toward the “User Programmable Preset no. 1” on my Sony A6300. This is my “people” default setting. No. 2 is for full manual control, so I don’t have to think too much about resetting when shooting “tabletop photographs” or other manual setting types of photographs. Photo by Charles Haacker
Depending on your camera and its abilities, many have programmable settings, often right on the dial and often numbered. I use an unmatched pair of mirrorless ILCs (Interchangeable Lens Cameras), both Sonys – the A6000, and a newer A6300. Both my Sony cameras have the Memory Recall (MR) detents on the dial, the user-programmable memory settings, plus several other handy programmable buttons. Together they help keep me from repeating the mistakes I have described above.
- Set for Raw-only capture. (You can shoot JPEGs, and I did for years, but I’ve been a confirmed Raw nut for almost as many years. Raw is far more flexible, but that doesn’t mean JPEG has no place.)
- ISO (speed, or sensitivity) set to AUTO from 100 to whatever. My cameras allow me to “cap” the ISO and I often cap it at 3200 to reduce noise, but if I have to get the picture, I will bump it up.
- Aperture Priority is my go-to mode, allowing me to quickly vary my depth of field.
- Autofocus set on AF-C, Continuous, which on my cameras follows fast action all over the frame.
- Focus area set on WIDE, also specifically to follow the action wherever it goes.
- Meter is usually on matrix, but, like everything else, it depends.
Note: I highly value the mirrorless capability of live view all the time, because I can see instantly in my finder if the meter is being fooled into under or overexposing and make a quick compensation.
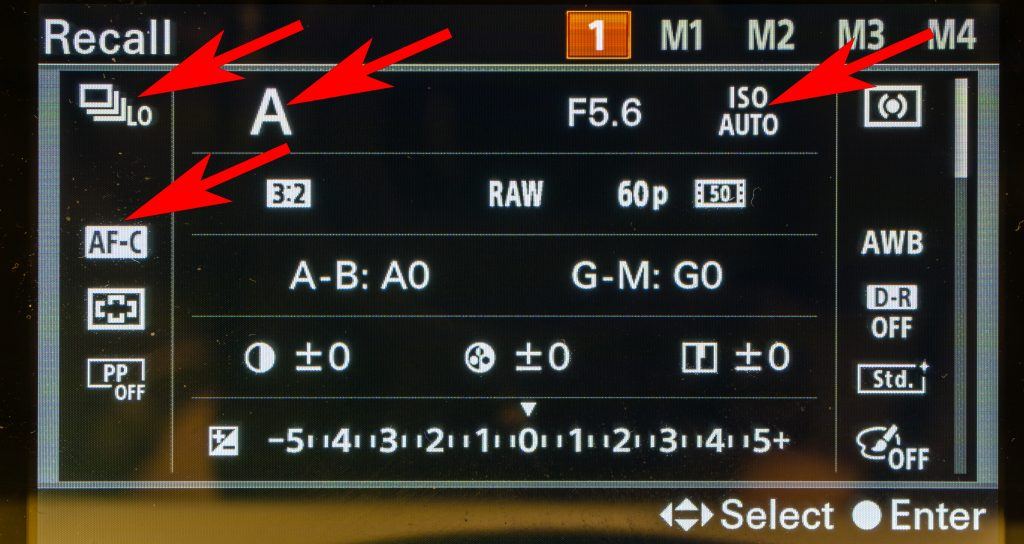
This is what the screen looks like for my number 1 memory preset. I leave it in Low Burst mode (3-FPS). Aperture Priority. ISO AUTO (what I call “floating”). Autofocus Continuous. In my cameras, that combination works well for generally photographing people, and it also helps me keep up with my granddaughter, nicknamed “Mercury.” Photo by Charles Haacker
Most ILCs have Function (Fn) buttons that are programmable. The lone “Fn” button on my Sony is multi-functional; it can be programmed with up to 12 specific settings that I chose to be able to access quickly. Many ILCs and even some high-end compacts and bridge cameras may have multiple programmable function buttons.
My Sony cameras have only one multipurpose Fn button, but almost every other button on the camera can also be reprogrammed by the user from its default to whatever makes sense, and I have done that with most of mine. That saves me from having to hunt through menus, and it makes the camera much more intuitive to use.
If you do not have programmable settings, make checklists. In those thrilling days of yesteryear when everything was totally manual, about the only way we could keep track was checklists. The modern user programmable (memory) settings are nice, but we did entirely without them. For most things we carried the checklists in our heads.
If you are serious, you should also make general equipment checklists to run down, ensuring that everything you need is in the bag. It’s easy to take something critical out and forget you did; it doesn’t go back in, and you only discover it when you are already on site and need it. It’s bad enough if you are not working, and inexcusable if you are.
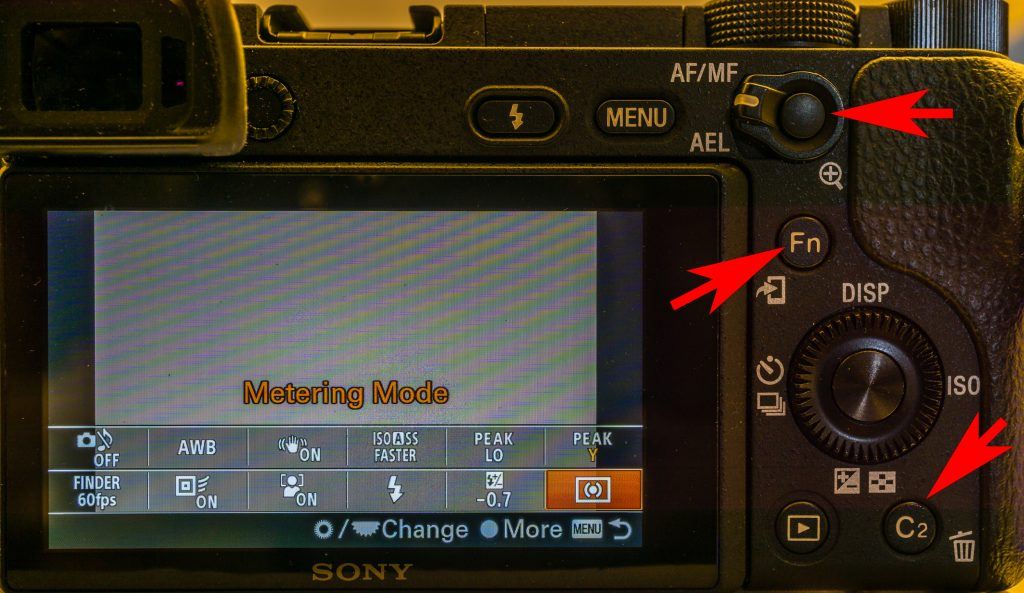
The center red arrow points to the Function button (Fn) on my Sony A6300. The display shows how I have configured it. Currently, Metering Mode is highlighted so I can quickly change it from multi (matrix) to center weighted to spot. The other arrows point to some of the several programmable buttons. Photo by Charles Haacker
3. Return Your Favorite Go-to Lens Back Onto the Camera After Using Another Lens
If you’re using a compact or bridge camera, your lens is probably a fixed zoom, but if you’re using an ILC and you have more than one lens, the lens you usually want on the body is your “walking around” lens.
It can be any lens, but it’s going to be your favorite for the type of photography you do most often. Mine is a mid-range zoom, 18-105mm f/4.0.
I have many friends that swear by primes. Maybe your go-to would be a “normal” prime, of a focal length roughly the same as the diagonal of the sensor.
Maybe you love macro, in which case you might always keep your 100mm f/2.8 macro on, as it doubles as a nice, very sharp prime.
Recommended Reading: Want a step-by-step guide on photography skills with your DSLR? Grab a copy of our best-selling guide: the DSLR Crash Course.
4. Keep It Clean Inside and Out
As a total mirrorless guy, that goes double for me.
In a mirrorless ILC when the lens is off the body, the sensor is right there, wide open. Most of them are protected with a plate over the actual sensor surface, but the real problem is dust and other debris.
I’ve noticed with my cameras that every time I change a lens the number of sensor spots immediately appear.
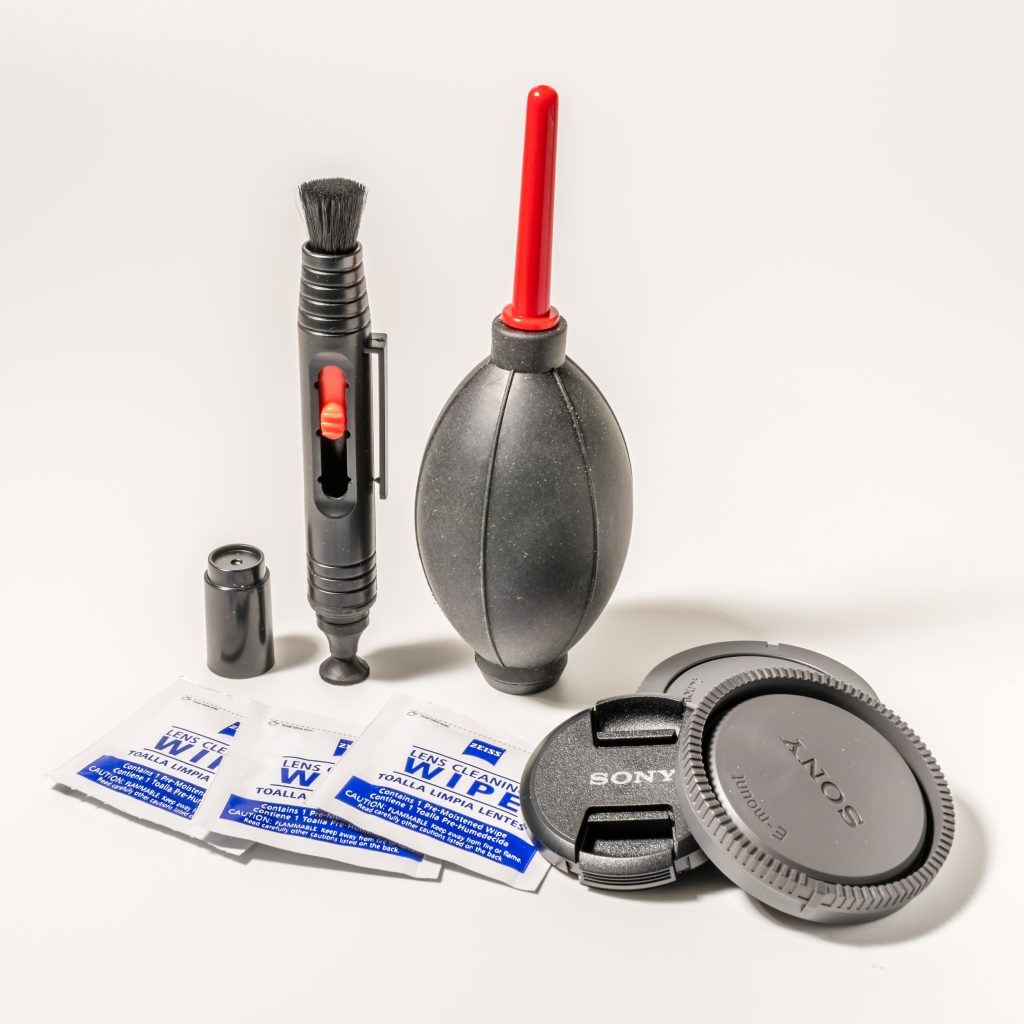
A basic and essential cleaning kit. Bulb blower (the only kind recommended by manufacturers), retractable brush with a microfiber tip that can be safely used to dislodge stuff that won’t blow off, and (in my case) some alcohol wipes for the lenses, not the sensor. Body caps and lens caps help keep the dirt out in the first place, but they are not dustproof. Photo by Charles Haacker
I always have one of those bulb blowers with me and give the interior a quick blast, and the rear element of the lens as well, since it can be dirty, even when capped, because no plastic cap creates a dustproof seal.
If you do reach for a body cap, give it a blast as well. And never blow your breath on the lenses or into the body; you are guaranteed to get spittle on things (don’t ask how I know this).
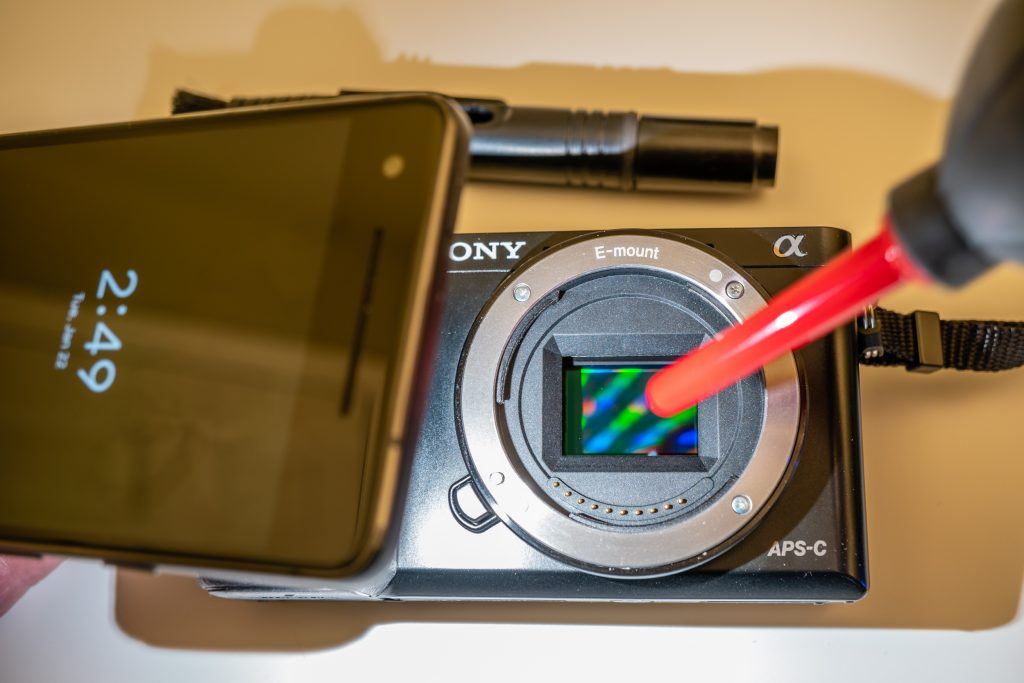
I like to use my phone flashlight to illuminate the sensor. I can lean it against the hand grip and it shows up any dust very well while leaving both hands free. Photo by Charles Haacker
Key Lesson: The light on your cell phone is a valuable tool when cleaning the sensitive interior parts of your camera.
5. Format Your Memory Card(s) in the Camera, Never Any Other Way!
I was lucky to get this tip very early in my digital career from a wedding photographer. I had been clearing my cards in my computer after upload, carefully selecting everything, then deleting it, and then emptying the trash.
He told me that while that might seem like a good idea, all the images were still on the card, just hidden.
Each time I did that, I was further down the inevitable road toward a meltdown of the card, with everything on it completely irrecoverable. Imagine if it were a wedding!
I took his advice immediately, and now I always format my cards in the camera that use them in. I should not say this (JINX), but after 12 years, so far I have never had a card corrupt, and yes, I use them over and over again.
I carry spares, of course. If you are serious about your photography, you should have everything backed up. If you are turning pro, it is mandatory. Anything can break, and according to Gumperson’s immutable law of probability (a corollary to Murphy), the thing that will break is the thing you have only one of. Never assume something works just because it worked last time.
Key Lesson: Always format your memory cards in the camera that you will be using it in. Don’t use memory cards across different cameras. Always carry extra cards.
6. Charge All Your Batteries
When I was working, none of my cameras used batteries except for button batteries for the light meters. But I shot weddings using multiple flashes. When I came in from any job, the first thing I did was put all my Quantum batteries on charge.
Modern digital cameras are utterly dependent on power. A dead battery is a dead camera.
You need to be certain you have enough batteries for any conceivable job.
I use mirrorless cameras, which are notorious battery hogs because of the Electronic Viewfinders (EVF) and they are constantly in live view.
Modern digital cameras are utterly dependent on power. A dead battery is a dead camera.
I carry six charged batteries, seven if I’m working two camera bodies (one battery already in each body).
These days most batteries are small and light so it’s really no trouble to pack them, but when you’ve been out shooting, don’t forget to charge the depleted batteries right away. Don’t wait.
I have numbered dots on my batteries so they get used in rotation. If you haven’t used your equipment in a while, top up the batteries as they slowly lose charge.
Key Lesson: Your camera is power dependent. Keep your batteries charged at all times. Top them off with a charge if they have been sitting for a while.
7. Put It in Full Auto Mode So at Least You Will Get Something
I know photographers who leave their cameras in full auto so they aren’t surprised by, say, a big Northern Cardinal suddenly appearing at the bird feeder, or their grandchild suddenly doing something wonderful for just a few seconds with no time to check settings.
8. Preset Everything for Occasions That Don’t Fit Your Usual Memory Settings
If you are heading out for a day of shooting something outside your norm (for example, shooting all manual), preset and check your camera the evening before. Take some practice shots to familiarize yourself with the unusual setup.
Key Lesson: In between organized photo sessions, leaving your camera in a full auto setting can help you to capture spur-of-the-moment shots.
Recommended Reading: Want a step-by-step guide on photography skills with your DSLR? Grab a copy of our best-selling guide: the DSLR Crash Course.
9. Before You Go Out the Door, Run a Checklist to Ensure You Haven’t Forgotten Anything

The empty space on the right is where my A6000 (the camera that made this picture) goes, usually with the little “kit” pancake zoom that fits handily in that small space. Photo by Charles Haacker
Final Thoughts
Modern digital cameras are simply amazing! Awesome! As a retired working pro, I am astounded every time I go out, no matter what I’m doing, but the Sony cameras that I am now committed to are notorious for their byzantine menus. I’ve used a few other cameras and don’t feel the Sony cameras are any more complex. But I do have a PDF of the entire manual, plus the quick-start, on my phone. Every so often I refer to it when I can’t recall how to do something.
No two cameras seem alike these days, even within a brand, so you need to know where things are on every one you use. My Sony cameras have user-programmable settings, plus they have userprogrammable buttons. I have customized my two mismatched bodies to be as identically set up as possible, and I have taken full advantage of everything offered.
If your camera(s) offer that kind of customization, use it. It saves time and increases usable pictures.
To locate and use every tool in the camera’s box, you really must read the manual, reread it from time to time, and carry a copy with you. Every shortcut you can program into your camera is something you don’t have to hunt for while missing shots.
Self-Check Quiz:
- True or False: If you are not a professional, there is no reason to check your gear beforehand.
- True or False: Camera manuals are too tedious and boring. I can learn by doing it alone.
- True or False: All cameras have easy-to-understand menus that make the manuals redundant.
- True or False: User-programmable settings and buttons are valuable shortcuts to make the camera easier and fast to use.
- True or False: If I don’t have user-programmable settings, I can make checklists as a substitute.
- True or False: I don’t need to keep my sensor perfectly clean because modern apps make it so easy to spot flaws.
- True or False: The most reliable way to clear SD cards is by formatting them in the camera.


