

I’m a huge fan of dramatic skies, big thunderous clouds, and stormy-looking landscapes, simply because the more striking the sky, the stronger the visual impact.
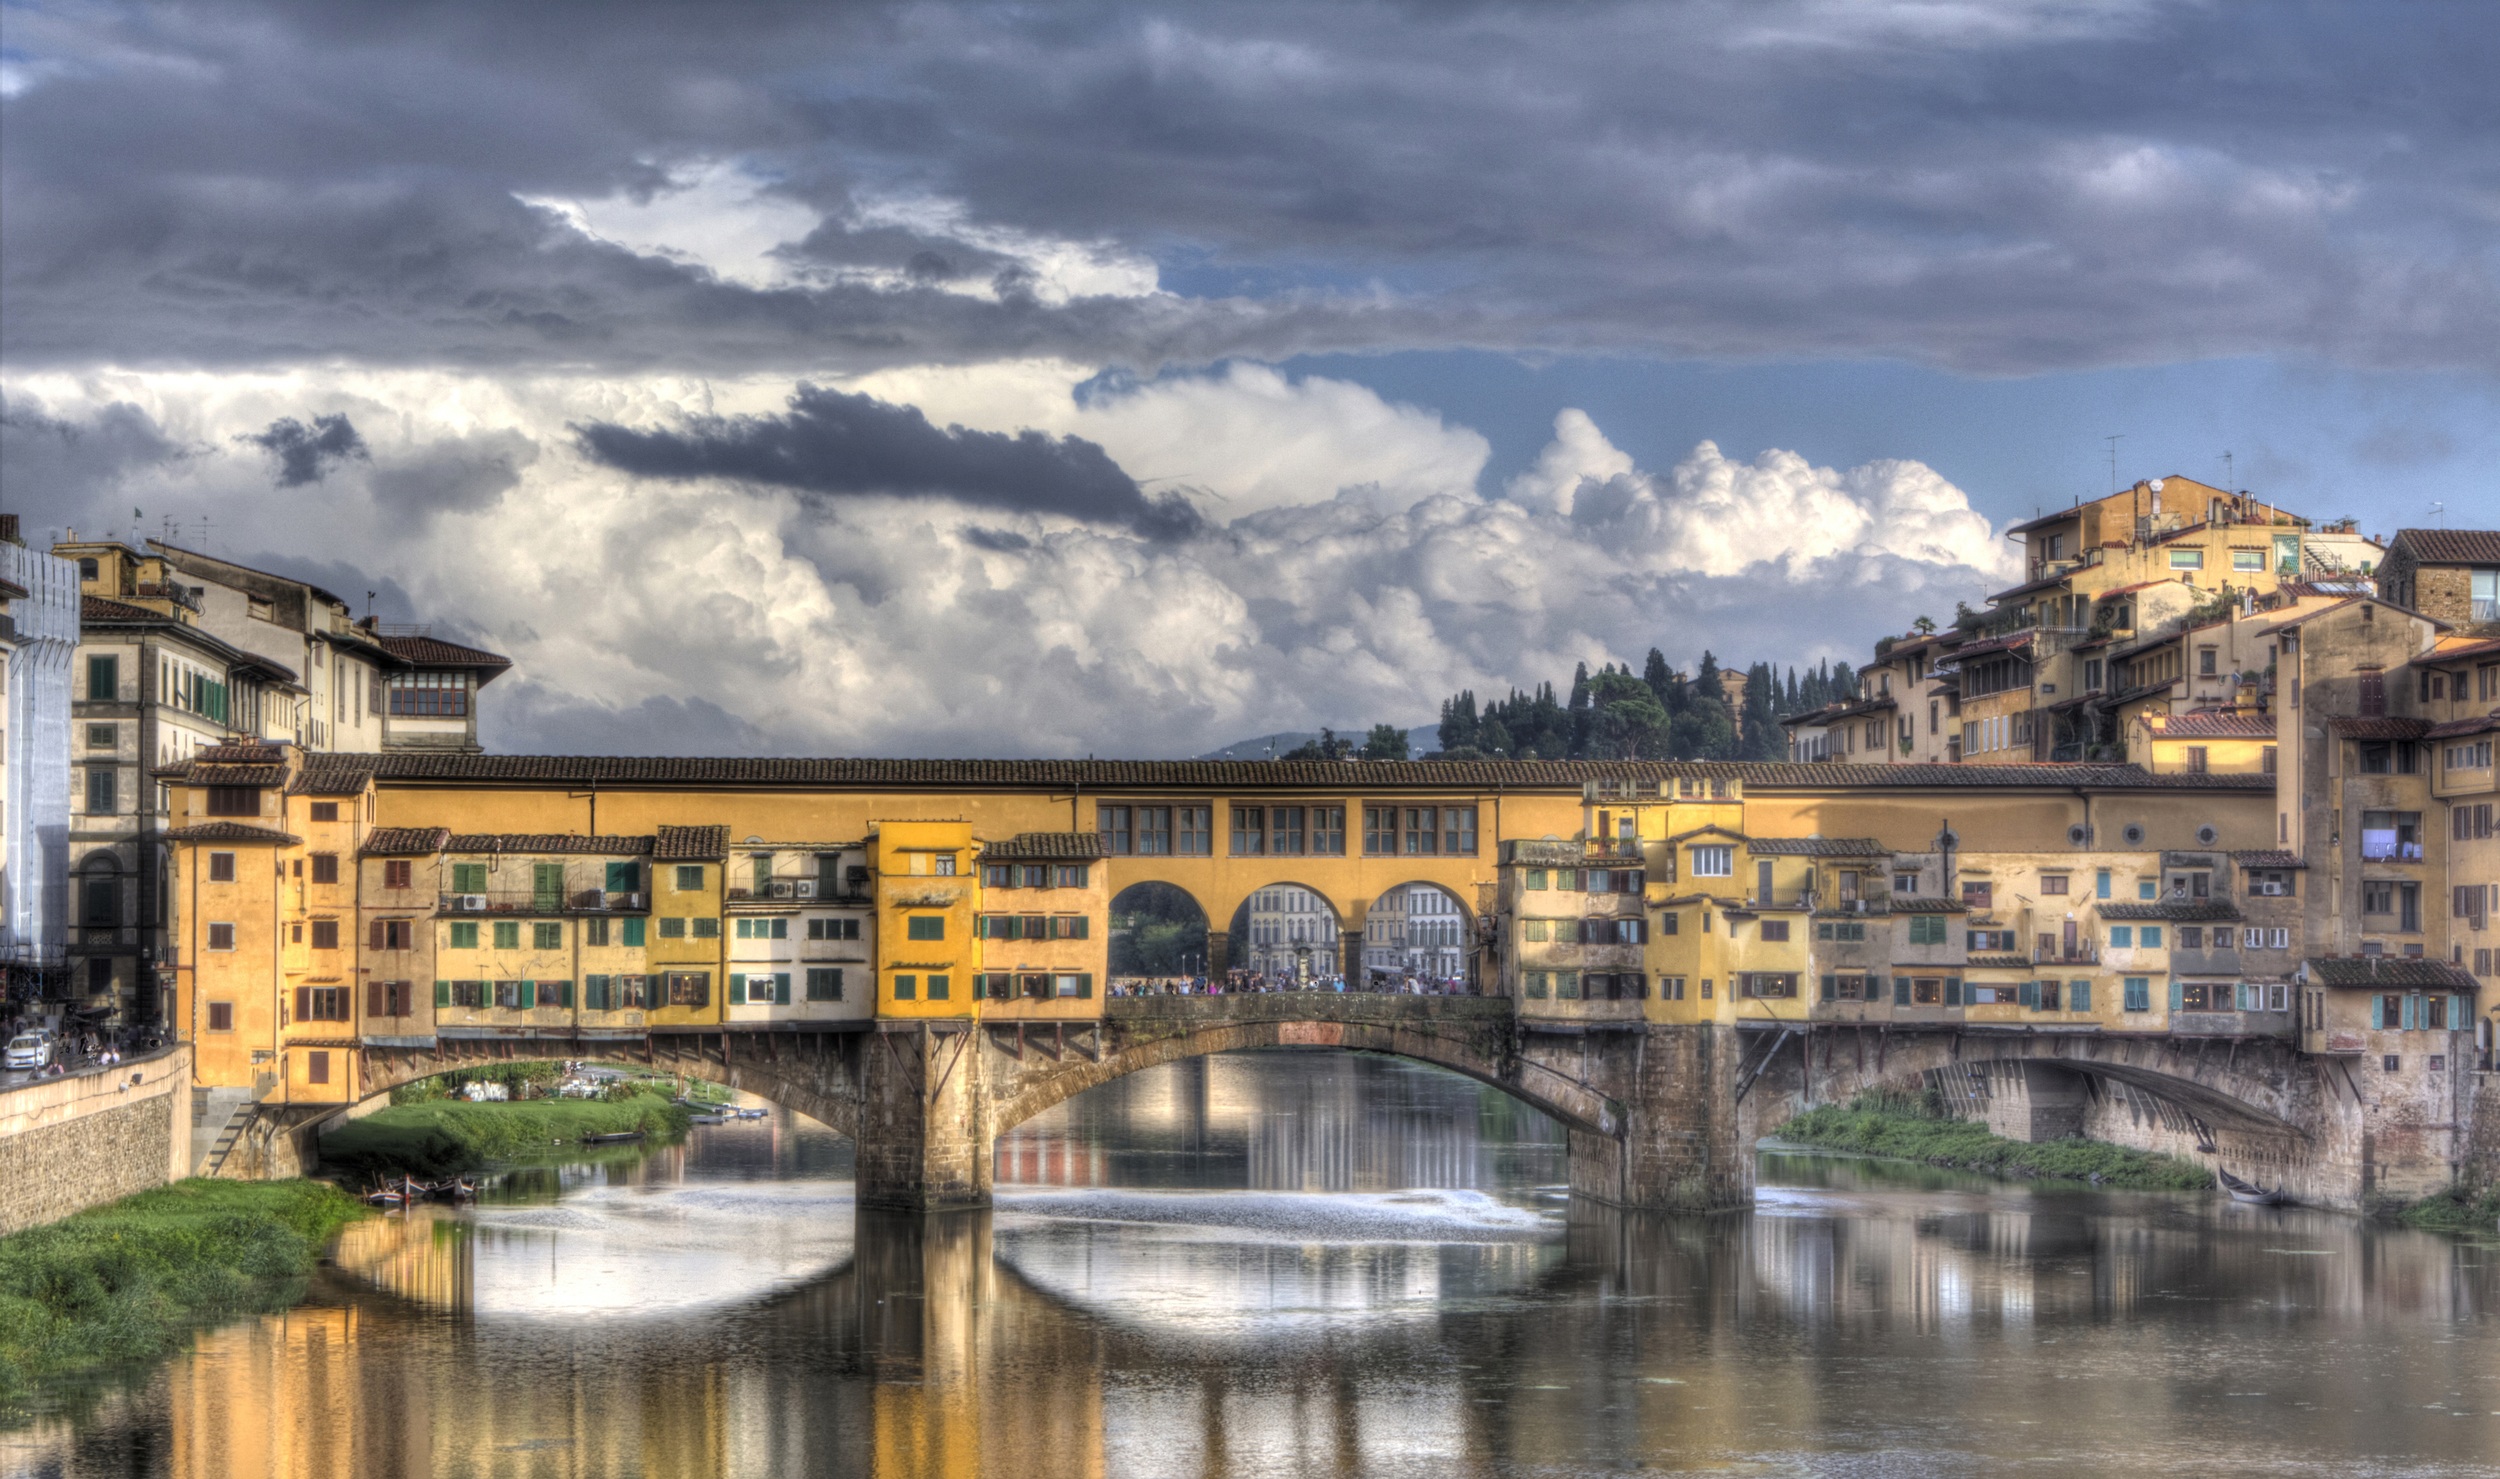
The cover photograph for this guide is titled ‘After the Storm.’ A brief storm passed through Florence as I was walking along the Arno River, presenting a perfect opportunity to capture the magnificence of the bridge with stunning clouds as a backdrop.
But do we create a dramatic-looking sky, or is it just there all the time? To begin with, if you don’t have a direct line to a supreme being, and don’t want to take a chance at just being in the right place at the right time, then here are some initial tips on how to be in that correct location at an appropriate moment in time:
- Monitor local weather reports.
- The Bureau of Meteorology’s website might provide you with good information on what types of clouds might be expected in the forecast.
- Pay attention to changes in the sky in the local area that you plan on shooting in.
- Storm fronts make for some of the most dramatic shots.
- Lighting immediately after a heavy cloudburst, or when a radical change in temperature comes through, can be incredibly dramatic, especially if hail is predicted.
- Thunderstorms are also strikingly atmospheric for intense-looking skies.
- Be aware of your safety when out shooting in electric storms, and be prepared to get a little bit wet!
More often than not, an attempt at capturing a great landscape or cityscape photo fails because the sky is just not very dramatic. I’m not saying that to make a good landscape it must have drama in the sky, but the very nature of our camera’s light metering technology often means that your ‘straight shot’ is likely to be overexposed in the sky areas.
More often than not, an attempt at capturing a great landscape or cityscape photo fails because the sky is just not very dramatic.
Why does this happen? It’s simply a metering problem caused by the fact that most landscapes are darker than the sky above, so the meter is likely to overexpose the foreground. And while overexposing the foreground might be okay, overexposing the sky by the same proportion might not be so good, which is why skies often look a bit washed out.
Key Lesson: Using local sources to monitor weather can help you determine a good time to grab the camera and go take pictures.
Recommended Reading: If you’d like to improve your composition skills for better nature photography images, grab a copy of Photzy’s best-selling premium guide: Understanding Composition.
Tip One: Compensate
The likelihood of this overexposure happening these days is considerably less than it was a few years ago because light meters in newer-model cameras are far better at ‘weighting’ the meter reading process to give more accurate results (i.e. identifying the brightness regions in the viewfinder and making small exposure allowances accordingly).
If you note that your skies are looking a bit pastier than you remember them being on the day, the quickest solution would be to dial in a little exposure compensation. Underexpose the RAW file a little to darken the sky and retain detail in those precious white (cloud) highlights.
Key Lesson: When capturing dramatic clouds in a photograph is your goal, underexposure works in your favor!
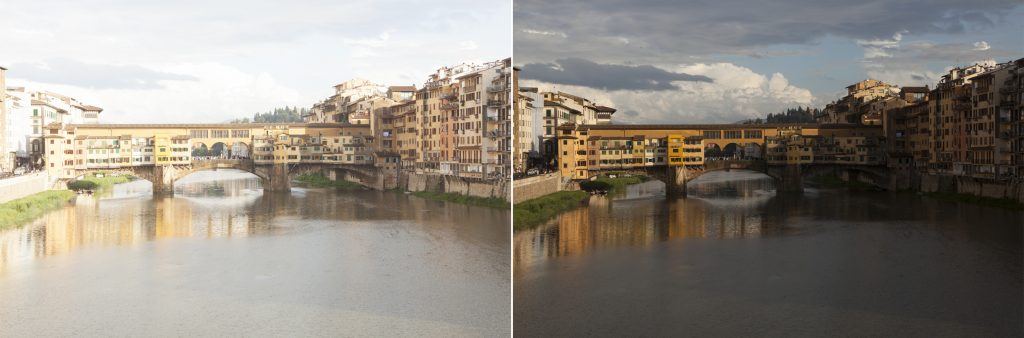
Sometimes you simply cannot win with a straight shot. To capture details in the shadows, I overexposed the average meter reading by a stop, at left, which also turned the dramatic-looking sky into a rather undramatic image. But if I underexpose by a stop to darken the clouds, I lose a lot of detail in the lower parts of the image, making it look very gloomy. However, all is not lost, as this can usually be fixed by lightening it using post-production software. Photo by Robin Nichols
Tip Two: Use Filters
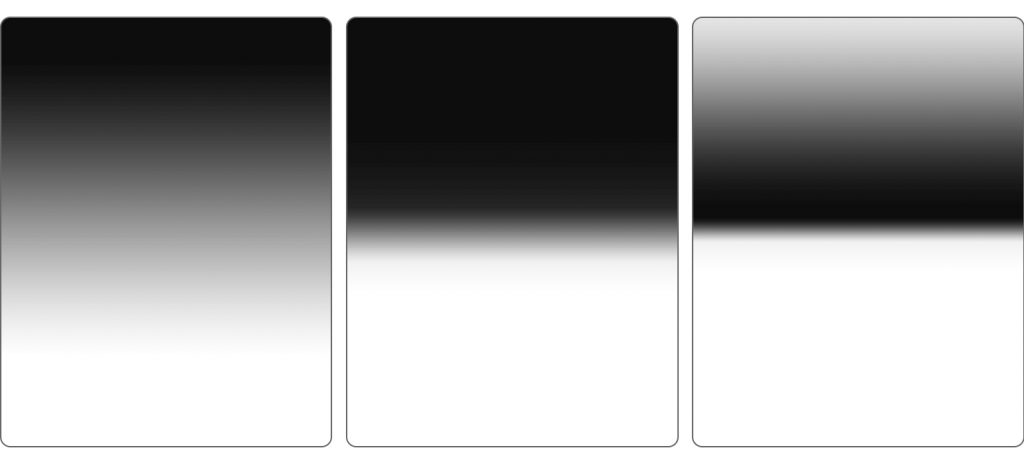
Here’s a good illustration of what a ND Grad filter looks like. The image on the left is the soft grad, a hard grad is in the center, and a reverse grad is on the right. Graphic by Robin Nichols
Old-fashioned graduated neutral density filters can be extremely effective in helping to introduce significant drama in a stormy or cloudy shot.
The most common type of ND Grad filter is one made of resin that slides into a special holder screwed over the front of the lens. The top half is dark and therefore underexposes the upper part of the scene, while the lower section is clear and therefore has no exposure effect.
ND Grad filters effectively allow the user to combine two different exposures in the one snap. How much you underexpose the top portion of the frame is controlled by the density of the respective filter; typically filters come in half f-stop increments.
Key Lesson: Graduated neutral density filters help to balance the exposure between a bright sky and a darker landscape area.
Some of the better brands, such as those produced by Lee Filters, also offer different hardness levels in their products. A hard ND Grad filter has a very short gradient from clear to opaque toward the center of the filter, while a soft gradient filter has a very subtle and smooth gradation running from dark to light. For very tricky exposures there’s a third type of filter called a reverse grad. This is dark at the center of the filter and tapers to clear at the edge.
All produce quite different results depending on the placement of the grad in the frame, the f-stop used, and the type of horizon being recorded (the smaller the aperture, the sharper the gradient line).
If it’s a flat urban scene, for example, you’d use the hard ND Grad filter, but a scene with, let’s say, a forest rolling up to the horizon, you might be better off with the smoother soft grad filter.
Be aware that although these filters are most effective in adding drama to skies, especially if it’s a stormy, cloudy scene, their linear nature means that all objects in the scene that protrude into the area covered by the filter, such as tall buildings, will also be affected, and this can sometimes look a little weird.
Note that a circular polarizing filter will also work well by darkening blue skies, thus emphasizing the presence of white clouds, but these filters only work in certain types of light and at certain angles.
Tip Three: Burn and Dodge Your Clouds in Post-Production
I consider the Burn and Dodge tools to be some of the most underrated features in editing software. I use them to paint in a bit of darkness into the darker parts of the sky, or conversely, to lighten some of the highlights.
Each tool can be used in one of three different tonal areas: Shadows, Midtones, and Highlights. I usually start (slowly) with the midtones with the opacity set to about 20%. If it’s set any higher than 20%, the process goes way too fast; any lower and you’ll be there all day.
Use the tools to enhance what’s already in the scene, so if the clouds are dark in parts, make those bits even darker for added drama. Don’t try and darken light bits, or lighten very dark areas, because unless you are very skilled, it will show up as clumsy editing.
Key Lesson: Learn to burn and dodge in your editing software. This knowledge will help you boost the dramatic factor of clouds in images that you’ve already taken.
Burn and Dodge brushes allow you to easily modify what’s already in the frame. They are used here to emphasize the darker parts in the sky and to lighten the yellow grassy area in the foreground. Photo by Robin Nichols
Tip Four: Use Software Gradients
I’m always loath to rely entirely on software to fix photographic problems, but this technique of using picture-editing software to darken just the upper portion of the frame is brilliant, because it works better than an expensive top-of-the-line optical filter.
Most editing software has a feature called the Gradient. When this is combined with a specific layer Blend Mode (in the Layer Palette, preferably set to Overlay Mode), it can be used to simulate the exact look of a graduated neutral density filter. Even better, if this filter effect is created using an Adjustment Layer (or with a separate Layer Mask), you can customize the gradient to affect just the sky, and not any tall buildings or palm trees that rise up into the sky area.
A mask always starts off being all white. This means that it’s completely opaque, so whatever effect is applied to that mask (in this case, a gradient), it appears full strength, or 100%. If that Adjustment Layer’s opacity is reduced to 50% (via the Layer Palette), the gradient is reduced to being half strength. So instead of having a set of expensive ND Grad filters offering half-stop differences, a software-generated gradient offers 100 levels of effective opacity, from zero (i.e. not visible at all) to 100% full effectiveness.

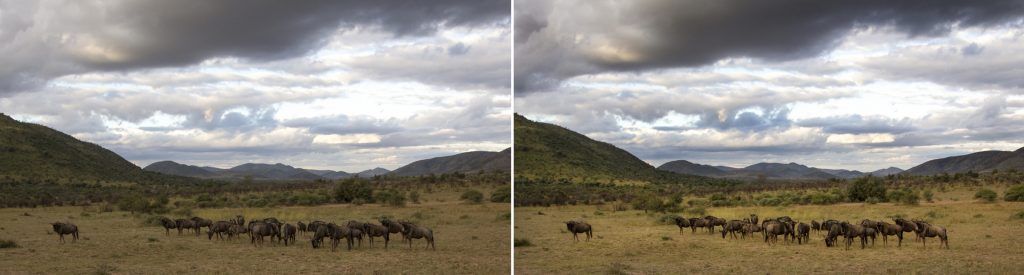
A simple example processed using the Graduated Filter in Adobe Lightroom. No filter, at left, and with a slight grad filter applied over the top third of the frame, at right. Because of its linear nature, the darkening effect is also applied to the foliage, a side effect which is not always desirable. Photo by Robin Nichols
As the software mask is white, if you ‘paint’ onto the mask using a black brush, the effect of the gradient is reversed, removing the mask effect, as black replaces white. It’s as easy as painting freehand into the main image window, reversing the effect of the mask, and therefore removing the gradient effect with each brushstroke.
Because the efficacy of any brush tool can be set between 1% and 100%, this technique gives any photographer massive control over exactly how light or dark tones in specific parts of any image can be fashioned.
Key Lesson: A gradient filter within editing software can pull back the exposure of the sky and give it a more dramatic appearance.
Tip Five: Go HDR

This was a truly dramatic sky. A wide-angle lens emphasized the direction of the high-altitude clouds while the classic 1930’s ocean liner moored in Yokohama harbor provided ample foreground interest. A single shot was OK, but adding three bracketed images to the HDR software really exaggerated the dark blue in the upper atmosphere as well as the detail in the ship. Photo by Robin Nichols
Adding drama to any scene has to be taken with a pinch of salt. What I mean by this is, for example, if you shoot an average-looking landscape that has a very pale sky and only faint clouds, then ramp up the contrast, you might just end up with a not-very-interesting image that’s clearly had too much editing.
But if it’s a truly dramatic stormy sky filling the frame, you might need to do almost no post-processing on the image at all because the drama has already been captured in the file.
Adding drama to any scene has to be taken with a pinch of salt... You might just end up with a not-very-interesting image that’s clearly had too much editing.
In practice, this really means having a darn good look at the scene before you press the shutter and assessing the result on the LCD screen while still in the field. If the gamut warning (set in the camera menu) is flashing away on the LCD, it probably means that the sky is clipped (i.e. it has lost some tones) so you need to re-shoot after dialing-in some negative exposure compensation. That way at least you get home with all the tones needed to edit the file later.

Note that if you want to crank up the drama in any shot, an HDR app like Skylum Aurora works with any type of file format: JPEG, Tiff, PSD, or RAW files. Another advantage is that it does a really good job on single RAW files, as in this impressive Madagascan landscape, with little or no effort at all. Photo by Robin Nichols
Back in the days of shooting film, if I really liked the scene I’d bracket my exposures to cover myself in case of over- or underexposure – characteristics that were very expensive or impossible to fix once the film was processed.
Key Lesson: Bracketing exposures allows you to experiment with HDR technology, or you can use your bracketed exposures for cloning techniques to acquire the clouds from one shot and then insert them into another shot.
Bracketing means that, once back in front of a computer, you can use all the frames to assemble an image containing many more tones than you’d get if just shooting one frame. Recording this range of tones from black to white also means you can get some impressive effects, especially with clouds, by processing everything using HDR software.
Recording this range of tones from black to white also means you can get some impressive effects, especially with clouds, by processing everything using HDR software.
Here’s what you can do:
- In the field, set your camera to shoot an exposure bracket. Start shooting three frames (in continuous shooting mode). Some cameras can shoot five, seven, and even nine in one continuous burst, but this can become time consuming and will fill the memory card quicker. It’s not necessary to stretch the bracket wider than about plus/minus two f-stops.
- Take a snap of your foot first, then shoot the bracketed sequence, then snap the other foot so that once you get home and try assembling the sequence, months or years later, it’s easier to extract the brackets from the mess of other shots taken around the same time.
- Import these brackets into the HDR software and choose from one of its example thumbnails, a ‘look’ that you particularly like. Then either save this as the finished article or go on to make more adjustments using the many sliders at the side of the main screen. I find that even using one of the software pre-sets can be more than enough processing. You can, of course, use your camera’s HDR setting if it has one, but in-camera processing will never be as impressive as images created using third-party software.
- Export or save the HDR processed image.
The following software programs can be used for HDR processing:
- Skylum AuroraHDRPro (PC/Mac)
- PhotomatixPro (PC/Mac)
Recommended Reading: If you’d like to improve your composition skills for better nature photography images, grab a copy of Photzy’s best-selling premium guide: Understanding Composition.

Here’s a good example of how powerful an HDR application like Skylum Aurora can be for all photographers wanting to create impressive images. For best results, it pays to shoot a series of different frames to cover the exposure range in the scene. The left-hand pane has no processing applied to the image, while the right-hand pane depicts the effect from one of its many pre-set (HDR) ‘recipes,’ seen as thumbnails along the base of the screen. Photo by Robin Nichols
Tip Six: Add Your Own Clouds

The original image with very distant and indistinct clouds. Photo by Robin Nichols.
I’m being somewhat glib here, but if you really would like to ramp up the visual quality of your image by adding some clouds, it’s an easy enough process of downloading one of the hundreds of free brush sets available online, loading them into Photoshop Elements or Photoshop CC, and literally painting the clouds into the sky.
A cloud brush is made from a black and white image of a cloud or clouds. Click once and the brush dabs that photo into the canvas. Click, hold, and drag the cursor over the screen and it deposits multiple images of clouds on top of each other to create the expected cloud brush. For our purposes here, it’s best just to click once.

Photo by Robin Nichols
You can control the opacity and color of the cloud being painted as well as its size; although the latter feature is limited to the size of the original brush image loaded (which is usually labelled as a pixel dimension).
Good Places to Find Free Brush Sets
(To be honest, I only ever got as far as Brusheezy because it has more than 2000 free brush sets, enough to keep me busy for quite a while.)
How Does This Work?

Figure 10: Brusheezy is, I think, one of the best free brush sites around. It includes free and paid brushes of every type and description. Screenshot by Robin Nichols
- Choose a suitable photograph, maybe one that’s lacking in clouds.
- Find a free brush set and download it from the host website.
- TIP: Be aware that amongst the freebies there are a lot of sponsor sites from companies like Shutterstock. If you are on a budget, stick with the free sets!
- Open Adobe Photoshop Elements (or Photoshop CC) and open your chosen image.
- From the Brush Tool Options panel, choose the Brush Tool (and not one of the other two brushes on offer: Impressionist and Color Replace).

Here’s the Brush options panel open to show Default Brushes. There are more than 200 different brushes in Photoshop/Elements. By clicking the Load Brushes menu (highlighted in blue), you navigate to the place your new cloud brush set was downloaded to, select it, then click Load and it automatically installs at the bottom of the Brush list (where you see Default Brushes in this grab). Screenshot by Robin Nichols
- In the Tool Options panel, click the Brush pop-down menu. This is where you can choose from the brush sets supplied by Adobe (i.e. Default, Basic, Calligraphic, Faux Finish, and Wet Media, to name a few). Inside this panel note also the small tab, at the top right-hand side (in red above). Click this tab to open the (brush) window’s preferences where you can adjust the size of the brush tip display, etc.
Choose the Load Brushes tab and navigate to where your downloaded brush set .abr file is waiting. Select the file and click Load. You should now see this new group of brushes appear at the bottom of the dropdown menu, probably under Wet Media Brushes. In this example there are two sets: Clouds by Mila and FG HiRes Clouds 2. Both display the shape of the clouds, as well as their pixel dimensions. I normally like to use cloud brushes with a pixel dimension of 1500 pixels or greater.

Here are two brush sets that are already installed into my editing program (Photoshop CC). The numbers give you an idea of how large they are, so if you are adding a cloud into, say, a 24Mp image, you would be best starting with a large brush measuring 500 pixels or more. Screenshot by Robin Nichols
- With the target file already open, create a new blank layer. Clicking once into the layer ‘paints’ the cloud onto a blank canvas that can then be moved to the optimum position.
- The problem with this technique is that it works best on clear skies with no vertical obstructions, like these two magnificent sea stacks off the coast of Vik in Iceland. To add a degree of authenticity, I selected the sky using the Magic Wand Tool (easy to do in this contrasty example) and then I added the clouds to the image. Because of the selection, the clouds only paint into the sky, not over the landmass, thus giving the impression that they are behind, not over, the rocks.
A cloud brush is made from a black and white image of a cloud or clouds.

Create a new blank layer (Layer > New > Layer) onto which you can then ‘paint’ a cloud. Doing this on a different layer allows you to move the cloud and also to change its opacity and color, if needed. To make a weak-toned cloud appear more impressive, simply duplicate the cloud layer to give twice the impact. Photo by Robin Nichols

This is Photoshop’s Quick Mask mode (press the “Q” key to open Quick Mask, and press it again to turn it off), turned on to illustrate how good (or bad) the Magic Wand selection might be. In this mode you can add or erase the pink mask to modify your selection using the Brush or the Eraser tools. It’s a visual and easy way to fine-tune any selection. Screenshot by Robin Nichols

By clicking the Mask button on the Layer Palette (in red), you can attach a white mask to the blank layer. I then selected the sky with the Magic Wand selection tool (easy to do in this example with such black rocks and a distinct horizon) and added my clouds. Because the black part of the mask is 100% opaque and the white part the opposite, the cloud appears behind the rock, not in front of it. But the overriding advantage of making a layer mask is that it is infinitely editable simply by painting with a black or white brush to add or subtract from the shape of the mask. Screenshot by Robin Nichols
- If the sky in the image is hard to select, you might be better off using a Layer Mask. This is attached to the blank layer and can be adjusted simply by using a black and white brush to ‘paint’ into the mask, but this technique is a little more complex. Make your initial forays into this technique easy by choosing a ‘simple’ image to work on.
Key Lesson: There are a number of methods to add clouds into a photograph. One of the author’s favorite methods is to use a mask and a brush. Follow the tutorial and try it out!
Recommended Reading: If you’d like to improve your composition skills for better nature photography images, grab a copy of Photzy’s best-selling premium guide: Understanding Composition.
- How can monitoring weather sources improve your cloud photographs?
- What can you do to your exposure setting to improve the clouds in your picture?
- What type of filter helps to bring out the drama of clouds?
- How is a reverse ND graduated filter different from standard graduated ND filters?
- Can a polarizing filter help to improve cloud pictures?
- In post-production, you can easily increase the drama of clouds by using two tools: _ _ _ _ and _ _ _ _ _.
- What is a software gradient?
- In order to work with HDR technology, what must you do when taking the picture?
- What tool does Robin Nichols like to use to add clouds that weren’t there in the original scene?


