Photo by Shari Hunt
Night sky photography can seem daunting to some folks who are just starting out. Many folks who are just diving into photography think it is far beyond their reach with knowledge and equipment. Most likely, it is not. I promise that once you begin, it’s very addictive and empowering.
When I realized, several years ago, that I could capture light in the camera that I couldn’t see with my own eyes, I was amazed; instantly hooked. The first time I captured the Milky Way’s galactic core, I wanted to do it again and again. Eventually, I became more technically savvy along the way.
At first, I thought for sure that I did not have the right camera and needed to purchase completely different equipment. However, the camera and lens that I had was fine. So with a little help and some learning, I quickly picked it up.
If you are thinking about getting into night sky photography, here are five tips to get you started to capture the night skies.
Once you begin night sky photography, it’s very addictive and empowering.
Here is what we will cover:
- What are the different types of night sky photography?
- What is the basic, required equipment for night sky photography?
- How can you find dark skies?
- How can you determine if there will be clear skies?
- What are the camera settings to use for night sky photography?
Recommended Reading: If you’d like to improve your composition skills for better night photography images, grab a copy of Photzy’s best-selling premium guide: Understanding Composition.
What Are the Different Types of Night Sky Photography
- Milky Way (specifically with the galactic core)
- Stars and/or moon (without the Milky Way’s galactic core)
- Star trails
- Deep space objects (with no landscape)
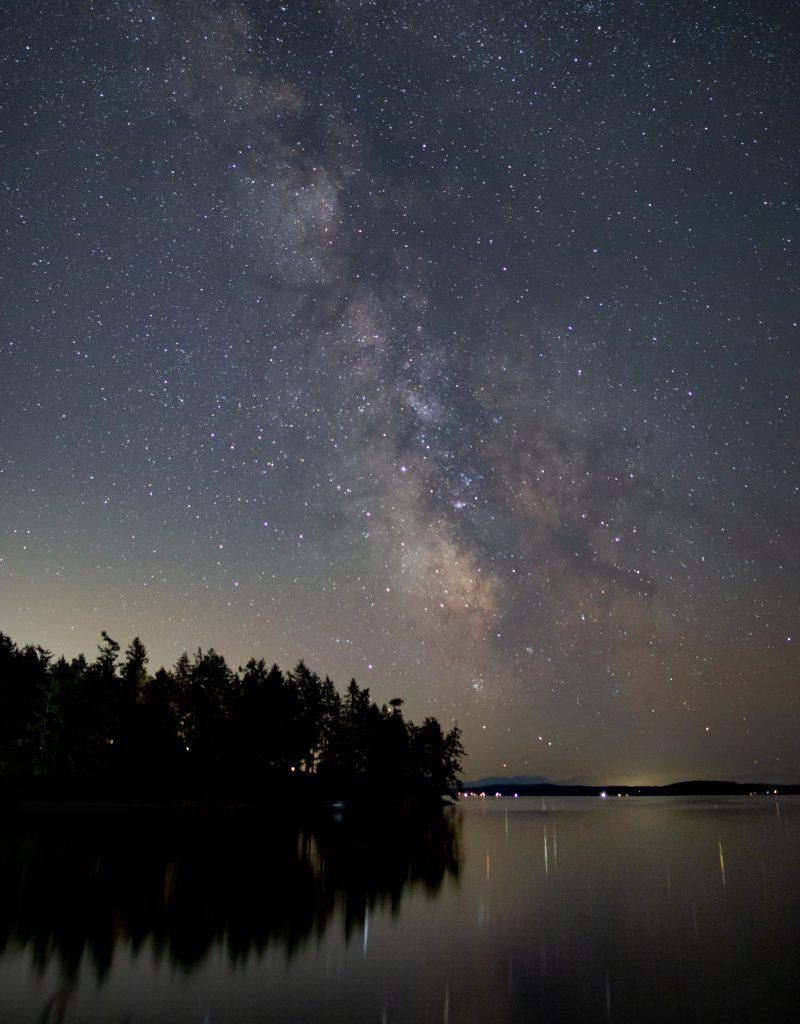
Milky Way Photography
When we look up at the night sky, every star we see (with the human eye) is part of our galaxy, the Milky Way. So, technically, any photograph of a star in the night sky is a photograph of the Milky Way. However, when photographers talk about capturing the Milky Way, we really mean capturing the core of our galaxy.
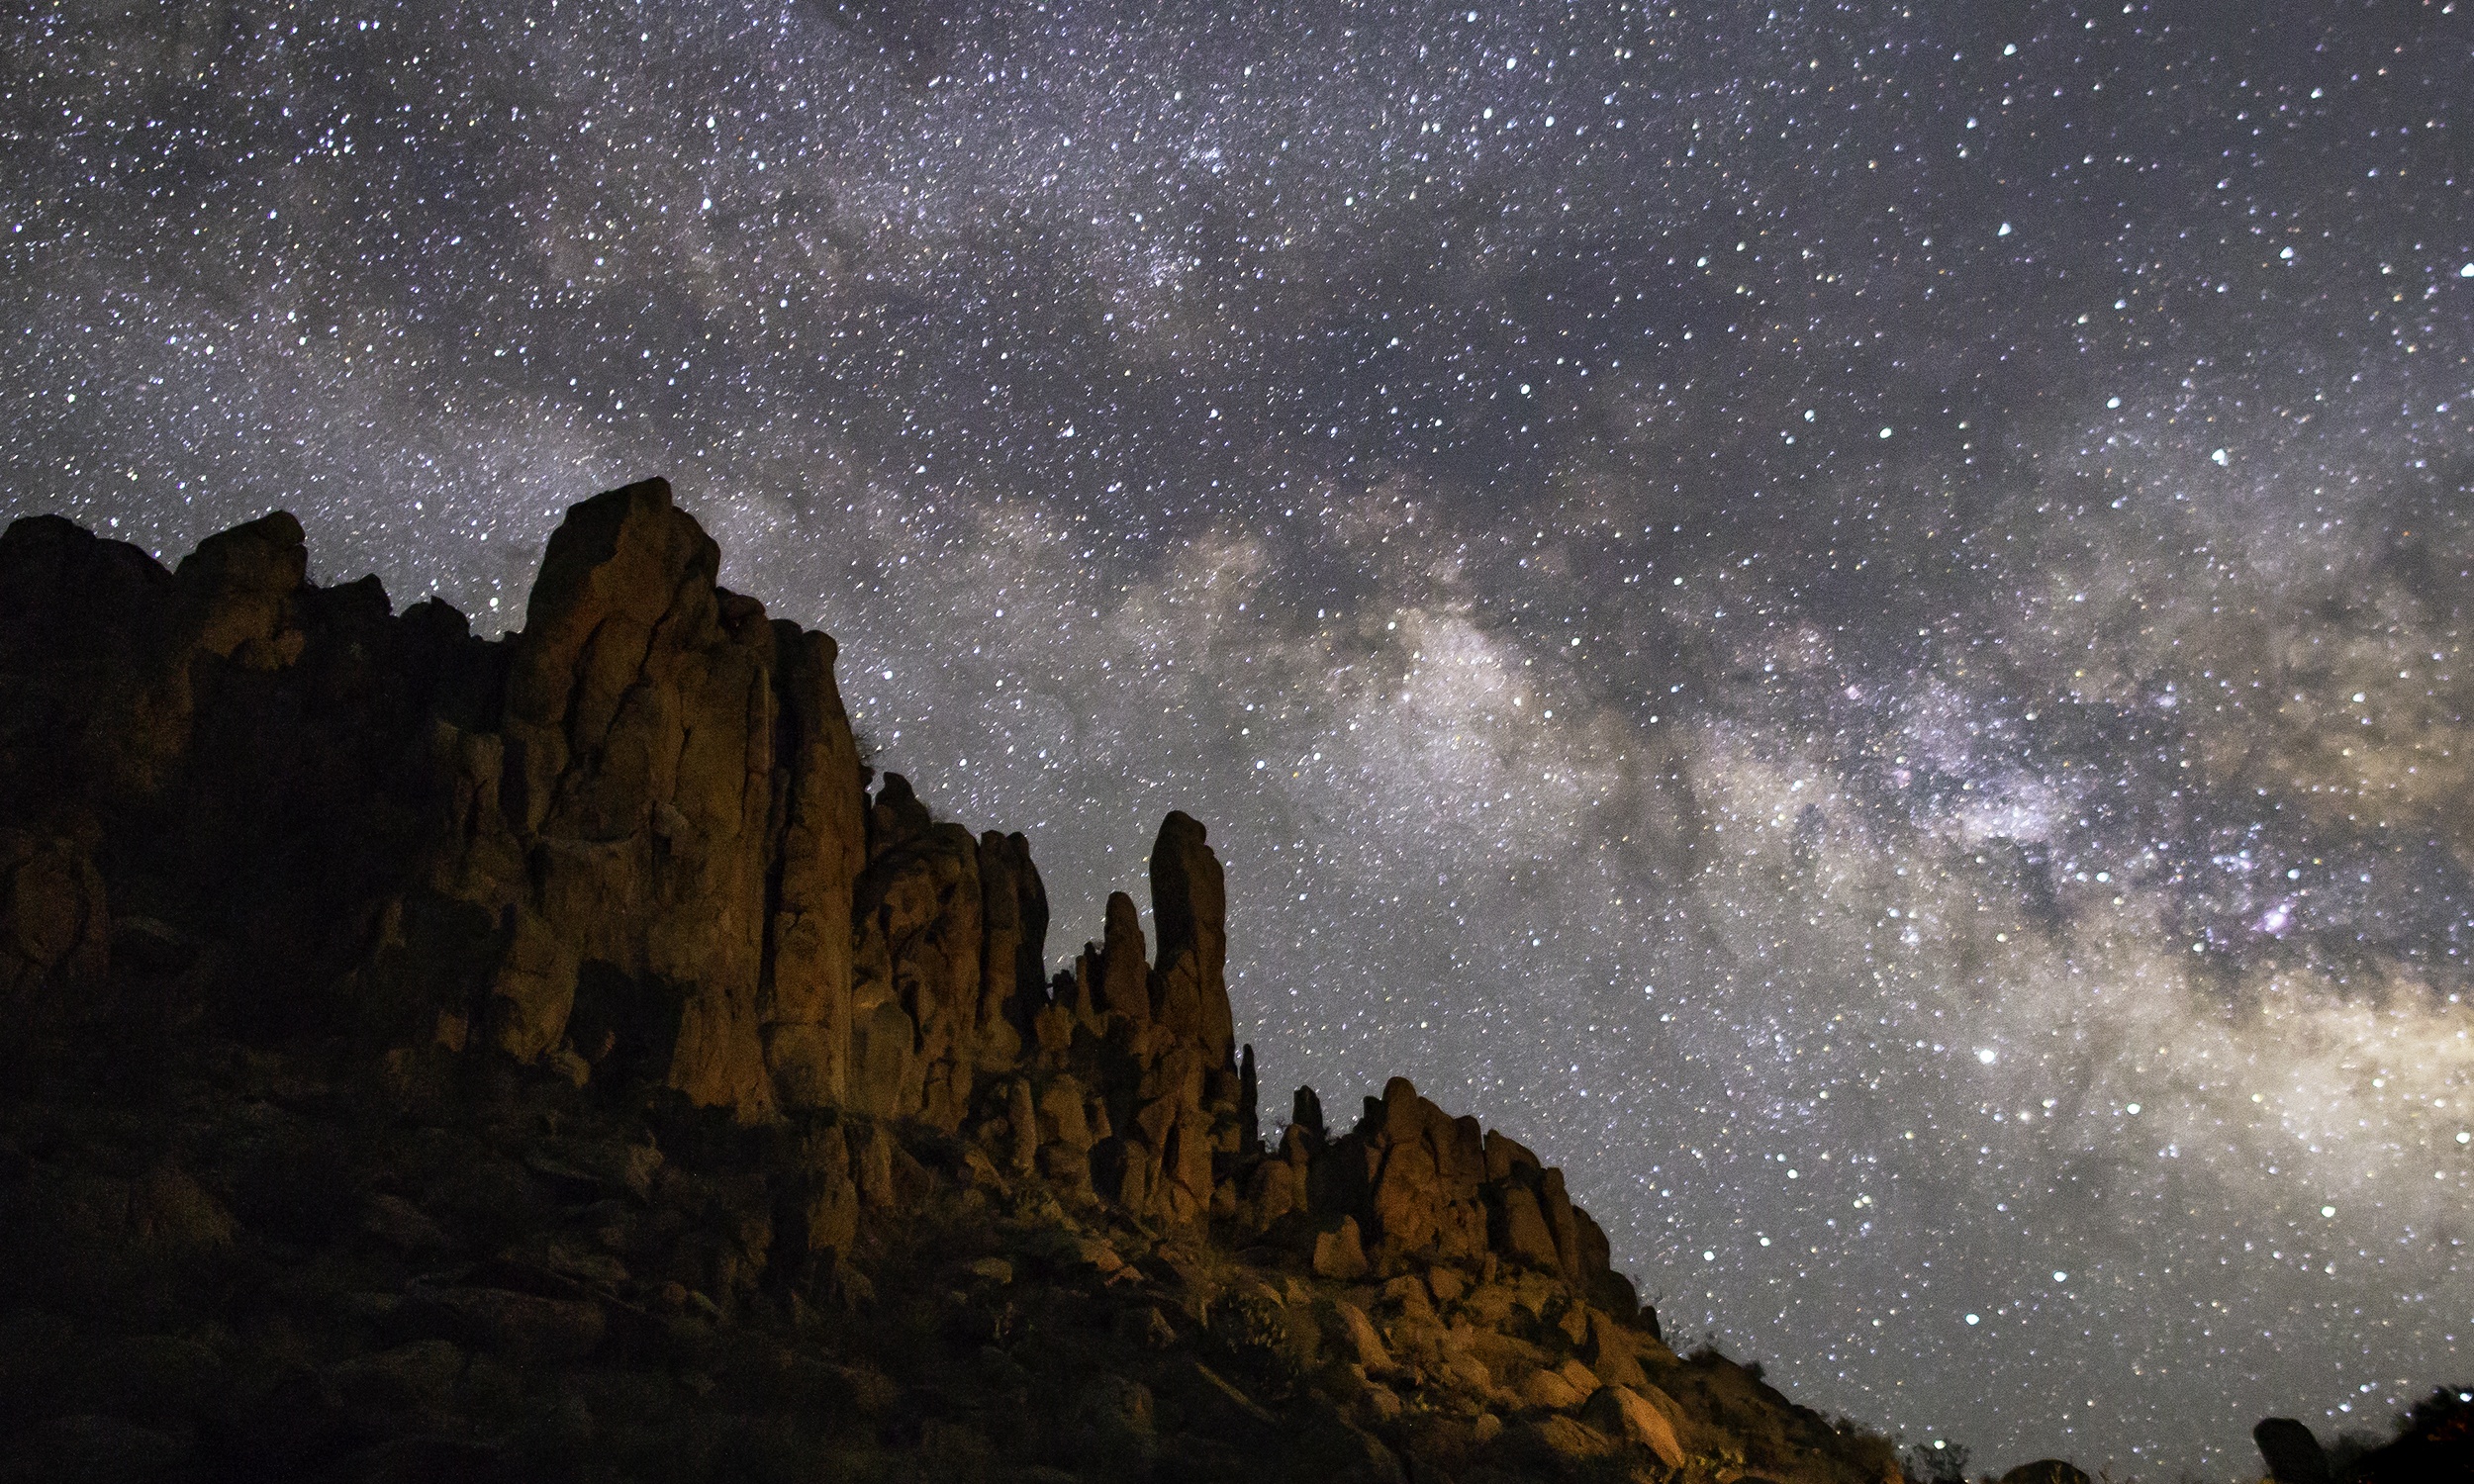
The Milky Way’s galactic core rises above Ship Bay in Washington State. Photo by Shari Hunt
Stars and moon photography
Photographing the moon, or landscapes with the moon, can be captured in the city. Unlike capturing the Milky Way’s galactic core, the moon is very bright and will shine through your city’s light pollution. Knowing where and when the moon will rise and set will be helpful in planning your photography. In fact, there are mobile applications that can help you with this planning. We will review these in a later section.
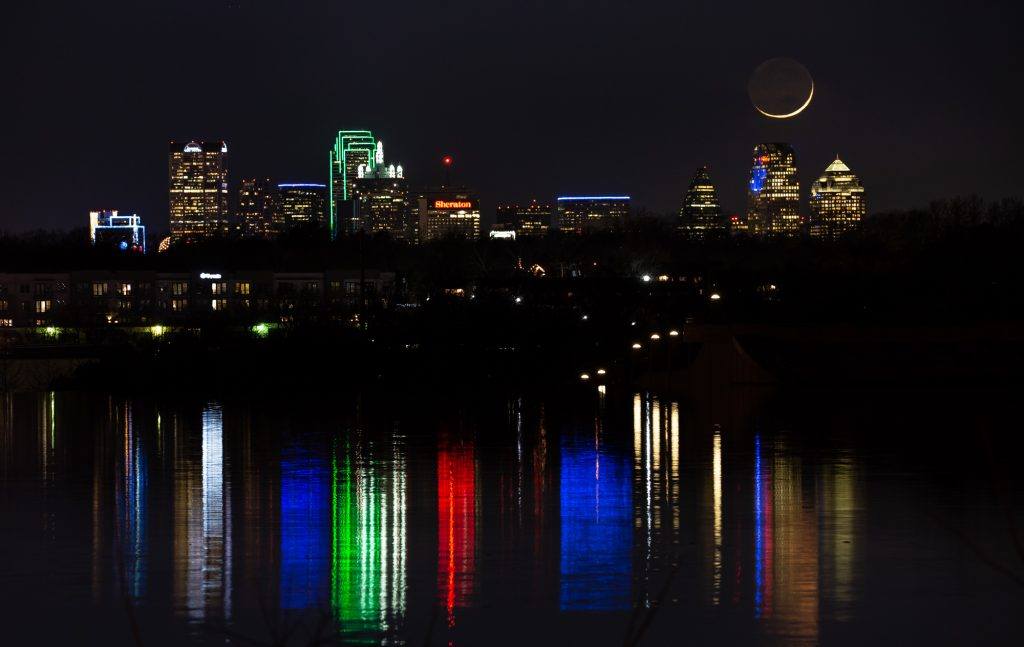
The crescent moon sets over downtown Dallas. Photo by Shari Hunt
Star trails photography
Star trails can be made by choosing one of two methods: either one long exposure or by stacking several long exposures together using a post-processing software to make the final image appear as if it were only one. There are several reasons why one method may be better than the other method, depending on the conditions of your landscape environment.
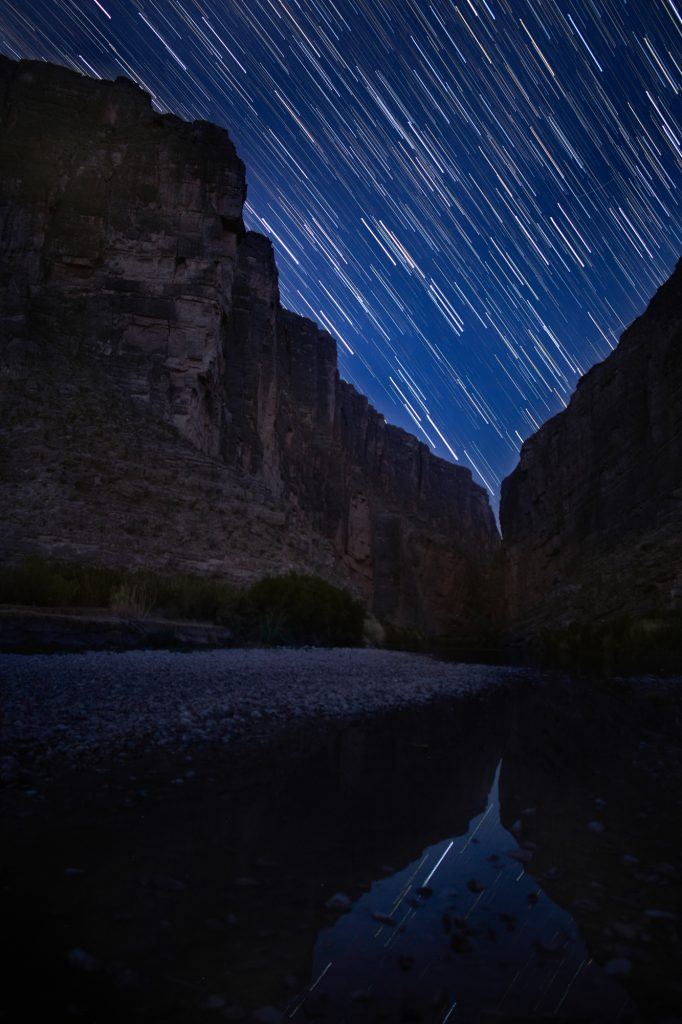
Star trail image created by stacking over 20 images together. Each image is exposed for 30 seconds. Photo by Shari Hunt
Deep space photography
This involves using a camera connected to a telescope and a star tracker to take close-up photographs of objects that are in deep space. Since you are looking so far in the distance, landscape does not appear in the picture.

A telescope was used to get this close-up picture of the Andromeda galaxy. Photo by Shari Hunt
What Is the Basic Equipment Required for Night Sky Photography?
Except for deep space photography, you can take great night sky photographs with a camera, a lens, and a tripod. It helps to have a remote or an intervalometer to decrease any chance of vibration or movement to pressing the shutter. Let’s talk specifics; not just any lens and camera will do.
The Camera
Most DSLR and mirrorless cameras made within the last five years have decent, if not great, sensors to capture light in dark and dim lighting situations. Cameras older than five to eight years do not have the most advanced technology and have a difficult time in low-light situations.
There is quite a bit of information out there about full-frame cameras over crop-sensor cameras. Ultimately, full-frame cameras handle higher ISO better and allow more light to hit the sensor. However, I’ve seen some fantastic star photography from some of the crop sensor cameras made within the last few years that are not very expensive. The most important part about the camera is that you are able to get into full manual mode. You need to be able to manipulate the aperture, ISO, and shutter speed individually. We will discuss camera settings later in this guide.
The most important part about the camera is that you are able to get into full manual mode.
The Lens
I would argue that the lens is more important than the camera. Some photographers may disagree with me.
In order to allow as much light from the stars to hit your sensor in your camera, you need a lens that will open wide – an aperture of 2.8 or wider. Examples of other apertures wider than 2.8 are f/2.0, f/1.8, and f/1.5.
I can have an amazing full-frame camera, but if I put a lens on it with a maximum aperture of 5 (f/5.0), I most likely will not be able to capture stars or the Milky Way’s galactic core. Why not compensate for the small aperture with a longer shutter speed? I could, but then I will get star trails. I may not always want star trails, instead I want a sharp, crisp Milky Way.
One other recommendation, if you are choosing a lens for night sky photography, is to start with a wide angle lens; for example, 16-35mm or 14–35mm. Wide angle prime lenses are great as well.
The Tripod
Night sky photographs involve a long exposure. To reduce camera shake, you will need a tripod. There are cheap tripods (under $30) and there are sturdy, more expensive tripods (between $150 and $600, if you can believe it!). Here’s a recommendation: If you have an expensive camera or you think you might be doing this more than once or twice, do not go cheap on a tripod. Invest in a good tripod. You don’t want to ruin your camera and you don’t want to travel a long distance to find yourself with a broken tripod because it was cheap! I have seen too many people get to amazing landscape locations only to find their cheap tripod breaks with no camera store around for miles.
In addition to reducing camera shake with a tripod, you will also need to reduce camera shake that occurs when pressing down on the shutter of your camera. There are two ways to do this: (1) place your shutter on a 2- or 10-second delay (I do this when I have forgotten my tripod), or (2) press the shutter using a remote or intervalometer.
You can buy these through your local camera store or online. Unlike a tripod, there is no need to buy an expensive intervalometer or remote. They are all, mostly, the same (unless you want a wireless intervalometer), so you can ‘go cheap’ on the intervalometer.
There are two additional pieces of equipment I recommend: a red headlamp and a camp chair. If you are in a dark sky, you will want to retain your night vision. Looking at a white light will most certainly ruin your night vision for a few minutes, if not more. A red light (a headlamp is best to free up your hands), on the other hand, helps preserve that night vision and allows you to see your camera to manipulate your settings.
Once you have done this enough times, you will not need any lights. You will know exactly where to feel and touch to get your camera onto your tripod and on and into manual settings without a light at all.
How Can You Find Dark Skies?
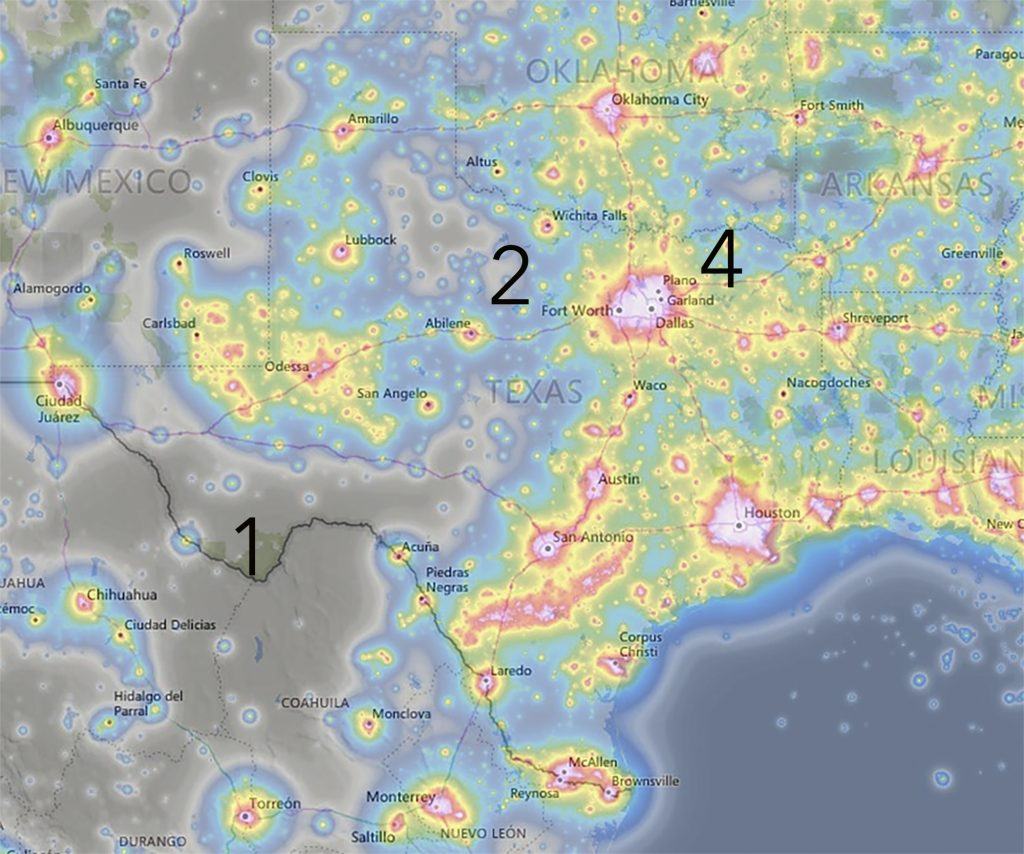
The light pollution map above shows varying degrees of light pollution. The map shades correspond to the Bortle Scale. The Bortle Scale is a measure of the night sky’s brightness in a particular location. The numbers on the map above correspond to the photographs below of the Milky Way. Photo by Shari Hunt.
Millions of people live in areas where they cannot see the Milky Way’s galactic core due to light pollution, myself included. However, I can travel about 1.5 hours outside of the Dallas, Fort Worth metroplex and see more stars, including the Milky Way. It won’t be as bright and distinct as being in a darker sky farther out, but it is an opportunity for me to practice nearby without driving three or more miles. A tool that I use for finding darker skies is a website called LightPollution.com. There are several other websites out there as well. I can locate darker skies on a map, zoom in, and find specific areas I might want to travel to in order to photograph the night sky.
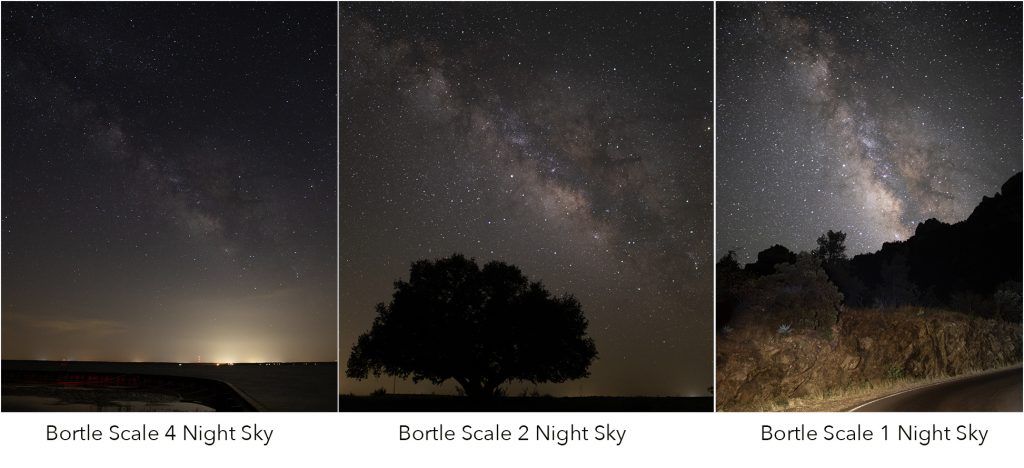
The images above show the Milky Way’s galactic core in two different skies. The sky onthe left is in a Bortle Scale of 4. The Milky Way is visible but without detail and contrast.The Milky Way in the middle is in a Bortle Scale of 2. The Milky Way on the far rightis in a Bortle Scale of 1. You can see very distinct details in the galactic core. Photo by Shari Hunt.
How to Determine if There Will Be Clear Skies
You will need to determine if the skies will be clear.
The weather forecast is certainly helpful, but sometimes it does not provide all the information, such as cloud coverage. I cringe when all I hear is “partly cloudy.” If we want a sky full of stars, then we do not want any cloud cover.
There is a website I like to use that provides cloud cover information, ClearDarkSky.com. This will only provide the forecasted cloud cover for up to 48 hours. While I cannot use it to plan next week, I can decide if I should bother going out to photograph tonight or choose tomorrow night. I have found this to be 95% accurate and very helpful.
Photo by Shari Hunt.
What Are the Camera Settings for Night Sky Photography?
Night sky photography camera settings should be set to capture in RAW format. When shooting with RAW, you will be able to collect more information in your photograph and be able to make better edits in post-processing.
You will need to work your camera in manual mode. Camera settings will be different depending on the camera, the lens, and the amount of ambient light or light pollution in the environment. The settings for a Bortle Scale 1 sky are different than the settings used in a Bortle Scale 4 sky. In addition, settings will also differ depending on the type of night sky photograph you are trying to capture.
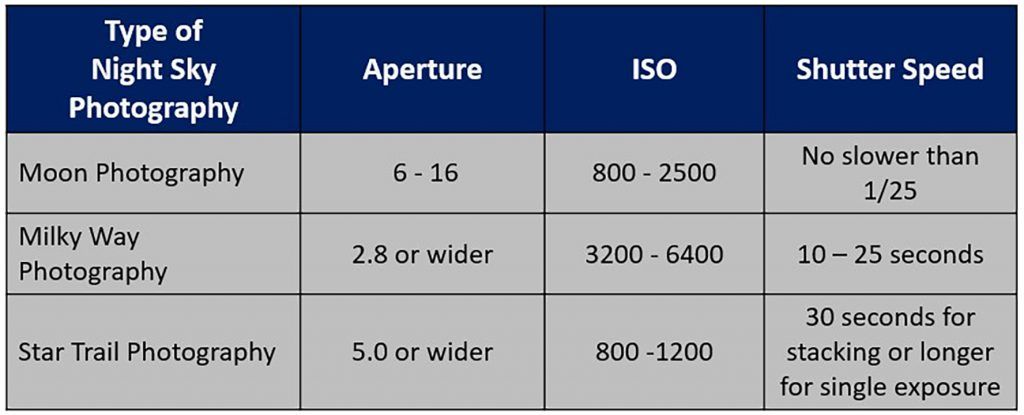
Photo by Shari Hunt.
In general, I recommend that people start out with these basic settings (see chart above) and then adjust their camera settings based on the ambient light in your environment.
Note: Some cameras do not fare well on high ISO settings. They will begin to show ‘noise’ in the darker areas of the picture. You can see this when you zoom in to the picture. To prevent this, keep your ISO as low as possible. Instead, open your aperture wider or change your shutter speed, depending on the type of photo you are trying to capture.
Finally, you will want to set your camera to manual focus. Autofocusing on the night sky, unless you are focusing on the moon, does not work. There are several ways to get your night sky in focus, but let’s just review one method. Here’s what to do to focus on the night sky:
- Set your lens on manual focus.
- Using the live view screen on your digital camera, zoom in to the brightest star in the sky or maybe a light off in the distance.
- Turn your focus ring until that star or light is a small pinpoint.
- Take a picture.
- Zoom back in to the picture to see if the stars look sharp. They should all look like pinpoints.
Recommended Reading: If you’d like to improve your composition skills for better night photography images, grab a copy of Photzy’s best-selling premium guide: Understanding Composition.
Conclusion
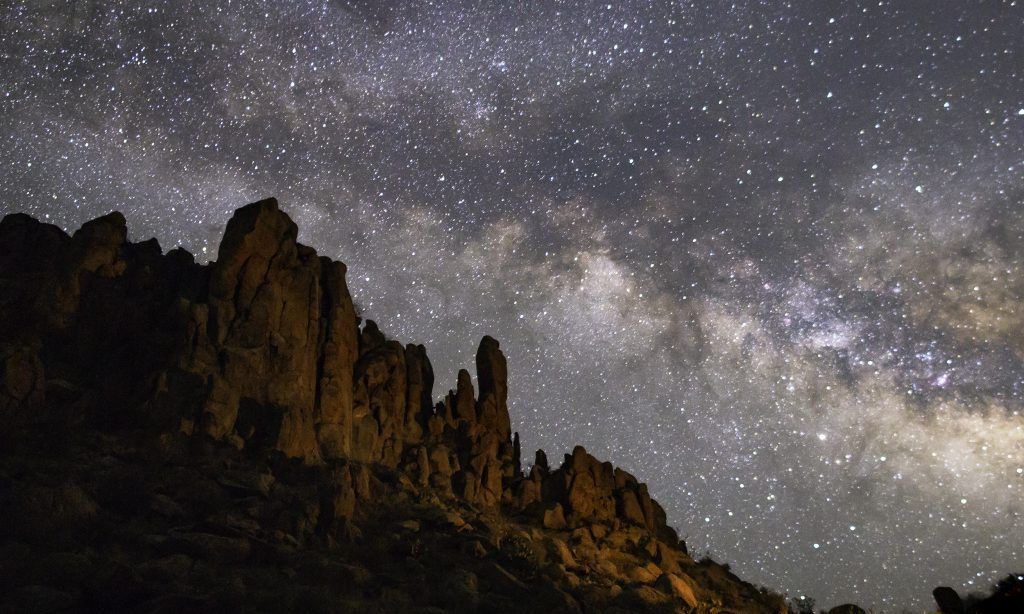
Photo by Shari Hunt.
The items required to capture the night skies are:
- A camera (DSLR or mirrorless camera made within the last five years)
- A lens with f/2.8 or wider
- A sturdy tripod
- A remote or intervalometer
There are several different categories of night sky photography. Each category requires different camera settings. In addition, different types of night sky photography may require darker skies to capture specific celestial objects.
Start with the recommended basic settings and then adjust your settings to your environment and your camera. Turn your lens and camera to manual focus to get sharp stars in your pictures.
Shooting Assignment:
Do you want to be prepared to go out to darker skies and photograph the stars? Make the most of your time by “practicing” your set-up in the dark. You can practice this right now! Turn off all lights in your living room and do the following (I know this sounds silly, but it’s true):
- Set up your tripod and secure your camera on your tripod (in the dark, no lights).
- Turn on your camera (in the dark).
- Place your camera into manual mode.
- Set your camera settings to f/2.8, shutter speed to 15 seconds, and ISO to 1600.
- Take a picture. Based on the picture, adjust your settings.
Find the nearest dark sky in your area and go practice capturing the stars. Change your settings to get a feel for what you can do!
If you are traveling somewhere to capture some night photography, this will get you started to become familiar with your camera, your set-up, and your settings.
Self-Check Quiz:
- Name the four types of night sky photography.
- What three of the four types of night sky photography can be taken with a DSLR camera?
- What is a star trail?
- Why is a full-frame sensor camera an advantage in night sky photography?
- What aspect of a lens is critically important to night sky photography?
- True or False: The one piece of equipment that you can skimp on for night sky photography is the tripod.
- What is meant by “finding a dark sky”?
- What is the Bortle Scale?
- Name a website that can help you find a ‘dark sky.’
- In night sky photography, will you be using low ISO settings or high ISO settings?
- Should you use auto focus or manual focus?
- Besides a camera, lens, and tripod, what is another required piece of equipment?
About the author: