


When you first pick up a camera, there’s a huge thrill about the possibilities lying ahead of you to create beautiful images. If you’re interested in photography, then you’ve probably got a great ‘eye’ for a photograph, and that in itself is half the battle. But when I think back to when I first started in photography, there are things that I wish I’d known about in more detail.
In this article, I’m going to look at five important photography facts that you should know before you start out on your photographic journey. Here is what we will cover:
- The importance of understanding light
- Why depth of field is so important
- Why you should shoot RAW
- Why you should prioritize your lenses
- Learning what to include in a shot
Recommended Reading: Want to expand your shooting skills and master photography? Grab our set of 65 beautifully designed and printable Action Cards that will give you over 200 photography assignments to help you take your photography to the next level. Check it out here.
The Importance of Understanding Light
I think most of us know that without light, there is no image. But when we first start photography, it’s easy to presume that any light is just…light! However, light changes throughout the day and even has a color temperature. Let’s look at temperatures in a little more detail. Light is measured in a unit known as Kelvins. Here’s a small chart to help you understand different temperatures:
- 1000-2000k: Candlelight
- 2500-3500k: Tungsten Light (Normal household bulb)
- 3000-4000k: Sunrise/Sunset (Clear skies)
- 4000-5000k: Fluorescent Light
- 5000-5500k: Electronic Flash
- 5000-6500k: Daylight (Clear skies with sun overhead)
- 6500-8000k: Overcast skies (Moderate)
- 9000-10000k: Heavily overcast skies or shade

If you understand light, you can manipulate it to create interesting and dramatic imagery. Photograph by Jo Plumridge
As you can see, electronic flash, such as flashguns, studio lights, etc., are balanced to produce the same Kelvin rating as natural daylight, in order to keep it as realistic as possible.
In addition, you need to be aware of the colors of different light and where the sun is angled. For example, most people know that the midday sun will produce very harsh shadows, as the sun is directly overhead.
Here’s is another useful chart to help you understand light:
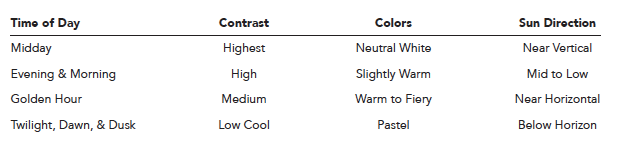
With an understanding of light, you’ll be able to make better decisions about how and when to shoot.
Why Depth of Field Is So Important
I bang on about this a lot, but I do truly believe that nothing is more important than understanding depth of field. We all know how important learning about the exposure triangle is, but in the rush to get that straight in our heads, we can often forget about aperture’s other function: to control depth of field.
I bang on about this a lot, but I do truly believe that nothing is more important than understanding depth of field.
So, why do I think depth of field is so important? Well, nothing makes or breaks a shot faster than what’s in focus in the shot. The correct depth of field sets the tone of an image and is the first step in transitioning from a happy snapper to an accomplished photographer.

Choosing the right depth of field is crucial for an image. The soft feel of this image would be ruined with a larger depth of field. Photograph by Jose Ros
A small depth of field is represented by a small f-stop number (e.g. f2) and a large depth of field by a large f-stop number (e.g. f22). Conversely, f2 is actually a large aperture, meaning it lets a lot of light into the iris of the lens. Therefore, f22 is a small aperture, meaning it only lets a small amount of light in.
Depth of field is a range of distances around your subject (known as the focal plane) that are in acceptable sharpness, with a gradual transition from sharp to unsharp. To provide a couple of examples, you’ll want a large depth of field for shooting landscapes so that the whole shot is sharp (i.e. between f16 and f22). For a head and shoulders portrait, you should be looking at an aperture of around f4–f5.6.
Key Lesson: While the focal length of your lens doesn’t actually influence depth of field, a telephoto lens will appear to create a shallower depth of field. That’s because a telephoto lens is used to magnify a subject.
Why You Should Shoot Raw
This one didn’t really apply to me when I started out, as I’m old enough to have learned photography when everything was shot on film! But if I were starting out in photography now, I’d learn the reasons for shooting RAW over JPEG as a priority.
RAW files are basically uncompressed, unprocessed data files as captured by the camera’s sensor. RAW files are the largest files that your camera can produce, which means they’ll retain the most quality and detail as well as maintaining dynamic range. However, RAW files do all need to be converted in post-production, where it’s also expected that some post-processing work will be done to them.
If I were starting out in photography now, I’d learn the reasons for shooting RAW over JPEG as a priority.
In comparison, JPEGs are compressed and processed in-camera, meaning they are much smaller files. Processing is added in-camera, with higher contrast and sharpness applied. Image quality will be lower, and you’ll have less dynamic range. While JPEGs are useful if you have to send files on straight from the camera, I would always recommend shooting RAW where possible in order to have the maximum image quality to work with.
Prioritize Your Lenses
When buying a digital camera, most people start out by buying the camera with a kit lens. This is because manufacturers tend to offer very competitive bundle prices and it’s hard not to be tempted! There’s nothing intrinsically wrong with starting out with a kit lens, but you need to be aware that the glass in a kit lens will not be of top quality. Kit lenses also come with a variable maximum aperture (usually f3.5– f5.6), meaning that you’re tied into your focal length/aperture combination.

You can have the best cameras in the world, but if you don’t have decent glass to back them up with, then your images won’t be top quality. Photograph by Riley Bowden
My advice is to not buy the kit lens that comes with a camera and instead exchange it for a ‘nifty fifty.’ 50mm lenses are probably the most useful focal length to start off with and, after all, Henri Cartier-Bresson (probably the greatest ever street photographer) shot exclusively with one. Most manufacturers make several 50mm lenses, with apertures of f1.8 or f1.4, and some also make an f1.2 version. Best of all, a 50mm f1.8 is ridiculously cheap and, while it has a distinctly plastic feel, still has good glass. If you can afford it, the f1.4 is one of the best lenses on the market, producing consistently pin-sharp images.
If you’re going to spend money on anything, I’d always go for a new lens. Yes, it’s tempting to buy a newer camera model, but the truth is that even the most expensive camera is nothing without good-quality glass to back it up. So always prioritize your lenses and make them the most important part of your camera kit.
Key Lesson: When it comes to zoom lenses, it’s worth saving up to buy one that has a consistent aperture throughout its focal range (e.g. 24-70mm f4). This makes a huge difference to the quality of the lens and you’ll certainly notice the difference in your images.
Recommended Reading: Want to expand your shooting skills and master photography? Grab our set of 65 beautifully designed and printable Action Cards that will give you over 200 photography assignments to help you take your photography to the next level. Check it out here.
Learning What to Include in a Shot
Whenever I teach students who are just learning to use their cameras on manual, I always notice the same trend. They will consistently try to include everything from a scene in a single shot, which often leads to a cluttered image with no obvious focal point for the eye to follow.

In a busy scene you can create stronger images by picking out and focusing on one strong subject matter. Photograph by Omotavo Tajudeen
I think this is a common problem for beginners as there’s an urge to try and get as much as possible into an image. It’s easy to be overwhelmed by a busy scene! One of the keys to improving your photography is learning how to pick out an interesting subject in a scene. A strong image, whether it’s a portrait or a landscape, needs a strong focal point.
Think of it this way: a strong image needs simplicity with a focal point that leads the viewer into the image and grabs their attention. You don’t want lots of things competing for attention. By the way, this leads me back nicely to my point on depth of field. If you’re shooting a subject against a busy background, then using a smaller depth of field to blur out said background will make your subject ‘pop.’

Photograph by Matej
Conclusion
Hopefully, these five facts will help those of you that are just starting out in your photographic journey and will enable you to get to grips with your camera equipment more quickly. So, remember you need to:
- understand light,
- understand depth of field,
- shoot RAW,
- prioritize your lenses, and
- learn what to include in your shots.
Self-Check Quiz:
- What unit is color temperature measured in?
- Does a large aperture mean a small or large depth of field?
- What would be a suitable aperture to choose for a landscape shot?
- Are RAW files compressed in-camera?
- What is the most useful lens you can buy when you’re starting out?
- Why should you prioritize good glass?
- How do you make a subject ‘pop’ out of an image?


