3 Ways to Manipulate Depth of Field When Photographing

New / Noteworthy
EDITOR’S NOTE: The following post is a quick tip from our Free eBook – The Three Keys to Depth of Field. If you missed out on your copy last time, it’s available again, and free today.
Depth of field is the area that is in focus when you take your photograph.
A narrow depth of field is an area with very shallow depth – sometimes as shallow as a few centimeters or inches.
A large depth of field is just the opposite. It could start a few steps from you and stretch into infinity.
It helps to know where a given depth of field starts and where it ends because you’d like your subject to be positioned within that area.
Your depth of field always starts somewhere in front of the subject on which you focus, and it ends somewhere behind it.
It becomes important to know the boundaries in certain situations – for example: when you want to capture a more pronounced background blur when photographing a flower, or when you want a deeper depth of field when photographing a group of people to bring all of them into focus.
Depth of field is determined by three ‘key’ factors. Let’s have a look at them.
(Note: Today, you can download our 27-piece Camera Fundamentals Guided Resource Kit, including a new exclusive free bonus, right here for a limited time!)
#1: Changing Camera to Subject Distance
⚡ The closer you get to your subject, the shallower your depth of field will be.
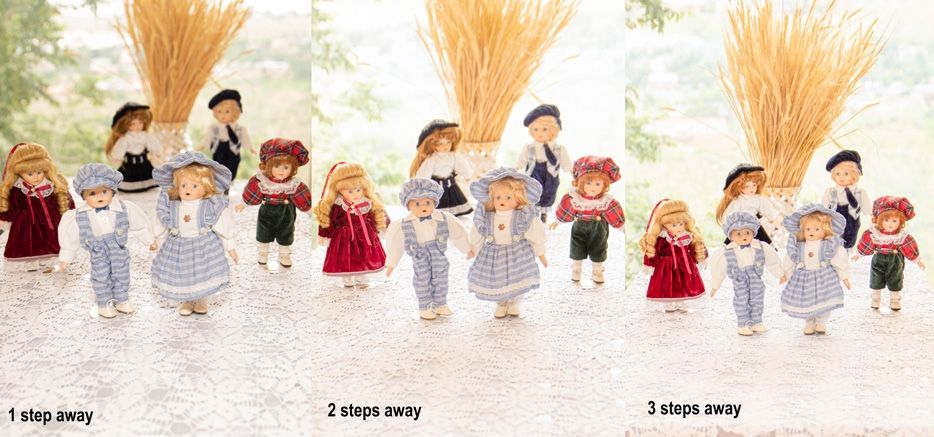
Take a look at the shots below – taken at 1 step, 2 steps and 3 steps away.

This example was taken at 35mm, f/2.8. Focus was on the front dolls.
See how the eyes of the dolls at the back are blurred at one step away and become clearer at two steps away. At three steps away everything is in focus up to the reeds at the back.
This indicates quite a significant increase in depth of field as a result of a relatively small increase in distance from our subject.
It should caution us to always be aware of our actions during a shoot. A small, absent-minded adjustment in our position can have severe repercussions.
Want the Free Depth of Field eBook?
Grab your free The Three Keys to Depth of Field eBook now. Learn how to nail this critical and frequently misunderstood concept of photography… Download Your Free The Three Keys to Depth of Field eBook
#2: Changing Aperture
⚡ The wider your aperture, the shallower your depth of field will be.
Let’s demonstrate this with the same scene from above.

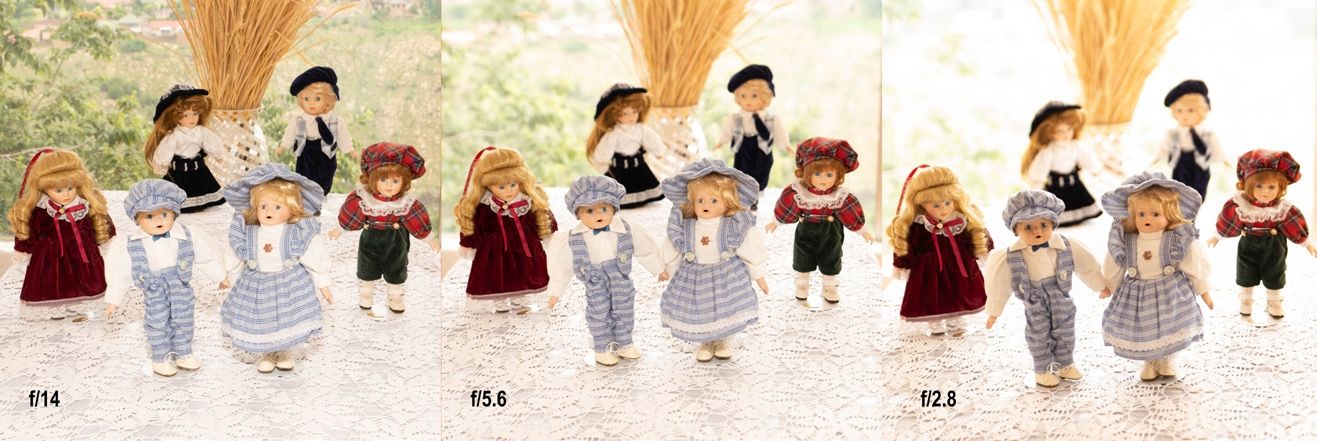
This example was taken at one step away from the front dolls, at 35mm focal distance.
The first shot was taken at f/14. See how everything is in focus, even the landscape in the background? This is indicative of a massive depth of field. It is understandable why this is a popular aperture setting for landscapes where everything must be in focus.
It is also understandable why it is not a popular setting for portraits where an in-focus background is distracting.
The second shot was taken at f/5.6. See how everything is starting to blur in the background, even the dolls in the back row? This indicates a shrinking depth of field.
The third shot was taken at f/2.8. Only the front dolls are in focus, indicating a very shallow depth of field.
Just for interest’s sake, note what the larger aperture adjustments did to the exposure of the background. This shows why it is necessary to lower the ISO and/or increase the shutter speed as you open up the aperture setting.
#3: Changing Focal Length
⚡ The higher your focal length, the shallower your depth of field will be.
Continuing with the setup from above.

This example was done one step away from the front dolls at f/2.8. Focus was on the front dolls.
See how almost everything is still in focus at 24mm (including the reeds at the back), indicating a depth of field of +/- 2m (6’)?
At 50mm, a lot of blur was already introduced at the back but the dolls in the middle are still in focus, indicating a depth of field of +/- 1m (3’). At 70mm everything is out of focus at the back, and even the dolls in the middle are somewhat blurred, indicating a depth of field of +/- 15cm (6”).
There you have it. The next time you’re out photographing and want to control the depth of field, you’ll know the 3 ways to achieve the desired result.
The important thing is to pause for a moment before each shot and decide what type of background you’d like to have, or how far back you want subjects to be in focus. Then spend that extra second or two to dial to the settings that would achieve that.
BONUS: I've got something special for you on the next page...
Want to get a stronger grip on camera fundamentals? Grab our Camera Fundamentals Guided Resource Kit. This curated collection includes some of our best material on camera fundamentals – including a 2-part guided video walkthrough, and 5 hands-on exercises & assignments for you to try!
If you missed out on your kit last time, it’s available again, and on sale right now. Plus it includes a daily bonus for free.
Click below now, to read about it on the next page…

About Ritesh Saini
Ritesh has been photographing since 2010 and his photographic interests have varied from nature and landscapes to street photography. He recommends the Camera Fundamentals Guided Resource Kit to anyone who wants to advance their knowledge of camera fundamentals and really improve their photography.


