Lightroom is a powerful and complex image editing software. If you have some experience with Lightroom, at least one of the updated features in Lightroom Classic 10 will appeal to you. If you’re just starting out using this software, you may wonder what all the fuss is about for the recent updates. But stick with me and you’ll find out.
Editing software evolves as photographers push the potentials of imaging in new and bold directions. Adobe continues to add new features. These allow for an enhanced workflow experience ranging from image capture to edited output. Keep reading, and I’ll guide you through what’s been added, advanced, and fine-tuned in this favorite of image editing software packages.
Key Lesson: Upgrades are important as they will improve your workflow, creativity, and efficiency.
Recommended Reading: If you want to learn how to enhance your photos and create better images, grab a copy of Photzy’s premium guide: Ultimate Guide to Fundamental Editing.
Overview of What’s New in Lightroom Classic 10
The most prominent changes to Lightroom 10 are as follows:
- New camera RAW file support for a handful of cameras including models from Sony, Fujifilm, and Panasonic
- New lens profiles for some Leica, Sigma, Sony, and Voigtlander lenses
- Catalog upgrade changes
- Minimum computer system requirements
- Performance improvements
- Live view tethering for a selection of Canon cameras
- Advanced color grading improvements
As usual, most of these updates are relatively run of the mill for Lightroom Classic. The inclusion of new lens profiles, new camera support, and performance improvements are nothing to get excited about. Revision of how catalogs are updated and the introduction of live view tethering for some Canon cameras will be welcomed by some users.
Key Lesson: Live view tethering is a vital tool for photographers who shoot in a studio.
The changes to the color grading interface will enhance the workflow for many photographers. You now have a greater level of control over color tone and saturation in the highlights, mid-tones, and shadow areas of an image. The new zoom functionality is a very welcome update that most users will appreciate. Up until now, zooming in Lightroom was impaired.
Key Lesson: If for no other reason, the improved zoom features are worth the upgrade.

Screenshot by Kevin Landwer-Johan
How to Update to Lightroom Classic 10
To check the version of Lightroom Classic you have, go to Help > Updates in the top menu. Or you can check it in the Adobe Cloud app. If your Lightroom is up to date, there will be a button to open the program. If you do not yet have the new version, the button will read ‘Update.’

Clicking this button will initiate the update process, and Lightroom Classic 10 will install on your computer. Screenshot by Kevin Landwer-Johan
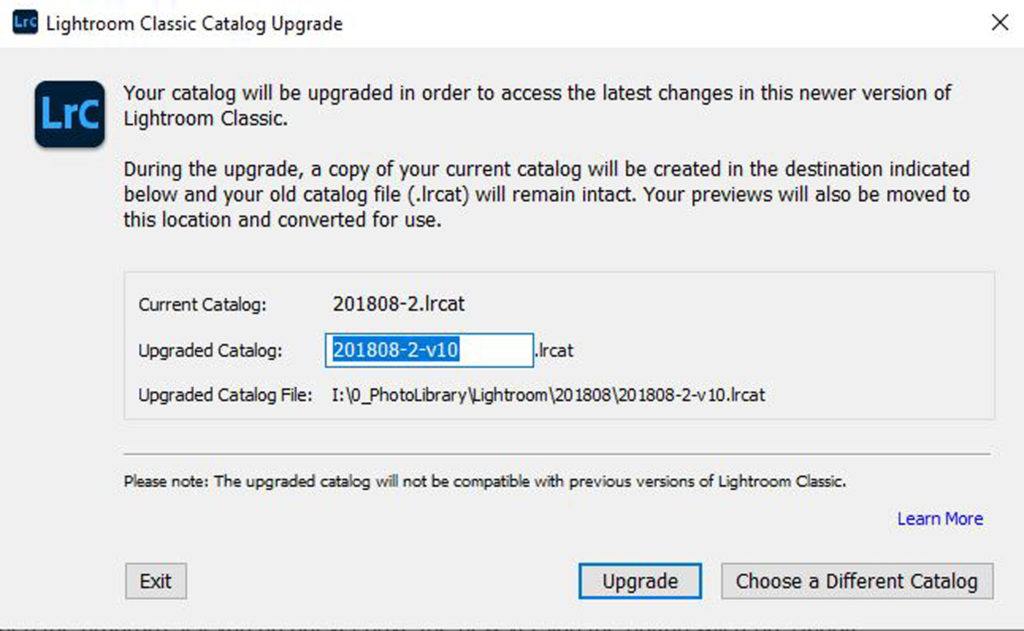
Once installed, when you open an existing Lightroom catalog you will see this dialog box appear.
The new version of Lightroom Classic 10 requires you to upgrade your existing catalog so they are compatible with the new version.
One of the changes in Classic 10 is the option to rename your catalog. You can add a suffix indicating that the catalog is updated, or you can leave the default suffix that Lightroom adds, which is ‘-v10.’ In previous versions, Lightroom would simply append ‘-2.’ This could become confusing if you were using the same catalog after multiple Lightroom upgrades.
Key Lesson: It’s very important that you upgrade the catalog!
Updating an older catalog may take a few minutes. The duration of the update depends on the size of the catalog you are updating.
Screenshot by Kevin Landwer-Johan
Lightroom 10 Support for New Cameras and Lenses
As with all new versions of Lightroom, Classic 10 comes with added support for several new camera models and lenses. For a full list of supported camera models, please click this link.
The new version of Lightroom Classic 10 requires you to upgrade your existing catalog so they are compatible with the new version.
The option to select a lens profile for an image when you’re working in the Develop Module has been a helpful feature since version 3. By enabling the correct lens profile to match the lens the photo was taken with, some common optical issues are corrected. To see a list of supported lens profiles, please click this link.

With an image open in the Develop Module, you can check the lens profile in the right-hand panel in the Lens Corrections tab. Click the Profile option and check the box to Enable Profile Corrections. The lens you used will be automatically selected if it’s included in the Lightroom database. Photograph by Kevin Landwer-Johan
Improvements to Performance
As you work on an image in the Develop Module, you’ll notice some performance improvements. Lightroom 10 has enhanced the use of gradients and brushes.
The experience is smoother and rendering faster when working with both linear and radial gradients. Painting with the Brush tool and making adjustments to sliders is also smoother when you have GPU acceleration turned on.
To see if you have GPU acceleration turned on, check under the Performance tab in your Lightroom Preferences.
Key Lesson: Turn on GPU acceleration for a smoother editing experience.
Recommended Reading: If you want to learn how to enhance your photos and create better images, grab a copy of Photzy’s premium guide: Ultimate Guide to Fundamental Editing.
Canon Cameras Tethered Live View Support
The ability to tether your camera to a laptop is especially helpful when you’re working in a studio. You can see precisely what you’re photographing in real-time. You have options to resize and rotate the window. You can also manage focus from within the interface.
Click here for a list of supported Canon cameras.
Once you have connected one of the supported Canon cameras, you can open live view tethering.
Do this by going to File > Tethered Capture > Start Tethered Capture. Here you can select the settings you want and then click ‘OK.’ Once Lightroom detects the connected camera, the Tether Bar will appear. Click ‘Live’ to start live view tethering.
Updated Color Grading Interface
Anyone who has experience editing video will be familiar with the style of the new color grading interface in Lightroom Classic 10. If you’re not familiar with this method of color grading, the best way to learn is to experiment.
This feature is a major update to the previous controls for Split Toning and remains completely compatible with it. You can do everything you’re used to using Split Toning and much more.
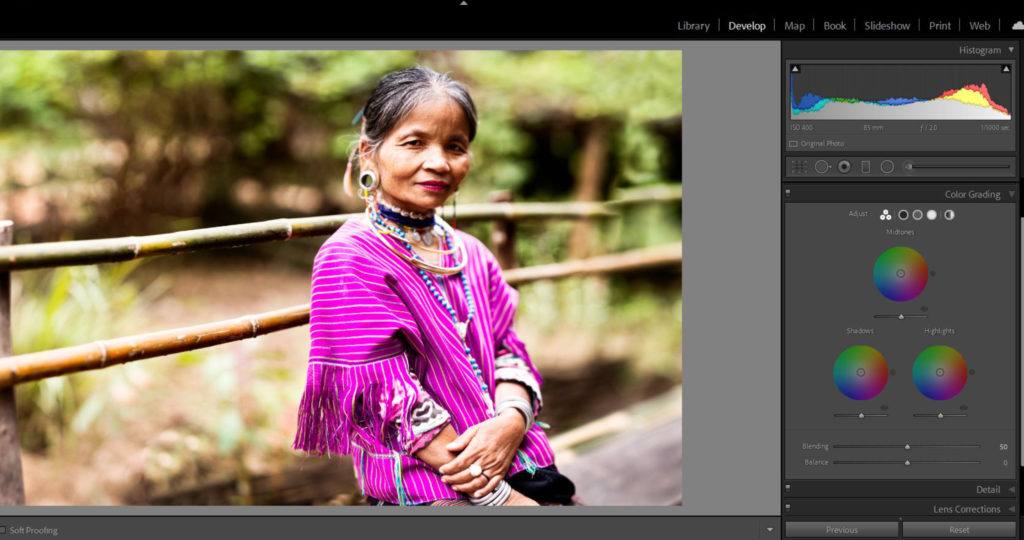
With this improved color grading tool, you now have more control over highlights, mid-tones, and shadows. Previously, there was no separate way of controlling the colors in the mid-tones of an image.

Photograph by Kevin Landwer-Johan
You will find the color grading dialog box about halfway down the right-hand side panel. In the default view, three-color wheels are visible. These are for the control of color and saturation for each of the highlights, mid-tones, and shadows. Beneath each color wheel, there’s a slider to control the luminosity. Below the three wheels are sliders for controlling the blending and balance.
By clicking the ‘Adjust’ icons above the color wheels, you can select to view each one separately. Or you can bring up a color wheel for making global color grading adjustments to the entire tone range in an image.
Key Lesson: The new color grading feature will work with all your color-based presets created using the Split Toning.

Photograph by Kevin Landwer-Johan
Enhanced Zoom Feature in Lightroom Classic 10
In previous versions of Lightroom, the ability to zoom was limited and the functionality was clunky. The enhanced zoom feature is a vast improvement to the workflow in Lightroom. Now you have more control over zooming while in Loupe, Compare, and Reference views. If you have GPU acceleration turned on, Scrubby Zoom is also available in the Develop Module.
There are two new types of zoom control. One is called Scrubby Zoom and the other is Box Zoom.
To use the Scrubby Zoom feature, simply hold down the Shift key. The cursor will change to a magnifying glass icon with an arrow on each side. Click and drag to the right to zoom in and to the left to zoom out. Lightroom will zoom into the area of the image where you have your mouse positioned.

Photograph by Kevin Landwer-Johan
Using the Box Zoom tool is controlled by holding down the Control key on a PC or the Command key on Mac. The cursor will change to a magnifying glass icon with a box attached. Clicking and dragging will draw a box of marching ants around the area you want to zoom in to.
In the Navigator window at the top of the left panel, the zoom function has also been updated. Now there are options to zoom to the following:
- Fit/Fill
- 100%
- Range from 6% to 1600%

Photograph by Kevin Landwer-Johan
The zoom slider in the toolbar below the image when you’re in Loupe view is now divided in two. On the left side, the zoom ranges from 6% to 100%. On the right, it ranges from 100% to 1600%.
Key Lesson: When using the zoom functions in any mode, tapping the Z key will resize the image to fit the window.
Recommended Reading: If you want to learn how to enhance your photos and create better images, grab a copy of Photzy’s premium guide: Ultimate Guide to Fundamental Editing.

Photograph by Kevin Landwer-Johan
Conclusion
For me personally, the new zoom functionality is a huge improvement to the workflow in Lightroom. I also love the new color grading interface. Both of these features bring greater control to manage image editing to a finer degree.
For me personally, the new zoom functionality is a huge improvement to the workflow in Lightroom.
The improvements to performance are always appreciated, but they never seem to be enough to satisfy. I am sure the live view tethering will be welcomed by Canon users who work a lot in the studio.
If you are used to using a previous version of Lightroom Classic, don’t hesitate to upgrade to version 10 and start enjoying these new improvements.
Self-Check Quiz:
- What menu must you access to determine your version of Lightroom Classic?
- True or False: After installing Lightroom 10, you must upgrade your existing catalog.
- What does the ‘Correct Lens’ profile do?
- Where do you look to see if GPU acceleration is turned on?
- What brand of cameras can be tethered to Lightroom 10?
- Where is the ‘color grading’ dialog box located?
- Can you still do split-toning in Lightroom 10?
- How do you use the ‘Scrubby Zoom’ feature?