


Don’t know where to start with photo editing? We’ve brought you all the pro tips, including device and software choice, basic tools of editing, and practicing.
Introduction
The photography world is huge. If you want to work as a professional in this field, you need to learn a lot of things to go to that level. And this field is always growing. You might have so many questions on where to start, what to learn, which guide to follow etc.
So, what is the best way to edit photos? There is no limit to information on the internet. It’s no joke to know how to edit photos like a professional. You might feel lost while starting with photo editing for the first time. So, we are here to help you out with some basic photo editing tips to get professional-looking images.
What you’ll learn in this guide:
There are so many areas in photo editing that you will have to cover as a professional photo editor. Before starting, you need to have an idea of what you’re going to do. Here, we include the most important topics about photo editing. If you keep these points in mind while editing photos or practicing, it will assist you in achieving your target.
We are going to start with the device first. Which device is good, and which one should you use? Then we will discuss some basic ideas about photo editing software. We will touch on some core tools that you need to know for professional photo editing. And finally, we’ll include some other photo editing tricks to master professional photo editing.
Recommended Reading: If you want to learn how to enhance your photos and create better images, grab a copy of Photzy’s premium guide: Ultimate Guide to Fundamental Editing.
Check out these photo editing techniques that will help you to develop your photo editing skills and will take you to the next level. You will get to know how to edit photos like a pro.
1. Choose the Correct Device
Choosing the correct device is one of the most important parts of photo editing. This is the place where you will do your work. A good display has much more to do with your photo than you know.
A well color-calibrated display will show you the exact color that your photo has, and even a small amount of difference matters a lot here. Many use tablets to edit photos as this is handy and easy to use. If you’re one of them, you might wonder which tablet you should use to have your images edited.
A good display has much more to do with your photo than you know.
Some of the best tablets that you can use for best quality photo editing experiences are Microsoft Surface Pro 7, Microsoft Surface Go, Samsung Galaxy Tab S7+, and Samsung Galaxy Tab S6. If you want to go for Apple, then the best ones are iPad Pro 12.9″ or iPad Air. And there is one from Amazon if you want a budget tablet, Amazon Fire HD 10.
For those who love large screens, the best choices are Dell UltraSharp U2419H, LG 27UL500-W, ASUS ProArt Display PA278QV, and Acer ConceptD CM2. Whichever you use, make your display well calibrated so that you get the right color for your image.
2. Camera Raw Filter
Camera Raw Filter allows you to use the ACR (Adobe Camera Raw) anytime while editing. Usually, the raw editing options are used at the beginning, but with the ACR, you can use this option anytime and get access to the raw options.
Camera Raw Filter makes quick and powerful adjustments in certain parts of your image. You’ll find some functions are easier here than in Photoshop. You need to learn to use this tool to get fine-tuned editing faster and in an easier way.
3. Choose the Best Software
There is plenty of software in the market for photographers and the number is increasing day by day. It’s quite possible to feel lost in this crowd and feel confused about which software you should pick to get the best kind of output. Here are some of the top options you can choose from:
Adobe Photoshop
There won’t be any imaging professional who doesn’t know about Adobe Photoshop. Adobe Photoshop is considered the world’s best image editing software that has so many cool features and lots of tools to cover a wide range of editing works.
Adobe Lightroom Classic
Adobe Lightroom Classic is a complete package that includes top-notch tools for organizing and adjustments and it has everything you might need as a professional photographer.
Adobe Photoshop Elements
Adobe has another software for hobbyists that is Adobe Photoshop Elements. This software is for those who don’t need that many features and do the basic Photoshop works. As it has limited features, it costs less too. It’s not as expensive as Adobe Photoshop.
Corel PaintShop Pro
Corel PaintShop Pro is on the way to becoming the Photoshop alternative for budget-conscious photographers. This software is updating itself continues to be in the run.
Adobe Photoshop Express
Adobe has this app for Android users who do their editing on smartphones or tablets. This app offers great features on your mobile, but you’ll have to pay to get access to all the options. It’s worth the price as you’re getting high-quality editing done on your smartphone easily.
Affinity Photo
Affinity Photo is one of the best applications for photo editing. With a one-time payment, you get access to the best kind of editing features here. Besides Mac and Windows, you can use this on your iPad too. Though it’s a bit difficult to use this app as there are not that many tutorials available if you can handle this, you’ll get a really good outcome.
Luminar AI
When you don’t have enough time and you need a quick edit, you can pick the Luminar AI tool to get your photos done. You don’t need to have any kind of editing experience to start working with this app. It has unique and powerful tools with a simple interface.
Snapseed
Snapseed is a smartphone app created by Google. This is one of the most-used apps for photo editing. Snapseed has numerous filters and editing options, and the good news is, all these are free of cost.
4. Experiment With Software
You can never be perfect without enough practice. And practice, in this sense, is to experiment. Don’t settle with one software at the beginning. Different software has different strengths and weaknesses, so you need to explore those. This will help you to apply everything that you want to put in your photo.
Don’t settle with one software at the beginning. Different software has different strengths and weaknesses, so you need to explore those.
For example, Snapseed and Adobe Lightroom both work on mobile, but they don’t offer the same things. Snapseed has different filters from Lightroom. You will know which option you want to use only when you have experience with both software. That’s why you need to explore all the options. Lightroom might be perfect for one photo and Snapseed for another.
5. Cropping and Resizing
Cropping and resizing images are so common in photo editing. You can’t always maintain the frame while shooting. Again, in e-commerce photography or online publishing, photographers often need to crop and resize their images.
It’s common to get blur images while cropping or resizing images. That’s why while resizing or cropping images, set the image resolution first and then make the size you need.
6. Create Own Presets
The most vital outcome that you’ll get from having your own preset is that you’ll have a unique style that will help you to make a brand value. There are countless options in photo editing software to create your photo as you wish.
But if you want to work as a professional or want to have that look in your photo, you should have your own preset. Creating your own preset also saves time. You can make one preset and apply that to other photos. This way you can take more photos in a small amount of time.
Recommended Reading: If you want to learn how to enhance your photos and create better images, grab a copy of Photzy’s premium guide: Ultimate Guide to Fundamental Editing.
7. Brightness and Contrast

Brightness is the overall lightness or darkness of an image. Changing brightness changes the amount of light in an image. This will highlight both the highlighted and dark areas of an image. So, while changing brightness, you need to be careful about it so that your already highlighted area doesn’t get excessive light.

You can see here the low contrast number made the colors paler in the first photo and more vivid in the second. Photograph by Amy Grace
Here, the first one is an example of low brightness and the second one is of high brightness.
Contrast is the difference between the light and dark of an image. High contrast means the difference between highlight and dark areas in the image, and low contrast refers to the low difference of highlight and darkness in an image. Proper contrast helps to see the details of an image. High contrast can hide the details in dark areas and low contrast can hide the details in highlighted areas.
8. Understanding Color Balance, Vibrance, and Saturation
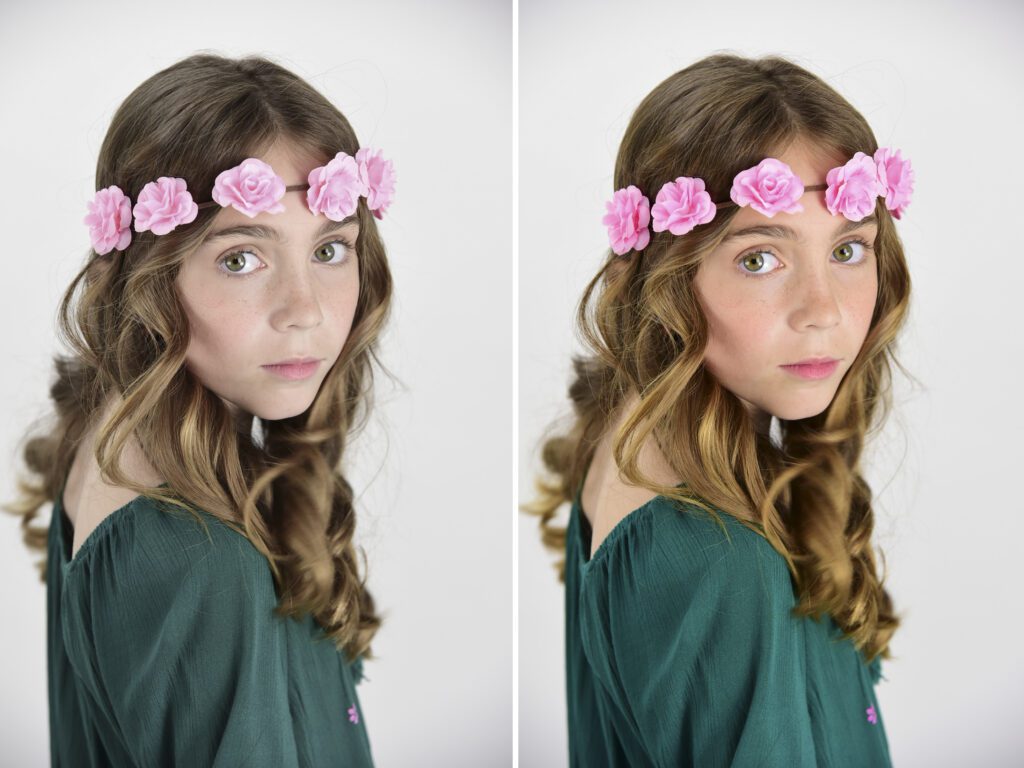
Here, the photo on the left has low vibrance and the photo on the right has a high vibrance level. Photograph by David Clarke
Color balance is used to correct the color of your image. There is a color palette from which you can pick specific colors and make any change or correction in your photo. This option is also used to create dramatic effects in photos.
Vibrance works with the intensity of color in photos. It intensifies the muted color without changing the well-saturated part. Vibrance is also used to balance the skin tone in an image. You can use this tool to get a natural look in your photo.

You can see the difference between low and high saturation levels in these two photos. Photograph by David Clarke
Saturation is the intensity of color in an image. The higher the saturation, the more intense the color of the photo. Excessive use of saturation makes images look unnatural.
9. Removing Unwanted Backgrounds
In various cases, particularly in e-commerce product photography, removing background is one of the most common works that photographers do. Removing background is done for so many reasons. Background can be unwanted and distracting as well as unnecessary and irrelevant.
You need to understand where you should keep the background and where not to. For example, in this image, the surface on which the bag is sitting is not so nice.

Photograph by Amy Grace
So, we can remove the background and change the surface easily.
You might need to change the background for many other reasons too. For example, if you want to add a drop shadow or want to change the color of the background, you’ll have to remove the background.
There are several tools to remove backgrounds in Photoshop. You can choose any of the following:
- Background removal tool
- Magic wand tool
- Magic eraser tool
- Pen tool
- Quick selection tool
Different tools have different expertise, so you can use whichever your photo demands.
10. Considering the Choice of Targeted Viewer
How you present your photos depends on who your viewers are because ultimately, they are the consumers of your images. You create for them, and you need to know what their choice is. You will reach more and more customers of your target audience if you have a clear idea about their taste.
You will reach more and more customers of your target audience if you have a clear idea about their taste.
This won’t just attract customers but will also help you to keep the consistency. For example, your targeted customers are from a specific place, the USA. Now, you need to have a decent idea about the trend of the USA. You need to do some market research and consider your customers’ choices along with yours.
11. Grow Your Own Style
Creating your style is not only important in photography, but also other areas too, like in business or other creative areas. This is your identity, and your style makes you different from others. Your unique style will speak for you.
You need to have your own way of working so that no one can have what you have. This is important because, without your unique way of showing your works, you won’t survive in the field of the creative world. There are numerous photo editing styles and you need to create your own.
Recommended Reading: If you want to learn how to enhance your photos and create better images, grab a copy of Photzy’s premium guide: Ultimate Guide to Fundamental Editing.
12. Explore New Styles
There is no limit to learning, and in a creative field like photography, you will always have to keep learning and growing. Watch tutorials as much as you can and watch the works of other people as well. This way, you won’t just get the idea of what works are produced by others, but also this will help you to get new ideas for your work.
Keep experimenting with your images. Collect photo editing ideas from different sources. Try different light conditions, colors, aesthetics, and styles, and find what’s best for your images. The more information you have, the more you’ll get access to new ideas.
Conclusion

Photo editing is not a set of knowledge; rather, it’s a skill that you gain over time with lots and lots of practice. There is no shortcut to that. You will only master this skill when you develop a natural sense of quality images. This requires experience which comes from experimentation.
The more you will explore new areas of photo editing and the more you will try new ideas and styles, the more your work will improve. So, there is no other way than to research and then implement that in your work. Like any other skill, this will take time too, but if you keep the consistency, you too can reach the professional level.
Self-Check Quiz:
- Why is choosing the right device important for photo editing?
- Which application is suitable for editing photos in Android?
- Which tool is used to give dramatic color effects in images?
- How many tools can you use to remove the background from your photo?
- How can you control light while editing photos?


