

You might be lucky enough to chance upon a trainee geisha (called a maiko) while wandering the streets of Kyoto – but chances are they are most likely tourists who have paid to dress the part for a few hours. They still make for great images. Here, I snapped a group of three women as they were posing for the official photo studio photographer. Pic by Robin Nichols
Japan is one of those destinations that many folks want to visit but, for various reasons, are a little wary. It is still, after all, a very foreign country to Westerners.
A huge population crammed into a relatively small land mass, a hard to understand language, packed streets, teeming masses in train stations, and a culture that’s about as foreign as it is interesting. My first bit of advice is: do not panic!
Your first couple of days in Japan will be confusing. There are always a lot of people out and about, endless advertising for everything from new technology to cat cafes, tiny coffee shops you can barely squeeze into, with every shop employee calling out, robot-like,“irasshaimase” (‘…come on in…’) as you walk past every shop, and electrical cables crowd power poles everywhere. In the cities at least, that image of a magical, picture-perfect Japan is nowhere to be seen. It’s hard to know where to start pointing your camera lens.
Japan has changed a lot in the last couple of decades – sure, it is still very foreign to Westerners, and that’s part of its attraction. What most new visitors might appreciate when they arrive is that most Japanese people can speak English – most learn English at school, they just don’t always have a chance to practice it. So, if you get lost somewhere, need help finding a shop or subway platform, or just can’t figure out the ticketing machines in a railway station, there’s a good chance that someone will come to your rescue.
The sheer weight of the populace pressing in on you in the big cities can be very intimidating but I find that if you make no sudden moves and simply walk calmly in the direction you need to go, the crowds part and swirl around you like a shoal of fish. And once you’ve spent a couple of days travelling around town, dealing with the crowds becomes second nature.
———————————————————————————————————–
What you’ll learn in this article
– How to deal with the overwhelming visual impact Japan might have on first time visitors
– How to get great effects panning your moving subjects
– How to approach strangers for a street shot
– How to shoot and process your bracketed images to deal with high contrast subjects
– Develop a theme for your trip to make putting a photo book together after the trip that much easier
– How best to shoot contestants in a sumo match
– How to add a completely different, but appropriate ‘look’ to your shots using post-processing software such as panorama stitching, aged effects and even an arty wood block software.
———————————————————————————————————–
Tip 1: What to Take
Packing for any photo trip can be a daunting task. Last time I travelled to Japan, rather than take a whole bunch of lenses as I usually do, ‘just in case’, I decided to approach the gear decision more logically. By looking at the metadata for images shot on previous trips, I worked out which lens focal length was used the most – in this case it was a 17-40mm (Canon) lens for my full frame EOS5D MkIII.
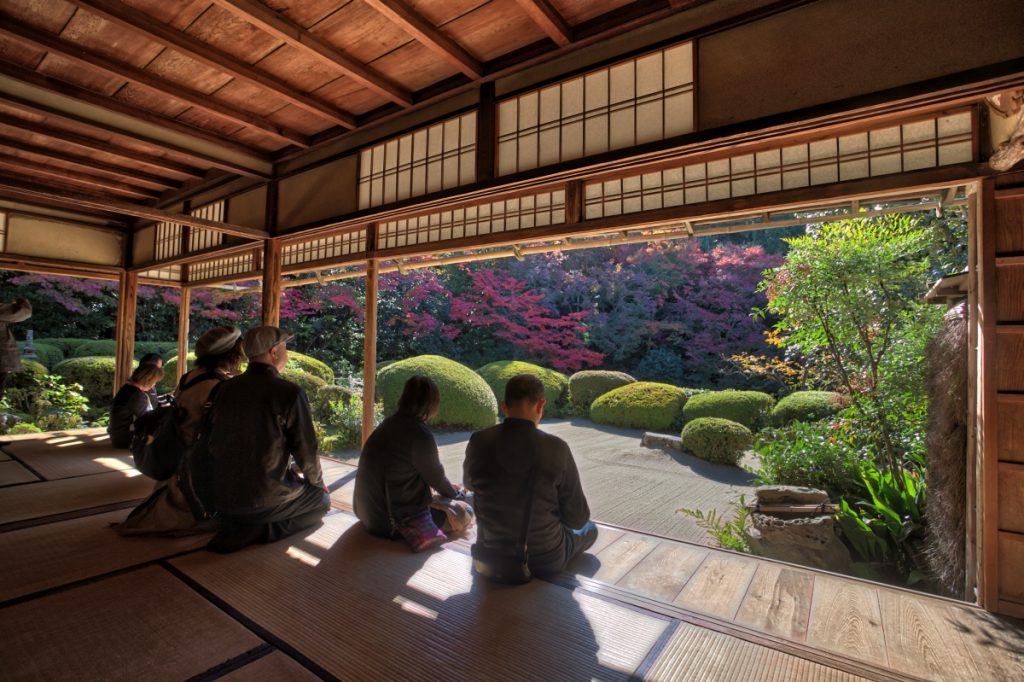
Japan has many idyllic, original houses and shrines open to the public. This is Shisen-do, a small private house turned into a shrine where you can sit on the centuries-old boards and contemplate the fabulous autumnal colours. Photographically, places like this are quite tricky to capture accurately because, if you get there at the wrong time of day, or if the sun is too bright, you’ll never record a complete range of tones. Even the best cameras cannot capture the full dynamic range in a scene like this.
Because we can never predict the weather I find it best to try and shoot three frames of the same subject – with the same f-stop, but with one step difference in the shutter speeds using the camera’s auto exposure bracketing function. These are then assembled together using special high dynamic range (HDR) software so the resulting (single) shot contains all the tones in the scene. (See next shot as an example of how limiting a single shot can be in this type of lighting). Pic by Robin Nichols

As you can clearly see in this single, unedited frame, shooting almost directly into the sun usually produces gross underexposure. However, if I overexpose the frame using exposure compensation (i.e. set to ‘plus’ one or two stops) to brighten the interior of the house, I will more than likely lose all the highlight detail in the timber floor and the gravel outside. Pic by Robin Nichols
You’ll find that the most obvious subjects to go for in Japan are shrines, architecture, interiors, transport, street subjects, and portraits. There’s a limited opportunity to shoot landscapes because Japan is such an urbanised country, or indeed wildlife, unless travelling to one of its remote national parks. Though I set out with slight misgivings about only taking one lens it actually worked out to the be the perfect lens for job. If you need to take more, a 75-300mm telephoto would be useful for shooting events like a sumo match, a fisheye lens is fun for architecture and interiors and a dedicated portrait lens (i.e. 85mm f1.8 lens) is small and light.

After being swathed in scaffolding for nearly seven years, Himeji, the White Heron castle, reveals itself in all its majesty. The panorama format gives the viewer a better idea of the way these buildings dominated the medieval landscape hundreds of years ago. One technique you can use to broaden the limitation of carrying only one lens is to join images together using panorama software – either in the camera if it has that feature, or later using photo editing software like Photoshop, Photoshop Elements or Lightroom. It’s a ‘look’ guaranteed to make the image pop off the page and looks especially good when printed across a double page spread in a coffee table photo book. Pic by Robin Nichols
Travelling unencumbered by a bagful of gear is actually a good thing because it frees up your mobility, enabling you to get shots that others don’t – because they are still fiddling around with a lens change. Plus, it leaves a space in your camera bag for all those bits of new equipment you might want to buy while in Japan.
Tip 2: Getting around, and Safety
I live in a country where everything works pretty well – or at least I thought it did till I went to Japan. The locals there are insanely polite and well behaved in an environment where everything runs on time. Really.

The shinkansen was the first high speed train network in the world and is an excellent way to travel around Japan – it’s fast, punctual, clean, starts and finishes from most city centres, and with the Japan Rail Pass, is quite affordable. If you can get a shot of the passing landscape from one of the carriages, choose the fastest possible shutter speed to avoid blurriness or subject movement – the fastest trains move at over 300kph. Pic by Robin Nichols
The high-speed train network, called the shinkansen, that most visitors use while travelling in Japan, generally runs exactly to time. Its worst year was back in 2014 where trains ran with an average lateness of 54 seconds. It’s probably the best and most reliable transport system in the world and one that’s relatively easy to navigate once armed with a Japan Rail Pass, a document that provides heavily discounted travel on all but the very fastest trains. Note the PR Pass does not work on private train lines, only those run by Japan Rail.
Crime does exist in Japan but, as a visitor, you are very unlikely to be a witness to any unpleasantness. And, as I have experienced on more than one occasion, if you accidentally leave something valuable, like a camera, on the train or bus, it will inevitably be returned to you via the conductor, a well-meaning member of the public, or that company’s lost property office. I have even had staff run after me with small change that I’d forgotten to pick up in a shop. Attention to service is at the core of the Japanese psyche.

Panning is a good technique to give an image a strong feeling of movement. In this example, a rickshaw puller and his clients, running through the streets of Kyoto. Set the camera’s shutter speed to about 1/40s or slightly slower, and move the camera at the same speed as the subject, while popping off a stream of images in continuous drive mode. It’s a hit and miss technique but when it works well, the result is very pleasing. I sometimes just stand on a prominent street corner where I know these guys operate and test shoot a few subjects as they cruise past – it could be a vehicle or a pedestrian. Once I’m happy with the degree of blur created by the shutter speed, I can then wait for the real subject, the rickshaw puller, to get the shot. Pic by Robin Nichols
Of course, Japan is also steeped in centuries of custom, history and isolation. Apart from popular touristic areas, you won’t see many Western travellers at all which, compared to most other destinations in South-East Asia, is perhaps both refreshing and disarming at the same time.
Despite its modernisation, Japan remains very much a mono culture.You’ll find it about as safe a destination as you will ever visit.
Tip 3: Find your theme
I’ve found that most people who visit Japan for the first time are blown away by the visual feast thrust onto them in the street. This can be quite disarming – not only is the language totally foreign, but the streets are lined with endless visual and audio advertising, there’s a staggering amount of consumer goods on show, the youth display crazy fashions – as you queue in a coffee shop behind a girl dressed as Little Bo Peep – and of course, despite the intrusion of Western fast food products, there’s still an enticingly, confusing range of unusual-looking food and drink to savour.
![]()
Fushimi Inari is a shrine a few minutes train travel from Kyoto. The shrine has always been associated with business so the torii gates that straddle more than seven kilometres of the hills behind the main shrine are all donated by local companies with an eye for good fortune. Unusually for major shrines such as this, Inari is actually open 24 hours so you can easily get there before or after all the hordes have departed to get deserted shots like this. Pic by Robin Nichols
Photographers tend to go through a few days of shooting absolutely everything: the chaos of the streets, the weird fashions, myriad signs, wacky shops, weird plastic food, high tech architecture, pampered pooches and local residents dressed in formal kimono going about their day.
My advice is to let this initial experience wash over you, take time to look around and try to get a handle on the culture, then you might like to focus your eye more on one or two visual aspects of Japanese life – which will help immensely in creating purpose in your shooting style.
Its historical buildings, mostly shrines and castles, are an easy subject to start with, simply because there are so many old, or reconstructed, beautiful structures to be found in most urban areas.
I try to travel in Japan mostly in the autumn because the colours of fall are stunning. The Japanese are also avid photographers – you’ll find (moving) autumn colour maps published on many touristic websites. These online resources display where the best fall colours are to be found in any particular week, so, for example, if they can only get away for a short time, they are assured of finding the best locations. It’s a great travel planning reference.


Autumn is an incredibly colourful event in Japan and worth exploiting if you arrive at the right time. Close-ups and general shots, front lighting or backlit – there are so many ways to capture the outstanding colour and light. Pic by Robin Nichols

I prefer to overexpose the frame a bit (using the exposure compensation feature while shooting in aperture priority mode) while shooting into the sun to give the bright, airy ‘look’ you see in this frame. Pic by Robin Nichols
Tip 4: Street Photography
In many ways, street photography is a natural subject to pursue here because there’s so much of interest to experience and capture, and you’ll find that most people don’t mind being snapped – providing you ask. If you can ask in simple Japanese, even better; “Anata no shashin wo totte mo iidesu ka?”.

You don’t have to go far to find weird and bizarre fashions in Japan – just a walk in a Shibuya park (Tokyo) or stroll along a fashion street in Harajuku throws up all sorts of photographic potential. You can pre-set your camera settings and shoot from the hip or ask the people if it’s OK to take a snap. Get your settings sorted out first, before approaching someone so you don’t waste time fiddling with the controls – and you lose the moment. Pic by Robin Nichols
At certain times of the year, you’ll find colourful festivals, or ‘matsuri’, featuring hundreds of locals parading through the city streets, sometimes in full samurai costume, maybe riding horses, pulling floats or re-enacting scenes from their tumultuous past. It pays to check the national tourist office for details of these special events before you book your travel.

Fashions are not restricted to people – the Japanese love their small pets, particularly dogs, which often get dressed up like one of the family. This makes for some cute shots. As a tip, always check your exposure by snapping a couple of test pics before you make an approach. This saves time and gives you a much better chance of getting the shot you want. Pic by Robin Nichols
Japan has a highly visible youth population – as a result you’ll find some amazingly bizarre fashions to shoot on the street, and during specific festivals. For example: cartoon lookalikes milling about cosplay conventions, cheeky lolitas, over-dressed in eccentric Edwardian garb, white-faced shironuri girls, androgynous visual kei pop music fans, or sad-faced, blushing kids trending a fashion called ‘me no shita chiiku’ (meaning something like an ‘undereye blush makeup’). As I said, weird.

These two local Kyoto girls are out for the afternoon wearing traditional kimono. To encourage more young kids to embrace traditional values, many places offer free admission if you wear traditional clothes – you can get free transport, free entry to shrines and more. Plus, they always make for fun street shots. Pic by Robin Nichols
Of course, much of corporate Japan is exactly what we expect in the West: the conformity of ‘the salary man’. But on the weekends, go to Shibuya, Harajuku, or Yoyogi Park in central Tokyo, and you might be in for a visual treat.
People transform themselves for the day and go to perform, dance, sing, rock or just hang out in a park or along the streets in Tokyo, Osaka and many other cities. If I see someone particularly wacky I’ll certainly ask them if it’s OK to take their portrait, especially if they are from an older generation.
In Kyoto, tourists love to try and find a real geisha to snap. Although there are fewer than 100 genuine geisha, or more correctly, geiko, still active in Kyoto, the ones you might spot in the street are either trainees, called maiko, or more likely, just housewives or tourists who have paid to don the gear for an hour or the day from a make-up salon in town.

It’s traditional to get married in a shrine in Japan, and the bigger the shrine, the better! Here’s a stunning-looking bride I snapped while walking through Tokyo’s Meiji Shrine. I subsequently converted the image to black-and-white as I think it makes the tonal separation between bride and background far more dramatic. Pic by Robin Nichols
Even so, these tourists make for great pictures as they are both very colourful, as close to the genuine thing as you are likely to encounter, plus they are usually very happy to be the centre of attention in front of your camera lens.
Tip 5: Portraits
I take portraits of locals all the time in Japan using an 85mm lens (on the occasions I have it with me). I always make a point of trying to ask, in my bad Japanese first, then English, if it is OK to take a picture.
As a general rule, locals will take you at face value and are completely OK for you to take a snap of themselves, or even their very cute kids, something that’s often frowned upon in other countries.
When girls get to the ages of three or seven, and boys reach three and five, they are taken, in traditional costume, to the local shrine to attend a kind of rite of passage ceremony. You’ll see this happening at weekends all over the country and it makes for some great shots. The kids are always ‘Kawaii’ or cute, as the locals would say.

If you walk the streets of Kyoto you will find plenty to photograph. This woman is a Japanese tourist posing for some studio shots while wearing a traditional geisha-like costume. I asked if I could take a shot – ‘no problem’ was the reply and the result is one of my favourite street portraits. Pic by Robin Nichols
Sometimes it makes sense to just shoot one subject for the entire day. For example, head and shoulders portraits. That way you can concentrate more on composition, depth of focus and clarity than if you are hopping from subject to subject, or lens to lens, as you might be in your first few days in the country. In my mind it’s far better to get one great portrait in a day than a bunch of so-so shots because you are trying to capture a bit of everything every time the camera comes out of its bag.
Tip 6: Shooting at Night
Shooting at night in my home town CBD is usually fraught with trouble. Technically you are not allowed to use a tripod in so many of the city’s thoroughfares that it’s almost impossible to get any good shots without running the risk of being pestered by city rangers, drunks or weirdos.
In Japan it’s a different story. Night shooting is a fun experience – you’ll even find yourself in competition with locals who are also out with their cameras and tripods, not to mention selfie-sticks, all vying for that ‘best shot’.

Japan presents many fun opportunities for night shooting. This is a metal sculpture built into the Kyoto railway station complex – with the 70s Kyoto Tower in the background. To get good night shots, use a tripod and a self-timer or electronic cable release. To pep this one up a bit, I used my flash light to add a bit of fill light on the colourful sculptures. Pic by Robin Nichols
Kyoto in particular has some great potential for nocturnal image makers – both among its ultra-modern buildings, as well as its gorgeous gardens and shrines. Unfortunately, many religious locations that are open daily to the public close at 5:30pm, so, unless you are in Japan during the depths of winter, you might find yourself forced to shoot exteriors, street scenes, rivers and canals. Not a hardship in my book.

This might look like a daylight shot but it was in fact taken in the early evening in Kurashiki. If there’s still some light in the sky, and your exposure is long enough, you can achieve some truly surprising results. This exposure is actually five frames stitched together using special HDR software. Essentially, it’s a very long exposure to get this level of brightness, so, even if someone walks past while you are taking the shot, as long as they don’t stop, they are unlikely to show up in the frame. Pic by Robin Nichols
One favourite location of mine is the small town of Kurashiki – an old community located between Hiroshima and Kyoto, famous for rice production in the mid-1800s. It now hosts tourists who come to wander along the willow tree clad banks of its old canals. Very picturesque and perfect for the nocturnal shooter.
Again, I’d recommend snapping with a medium range wide-angle lens to encompass large buildings while holding deep focus by choosing a small aperture – maybe f11 or f16.
Most photographers hate the idea of travelling with a tripod but to get truly good results in poor light – it’s a necessary evil. Buy yourself a good quality carbon fibre tripod that weighs less than two kilos, and you should be good to go. Anything heavier will certainly be more stable, but far less likely to get into your suitcase in the first place.
Tip 7: Visit to the Sumo
Sumo is quintessentially Japanese. Visiting a match is one of the few times I use a telephoto lens – this is helpful simply because front row seats are expensive, and you also run the risk of having one of these very big boys land in your lap.

When they fall, they fall hard. This was shot from the back of the stadium in Fukuoka with a 75-300mm lens. Because of the need for a fast shutter speed (to counter lens shake as the stadium jumps to its feet and roars with excitement) you’ll need to shoot at an ISO of around 3200, and in continuous drive mode – so as not to miss that all-important moment when the contestant steps out of the ring – and becomes that bout’s loser. While you’d be told off for taking a tripod to one of these occasions, I have used a monopod on occasion – it’s discreet, packs small and gives you a distinct edge in terms of sharpness and clarity. Pic by Robin Nichols
Spend a bit less than $100 for a hard seat towards the back of the stadium, pack a 75-300mm lens and you’ll get shots that are right in the thick of the action.
As these bad boys go at it with surprising speed it’s almost impossible to press the shutter once and get the winning shot. Far better to set the camera to its high-speed drive mode, frame the contestants glaring at each other in the viewfinder and, the moment one or both make a move, hold your finger down on the shutter button till the bout is over. Then it’s a simple matter of deleting all the shots where little of interest is happening and saving the one winning shot.
Top ranking sumo wrestlers are treated like rock stars in Japan, so it’s well worth spending some time hanging about the entrance of the stadium among all the fans, to get shots of the fighters arriving. I have been to the sumo four times and still love the buzz and theatre of each event and, despite the fact that it’s still taken very seriously in Japan, the atmosphere during a tournament can be quite relaxed – that is until the last couple of days. You can easily book sumo tickets online prior to the event and have the tickets delivered to your hotel.
Tip 8: Food, food, food
I hate to say it but shooting food is one of my favourite things to do in Japan – because once done, you get to eat the subject matter.

Food is a work of culinary art in Japan. Besides being delicious, it’s hard not to spend the first few minutes of every meal taking a few snaps of the colour, arrangement and crockery used in each preparation. Make sure you have a compact camera, or at least a smartphone at the ready to capture some of the stunning cuisine. When I make a travel book from a trip, I always try to include at least one double page spread on the cuisine of the region. Pic by Robin Nichols
One of the most colourful culinary experiences you can arrange in Japan is to try kaiseki. This is a seasonal preparation of around 8 or 12 courses (depending on your budget), prepared in the minutest detail. It’s a visual feast as the serving staff bring plate after plate of perfectly-arranged food to your table. It’s not cheap, but you’ll feel you have to photograph everything brought to the table because it is so perfectly attractive. Each plate will even be a different colour and shape, selected to enhance the nature of the food, and pay homage to the season. Use a compact camera or a smartphone to get a record of your culinary experiences.

Even some of the labels appear as works of graphic art. Simple, stylish and to the point. Well worth a few snaps in the local convenience store (where many locals do most of their shopping) and a good idea if you need a few fillers when putting together a digital photo book on Japan. Pic by Robin Nichols
I even found myself snapping sake bottles in a supermarket one time. Not because I have (much) of a problem with alcohol, but because the labels are exquisite examples of graphic design, the packaging a work of art, and the images make for a great double-page spread when preparing a photo book about your travels in Japan.
Tip 9: Go Technology Shopping
You don’t go to Japan to get cheap cameras and, unless the exchange rate falls very favourably in your direction, everything you look at will be on par, or be slightly more expensive than you might get at home. That said, you can’t go to Japan and not visit one of its gigantic photo superstores: BIC Camera or Yodobashi Camera. There are branches in all large cities.
For example, buying a tripod at home can be tricky. They are mostly all black, have three legs, yet come in a staggering array of weights, head combinations, leg types and heights. My local photo store probably has ten different models to choose from. Yodobashi Camera, on the other hand, pretty much has one example of almost everything that you can buy, from anywhere in the world, and everything is on display.

Hours could be lost wandering the various sections of one of Japan’s giant technology stores. Even though most of your gear can easily be purchased online from home, the advantage of a store like this is that everything is on display for you to try – they are very hands-on stores – and that’s a huge advantage when compared to internet shopping. Pic by Robin Nichols
In the big city stores of Tokyo, Osaka and Hakata, you can literally walk through a forest of tripods. It’s brilliant because you can try the tripods out and get an accurate idea of how well they are made, their weights and robustness – something that’s impossible to assess accurately online.
I always joke that though you might ‘think’ you don’t need any more gear, 10 minutes in this massive store might prove you wrong. Best advice though is if you are seriously thinking of shopping in Japan, do your homework first – get a good idea of availability, price and shipping through your regular suppliers at home before you head overseas. That way, if you find something you might be tempted to buy in Japan, at least you are armed with an up-to-date price comparison.
I have been in this store way too many times and usually end up buying something like an accessory bag, camera strap, or memory card case, simply because the range you find there is so comprehensive – it makes my home town retailer look decidedly understocked.
Consider checking out the second-hand camera market
In a country that produces most of the world’s camera equipment, it’s not surprising that there’s quite a good second-hand market. Enthusiasts upgrade their gear on a regular basis, plus the fact that Japanese are great collectors, means you’ll find a good array of ‘not quite new’ equipment in many stores around the country. Most have websites, in Japanese, so you might get an idea of the process, and what’s on offer, before you hit the streets. And even though there’s not much written in English on these store websites, you could always send an email beforehand asking about specific items.
Note also that Japan has a second-hand grading system that might help you appreciate exactly what a lens/camera condition really is before you part with a bunch of yen. In brief, this is: Like new (A) perfect condition, no signs of wear; Very good (AB) limited use, works perfectly; Good (B) Some wear, works perfectly; Acceptable – fairly worn, works perfectly; Bad – does not work perfectly or has been damaged; and Junk – unusable. The last one, I guess, is for people wanting to pick up spare parts or props.
Tip 10: Don’t discount special effects
Readers might not be too sure about adding a software special effect just to try and make a so-so image look stronger. Generally, this does not work – a bad picture is always going to be a bad picture. That said, I have to admit to using a couple of software effects that I think are perfect for images shot in Asia, and in particular Japan.
My all-time favourite is called Moku Hanga, which means wood block in Japanese, and that’s precisely what it does to your images, convert them into something that closely resembles a Japanese woodblock print. As a technique, wood block printing was first recorded in 220AD so it really won’t look effective if added to a modern subject, but apply it to something that may very well have been the subject of a real block print at some point, and you’ll find it a valuable addition to the look and atmosphere of the shot.


Sometimes it’s possible to significantly add to the nature of an image using software – in this case I used Moku Hanga, an inexpensive software app that creates the look of a hand-made wood block print. It’s easy to use and produces excellent results. Pics by Robin Nichols
I also love grunge-ing up images taken of ruined landscapes or architecture. On my last trip to Japan, I flew to Okinawa and visited the former Japanese Naval HQ in Naha. This is a grim relic from a violent and costly WWII campaign that resulted in the deaths of more than a quarter of a million people. The HQ is a series of deep caves and tunnels running for kilometres underground. Most of the staff committed suicide here rather than accept defeat by the American forces. I thought that the grungy, scratched effect (once applied) was quite appropriate for the grimness of the scene and the history behind it.


Underground Naval HQ, Naha, Okinawa. By adding a faded tone and heavy texture border to this picture taken in an underground bunker, I think the image takes on a more historical look. Also the added grunginess further enhances the somberness of the location. Pics by Robin Nichols
Although I try to keep my editing to a minimum, I sometimes just run the file through Aurora HDR Pro – although this is effectively a dedicated HDR application, it is brilliant at pulling more detail and grittiness out of a scene than most other straight photo processing apps I know of.
You do have to be a little careful not to ‘overcook’ the files and make them look too processed but as this application uses layers and masks, it’s easy enough to apply this enhanced effect to just part of a scene – the sky, for example – to give it more weight.
Links
Hyperdia – the perfect website for checking train times in Japan
www.hyperdia.com
Best photo superstores in Japan
BIC Camera & Yodobashi Camera
www.biccamera.co.jp
www.yodobashi.com
Software Effects – Jixi Pix Moku Hanga & Grungetastic
www.jixipix.com
HDR processing – Aurora HDR 2018
www.aurorahdr.com
Second hand gear
Miyama in Shinjuku, Tokyo
http://www.miyama-shokai.co.jp/
Nissin Camera in Akihabara
http://www.nisshin-camera.com/ or just search for ‘buying second hand cameras in japan’.
Autumn colours – some places to start looking (though still a bit early in the year…)
https://www.jnto.org.au/plan-your-trip/seasonal-attractions/autumn/
https://www.kyuhoshi.com/japan-autumn-foliage-forecast/
About the Author Robin Nichols
 Robin Nichols is a UK-born photographer. He has spent the past 30 years in Sydney, Australia, where he began work as a cameraman, then as a freelance photographer.
He worked as a freelance writer and then as a magazine editor for several photography publications for more than eight years. He also ran his own publishing business, producing two specialist magazines – Better Photoshop Techniques and Better Digital Camera magazine.
Aside from conducting photo tours and workshops, Robin teaches photography, video, and post-processing classes through the Centre for Continuing Education at Sydney University.
His work can be seen online at:
Blog
www.robinnicholsworkshops.blogspot.com
Google+
https://plus.google.com/u/0/
Facebook
https://www.facebook.com/robinnicholsworkshops/
500px
https://500px.com/betterdigitalmag
